You can access the full course here: Create a Road Crossing Game with Phaser 3
Rendering Sprites
Corrections
At 11’00”, I say “340” when I should have said “640” (this was coded correctly on screen).
At 15’14” on the Slide “Coordinate System”, the text should instead read:
X coordinate: positive to the LEFT, negative to the RIGHT
Y coordinate: positive DOWNWARDS, negative UPWARDS
Learning Goals
- Phaser’s preload and create methods.
- Rendering a sprite.
- Coordinate system.
- Sprite origin.
In this lesson you will learn how to display images on the screen using Phaser. The images that will be used during this lesson can be downloaded from the course. They are in the assets folder. There are a total of 4 images in the folder: background, dragon, player, and treasure.
We will begin by loading the background, and the loading will occur inside of our scene.
The diagram for the life cycle of a scene:

The init() method– called once this is used to initiate certain parameters of your scene. This method is not always used.
preload() method-all asset preloading takes place. This means that Phaser will load all of the images, all the audio files, and other external files you may want to use in your game. All of the files will be loaded to memory so that they can be used without any delay. When you want to show an enemy or character, you don’t want the player to have to wait until that image is loaded.
create() method-called once and this is actually where you create the sprites and display them on the screen.
update() method-we will look at this method later on in the course, but it is called on each frame during game play. This method is used when things need to be checked all the time.
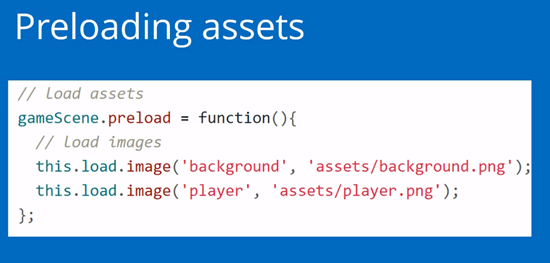
We will now create the preload method for the scene. See the code below and follow along:
// create a new scene
let gameScene = new Phaser.Scene('Game');

// load assets
gameScene.preload = function(){
  // load images
  this.load.image('background', 'assets/background.png');
  this.load.image('player', 'assets/player.png');
};

// called once after the preload ends
gameScene.create = function() {
  // create bg sprite
  let bg = this.add.sprite(0, 0, 'background');

  // change the origin to the top-left corner
  //bg.setOrigin(0,0);

  // place sprite in the center
  bg.setPosition(640/2, 360/2);

  let gameW = this.sys.game.config.width;
  let gameH = this.sys.game.config.height;

  console.log(gameW, gameH);

  console.log(bg);
  console.log(this);
};

// set the configuration of the game
let config = {
  type: Phaser.AUTO, // Phaser will use WebGL if available, if not it will use Canvas
  width: 640,
  height: 360,
  scene: gameScene
};

// create a new game, pass the configuration
let game = new Phaser.Game(config);
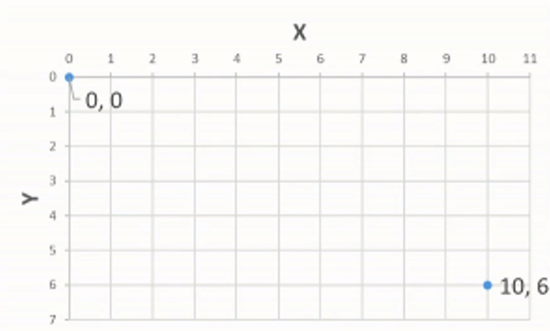
In Phaser games a two dimensional coordinate system is used. There is an X axis that goes from left to right. There is a Y axis that goes from top to bottom. The origin(0,0) is always at the top left corner of the game.

If we said we wanted the player to begin in position (5,4) What we are saying is that the center of our sprite will go in that position.
- X: Positive to the right, negative to the left.
- Y: Positive upwards, negative downwards.
By default the origin is the middle point on X and the middle point on Y.
You can use the bg.setOrigin(0,0) method to change the origin of sprites.
Learning Summary


- Sprites
- Game characters and elements.
- Origin: by default, the middle.
- Position on x, y can be accessed and changed: set position.
- Coordinate system
- X: Positive to the right, negative to the left.
- Y: Positive upwards, negative downwards.

- Challenge
- Place the sprite in the middle of the screen by changing the position.
- Don’t change the origin.
- Use the setPostion method.
Source Files
Access the project source files here.
Transcript
In this lesson you’ll learn to create sprites in Phaser. This means, basically, displaying images on the screen. The first step, of course, to creating games. The images that we’ll be using are all under assets, so we have our background image, we have a dragon, a player, and a treasure.
So we’ll start loading the background, and the loading will occur inside of our scene. Scenes in Phaser have different methods that have a different purpose for the life cycle of that scene. This is a concept that we’ll be looking at again and again in this course. So let me bring up a diagram of this life cycle for the first time for you to see. When a new scene is started, there is a method called init, which is called once. This is used to initiate certain parameters of your scene. It is not always used. After that method is called, we call a method called preload, and this is where the asset pre-loading takes place.
Now what does that mean? It basically means that Phaser will load all of the images and all the audio files, and other external files that you may wanna use in your game. All of those files will be loaded to memories, so that then they can be used without any delay. When you want to show an enemy or a character, you don’t want the player to have to wait until that image is loaded.
Imagine if you play a video game and the enemy is not loaded yet, so you see a… I don’t know, a pink rectangle, and then a few seconds later you see the actual enemy. That wouldn’t be acceptable for a game, so that is why we need to load all the images first, and then in the create method, which is called only once after the pre-loading phase finishes, this is where you actually create your sprite and display them on the screen. The update method, we will look at that later in the course. But it is basically called on each frame during the gameplay, so it is used for things that need to be checked at all times.
All right, so let’s go and create this preload method for our scene. So what we’ll do here is, we’re going to load assets. So we’re gonna type gameScene.preload, and this will be a function. This will be a function, and it is inside the function where we are going to be adding all the codes.
So let’s start by loading our background. And for that we are going to type this, which refers to the scene object. Our scene object has a component called loader which is… It give us access to this load object here. So we’re going to load image, that is the name of the method that we use to load an image.
And we need to give the image, we need to give it a label. It can be anything we want. It doesn’t have to be the same as the name of the file. So I’m calling it background, but again, the image is called background.png, but this could be anything. This could be X, Y, Z. And now we need to specify the location of our image. And in here we will type assets/background.png. So in here you need to enter the correct path name. This is just for labeling purposes. Close that with a semicolon.
All right, so we are loading a single image here. We can go and load more if we want, so I’m going to copy and paste this line, and we’re going to load the player as well. I’m gonna call that player and the file is called player. Okay so that is our preload method. Nothing is really happening until then. We actually wanna create the sprite now and show that on the screen for the players to see. This is called once after the preload ends. And this will be our create method. Remember that we had preload and then create. We’re not using init just yet. It’s an optional method. They’re all optional to be strictly speaking, but we need to preload images if we want to then show them on the screen.
So this is also going to be a function. And in here we are going to create a sprite. Create background, background sprite. Again, we are gonna type this, this refers to our scene object. And this.add.create allows us to… Sorry, this.add.sprite allows us to create a sprite.
Now, where do we position the sprite? We need to understand how the coordinate system works. So I’m just gonna type 0, 0 first, and you will see the result. The image that we are loading, I need to specify that label that I defined. So whatever I entered here is what I have to enter in here, regardless of the name of the file.
Okay so let’s see if this shows anything on the screen. Let’s see if we made any mistakes. We’re not seeing anything so let me just make sure that we are in the right folder here in the web server. Okay, here we go. So as you can see, we are displaying the image, but it’s not looking quite right. We need to understand how the coordinate system works first.
In Phaser games, we have a two-dimensional coordinate system, so let me go and… Draw this coordinate system. Basically we have an x-axis that goes from left to right. And we have a y-axis that goes from top to bottom. So what does this mean? It means that the origin is actually on the top left corner of the game. So if we bring our game here, the origin, the coordinate 0, 0 is this point here in the corner. And if you, if you go in this direction, this will be 0, 0, the origin. If you go in this direction, you are going positive on X. And if you are going down, you’re going positive on Y. So this is different to how we learned in school, where we learned that it was like that. Well it works differently in the context of working with the canvas in general in Phaser.
So, now what about the position of a sprite? Let’s say that we have… Let’s say that this is 0.5, 4, or something like that. And we want to place our player here, so if we say that our player will be in position 5, 4, that point there, what we are saying is that the center of our sprite will go in that position.
So this is our sprite. Let’s say that this is our player. The center of the sprite will go in the position that we give it. If we go back to our code and to the result that we’ve obtained, we will see that we told Phaser to place the background position 0, 0. So what it did, it took the center of the sprite and place that point on 0, 0. The point that you specified is called the origin. So by default the origin of a sprite is the middle point on x, and the middle point on y. Now that can be a bit complicated now, right? Because I actually want this corner here to go on the top left corner. So there are different ways on how you can achieve that.
The first one is to actually change the origin of the sprite, so that the new origin is the top left corner of the sprite. So let’s go and do that. We are going to first place this in a variable. Let’s call this background bg. And now we’re going to change the origin to the top left corner. So bg.setOrigin is a method that is available for us to use on sprites, and we can specify the coordinates inside of the background that will correspond to the origin point.
If you look at the background, the coordinate 0, 0 is the top left. So what we are doing here is so we’re saying the top left of the background is the new origin, so that when you place in a certain position, it is now this point, this point here that will be placed on that position. So let’s save and see what we obtain. Awesome, so we’ve got that shine now where we want it to be. So that is one way of doing it. It is just changing the origin.
Another way of doing it, if you keep the origin where it was before, would be to basically push the position so that if the middle actually goes in the middle of the screen here… And that brings me to the challenge of this lesson. So place the background sprite in the middle of the screen by changing its position. So don’t change the origin like we saw, instead use a method called setPosition, and you can go to the documentation and find this method, or you can have a try and see if you can do it without the documentation. But in any case, have a go, have a try.
If you’re not sure how to do it, that’s fine. I will show you now the solution.
All right. You had a try, now welcome back. Let me show you how we can solve this challenge. So let’s go back to our code, and let’s get that game showing again. So what I’m going to do here is place the sprite in the center of the screen using setPosition. So I’m gonna type bg.setPosition. And the first parameter here will correspond to X, and the second parameter here will correspond to Y. So I know that the screen is 340 wide, so I’m going to type in 640 divided by 2. I can also type 320, but I just wanna make it very explicit so that you know where these numbers came from. All right, so this is the solution, or it is a solution. And if you refresh the page, you will see that the sprite is… Perfectly positioned in the middle. So that is one way of doing that.
Now I’m sure that some people will wonder, “Okay how can I just grab the width without having to manually type the number?” And yes that is possible as well, so if you want to grab the width of the screen. Let’s call this gameW. If you wanna grab that value, you can actually do it by typing this, which refers to our scene, .sys, which is the system component, it gives you access to game level properties, then game, that gives you access to the actual game object, and then there’s a config object, and guess what? This config object will give us access to all of these things. So in here we can type width, and we can do the same thing with height.
So I’m gonna call this W, gameW and gameH, console.log. Let’s show both of them, and see what we get in here. So I’m gonna refresh that and you can see the numbers here. Now there’s a couple other things that I wanna show you right before you head off to the next lesson. The first one is that… You will wanna know what properties are available for us to use in different sprites. So something you can do on your own or while you’re developing, that’s quite helpful, is to simply show this sprite. Show a sprite on the console, and you will be able to… You will learn quite a bit by doing this.
So you will see the object sprite here, and you will see all of these properties like the alpha value, and you’ll see that there’s animations object here. There are a lot of properties and it is useful to overtime get more and more familiar with what’s available for us to use. So for example that same position method, I’m sure we can find it here, so if it’s not right here, it will be on the prototype, which is the object that this object comes from, in simple terms.
So we can find this setPosition method here. The other methods that we will use for sprites, they’re all going to be found in there. And you can do the same thing with the scene as well. So if you type console.log and this, you are putting your scene, your game scene, into the console, and that will also give you so much information and so much detail of what is happening here. So for instance, that add, that we used when we’re pre-loading, it’s here as well. And the load is there as well. The load is the one we used when pre-loading. So that is something that I just wanted to mention because it’s quite useful in general to do.
All right, so to summarize here, we’ve done quite a bit. We started by talking about the life cycle of the scene, or at least part of it, because there are more methods done than those that I showed you, but these are the main ones that we’ll be using. And we created our preload method where we loaded all of the image assets. We gave each image a label. And then we went on and created our first sprite, which was the background. And we talked about the coordinate system, the positioning, and the origin. All right, so that is all for this video. I will see you on the next lesson.
Interested in continuing? Check out the full Create a Road Crossing Game with Phaser 3 course, which is part of our HTML5 Game Development Mini-Degree.


