You can access the latest Phaser courses here: HTML5 Game Development Mini-Degree
In this lesson, you will be learning how to create 2D maps for your levels using the Tiled Map Editor.
Downloading the Tiled Program
Tiled is a free 2D map editor that will allow you to edit tile maps, place images, and add metadata. All of this can be exported as a JSON file which can be used to import into your Phaser game.
You can find Tiled at this website: https://www.mapeditor.org/. Click on the Download at itch.io button.
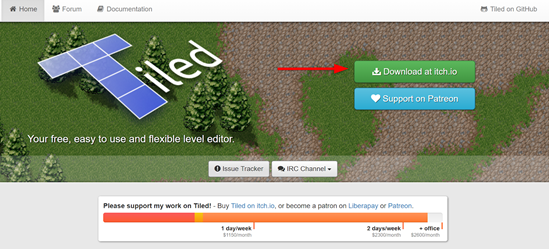
In the following screen, click on the Download Now button. Then you can either choose to contribute to this developer, or click on the “No thanks, just take me to the downloads” link to download this for free. Choose the appropriate installer for your development machine.
It would be helpful to take a look at the documentation for this program, which you can find here: https://doc.mapeditor.org/en/stable/. This documentation contains some tutorials and information about the various tools in the application. It will be a helpful reference for while you are working with the program.
Working in Tiled
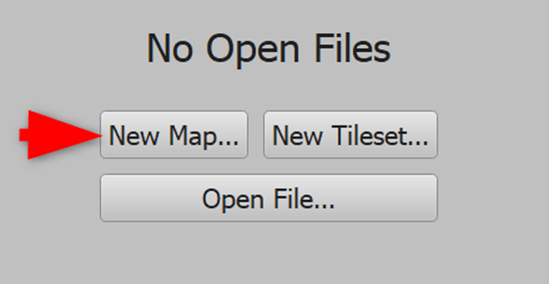
After it has installed, open the program and click the New Map… button.
You’ll be given a few options for creating your new map. Tiled supports a number of different orientation systems, for this game you’ll just need Orthogonal. For the Tile layer format, you can leave it as CSV. You can also leave the Tile render order as Right Down. In the Map size section, you will want both Width and Height to be 10 tiles. The Tile size section will determine how large each tile is in pixels. This can be important to be aware of when you are importing sprite sheets into Tiled, as you will want to make sure that they will fit properly. For this game, you can put the Width and Height at 64 px. Click on the Save As… button. Save this map somewhere that you will be saving assets for this game, name it level1.
Across the top is the toolbar. These are all of the different tools available to use while you are editing your map or inserting objects. On the left you will see the Properties window. It will be displaying the properties of your map. This will change if you are looking at different things in the map. It displays the metadata that is tied to things in the map. On the top of the right section you have your Layers window. Tiled supports multiple layers, you will be using this in your game. The first layer will be the background, the second will be the blocked layers where there will be sprites to block the players path through the game. The reason to use layers is that when you import them into Phaser you can treat each layer as a different sprite group, which will allow you to add gliders between the player and the blocked object. This will be covered in more detail later on.
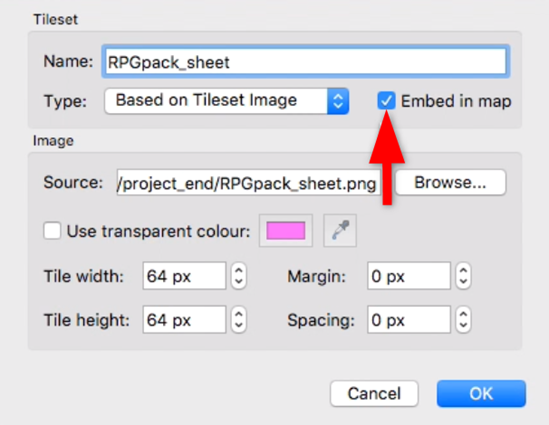
The bottom right window is where you will import the tilesets you will be using to put tiles into your game. Click on the New Tilset… button. Then click the Browse… button. You will want to choose the RPGpack_sheet that is included in the Course Files in the project_start folder of the 01_Creating a Level in Tiled folder. Make sure to click the Embed in map checkbox as this will embed the sprite sheet inside the Tiled map so it will be part of the export you’ll be using in Phaser. Leave the width, height, margin, and spacing as the default values, then click ok.
You will now see that the sprite sheet has been loaded into the Tileset window.
Overview of the Tools
Select one of the tiles in the tilesheet. The Stamp Brush tool will automatically be selected. This tool will allow you to add individual tiles to your map. You can click and drag to easily add multiple sprites at a time. If you want to fill multiple tiles at a time, you can use the Bucket Fill Tool, it will apply the selected sprite or group of sprites to the entire area. It will also allow you to apply the change to a grouping of sprites.
The Eraser tool works like the Stamp Brush but will remove the tile. The Rectangular Select tool allows you to select groups of tiles on your map and will allow you to only edit tiles in that selection. The Magic Wand is similar, except that it will auto select sprites based on their similarity to each other. The Select Same Tile tool will allow you to select a sprite on your map and then it will select all of that exact sprite to allow for editing of those specific tiles only. All of these tools have hotkey shortcuts, which may prove useful to learn.
To quickly delete the layer you are working on, there is a small trash can icon in the Layer window. Clicking this will delete the selected layer. You can then make a new layer using the button on the left with the star.
Making the Layers
Make or rename a layer to be Background.
Using Bucket Fill Tool, apply a solid grass sprite to all of the tiles in the map.
Now make a new layer, name it Blocked. In the Layer window, there are small eye and lock icons next to each layer.
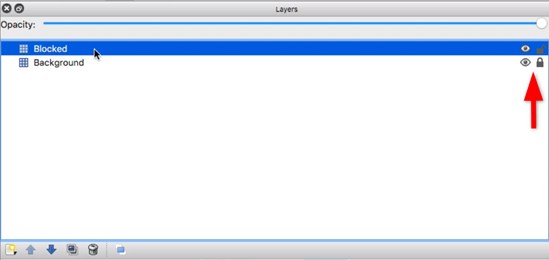
Clicking the eye will toggle that layer to display in the map. The lock icon will prevent you from editing that layer unintentionally. Lock the Background layer now.
Pick the larger bush of one of the colors. Using the Stamp Brush, place them in some random places in your map. You can also add trees. To select multiple sprites to add at once, simply click and drag in the Tilesheet window. You can also hold Ctrl/Cmd to select sprites that you cannot drag to.
Adding Objects to the Map
Objects in Tiled allow you to specify positions where you want to place objects in your game. In Phaser, when you load in the object layer you can associate a sprite with it and automatically place the sprite where you want it.
Click on the button to add a new layer and then select the Object Layer option.
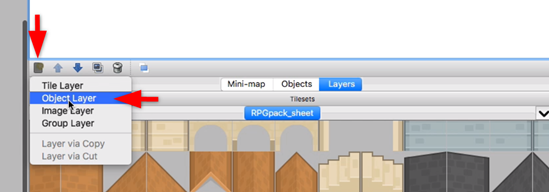
You will notice that the toolset has changed to the object toolset.
The Insert Tiles tool is the one that looks like a picture. This tool allows you to use a sprite as a representation of the object. Unlike with tiles, objects will appear wherever you place them on your map. To move them around, use the Select Object tool. You could also set the X and Y coordinates of the object in the Properties window. The other tools are used to represent objects that you want to place into your game.
Either delete and remake or rename your object layer to be Player. This layer will be used to represent the players starting point in your game. You can use any object you would like to represent this, but the point will work well. With your object selected, the Properties window will show a name field. Change it to StartingPosition. Change the Type field to that as well.
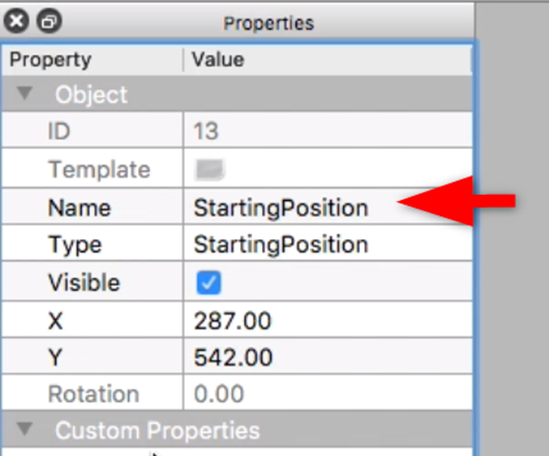
The Type field allows you to put multiple kinds of objects on one object layer while allowing them to still be distinguishable in Phaser. You can also set custom properties that will be included in the metadata. You could use this to name what kind of sprite you are wanting for different enemies, which would allow Phaser to automatically differentiate the different enemies.
As with the Tile Layers, you can toggle the display of Object Layers and lock them. You’ll now want to add a few more Object Layers. You will need an Enemies layer, a Coins layer, and a Portal layer. You could do all of this in one Object Layer by using different types, but for Phaser 3 there is an easy import from layer function that will allow you to easily create the groups of objects.
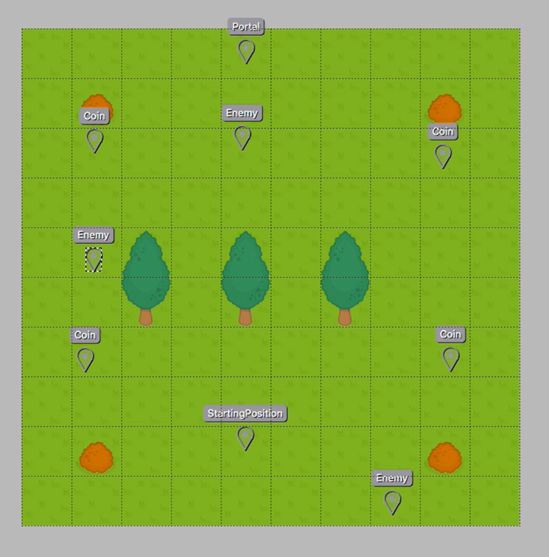
Select the Portal layer and add a point object near the top of the map. Change the Name and Type to be Portal. Then lock this layer to prevent accidental edits. Now select the Coin layer. Add another point object and change the Name and Type to Coin. To easily duplicate this, you can use the Select Object tool and then the standard copy and paste shortcuts. Set a number of Coin objects throughout the map and then lock this layer. For the Enemies layer, set another point object, change the Name and Type to Enemy, and then copy and paste it a few times in your map. Lock this layer as well. Your map should look something like this when you are done:
Save your level. Then go to File and then Export. Make sure to set the file type as JSON.
As a challenge, create your own map. Some things to remember if you are going to use your own maps in the game, make sure to pay attention to what you name the layers and the sprite sheet, as you will need to know those keys when you load it into Phaser.
Transcript 1
Welcome: in this course I’ll be showing you how to make this Phaser 3 top-down game.
I’ll be showing you how we can handle player input to move our player around the map. We’ll be handling collision between the player and game objects in the game. I will show you how to pick up, or we can add collectibles that the player can pick up. And we’ll also add in mechanics for allowing the player to shoot the enemies, and also when he collides with the enemies, he’ll take damage. And we’ll also add in logic to transition between Phaser scenes, so we can have multiple levels in our game, and we can also transition back. And lastly I’ll be showing you how we can actually pass data between the scenes, so that way our game will keep the same state as we’re loading between levels.
The maps in the game here were created with Tiled. I’ll be showing you how we can create a tile map in the Tiled Map Editor, and how we can export that data out, and load that into Phaser for our game.
And lastly, we’ll be using Webpack and Babel in our Phaser game. That way we can utilize newer JavaScript features, and we’ll be using Webpack so we can actually separate our code into multiple files and then have Webpack bundle all of our code into one build file.
Let’s get started.
Transcript 2
For our game, we will be using the Tiled map editor to create our levels. If you’re not familiar with Tiled, it is a fantastic 2D level editor that will allow you to edit your tiled maps, place images. You can also use it to add metadata to your levels. And all of that can be exported out to a JSON object, which we can use to import into our Phaser game. You can find Tiled at mapeditor.org, and you’ll be taken to this page here. And to download Tiled, go ahead and click on the download itch.io and then here you can click on the download now button. Tiled is a free tool, but you can help support the developer by making a donation.
You can either pay for the program or you can make a different contribution down here. If you don’t want to pay anything just click this link here and it’ll take you to the downloads page and from here, you just need to choose the appropriate installer for your development machine and then go ahead and click on download.
While that’s downloading, one thing I do recommend is you can take a look at the documentation here The documentation gives you little tutorials on how to get started with Tiled, it goes through all of the different tools that are available in the application. So, it’s definitely a good reference for while you’re working with the program. Once Tiled is downloaded go ahead and run the executable, and while you wait for it to install go ahead and pause the video. Alright now that Tiled is installed I’m going to go ahead and boot up the application you should be presented with a screen like this.
So the first thing we’re gonna do is we’re going to create our map. So when you do, you’re given a few different options, the orientation of your map, so Tiled supports a few different Tiled maps, orthogonal, isometric, hexagonal for our map we’re just gonna do orthogonal. And then they give you your tile layer format, we’re gonna leave that at CSV, and the tile render order, we’ll just leave it at right down, so it’s gonna start in the right corner and then render it down. Next is your map size, this will determine how many tiles are actually gonna appear in your map.
So you have you’re width and height, we’re gonna leave it at 10 for right now. Next is your tile size, when you’re importing your sprite sheets into Tiled each square, each tile, will be this many pixels wide by this many pixels high, so if you import a sprite sheet that is 32×32, I recommend that you do that, so that way your sprites will fit the tile itself. For the map I’m using it is 64×64, so we’re going to hit save as, and then you just enter in the name of your level and the this will take you into Tiled, so there’s lot going on here, so we’ll kind of do a high level review of what the different sections are and then we’ll start building our level and we’ll cover the individual tools we’re using at that time.
The first thing you can see up here is your tool bar, this is all of the different tools that are available to you while you’re editing your map, and also while you’re inserting objects. Over here is your properties, so this is the properties of your map, and this will change depending on if you’re looking at an at an individual object or if you’re looking at individual layers, this is just the metadata that’s tied to it. Over here is your layers, so Tiled supports multiple layers and what we’re gonna be using it for is we’re gonna have a layer that’s gonna include background, and this is just gonna be the background layer that we presented to the user in our game.
And then we’re gonna have a second layer, which will be our blocked layer, and these are gonna be our sprites that are gonna block the player’s path while they’re moving around the game. And the reason we’ll use the layers is when we import those into Phaser, we can treat each layer as a different sprite group. And then that way we can easily add gliders between the player and the blocked objects.
And then down here, this is where you can import your tile set that you’ll be using to put the tiles into your game. So what we’ll do is we’re gonna do a new tile set and you wanna browse to the sprite sheet. So, in this project start folder, you’ll see the RPG pack sheet, tile sheet, was wondering why I hadn’t opened that yet. And then down here you wanna specify the appropriate tile dimensions and then the margin and spacing if there is any. The tiles in this sprite sheet are 64×64 and then there’s no margin or spacing.
And the next you can go ahead, we’re gonna leave the name as RPGpack_sheet the name is important here, because this is the key that we need to specify in Phaser when we import our JSON object that has our Tiled map data. Lastly you’ll wanna check the embedded map option. This will embed the sprite sheet inside our Tiled map and then that way it’s part of the export that we’ll use when we load the data into our game in Phaser.
So we’ll go ahead and click okay, and then you’ll see that our sprite sheet has been loaded down here, and each tile will be created based on the properties we inserted, so as long as you chose the right dimensions, your individual sprites should be cut properly. And the first tool we’re gonna look at is gonna be the stamp brush, what that does is it allows you to click on an individual tile, and you can add in the sprite you have selected here into that tile space. You can click and drag your mouse to easily add multiple sprites at a time, but if you want to do like a larger selection, these are other tools, so just for example if I wanted to have this grass sprite cover all of the tiles here, what we could do is use the bucket fill tool.
So we’ll go ahead and delete our layer and add a new one. And if you grab the bucket, go ahead and apply this, select a sprite and see the group of sprites that you click on. So for example let’s say you have these sprites here, what the paint bucket will allow you to do is it finds similar sprites that are in that group, so as you can see, where I’m highlighting I would be changing those sprites that I have selected. The next tool is the eraser, so if you want to remove a sprite, you just go ahead and cover it like this, you can easily erase sprites.
The next tool we have is the rectangular select tool, and what that allows you to do is select the tiles on your map, and then when you are editing your map, you can only edit tiles that are in that selection. So you see if I’m outside here it’s not actually applying my sprite. The magic wand tool is similar, except the main difference is it selects sprites based on if they’re similar of not, so as you can see, like I selected this group here, or I could select that group, and then similarly I can only edit sprites that are in that selection. The next tool you have is the select same tile, what that does is it selects any tiles that are the exact same sprite, and then that way for that selection you’re only editing those tiles.
Alright, so I’m gonna go ahead and delete that layer, and we’re gonna add a new layer, and we’re gonna add a new layer and then we’re gonna call it background. We’ll go ahead and just use a grass tile, and we’re just gonna apply that for all of our background sprites here. So, the next thing we’re gonna do is we’re gonna add in our blocked sprites layer, so we’ll make another layer and we’ll call it blocked. And one of the nice things you can do here, is do you see this eye icon and these locks, it’ll toggle the display of the layer that you’re on, and you can also lock it so that way you don’t accidentally edit it when you’re trying to edit another layer.
And what we’re gonna do here is we’re gonna take some of these sprites and we’re gonna add, so what we’re gonna do is we’re gonna take some of the sprites here and we’re gonna add some obstacles for our player in our game. So we’ll chose that sprite, let’s put one here. And for any sprites that are bigger than one tile, you can go ahead and select multiple tiles, and then in your level you can just click to add both of those sprites to your level. So you see we can add multiple trees like that, we don’t have to select each tile individually. So next we’re gonna look at adding objects to our game, so objects allow for us to specify positions of where we want to place objects in our game.
And what we can do in Phaser is when we load in that object layer we can then associate a sprite with it and we can automatically use the position from the metadata that’s pulled in to place that sprite where we want it in our game. So to get started with layers, the first thing we’ll do is we’ll click on the new button here, and we’re gonna click on object layer, and the first thing you’ll notice is our tool set has actually changed to the object tool set instead of our normal tile tool set, and you can place objects in a few different ways, so first what we’re gonna look at is the insert tiles tool, and that allows you to use a sprite as a representation of your object. So we’re going to click here.
So one thing to know with the object is they will appear where you actually click on your map, so if you need to move your object around you can click on the select object tool, and this will let you drag it around. Your second option is you can also input your x- and y-coordinates here, and then that will move the object to where you want it to be. So some of the other tools available are you can use the rectangle, the point, the ellipse, or the polygon tools to represent the objects that you want to place in the game.
So I’m gonna go ahead and delete our object layer, and we’re gonna add a new layer, a new object layer, we’ll call it layer. So we’re gonna use this layer to represent the player’s starting point in our game. So for this I’m just gonna go ahead and use a point. Let’s say the player’s gonna start right here. So when your object’s selected it has the metadata here. So I’m gonna go ahead and give it a name of just StartingPosition, and I’m also gonna use that for the type as well.
So where types are useful if you’re gonna put many different types of object on one layer, you can use the type field to differentiate between them, and then when we load that metadata into Phaser, we can then get our objects based on that type. You can also add custom properties to your object and those will be imported… those will also be exported in the JSON object that we’ve imported to Phaser.
One example is let’s say if we had multiple sprites we could associate with our enemies, we could add a new property called sprite, and here we could put in the name of the sprite that we wanted to use, so we’ll say enemy1. Then that way we can use different sprites based on this property here. Then you can also remove any properties if you don’t need them. So similar to your other tile layers, you can go ahead and turn off the display, you can also lock them. Alright, so we’re gonna go ahead and add a few more object layers to our game. In our game we’re gonna have enemies, we’re gonna have some collectable coins that you can pick up. And we’re also gonna have a portal, that we’ll use for transitioning to the next level of our game.
So we’re gonna create a layer for each of these. Enemies, and then coins, and then we’ve got portal. So you could easily put all of these objects on one layer, and then use your type field to differentiate between them. But for this example we’re gonna go ahead and separate them into different layers here, since in Phaser, they have, in Phaser 3 they have a nice import from layer function, and we can use that to easily create our groups of objects based on these individual layers without having to loop through our objects. So we’re gonna go ahead and just for our portal, we’re gonna add another point, we’re just gonna call this portal. And we’re gonna lock the layer so we don’t accidentally edit it.
Next we’re gonna go ahead and add a point for our coin object. We’ll put this over here, I’m gonna call it coin. And one of the things you can do is you can use the select tool to select our game object and then you can copy it and then move it around the map to where you see fit. That way you don’t have to manually specify the name, type, and place it each time.
Then it makes it a little bit easier if you’re gonna have multiple game objects like this coin right here. And then I’ll lock that. Then finally we’re gonna add a point for our enemy. And then same thing, I’m gonna go ahead and select our enemy, and just place a few of them around our map. Alright, we’re gonna lock that layer. We’ll go ahead and save our level. And then finally, once you have your level finished, you can go ahead and click on file and you go to export. You’ll want to make sure you chose a JSON map file so it’ll have the .json file type. And then go ahead and name your level, and then click save.
This will export it to a JSON file, which then we can easily import into Phaser. Now that we’ve covered the basics of Tiled, I’m gonna go ahead and challenge you to make your own map. Some things to remember, if you are going to use the maps that you create in your game, you’ll wanna make sure you pay attention to what you name layers, and your sprite sheet, because we’ll have to use those keys when we load it into Phaser.
Transcript 3
All right, now that you’ve created your own levels, you’re welcome to use those in the following tutorials, but if you look in the Project N folder, you will see there are two complete levels for you to use, so you’ll see that we have our first level here and that we have our second level here.
And that brings this video to an end. In our next video, we’re gonna start setting up our Phaser project.
Interested in continuing to learn Phaser? Check out our HTML5 Game Development Mini-Degree.

