You can access our newest full course on creating an FPS game here: Construct a First Person Shooter
Part 1
In order to save a Scene in Unity you can either to it by using the Ctrl + S keys on the keyboard or by clicking on File>Save Scenes in the Unity editor.
Its important to save your Scene often so that you do not lose any progress with the work that you have done. Go ahead and save the Scene now.
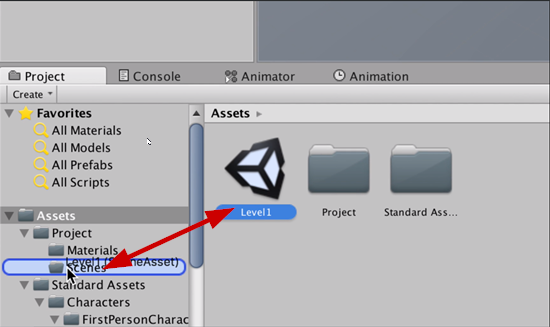
Save the Scene as “Level1” and you will see that we now have a Unity Scene file in the root of the Assets folder. We can create a new folder called “Scenes” inside the Project folder and move the Level1 Scene file into the Scenes folder.
We will now work on creating the weapon that the Player will use to shoot enemies with.
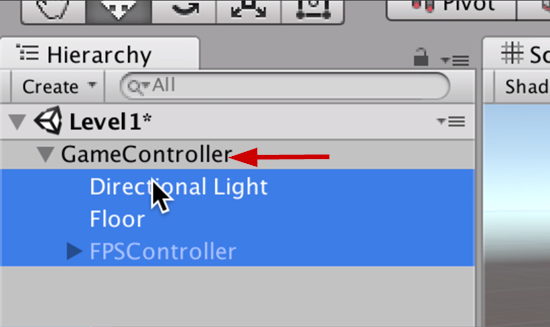
Create an empty game object and rename it to “GameController.”
Select the Directional Light, Floor, and FPSController in the Hierarchy and drag and drop them into the GameController object. This will make these object a child of the GameController.
The weapon will be something that belongs to the Player and the Player in our game currently is the FPSController. We need to rename the FPSController to “Player.”
Create a Cube and make sure the Cube is a child to the FirstPersonCharacter in the Hierarchy:
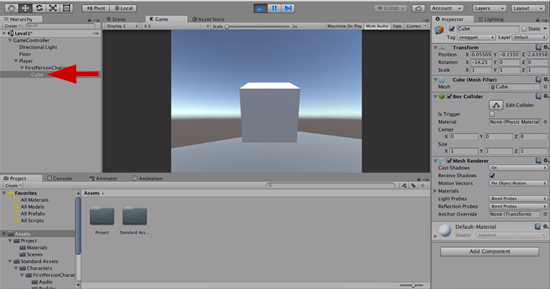
This cube will follow the Player around wherever they are looking, and by doing this we can now make the Player have a weapon.
With the FirstPersonCharacter selected in the Hierarchy create an empty game object, and rename this to “Gun.”
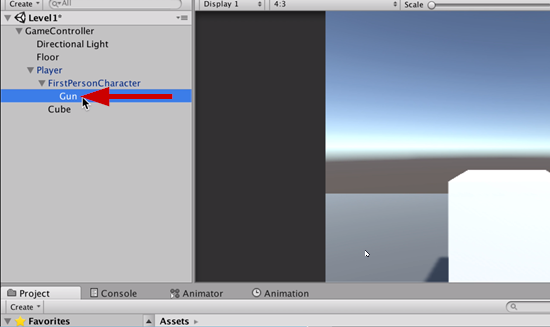
The Gun’s position is relative to the FirstPersonCharcter object because its a child to the FirstPersonCharcter object. What we now need to do is take the Cube object and make that a child to the Gun:
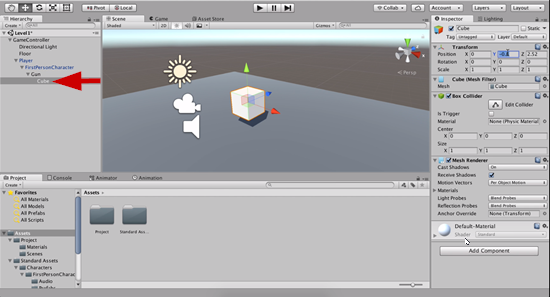
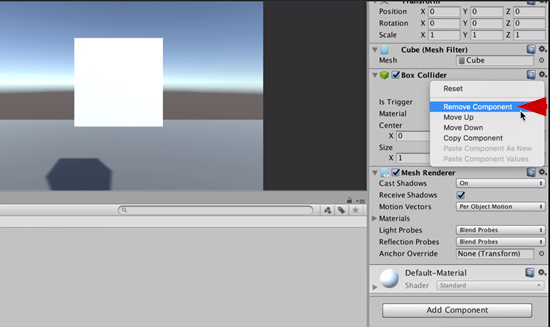
Select the Cube in the Hierarchy and remove the Box Collider component from it in the Inspector window.
You can remove a component by clicking on the cog icon in the upper right hand corner of the component and choosing Remove Component.
We need to adjust the Scale of the Cube object to 0.3 on the X axis, 0.5 on the Y axis, and 0.3 on the Z axis.
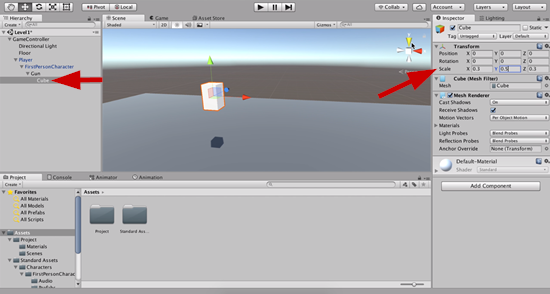
Duplicate the Cube and re-position it so its at 0 on the X axis 5.96046 on the Y axis, and 1 on the Z axis.
Adjust the Scale to 0.3 on the X, 0.3 on the Y, and 1 on the Z.
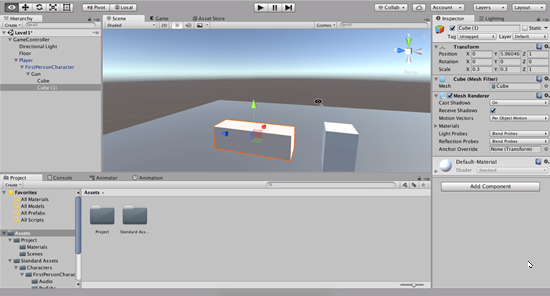
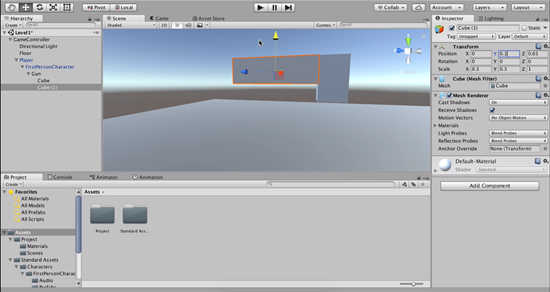
We can now move the Cube(1) a little closer to the handle of the Gun, so make Cube(1) 0.65 on the Z axis, and make the Y value be 0.1:
If you hit the Play button in the editor and test the changes, you see the gun move with the Player:
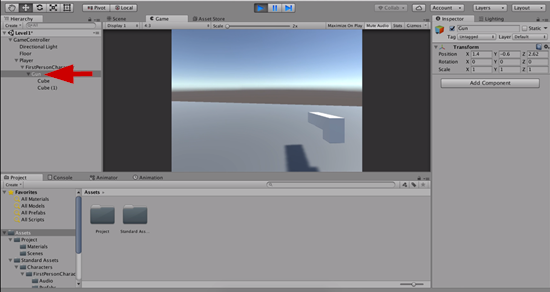
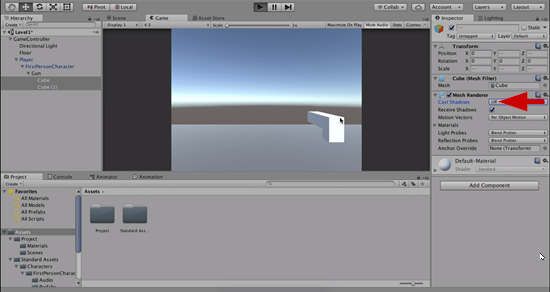
You can disable the Shadow Casting by selecting both Cubes and then on the Mesh Renderer component in the Inspector, change the Cast Shadows option to Off.
We can now make a material for our gun so in the Materials folder right click>Create>Material. Name this material to “”Gun.”
Use the color picker to choose a light blue color:
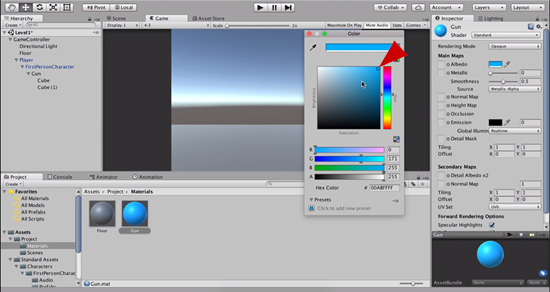
Drag and drop the Gun material onto the Gun.
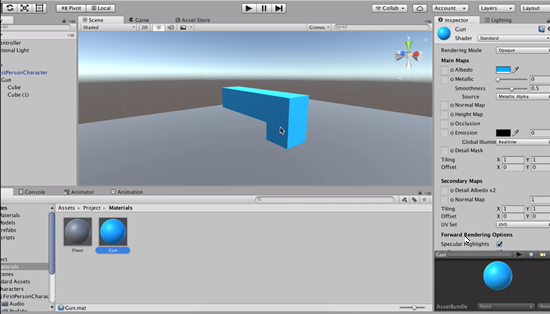
Save the Scene.
Part 2
In this lesson we will begin working on the logic for shooting bullets from the gun we created in the previous lesson.
We can create the logic for shooting bullets in a C# script.
Navigate to the Project folder and create a new folder and name it “Scripts.” Open the Scripts folder once you have created it, and create two C# scripts. Name the first one “Player” and name the second one “Bullet.”
It’s very important that you remember once a script is created it must be added as a component to an object in the Scene or the script will never run. So with the Player game object selected in the Hierarchy, drag and drop the Player script in the Inspector window to attach the Player script to the Player game object.
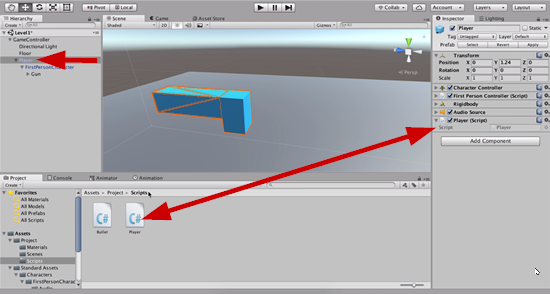
Open the Player script in the code editor.
See the code below and follow along:
// Update is called once per frame
	void Update () {
		if (Input.GetMouseButtonDown(0)) {
                    Debug.Log("Fire!");
}
}
}
Save this script and navigate back the Unity editor.
Hit the Play button and test out the changes by pressing the left mouse button.
You should see the debug statement display in the Console window:
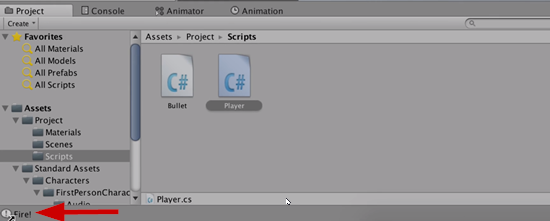
So we know now that the game is definitely listening for the mouse button press, but we now need to create the bullets and set the logic up for the shooting.
Create a new empty game object in the Scene and name it “Bullet.”
Reposition the Bullet game object at the (0, 2.12, 4.01) position:
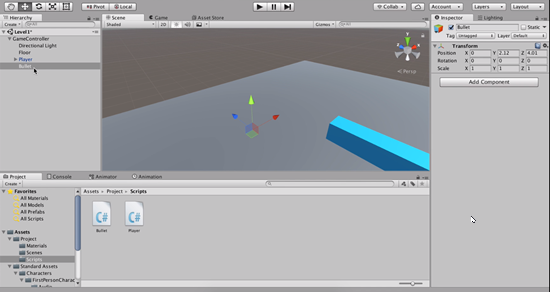
With the Bullet game object selected, right click and choose create empty. Rename this object to “Container.”
With the Container object selected in the Hierarchy, right click and create a Sphere.
So we now have this large sphere here in the Scene:
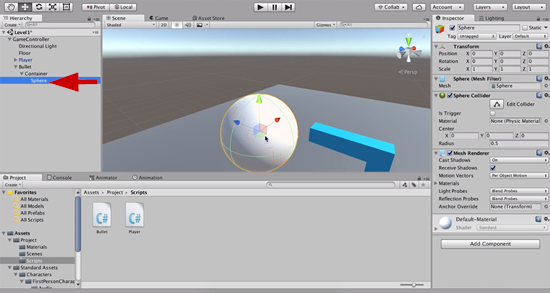
We need to remove the Sphere Collider component from the Sphere game object.
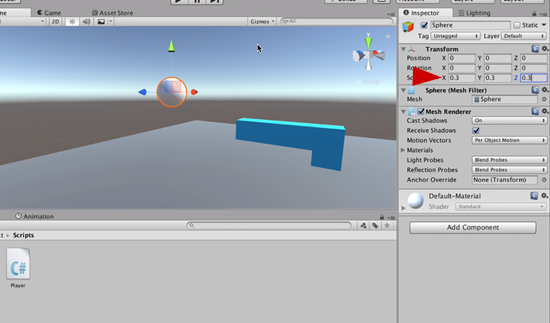
Change the Scale to be 0.3 on all axes:
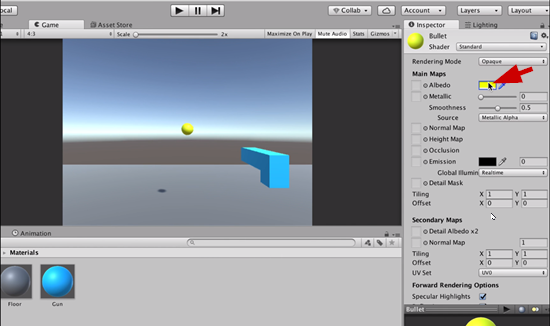
We need to change the color of the bullet now so lets create a new material. Create the new material in the Materials folder located in the Project.
Name the new material “Bullet.” Change the color of the Albedo to a yellow, so its very easy to spot in the game:
Select the Bullet game object in the Hierarchy and add a Sphere Collider to it by clicking on the Add Component button in the Inspector:
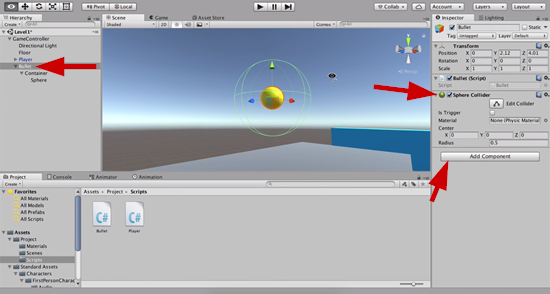
Adjust the Radius of the Sphere Collider to 0.2. Toggle the Is Trigger option on.
We now need to make the Bullet into a Prefab. This is so we can reuse the object later, and since we are going to be shooting bullets this will perfect for us.
Create a new folder in the Project and call it “Prefabs.”
We now need to select the Bullet and drag and drop it into the Prefabs folder:
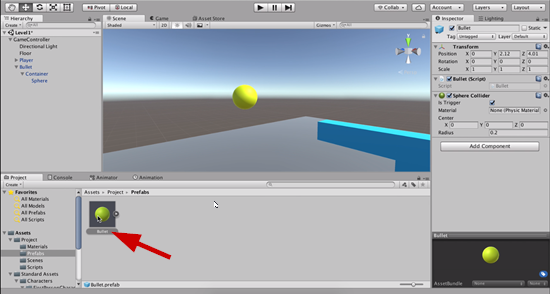
The Bullet will now be written in Blue, and this is Unity’s way of signifying what objects are prefabs.
You can now delete the Bullet game object form the Hierarchy, since we made it into a prefab we are OK to delete it.
Save the Scene and Project, and you may proceed to the next lesson.
Part 3
We will now setup the logic for the bullets to be shot from the gun.
Open the Player script in the code editor.
See the code below and follow along:
public GameObject bulletPrefab;
Save the script, and navigate back to the Unity editor.
We need to setup the reference on the Player script with the Bullet prefab.
Select the Player game object in the Hierarchy and there will be an empty Bullet Prefab field in the Inspector. We need to drag the Bullet prefab from the Prefabs folder onto this empty field in the Inspector to setup the reference.
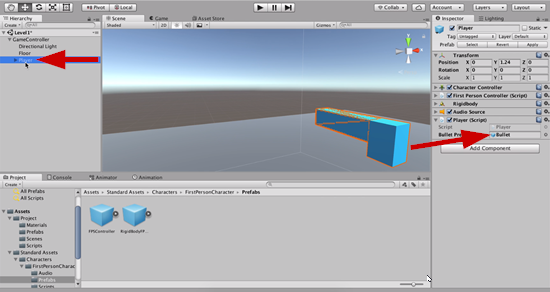
We now need to create a Prefab out of the Player so select the Player game object and drag it into the Prefabs folder.
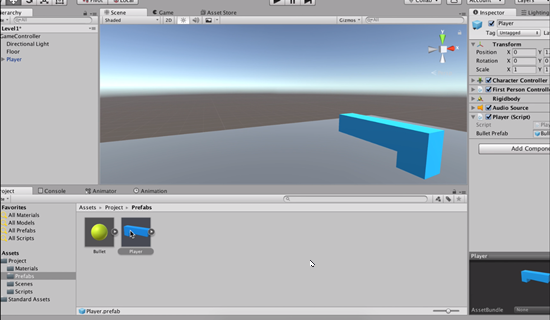
Open the Player script back up in the code editor.
See the code below and follow along:
// Update is called once per frame
	void Update () {
		if (Input.GetMouseButtonDown(0)) {

				GameObject bulletObject = Instantiate(bulletPrefab);

			}
		}
	}
Save the script, and navigate back to the Unity editor.
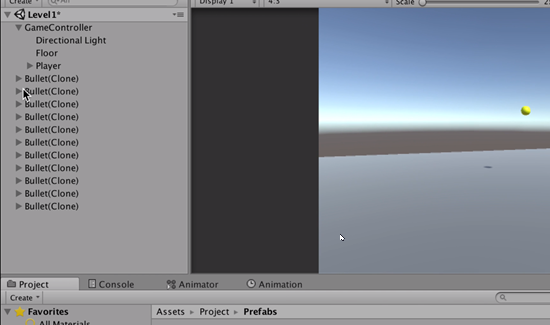
Press the Play button, and press the left mouse button, and you will see that every time the left mouse button is clicked a new bullet is being added to the Scene:
Open the Player script back up in the code editor.
See the code below and follow along:
// Update is called once per frame
	void Update () {
		if (Input.GetMouseButtonDown(0)) {

				GameObject bulletObject = Instantiate (bulletPrefab);
				bulletObject.transform.position = transform.position;
			}
		}
	}
Save the script, and navigate back to the Unity editor.
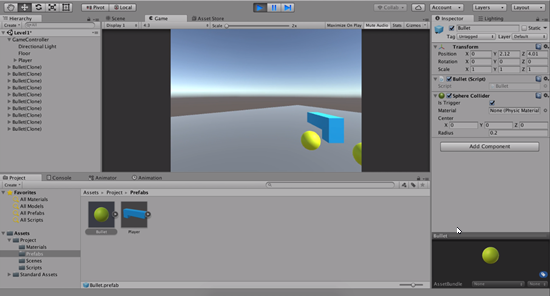
Press the play button, and test out the changes.
Open the Player script back up in the code editor.
See the code below and follow along:
public Camera playerCamera;

// Update is called once per frame
	void Update () {
		if (Input.GetMouseButtonDown(0)) {

				GameObject bulletObject = Instantiate (bulletPrefab);
				bulletObject.transform.position = playerCamera.transform.position + playerCamera.transform.forward;

			}
		}
	}
Save the script, and navigate back to the Unity editor.
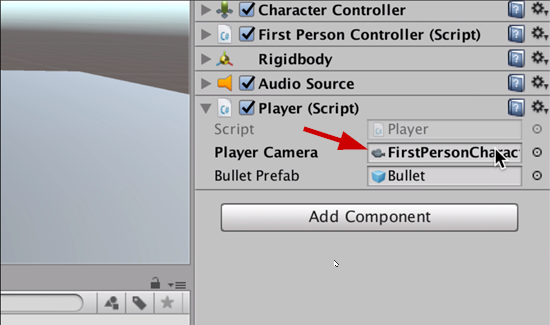
We need to setup the Player Camera reference on the Player script in the Inspector by dragging and dropping the FirstPersonCharacter object onto the field in the Inspector:
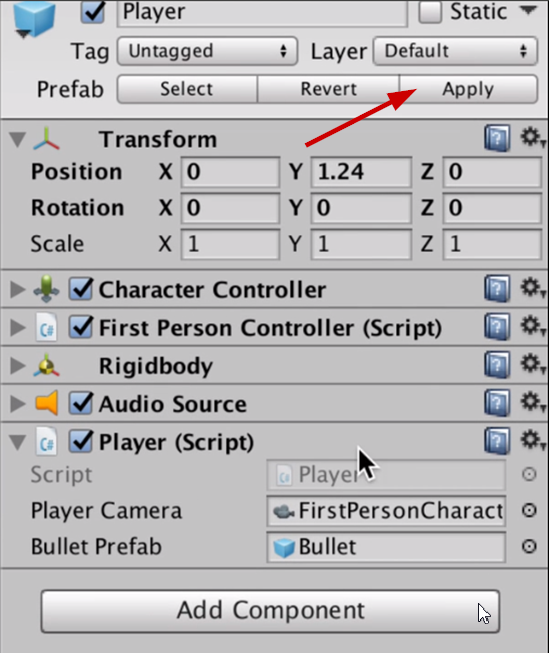
We need to hit the Apply button to save the changes we made to the Prefab:
Press the Play button to test the changes.
We now have the bullets appearing in front of us.
Select the Gun object in the Hierarchy and adjust the Scale of the Gun to be 0.3 on all axes:
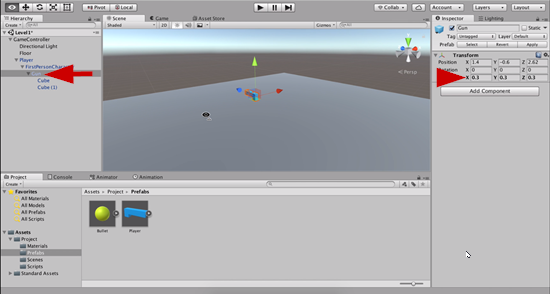
We now need to adjust the Position of the gun.
Set the X position to be 0.44, the Y to be -0.3, and the Z to be 0.79.
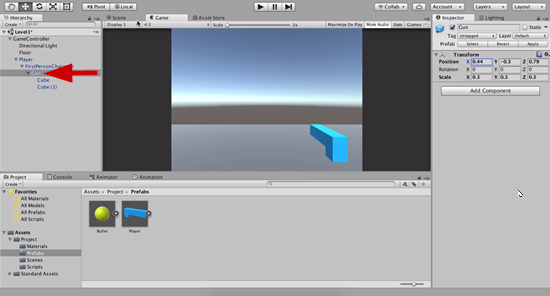
Test the changes by hitting the Play button, and we will need to adjust the Scale and Position of the Gun again.
See the screenshot below for the new positioning and scaling:
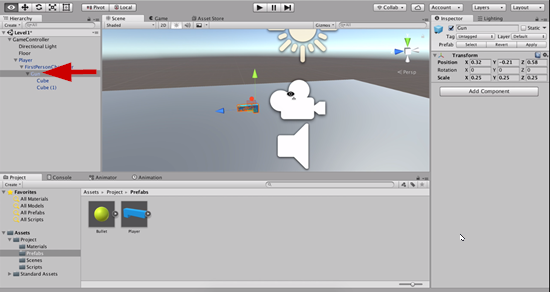
We need to get the bullets moving forward.
Open the Player script in the code editor.
See the code below and follow along:
// Update is called once per frame
	void Update () {
		if (Input.GetMouseButtonDown(0)) {
			if (ammo > 0 && Killed == false) {
				ammo--;

				GameObject bulletObject = ObjectPoolingManager.Instance.GetBullet (true);
				bulletObject.transform.position = playerCamera.transform.position + playerCamera.transform.forward;
				bulletObject.transform.forward = playerCamera.transform.forward;
			}
		}
	}
Save this script.
Open the Bullet script in the code editor.
See the code below and follow along:
public float speed = 8f;

// Update is called once per frame
	void Update () {
		// Make the bullet move.
		transform.position += transform.forward * speed * Time.deltaTime;
}
}
Save the script, and navigate back the Unity editor.
Hit the Play button to test the changes.
The bullets are now shooting and moving forward.
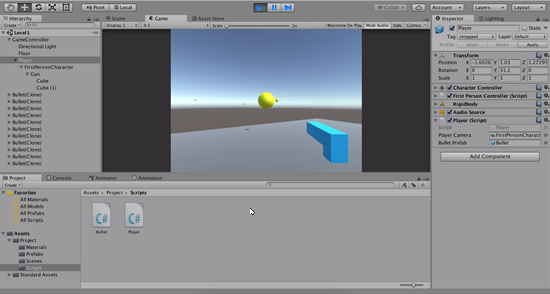
Right now the Bullets are lasting forever in the Scene after we fire them from the gun.
This is going to effect performance of the game, so we need to make a bullet lifetime, and destroy these bullets after some time.
Open the Bullet script again in the code editor.
See the code below and follow along:
public float lifeDuration = 2f;

private float lifeTimer;

// Use this for initialization
	void Start () {
		lifeTimer = lifeDuration;
	}

// Update is called once per frame
	void Update () {
		// Make the bullet move.
		transform.position += transform.forward * speed * Time.deltaTime;

		// Check if the bullet should be destroyed.
		lifeTimer -= Time.deltaTime;
		if (lifeTimer <= 0f) {
			Destroy(gameObject);
		}
	}
}
Save this script, and navigate back to the Unity editor.
Press the Play button to test the changes.
We now have the Bullets being destroyed after they are fired.
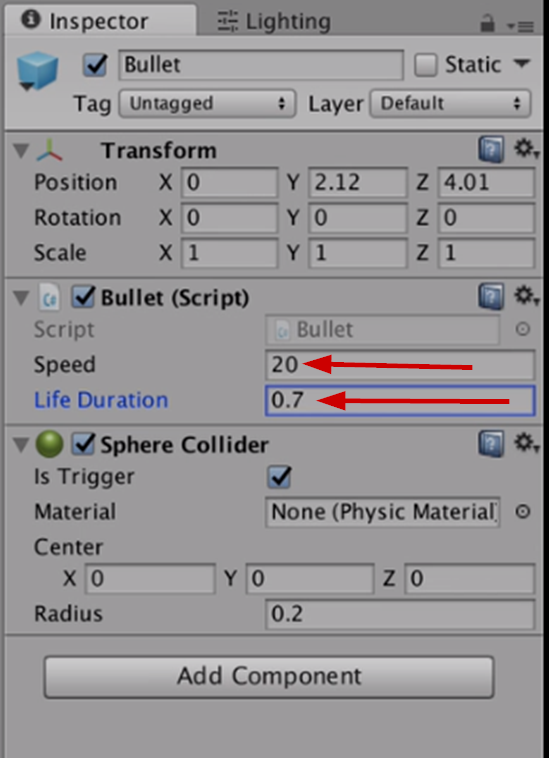
You can make the following adjustments to the Speed and Life Duration of the Bullet in the Inspector:
Save the Scene and Project, and proceed to the next lesson.
Transcript Part 1
Whenever you change your scene by adding new game objects by dragging and dropping prefabs here, you have to save it. If you look right now at the Hierarchy, it basically says Untitled because we haven’t saved this scene at all. And to save it, you can just go to File and Save Scene or hit Command + S or Control + S depending on the operating system you’re learning this. So I’m going to press Save Scene and I’m going to save this as Level1. It’s going to be the first level that we’re making. Now we press Save.
And if you look, that file that I just added is going to be in the root of the project, in the Assets folder. So we want to make a new folder inside this Project folder and drag the scene inside it. So I’m going to enter there, right-click, create Folder, and this is going to be named Scenes. And now, I’m going back to the Assets folder and I’m going to drag this scene and drop it here. And now we make sure we have everything organized. And now that we have this, now that we have a Floor, a Direction Light, and a Player, we should be able to start working on shooting some bullets in this game. This is very important because, well, the first-person shooter is a shooter game, so we need a weapon and we need to shoot some pellets or bullets.
So the first thing that we start by doing is to make a weapon here that the player’s going to basically drag around. So at this point of this course, it is important for us to understand about Hierarchy, how Hierarchy works in Unity. So if you look at the Hierarchy window, we have Level1 and we have several elements here, but the Directional Light, the Floor, and the FPSController, they all belong to an entity, that is the entire game. So it is important for us to come here and right-click, choose Create Empty and rename this GameObject as GameController. This is going to be used later but still, it’s important to have a notion of what’s happening here.
Let me put this GameController in the position zero zero zero, so it’s in the root of the world here. And now, we’re going to select all of the elements that we have here. We can select the first one, hold Shift, and the last one, and drag and drop to GameController. So, everything belongs to the game. Now, the weapon is something that belongs to the player, and our player is this FPSController. So we want to start by renaming this FPSController here into Player, just so it’s clearer for us that this is our player, the guy that is going to move around.
So, now that we have this Player and we want to add a weapon here, we want to add that weapon, it doesn’t matter its shape, it could be a cube, it could be a sphere, whatever you want. It needs to be inside this FirstPersonCharacter. Why is that? Let’s make a little test here. I’m going to select the Player, then I’m going to right-click, choose 3D Object, and then I’m going to choose Cube. If you look at the game window, you can see a preview of what the player is looking.
Right now, we can’t see a thing but if you go to the Scene window, you select that cube here and you move it forward like this, if you select the blue arrow, which stands for the depth axis and you move forward, and you look at the game, you start to see the cube. So let’s make a simple test here. At this point, if I press Play, if I look up and down, the cube is going to be there but if I look to the sides, then the cube is going to follow us. It’s not exactly what we want right now but this is starting to, you might realize that we are getting there.
So if you look up and down, the cube is not going to follow. And why this happens, if you play the game and go to the Hierarchy and you select the Player, you’re going to see that the player rotates in the y-axis but not on X and Z, just the Y one. This happens because of how the looking of this player is calculated, how the act of looking around is calculated.
So if you press Esc now to regain the focus of the mouse and you select the FirstPersonCharacter, you’re going to see that it rotates on X. And by having X and Y, we can pretty much look anywhere. First-person shooter games, they, in general, don’t use the z-axis unless you were in a zero gravity scene, if you are controlling a ship, but well, we just need X and Y. And to make sure that we can use both of these axes, we need to go to the Hierarchy and drag the Cube to the FirstPersonCharacter. Now, if we look around, the cube is going to follow us to whatever we are looking. And by having this, we can now have a weapon. But you needed to understand that.
We have the Player, we have the FirstPersonCharacter and the Cube needs to be under the FirstPersonCharacter. So, I’m going to stop this scene and here, I’m going to right-click in FirstPersonCharacter and I’m going to choose Create Empty. And I’m going to rename this GameObject to Gun. Now, the position is zero zero zero, and that position is relative to the FirstPersonCharacter, which its position is relative to the Player. So, this entire hierarchy here is a collection of relative positions.
So now, I’m going to grab this Cube and put it inside the Gun and I’m going to choose the Cube and put it to position zero zero zero. If I grab the Gun now, the Gun game object, if I move it forward, you see that its position changed to zero zero and around two and a half, and the Cube is still in the position zero zero zero because this is relative to the parent. Since the Gun is in this position here, the Cube is also going to be, and that’s pretty much why the rotation works. If you put the Gun here and you rotate around, the Player’s rotation is minus 18, FirstPersonCharacter is 0.7 on X, so the Gun and the Cube are also going to have that rotation because they’re all set to zero.
And now, what we want to do is we’re going to select this Cube and we want to remove this Box Collider. We’re not going to make any collisions with that element. So we click on this cog and choose Remove Component.
And now, we want to reposition this gun to another place but before that, let’s make a very, very simple design. I’m going to choose this Cube element here. I’m going to change its Scale on X to 0.3, Y to 0.3 as well, and Z to 0.3. So let’s make Y just a little bit bigger, maybe 0.5. If you look at the game, it’s going to look like this. And if you select the Gun game object and you change its position here, you can already see how it’s going to look like. So if we change to 1.4 and minus 0.3, no, 0.6 on Y, it’s going to look like this. It’s going to be in the right position of the player, You can change that to the left side of course if you want. You just have to select the Gun and change the value for the position here. If it’s positive, then you add a negative sign, so it’s going to be in the other side.
And to finish that, we go back to the Scene window, we’re going to select this Cube and we’re going to duplicate it, so it’s going to be in the same position as the first cube. We’re now going to move it to another position in Z, so maybe one in Z. Y is going to be 0.3 and Z is going to be something like one, something like this. And now, let’s move it closer to the base of the gun, the handle of the gun, so 0.65. And we’re also going to adjust Y, so it’s going to be somewhere here. I think that’s 0.1. So this is the shape of the gun that we have right now. We have the Gun element, which holds all of the other elements inside, and we have the two cubes.
If we go to the game windows, you see that a gun is here and if we press Play, you can see that the gun is going to follow you. You can see that it renders some shadows and if you want to disable that because since we right now don’t have a player model, you can just select the cubes, both of them, and where we have Cast Shadows, you can just disable that, and the shadows are going to disappear and we just have our weapon here. So we can just walk around and the gun is going to follow us completely. And so this is not entirely dull.
We now go to the Project folder, Materials, we want to make a material for that gun. So right-click, Create, then Material, and we need to name that as Gun, and we’re going to click here and change its color to light blue, like this one. After that, we can just drag and drop the material and we need to ensure that we are in the Scene window. Going to drag and drop here and drag and drop there. So we now have our Gun inside the Player. The Gun contains no collisions at all, not going to be used, and we can walk around.
So, what we want to do now is to make that gun to shoot bullets.
Transcript Part 2
Now that we have this gun here, we need to work on the logic for shooting some bullets. So, so far we’ve been using things already provided by Unity. We made game objects, we had a directional light, we viewed the first person character, we’ve used some cubes to design this gun, but we don’t have something specifically set to make the logic for shooting, okay, that doesn’t exist yet So we have to make our own logic. To do that, we have to make some scripts.
We’re going to need a script for the player and a script for shooting bullets. But you might ask yourself, hey, we already have a script here. We have the first person controller. So we can just open this script and then change it. Don’t do that, okay, it’s very important for you to understand that. This script is only for the movement and for the physics of the first person controller. There’s nothing related to shooting here. Yes, you could change that, it would work the same way, but it’s better to have our own script that is going to do other things, okay, besides movement. Something to work with movement.
So to make a script, we’re going to the project folder, we already have materials and scenes, but now we right click, choose create, then folder, and this one is going to be named scripts. Simple as that. And inside this folder, we’re going to make two files. So, right click, create, C sharp script. This is going to be player, or hero, whatever name you want to use. I tend to use player because that’s pretty much the form of the entire millions of games that you can make, okay, we always have a player. And now we right click, create, C sharp script, and I’m going to name this one bullets, and then hit enter. So every time you hit create, there is this little spinning wheel here to say that the code’s compiling, and after that’s done, we can already work on using this script.
So before you went to the script, it is important to remember to add it to the scene to add it as a component to the player. So make sure you have the player selected in the hierarchy, and you can select the player script and drag and drop it either like this in the player or dragging it and dropping it here. I prefer this one because it’s just faster, but make sure you have the player selected, okay? So we have the player script and that is going to basically, it’s guaranteed that that script is going to load. Now I’m going to double click the player script and you have to wait a little bit for MonoDevelop to open, but it already comes bundled with Unity if you haven’t changed anything in the installation process, and we have that empty class here.
So the first thing we want to do is to understand when should we shoot bullets, and we have two methods here, we have start and we have update, and for clicking in Unity, we should use the update method. Since this is called on every frame, on every time your game is processed by the device it’s being ran, okay, so if it’s on a smartphone, on a smart tv, whatever target platform you have, the update method is going to be called once per frame, and this is the perfect moment that we can use to check if we are clicking, okay?
So you want to listen for the click in the left mouse button, okay, a basic left click, and to do that, we need to use an if block. So we’re going to type if, open and close parenthesis and the curly braces, and to ask if we are clicking the mouse button we are going to type input to access the input class in the system, dot get mouse button, and you notice that there are two, three options actually. Get mouse button is going to return true at every moment, every time, every frame, the given mouse button is held down. So this is used for machine guns, for example, because if you hold down the trigger, then it’s going to shoot bullets, several bullets okay, dozens of them at every second, however for pistols, that’s not how it should work.
We should use get mouse button down, because that’s not an automatic weapon. You shoot one bullet for every time you press the trigger. So if you press the trigger, you have to release it and press it again, okay, that’s how basically pistols that are not automatic work. So if you look at the summary here in MonoDevelop, it says return true during the frame the user pressed the given mouse button. This is very important. Since we are using this in the update method, it’s basically going to work. So, get mouse button down.
Now we’re going to the pass the button that we want to use, and we need to pass zero for the left mouse button, but it can use one or two for the right and middle mouse buttons, and just to see if this is working, we’re going to print a message here. So I’m going to type debug dot log, okay, so we can print a message in the user’s console, and I’m going to pass between quotes the message “fire”.
Now we’re going to save the script, go back to Unity, and wait for that script to be process, and after this is done, I’m going to press play, so the player’s going to be back in the scene, you can move around, and if I click, you’re going to see that a message printed here. Fire, okay. If you click, it’s going to be highlighted in the console window, which is right here, okay? So we can, if we click several times, we’re going to see the fire message, so great. We already know how to listen for the left mouse button press. Now, we have to actually shoot the bullets, and how do we do this? Bullets, they work a bit differently than some elements that we have here.
We designed the gun, but how the game is working right now is we have one gun, okay. There is no need to transform that gun into something that can be reused later, but that doesn’t apply for bullets, because bullets, they appear all the time, okay. We need to make a system here where a bullet can be substantiated dynamically in the game, and then we take it off, okay, so how do we do this, how do we make that work?
We have to go here, so our hierarchy, and we have to make one bullet. So in the game controller, I’m going to right click, choose create empty, and I’m going to rename this game object as bullet. It’s going to be in the position zero zero zero, but let’s bring it in front of the weapon so we can see it once we design it. Alright, and inside that bullet, which is in this position, I’m going to right click, choose create empty, and I’m going to rename this game object to model, and then you might think hey, we have something different now.
At the player, we made a gun, and that gun already had the cube elements, but why do we have the model here? This is a tip that I’m giving to you because sometimes you need an intermediate game object before you add the visual elements, just like we have the first person controller. We have the main object and we have the first person character. It’s important to have this because if you want to make a ninja game for example, where you have shurikens, you want to rotate the model, okay. We just want to rotate the visual part of the bullet, and if you don’t do this, if you try to rotate the bullets, depending on the technique you’re using to make that bullet move forward, or whatever direction you’re shooting it, then it’s not going to work.
So it’s important to separate the logic, okay, the logic part, the code part, from the visual. That’s why we add this little model element here. You can also name this container if you want, okay, both work just fine. Let’s use container. Now, I’m going to right click, choose 3D object and then sphere, so we have this huge sphere in front of the weapon. I’m going to start by removing the sphere collider, it’s not going to be present here, you’re going to understand why. The scale is going to be zero dot three, I think. Yes, zero to three looks perfect. It’s going to be zero dot three, and we want to change its color as well.
So, we go to our materials folder, right click, create material, bullet, and I’m going to change the color to yellow so it’s very easy to spot in the game, and I’m going to drag and drop here. And if you want to change the color and test it right in the game, you can just click here and basically change it to whatever color you want. You see the results immediately here, okay.
So why did I remove this collider from the bullet, okay. You might know that colliders are used for basically processing collisions to see if one object is overlapping another or if there’s a physical collision between them. I took it off from here because this is not where the collisions are going to be processed. It should be processed in the bullet game object, okay? Remember, this is the logical part, and this is the visual part, so in the bullet, we need to add the bullet’s crypt to it, so we already made that,
I’m simply going to drag and drop to the bullet here or here, and we already have a descript here, nothing special but it’s going to work, and now I’m going to click on add component, and we can have either a box collider or a sphere collider, so if you click on that component you have that search field, just search sphere and we already have sphere collider.
If you look at the scene window it’s a bit bigger than the bullet, so let’s change that radius to zero dot two. It’s okay to make it bigger than the actual sphere because let’s forgive the player a little bit if they miss a shot. It’s important to have that little tolerance so the player doesn’t get frustrated for missing a shot, but it’s really up to you. If you want to change that to something like one dot five so it’s going to be precisely the size of the bullet it’s going to work, but I like to add a little tolerance.
Now, this bullet is not going to behave completely in a completely real physical way, okay. We’re not going to shoot it and if it hits the floor it’s going to bounce and roll around. We want to keep things simple, okay. Sometimes you need to simplify things, so you’re going to make sure that you’re game’s going to behave very well. And because of that, I’m going to mark this is trigger check box okay, so we’re just going to use the bullet for checking for overlaps. So basically, the bullet’s going to go through elements. It’s going to go through the floor if you shoot looking at the floor, it’s going to go through the enemy, however, if it goes through the enemy, it’s going to hurt it or kill it, okay. So let’s use this is trigger checkbox here.
So we have the bullet, we have the sphere collider, and now that we have this, we want to transform this bullet into something that can be reused later. In Unity, that’s called making a prefab, okay? It’s just like the name set, something that has been previously fabricated, something that has been previously made for us to reuse later. Since we are going to make use of several different bullets, it’s interesting that it is a prefab.
So what we’re going to do is, we’re going to the project folder, we’re going to right click and create a new folder that is named prefabs, like this, and now we’re going to select this bullet and we’re going to drag and drop to the prefabs folder, and we’re going to have the bullet here. If you look at the hierarchy it’s written in blue, okay, it’s something very simple. Just written in blue because it means it’s a prefab instance it’s a copy of the original prefab, which is this one, and if you want you can even delete it from the scene because it’s already saved. You can just drag and drop again, and it’s going to be back.
Now we’re going to save our scene, and we have to work on making this bullet appear.
Transcript Part 3
Now, how do we instantiate these bullets? We have to view with the player script. So I’m going to open it right now. We just have this little message here that says fire when click. What we need to have a reference for the bullets prefab. To make that reference in Unity, we can only make a very simple public variable here. So at the top, I’m going to type public GameObject bulletPrefab, like this.
And if you save that and go to Unity, and you wait a little bit for that processing of the code to be read and you select the player, you see that we now we have that bullet prefab set here.
So, to get that bullet prefab to work, we’re going to open the prefabs folder, and I’m going to drag this bullet from here to here. So, you just drag and drop. And it’s going to be in this position. Now, that we have the reference for the bullet, you’re going to notice that “Bullet Prefab” is set in bold. This is happening because that’s something new that wasn’t present, or wasn’t set in the prefab. And, remember, this prefab, if you choose select, you’re going to reference the EFPSController. So, this is the moment that we have to fork things a little bit. We want our player to be our own player prefab.
Our own first person controller, where we’re going to add new things. This is important because if you make auto-levels, you need to ensure that the player is going to behave the same on every level. And if you change the player, maybe you change the player’s weapon, then there might be some differences from each level because, well, we can forget things, we’re only human. So, now, we’re going to open the Prefabs folder, and just like we did with the bullet, we’re going to drag and drop the player here. And now we have the player, which is basically it’s gun, it’s the only visual element that we have here.
And now, how do we instantiate these bullets? There’s a very simple method for that. I’m going to remove this fire message from the update message, the update method, and I’m going to type GameObject bulletPrefab equals to Instantiate, bulletPrefab. This method is enough for adding a prefab instance. If it was only set as this, and you ran your project, it was going to work. But we want to keep a reference to it and you’re going to understand later. Instead of calling this bullet prefab, we’re going to name this bullet “object”. It’s the instance of the bullet prefab. So, let’s use this pattern here, bulletObject. So I’m going to save that, go to Unity, wait just a little bit.
And if you press play now, here we are, if we click, the bullet is going to be instantiated. So, if you look at the hierarchy, every time a click a new bullet is added here. But there is a problem. All the bullets are in this position. Which is odd, why they’re coming here. This is happening because the prefab, the way you save it, so even the position is going to be preserved. So, when we instantiate a bullet, we want to add it to a certain position.
So, what we can do here is we can type bulletObject dot transform dot position equals to transform dot position. What is this? We are accessing the bullet object that we just instantiated. We access the transform component and we change it’s position to be the same position of the player. So writing this, is the same as typing this, which is the player script that you’re dealing with, dot transform, dot position. You can just leave it like this.
Now, this time, if we save and go back, and we give this a try, we can press play button, OK, so here we are, and if we click, it’s going to be where the player was. OK, so basically, if I click, it’s going to be where I’m standing. Which is good, however, if we click, we need to step back for us to be able to see the bullets. And that’s something that we have to adjust as well. And one thing that we might want to do, is to make it spawn right in front of the player. So, we’re going to type here a plus sign and type transform dot forward. So what happened here?
We’re setting the bullet’s position to be where the player is standing, plus transform dot forward. And there is an interesting difference between these two values here. This is a Vector3 element, it’s a structure in Unity, a class in Unity, that contains three values, x, y and z. So, it can position things. And this is basically a point in space. It’s a place, basically. This one is also a Vector3. But, however, this is basically, you have to think of this as a direction. It’s a vector, and it’s size is going to be one. Can you imagine there’s an arrow that is going to point somewhere. So upwards, downwards, to the left, to the right, and it’s size is always one, because this is going to make our calculations easier. But the thing is this is not a place in space, it’s an arrow that is pointing somewhere.
So if we look to the left, transform dot forward is going to point left. If we look up, transform dot forward is going to point up. So, this is basically what we need. This means that the bullet is going to be at the exact place where the player is plus one unit in the direction the player is looking at. So now, if we try that again, wait for the compilation to be finished. And we press play. This time if I click, the player is going to be one unit in front of the player. Which is great. However, you see that it’s still not in a good position. It’s not exactly where we are looking. So, if you go to the scene and you select the player, the player is going to be here, you’re going to see that the player is in this position.
However, the first person character is in this position. So, it’s, there’s a little offset a little vertical offset. So, it’s going to be important for us to have a reference to the player’s camera, which is here in the first person character.
So, what I’m going to do is go into the player I’m going to type here public, Camera playerCamera. And now instead of using transform dot position and transform dot forward we’re going to use playerCamera dot transform dot position. And playerCamera dot transform dot forward. It’s important to see those differences just how the structure of the first person character was made. We have the player game object here but we have the camera which is the first person character here. Now, we select the player, and we’re going to drag the first person character from here to here.
So, we’re going to be able to reference its camera. And since we changed the prefab, we can hit the apply button for it to be saved. Let’s give that another try. I’m going to press play. Here we are. If I click, the bullet’s are going to be in front of me. If I look up or I look down, it doesn’t matter, it’s going to be in front. And the other thing that we might want to adjust is if you look at the scene window, the bullet is very far, the weapon is very far away from where the player is. This is happening because the gun is basically too big. So we want to make it very much smaller than it is right now because we’re going to have some issues where we look at the bullet and the weapon is going to be in front of it. So that’s a bit odd. Now, we’re going to select the gun here.
And to make that simple, we can just scale it. So maybe I’m going to change that to zero dot three on x, y and z. And you’re going to notice that it’s scaling the elements right below it in the hierarchy. Which is exactly what should happen because we have a hierarchy here. Now, the gun is very far away from the player, and to help you, you can just go to the game window, select the gun and you can click on these letters x, y and z and basically drag them around until you find a good position for the gun.
So, I’m going to make it closer to the player, like this. I think this is going to work well. And if you look at the scene now, the camera’s much, the gun is much closer to the first person character. You might need to adjust a little bit but, well, we just have to experiment and see things are working well. OK, so maybe a little bit closer to the player. I’m going to change that scale to zero dot twenty-five on the x, y and z. Bring it closer, like this, x comes to the left as well, and y moves up, so it’s going to be better.
OK, but well, I think this is good enough. We don’t have to worry too much about this because the bullet’s are going to move. So, now, we’re able to spawn bullets, they’re not going to be very far away from the gun it’s going to be okay. But now we have to make these bullets to move forward because we are shooting them. So, how do we do this? We already learned how to use transform dot forward. So we want to use this to make the bullets to move in the correct way.
So, what we’re going to do here is type bulletObject dot transform dot forward equals to transform, or better yet, playerCamera dot transform dot forward. This is very important here because it’s going to make your life much, much easier if because, otherwise we would have to calculate the angles. That’s not necessary at all. We just set the forward vector just like we did with the position, to be the same forward vector as the player camera.
So, it’s going to point to whatever the player is looking at. And with that in mind we can now go to the script of the bullet, so, scripts folder, double click on the bullet to make it open, and we can make a logic for it to move. And that’s going to be very simple. We can simply come here and type public float speed and I’m going to define that as 8f by default. OK, this is a floating point number so we add an f here. And in the update method we are going to make the bullet move. So, I’m going to simply add a comment here that’s going to say make the bullet move And we’re going to type transform dot position plus equals transform dot forward multiplied by speed multiplied by time dot deltaTime.
So, what happened here? When we transform dot position plus equals, it means we’re going to increase the position by passing another vector as a parameter. Another structure, another vector structure as a parameter. And what is going to be that. It’s going to be transform dot forward.
So, it’s going to be an arrow that is going to point somewhere. That means that our position is going to have an offset of one, because every direction has a size of one. But, we’re going to multiply it by speed, so we’re going to increase that forward vector it’s going to be bigger or smaller. And we also multiply by time dot deltaTime. So, we make sure that the game is going to behave more or less the same on different devices. We do that because we are in the update method and faster devices call the update method more times, more frequently, than slower devices. So, we use the time dot deltaTime here to scale that correctly. Now we’re going to save, go back to Unity, wait a little bit, and after that is done we’re going to press play.
And here we are holding our weapon. If we click, then the bullet is going to move forward. Which is good. You notice that it comes from the middle, so it might be a little bit odd. Because we might want it to come from the weapon. But that’s something very, very small. It’s barely noticeable if you select the bullet. And you increase the speed. So, for instance, we can stop the scene, change the speed to 20, for example. And if we press play now, no need to recompile the code, we can still shoot the bullet forward. It’s going to work just fine for us.
However, you notice the bullet is lasting a lot of time here. The bullet’s basically exist forever. And this is going to spend very, very important memory, very important resources from your game. So, if you have a hundred bullets in your game all of them are moving forward, so all of them are going to use space in the memory. So, we have to adjust that. And what we can do for the bullet is add a life time to it. So, we can come here to bullet and type public float lifetime or we can name this as lifeDuration, for example, and set that to be something like 2f, so it’s going to last for two seconds.
And now we need a private variable, private float, and we’re going to name this as lifeTimer. This is going to basically store for how long it’s going to be the internal clock for the bullet that is going to count down, and once it reaches zero, we get rid of the bullet. And now we have this start method here, so we’re going to use it, and we’re going to type lifeTimer equals to lifeDuration. And in the update method, we’re going to check if the bullet should be destroyed. And to do that, we’re going to type here lifeTimer minus equals Time dot deltaTime.
So, if lifeTimer holds three and we decrease Time dot deltaTime in the update method, it’s going to work exactly as the seconds passes, exactly as time passes. And we have to check if lifeTimer is less or equal 0f, it means it’s time to destroy it. So, we can simply type here destroy and pass gameObject as parameter, which is the same as typing this dot gameObject, which is the same as referencing the bullet that is running this script.
Now we can save this, go to Unity, wait for the processing to be finished. And now we press play. So here we are, holding our weapon. If we click, a bullet is added but apparently the lifetime’s still not working. And yes, they disappeared. So, let’s see what’s in the full value that we have here. Life Duration is set to two. We set lifeTimer to be life duration, so, yes, this should last for two seconds. So, press play. Zero, one, two. And the bullet disappears in the hierarchy.
So, since the bullet travels really fast, we might want to change that duration. Instead of two, we might want to use zero dot seven, for example. Whatever you think is going to be better. But, anyway, the lesser, the smaller the life time, the shorter it’s going to be, it’s the duration where the bullet’s going to be alive. And, well, you’re going to use your memory in a better way.
Interested in continuing? Check out our newest full Construct a First Person Shooter course, which is part of our Unity Game Development Mini-Degree.
