You can access the full course here: Build a First-Person Shooter with Godot
Creating The Player
In this lesson, we’re going to create our player object.
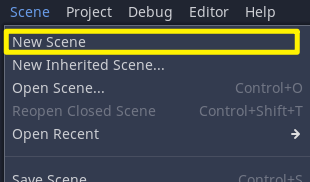
Let’s begin by creating a new scene. Go to Scene > New Scene.
Click on ‘Other Node‘ and create a new Root Node of type KinematicBody.
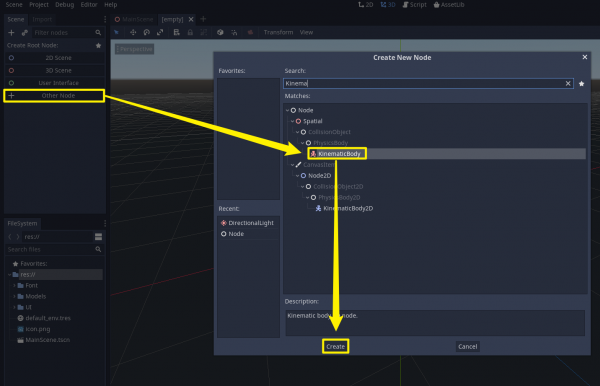
KinematicBody is a type of body that is not affected by physics, and it can only be moved by code or by an AnimationPlayer. It also has a built-in API for moving objects. For more information, visit the documentation: https://docs.godotengine.org/en/stable/classes/class_kinematicbody.html
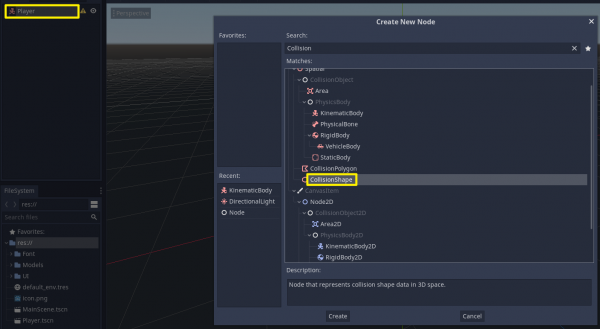
We’ll rename the node to “Player” and save it as “Player.tscn”.
Next, add a child node (Ctrl+A) of type CollisionShape.
In the Inspector panel, we can set the Shape property to ‘CapsuleCollider‘.
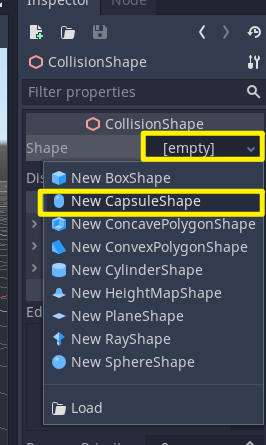
Select the Capsule in the Inspector, and set the Radius and Height to 0.5 and 1.5, respectively.
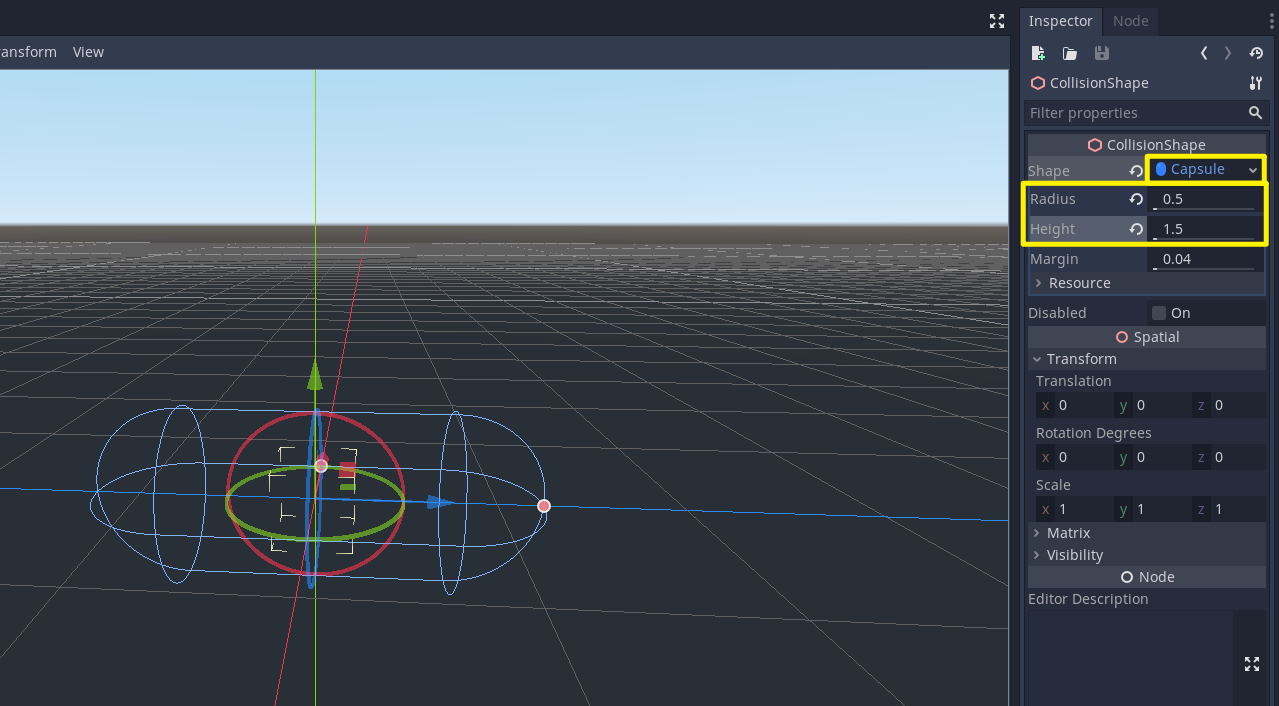
We’ll set the rotation degrees to 90 on the X:

We’ll also set the Y translation to 1.25 so that the collider just sits above Y zero.
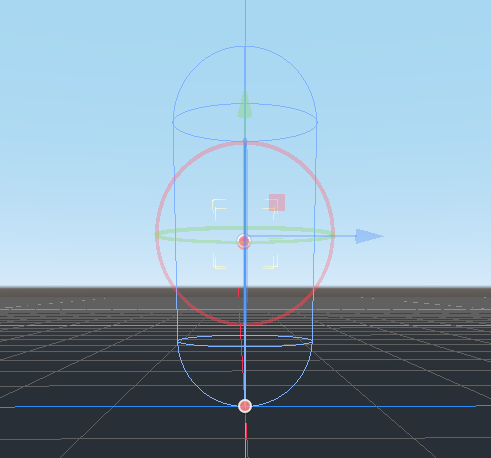
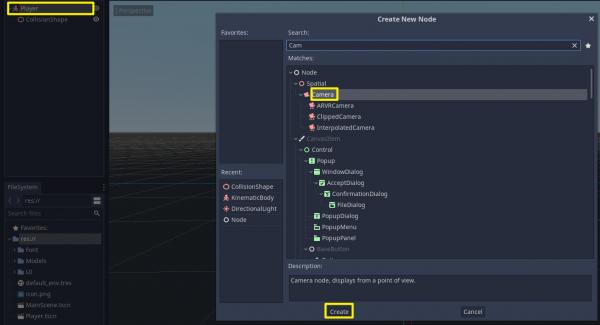
Next, we’ll add a new Child Node to the Player node (Ctrl+A) of type Camera.
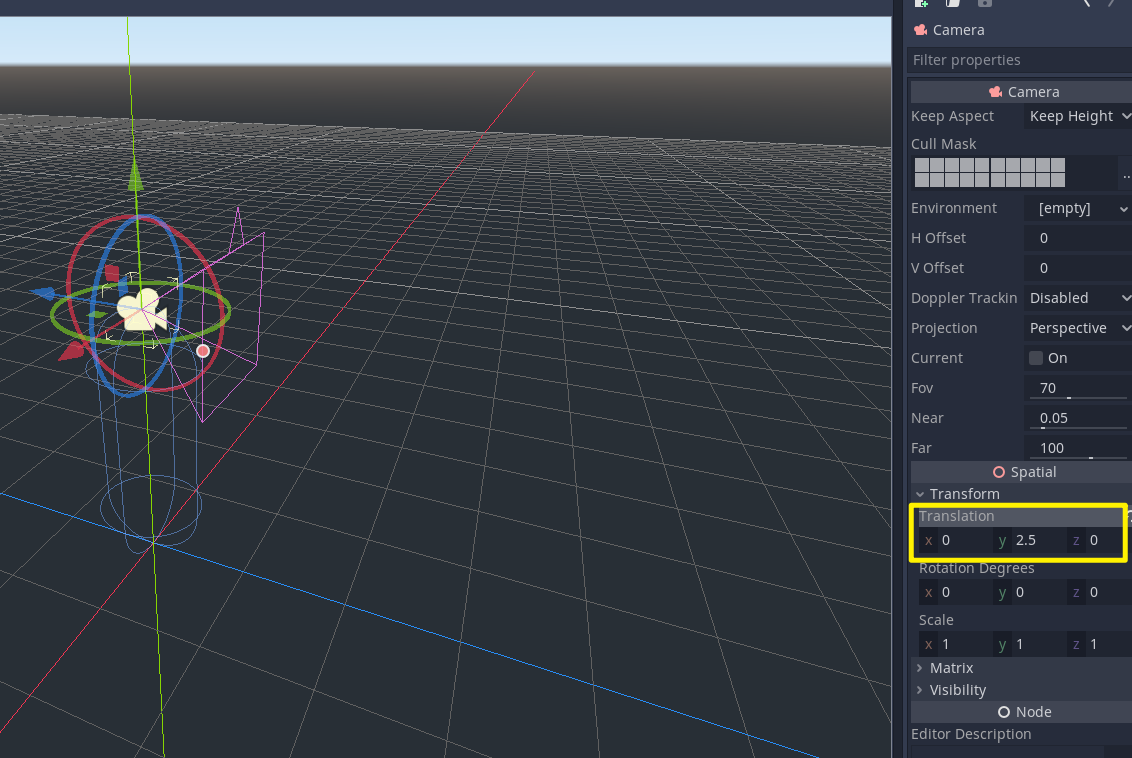
Let’s set the position to be 2.5 so it can sit just above the player’s head.
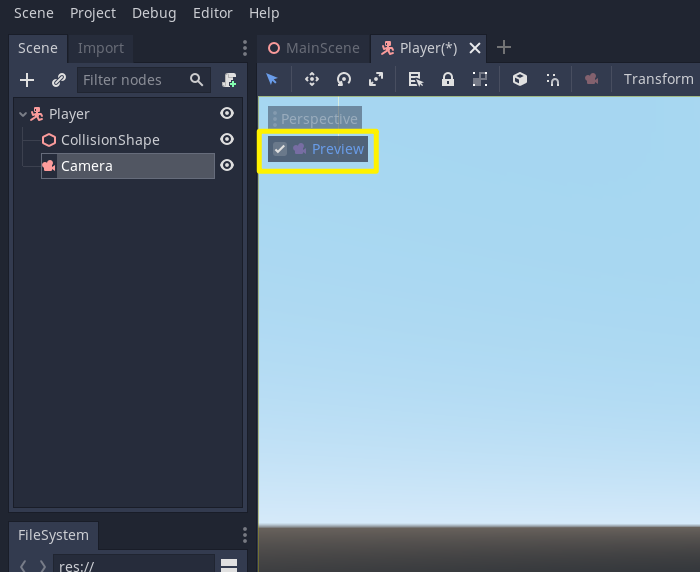
We can click on the ‘Preview‘ button in the scene view to have a look through the camera/player’s perspective.
Setting up the player weapon
First, we need to drag in the model of the weapon (Models > Weapon > Shotgun.obj) into the scene.
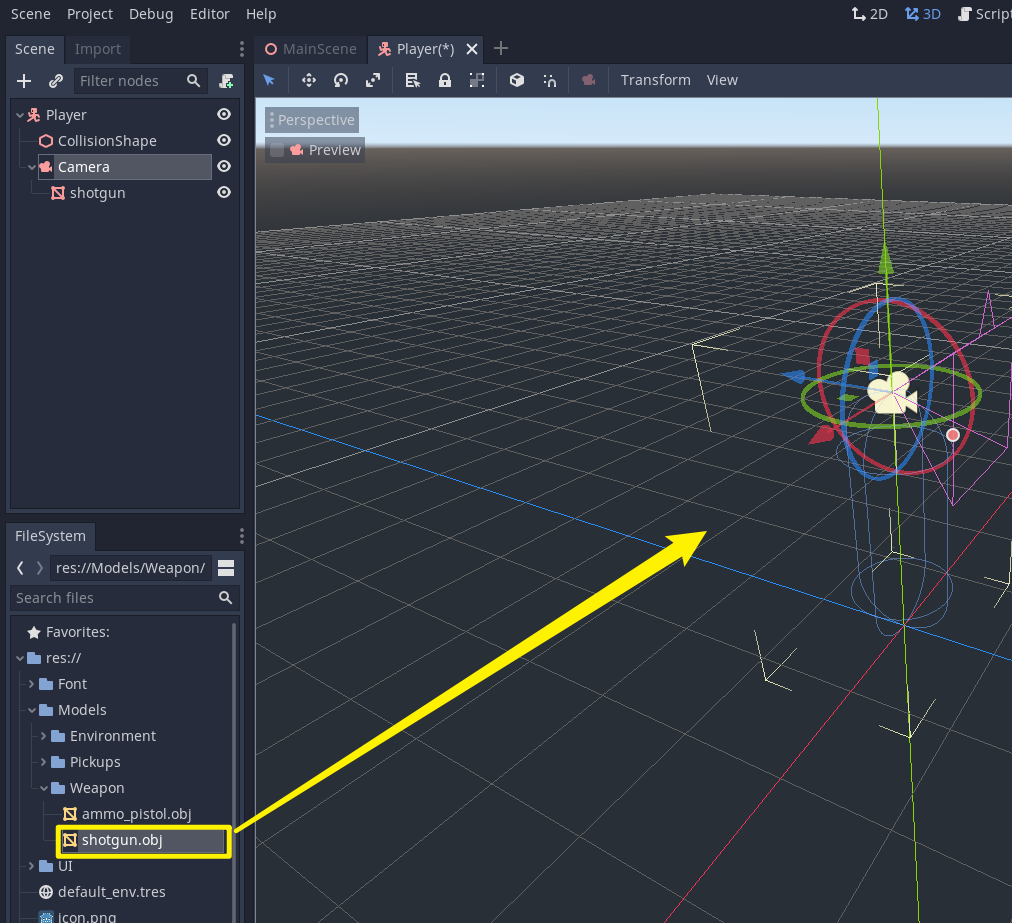
The gun model should follow the camera around wherever we look. You can ensure that by setting the model as a child of the Camera object.
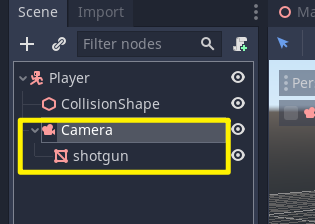
We’ll rename the node to ‘GunModel‘ and set the translation to be (0.2,-0.2,-0.6), so the model is positioned at the right side of the screen when we look through the camera.
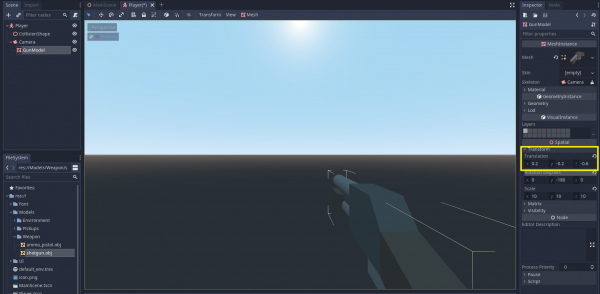
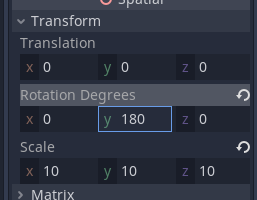
Set the Scale to be (10, 10, 10) and rotation degrees to be (0, 180, 0) so it is facing the right way.
That’s it for the gun model setup. Now, let’s add a new child node of type Spatial for the gun muzzle.

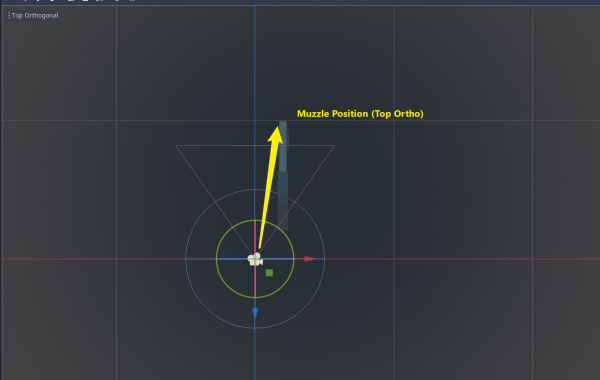
Rename the node to “Muzzle” and position it at the muzzle of the gun model. (You can enable Orthographic View by pressing 5 on Numpad, and Top view by pressing 7.)
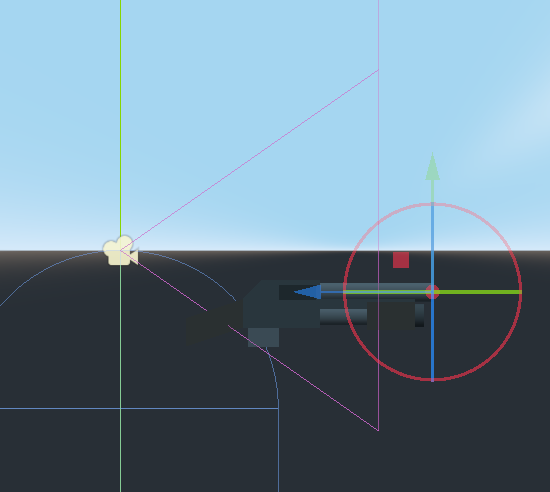
We’ll align it from the Side View as well (Press 3 on Numpad).
Let’s save the scene (Ctrl+S) and go back to our main scene. Drag in Player.tscn into the scene and place it at the centre of the scene by setting the Translation to be (0,0,0).
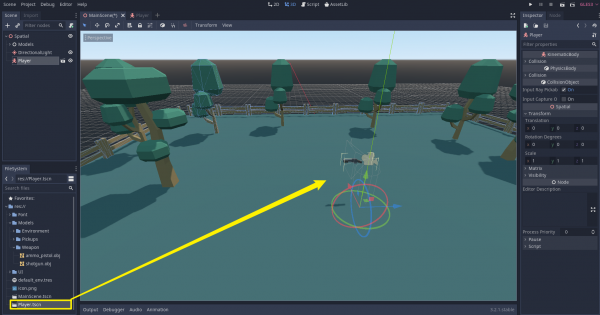
Now, if you save the scene and press play.
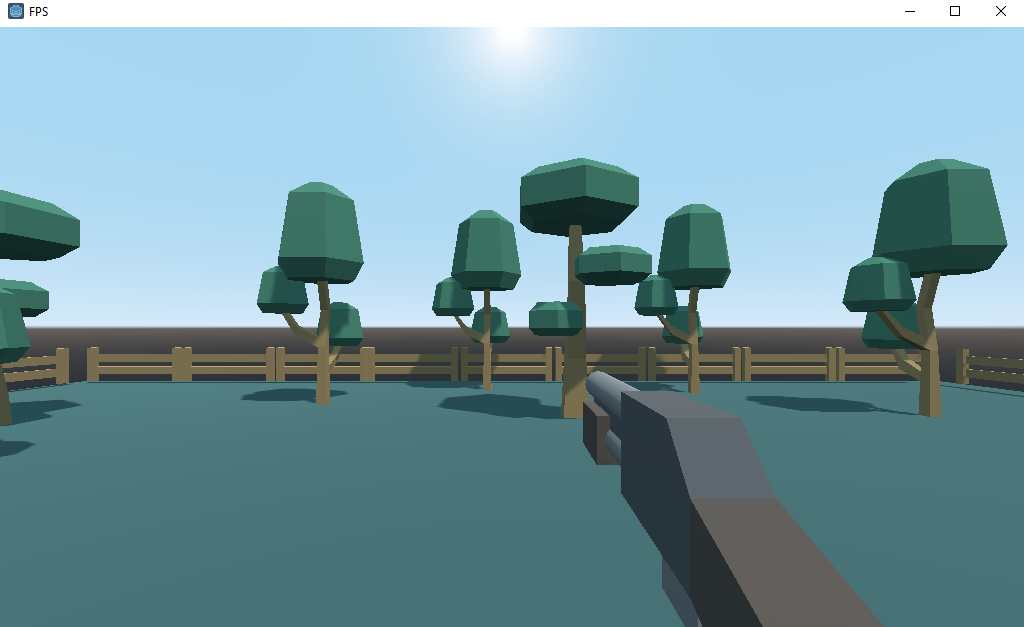
Scripting the Player – Variables
In this lesson, we are going to script our Player, so we can look/move around and jump.
Open up the Player scene that we created in the previous lesson. Select the root node and create a new script (Script > New Script).
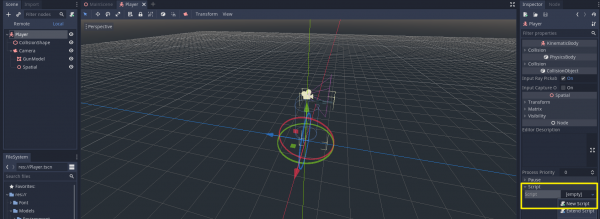
Setting up variables
First, we need to create variables of type integer to store our stats. We’ll assign the default values to our current health, maximum health, ammo, and score.
extends KinematicBody

# stats
var curHP : int = 10
var maxHP : int = 10
var ammo : int = 15
var score : int = 0
Now, we’re going to create some physics variables for moving and jumping.
extends KinematicBody


# stats
var curHP : int = 10
var maxHP : int = 10
var ammo : int = 15
var score : int = 0

# physics
var moveSpeed : float = 5.0
var jumpForce : float = 5.0
var gravity : float = 12.0
We’ll create another float variable for look sensitivity. We also need variables to clamp the vertical rotation of our camera, so we can look 90 degrees up/down instead of 360 degrees.
extends KinematicBody


# stats
var curHP : int = 10
var maxHP : int = 10
var ammo : int = 15
var score : int = 0

# physics
var moveSpeed : float = 5.0
var jumpForce : float = 5.0
var gravity : float = 12.0

# cam look
var minLookAngle : float = -90.0
var maxLookAngle : float = 90.0
var lookSensitivity : float = 10.0
We also need a Vector3 variable to store our current velocity, which includes x,y, and z position, and a Vector2 variable to track our mouse movement (both horizontal and vertical).
extends KinematicBody

# stats
var curHP : int = 10
var maxHP : int = 10
var ammo : int = 15
var score : int = 0

# physics
var moveSpeed : float = 5.0
var jumpForce : float = 5.0
var gravity : float = 12.0

# cam look
var minLookAngle : float = -90.0
var maxLookAngle : float = 90.0
var lookSensitivity : float = 10.0

# vectors
var vel : Vector3 = Vector3()
var mouseDelta : Vector2 = Vector2()
Now, we need to get components because our player node has separate child nodes for “GunModel” and “Muzzle” that we’ll be controlling in the script.
Note that the ‘onready‘ keyword is used to call the get_node() function once the node is initialized. This allows us to look through our node structure and find the target node.
extends KinematicBody

# stats
var curHP : int = 10
var maxHP : int = 10
var ammo : int = 15
var score : int = 0

# physics
var moveSpeed : float = 5.0
var jumpForce : float = 5.0
var gravity : float = 12.0

# cam look
var minLookAngle : float = -90.0
var maxLookAngle : float = 90.0
var lookSensitivity : float = 10.0

# vectors
var vel : Vector3 = Vector3()
var mouseDelta : Vector2 = Vector2()

# components
onready var camera : Camera = get_node("Camera")
onready var muzzle : Spatial = get_node("Camera/Muzzle")
Setting up key actions
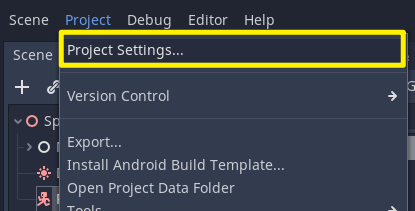
To allow certain actions (e.g. move/jump/attack) upon key press, we need to define the keys in Project Settings > Input Map.
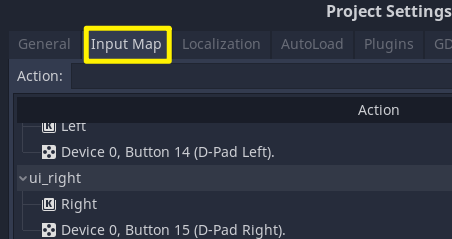
You can create a new action by typing in the name and press the ‘Add‘ button.
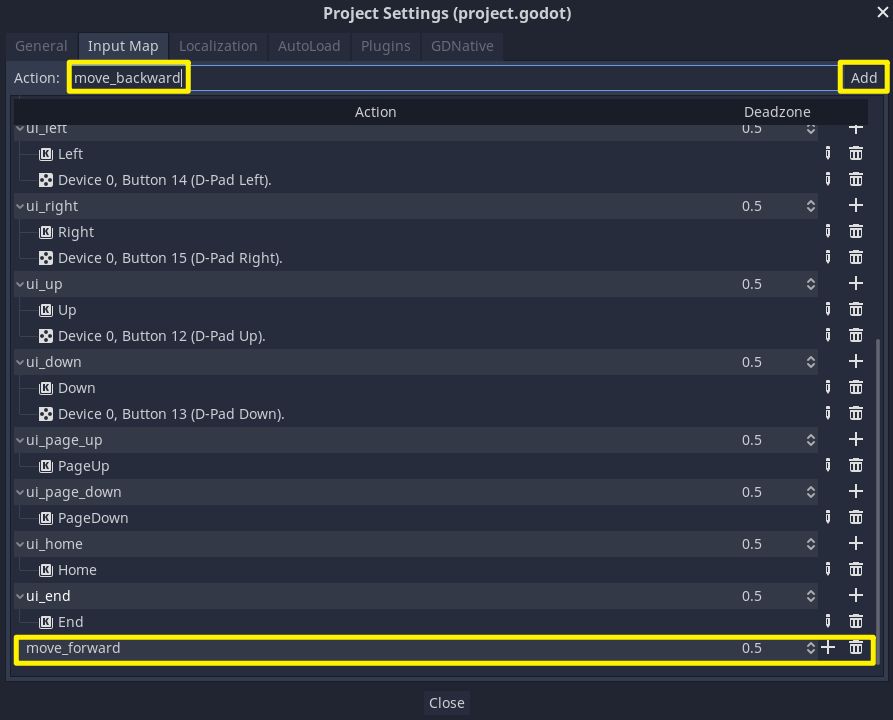
Here is the list of key actions we need to create:
- move_forward
- move_backward
- move_left
- move_right
- jump
- shoot
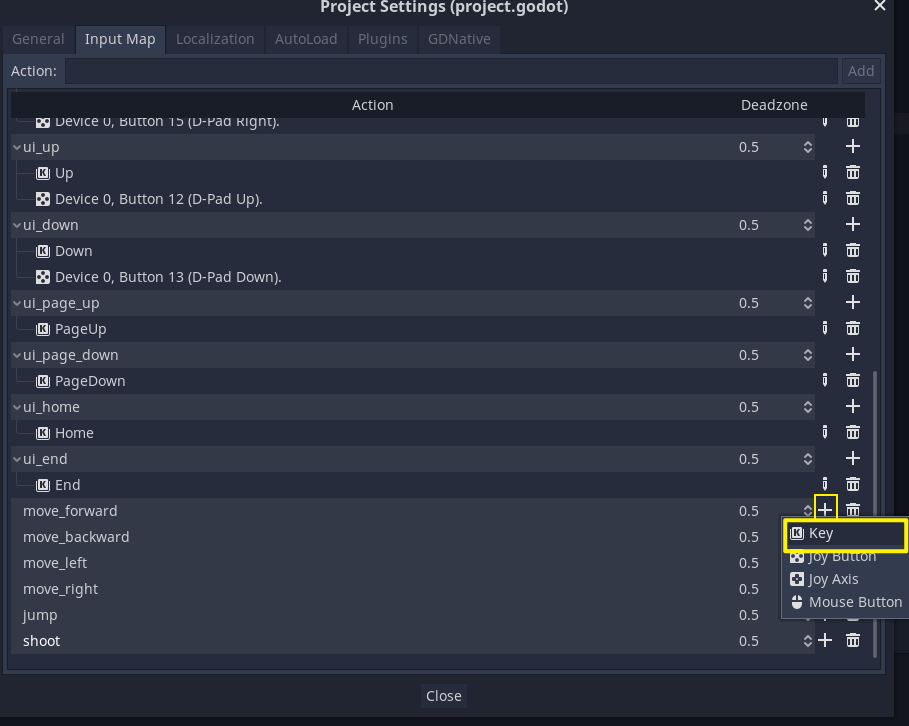
We can then assign a key to the action by clicking on ‘+‘ on the right and then press ‘Key’.
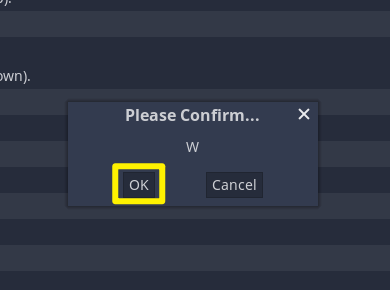
When the ‘Please Confirm…’ pop-up shows up, you can just press whatever key you want that to be assigned to and then hit OK.
As you already know, the conventional FPS key settings are W,A,S,D to move, Space to jump, and LMB (Left Mouse Button) to shoot.
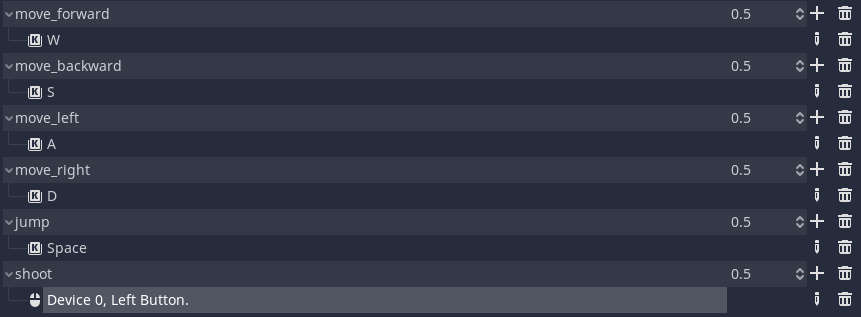
Once it’s all set up, close the window and save the project. Let’s open up our script again.
We now need to create a function that runs the physics. For this, we’ll be using the Godot’s built-in function ‘_physics_process(delta)‘, which runs at a consistent 60 frames per second.
func _physics_process(delta):
In the next lesson, we’re going to be adding more to this function (e.g. detecting inputs, moving the player, jumping, gravity, etc.).
Scripting the Player – Movement
In this lesson, we are going to add codes that will allow movement, jump and gravity.
The first thing we want to do is reset our x and z velocity because we want to stop moving once we let go of a button.
func _physics_process(delta):

	# reset the x and z velocity
	vel.x = 0
	vel.z = 0
Now we need to create a vector to check inputs for movement. This variable will be of type Vector2 as we will be moving along x-axis (left, right) and y-axis (forward, backward).
func _physics_process(delta):

	# reset the x and z velocity
	vel.x = 0
	vel.z = 0

	var input = Vector2()

	# movement inputs
	if Input.is_action_pressed("move_forward"):
		input.y -= 1
	if Input.is_action_pressed("move_backward"):
		input.y += 1
	if Input.is_action_pressed("move_left"):
		input.x -= 1
	if Input.is_action_pressed("move_right"):
		input.x += 1
At the moment, when we’re moving diagonally, we can move faster as the speed for movement on both axis adds up. We can prevent this by normalizing the vector, which means the magnitude of all the axis added together will equal one.
input = input.normalized()
Our next step is to get our forward and right directions because right now we’re only moving along the global x and z axes and not taking the player’s local rotation into consideration.
# get the forward and right directions
var forward = global_transform.basis.z
var right = global_transform.basis.x

var relativeDir = (forward * input.y + right * input.x)
the variable relativeDir will return a Vector3 which is the direction we’re going to move in. Now, we can pass this value back to our velocity vector as such:
# set the velocity
vel.x = relativeDir.x * moveSpeed
vel.z = relativeDir.z * moveSpeed
Applying Gravity
# apply gravity
vel.y -= gravity * delta
Applying gravity can be simply done by vel.y -= gravity. However, our root function ‘_physics_process(delta)‘ gets called 60 times per second, so it is not easy to guess what value would be ideal for our gravity.
Hence, we can multiply the gravity value by delta to convert it into ‘per second‘ rather than ‘per frame’.
Moving the Player
Finally, we can apply this velocity vector (vel) to the KinematicBody using a built-in function called move_and_slide().
# move the player
vel = move_and_slide(vel, Vector3.UP)
move_and_slide() moves the body along a vector. If the body collides with another, it will slide along the other body rather than stop immediately.
For more information, visit the documentation: https://docs.godotengine.org/en/stable/classes/class_kinematicbody.html
Adding in the ability to Jump
# jumping
if Input.is_action_pressed("jump") and is_on_floor():
	vel.y = jumpForce
First, we need to check if the jump key is pressed, using is_action_pressed(“jump”).
We also need to check if the player is on the floor, using is_on_floor(), which requires move_and_slide() to be called first.
Now you can press WASD to move, Space to jump, and have gravity applied to us when we’re jumping. Here’s the complete script:
extends KinematicBody

# stats
var curHP : int = 10
var maxHP : int = 10
var ammo : int = 15
var score : int = 0

# physics
var moveSpeed : float = 5.0
var jumpForce : float = 5.0
var gravity : float = 12.0

# cam look
var minLookAngle : float = -90.0
var maxLookAngle : float = 90.0
var lookSensitivity : float = 10.0

# vectors
var vel : Vector3 = Vector3()
var mouseDelta : Vector2 = Vector2()

# components
onready var camera : Camera = get_node("Camera")
onready var muzzle : Spatial = get_node("Camera/Muzzle")

func _physics_process(delta):

	# reset the x and z velocity
	vel.x = 0
	vel.z = 0

	var input = Vector2()

	# movement inputs
	if Input.is_action_pressed("move_forward"):
		input.y -= 1
	if Input.is_action_pressed("move_backward"):
		input.y += 1
	if Input.is_action_pressed("move_left"):
		input.x -= 1
	if Input.is_action_pressed("move_right"):
		input.x += 1

	input = input.normalized()

	# get the forward and right directions
	var forward = global_transform.basis.z
	var right = global_transform.basis.x

	var relativeDir = (forward * input.y + right * input.x)

	# set the velocity
	vel.x = relativeDir.x * moveSpeed
	vel.z = relativeDir.z * moveSpeed

	# apply gravity
	vel.y -= gravity * delta

	# move the player
	vel = move_and_slide(vel, Vector3.UP)

	# jumping
	if Input.is_action_pressed("jump") and is_on_floor():
		vel.y = jumpForce
Scripting the Player – Camera Look
In this lesson, we’re going to focus on being able to look around with our camera.
First of all, we need to figure out how and where is our mouse moving. (i.e. What is the direction our mouse is moving in, and how far is it moving?)
We’re going to be checking that inside of a built-in function to Godot, which is called func _input(event).
func _input(event):
Whenever a keyboard input’s detected, the function gets called with the corresponding information sent over in the event parameter.
func _input(event):

	if event is InputEventMouseMotion:
If the event has something to do with the mouse, then we want to set mouseDelta as the direction that the mouse is moving in.
func _input(event):

	if event is InputEventMouseMotion:
		mouseDelta = event.relative
Now we’re going to use func _process(delta), which is another built-in function that gets called every frame.
func _process(delta):
We want to rotate the camera along the x-axis. The up and down of the mouse movement multiplied by lookSensitivity multiplied by delta, so it’s converted in terms of seconds for smoother movement.
func _process(delta):

	# rotate the camera along the x axis
	camera.rotation_degrees.x -= mouseDelta.y * lookSensitivity * delta
Currently, we can rotate upwards until it loops back around, so our next step is to clamp the camera rotation on the x-axis. For this, we will use float clamp(value, min, max), which is a function that clamps ‘value’ and returns a value not less than ‘min’ and not more than ‘max’.
func _process(delta):

	# rotate the camera along the x axis
	camera.rotation_degrees.x -= mouseDelta.y * lookSensitivity * delta

	# clamp camera x rotation axis
	camera.rotation_degrees.x = clamp(camera.rotation_degrees.x, minLookAngle, maxLookAngle)
Now, we need to set up rotating left and right, using the same method we just used for the x-rotation.
func _process(delta):

	# rotate the camera along the x axis
	camera.rotation_degrees.x -= mouseDelta.y * lookSensitivity * delta

	# clamp camera x rotation axis
	camera.rotation_degrees.x = clamp(camera.rotation_degrees.x, minLookAngle, maxLookAngle)

	# rotate the player along their y-axis
	rotation_degrees.y -= mouseDelta.x * lookSensitivity * delta
Finally, we go reset the mouseDelta vector so that we don’t keep looking in the direction that the mouse is moving.
func _process(delta):

	# rotate the camera along the x axis
	camera.rotation_degrees.x -= mouseDelta.y * lookSensitivity * delta

	# clamp camera x rotation axis
	camera.rotation_degrees.x = clamp(camera.rotation_degrees.x, minLookAngle, maxLookAngle)

	# rotate the player along their y-axis
	rotation_degrees.y -= mouseDelta.x * lookSensitivity * delta

	# reset the mouseDelta vector
	mouseDelta = Vector2()
Here is how the script should look so far:
extends KinematicBody

# stats
var curHP : int = 10
var maxHP : int = 10
var ammo : int = 15
var score : int = 0

# physics
var moveSpeed : float = 5.0
var jumpForce : float = 5.0
var gravity : float = 12.0

# cam look
var minLookAngle : float = -90.0
var maxLookAngle : float = 90.0
var lookSensitivity : float = 10.0

# vectors
var vel : Vector3 = Vector3()
var mouseDelta : Vector2 = Vector2()

# components
onready var camera : Camera = get_node("Camera")
onready var muzzle : Spatial = get_node("Camera/Muzzle")


func _physics_process(delta):

	# reset the x and z velocity
	vel.x = 0
	vel.z = 0

	var input = Vector2()

	# movement inputs
	if Input.is_action_pressed("move_forward"):
		input.y -= 1
	if Input.is_action_pressed("move_backward"):
		input.y += 1
	if Input.is_action_pressed("move_left"):
		input.x -= 1
	if Input.is_action_pressed("move_right"):
		input.x += 1

	input = input.normalized()

	# get the forward and right directions
	var forward = global_transform.basis.z
	var right = global_transform.basis.x

	var relativeDir = (forward * input.y + right * input.x)

	# set the velocity
	vel.x = relativeDir.x * moveSpeed
	vel.z = relativeDir.z * moveSpeed

	# apply gravity
	vel.y -= gravity * delta

	# move the player
	vel = move_and_slide(vel, Vector3.UP)

	# jumping
	if Input.is_action_pressed("jump") and is_on_floor():
		vel.y = jumpForce


func _process(delta):

	# rotate the camera along the x axis
	camera.rotation_degrees.x -= mouseDelta.y * lookSensitivity * delta

	# clamp camera x rotation axis
	camera.rotation_degrees.x = clamp(camera.rotation_degrees.x, minLookAngle, maxLookAngle)

	# rotate the player along their y-axis
	rotation_degrees.y -= mouseDelta.x * lookSensitivity * delta

	# reset the mouseDelta vector
	mouseDelta = Vector2()

func _input(event):

	if event is InputEventMouseMotion:
		mouseDelta = event.relative
Now, if you save the script and hit Play, you’ll notice that you can look left, right, up, down. But once the mouse leaves outside the game window, it doesn’t continue to track.
What we need to do is lock the mouse cursor in the middle of the screen and hide it, so the cursor doesn’t go off the screen.

To do so, we’re going to call func _ready() at the top of the script. _ready() is a function that gets called once the node is initialized, so this should be called right at the start of the game.
func _ready():
We’ll be using .set_mouse_mode to lock and hide our mouse using one of these options:
- MOUSE_MODE_VISIBLE — Makes the mouse cursor visible if it is hidden.
- MOUSE_MODE_HIDDEN — Makes the mouse cursor hidden if it is visible.
- MOUSE_MODE_CAPTURED — The mouse will be hidden and unable to leave the game window.
- MOUSE_MODE_CONFINED — Makes the mouse cursor visible but confines it to the game window.
func _ready():

	# hide and lock the mouse cursor
	Input.set_mouse_mode(Input.MOUSE_MODE_CAPTURED)
Save the script and hit Play. You will now see that the mouse is hidden. You can press Alt+4 to close the game window. Here is the final script:
extends KinematicBody

# stats
var curHP : int = 10
var maxHP : int = 10
var ammo : int = 15
var score : int = 0

# physics
var moveSpeed : float = 5.0
var jumpForce : float = 5.0
var gravity : float = 12.0

# cam look
var minLookAngle : float = -90.0
var maxLookAngle : float = 90.0
var lookSensitivity : float = 10.0

# vectors
var vel : Vector3 = Vector3()
var mouseDelta : Vector2 = Vector2()

# components
onready var camera : Camera = get_node("Camera")
onready var muzzle : Spatial = get_node("Camera/Muzzle")

func _ready():

	# hide and lock the mouse cursor
	Input.set_mouse_mode(Input.MOUSE_MODE_CAPTURED)

func _physics_process(delta):

	# reset the x and z velocity
	vel.x = 0
	vel.z = 0

	var input = Vector2()

	# movement inputs
	if Input.is_action_pressed("move_forward"):
		input.y -= 1
	if Input.is_action_pressed("move_backward"):
		input.y += 1
	if Input.is_action_pressed("move_left"):
		input.x -= 1
	if Input.is_action_pressed("move_right"):
		input.x += 1

	input = input.normalized()

	# get the forward and right directions
	var forward = global_transform.basis.z
	var right = global_transform.basis.x

	var relativeDir = (forward * input.y + right * input.x)

	# set the velocity
	vel.x = relativeDir.x * moveSpeed
	vel.z = relativeDir.z * moveSpeed

	# apply gravity
	vel.y -= gravity * delta

	# move the player
	vel = move_and_slide(vel, Vector3.UP)

	# jumping
	if Input.is_action_pressed("jump") and is_on_floor():
		vel.y = jumpForce


func _process(delta):

	# rotate the camera along the x axis
	camera.rotation_degrees.x -= mouseDelta.y * lookSensitivity * delta

	# clamp camera x rotation axis
	camera.rotation_degrees.x = clamp(camera.rotation_degrees.x, minLookAngle, maxLookAngle)

	# rotate the player along their y-axis
	rotation_degrees.y -= mouseDelta.x * lookSensitivity * delta

	# reset the mouseDelta vector
	mouseDelta = Vector2()

func _input(event):

	if event is InputEventMouseMotion:
		mouseDelta = event.relative
In the next lesson, we’re going to focus on setting up the ability to shoot bullets.
Transcript
Creating The Player
Welcome back, everyone. In this lesson, we’re gonna begin to create our player object. This is going to be the player scene, which is gonna hold the player, it’s collider and the camera. And from there we’re gonna begin scripting the player.
So to begin let’s go up to Scene here and we’re gonna create a new scene. It’s gonna be of type kinematic body right here. Now this is very similar to the 2D kinematic body, which basically allows us to have some sort of physics interactions. It allows us to move along surfaces, collide with various different things. It’s really good for characters and character controls pretty much.
So I’m gonna rename this here to player. I’m gonna save it as, player.tsen and as a child of this node, we’re gonna be creating, first of all, a collider. So we’ll just look up a collision shape right here. And this is gonna be basically the sort of size of the player what they can collide with. So we’ll set a shape here to be a new capsule shape right here. Right now, it’s a bit odd. So what we’re gonna do is we’re gonna select the capsule shape. We’re gonna set the radius to 0.5 and the height to 1.5 Now we need to rotate it and position it. So in the transform drop down here, we’re gonna set the rotation degrees to 90 on the X. So it’s vertical now and actually 1.25 on the Y translation, so it is just sitting above Y zero right here.
Okay, great. So we got our player right here. Now what we need to do is add in the camera and the camera is going to be what we see through the player’s eyes, we’re gonna then be able to move this camera around with our mouse. So for the camera, I’m gonna right click on player, add child node and we’re gonna add in a camera right here. By default, it’s positioned down its feet. We’re going to be a bit higher up so I’m gonna set the Y position of the camera here, the Y translation to be 1.5. We want it to actually be 2.5, so it is sitting just above the player’s head right here and looking outwards. And in fact we can click on the preview button right here in the scene view to have a look through the camera and through the player’s eyes.
All right, great. So we got that, we got the camera set up. Now what we need to do is set up the player’s weapon. We need to set up the weapon that the player is gonna have on their screen so we can see what we’re holding onto and to do that we’re gonna open up our model’s folder here, weapon and I’m gonna drag in the shotgun.obj. Make sure it is gonna be a child of the camera object because when we do look around, we do want the gun model to follow the camera around wherever we look.
Okay. So we select the model. I’m gonna rename this here to be our gun model. Now in the inspector, I’m gonna set the translation to be zero, zero, zero, so it is nice and centered here. You might notice it’s also pretty small. So what we need to do is increase the scale a bit. I’m gonna set the scale here to maybe five by five by five. That’s still a tiny bit small, so let’s actually increase it to 10 by 10 by 10. We’ll set the Y rotation degrees to 180, so it is flipped around and facing the right way here and then what we can do is drag it forward a bit. Maybe move it down a bit, move it to the right a bit, and let’s look through our camera.
So I’m gonna select the camera here, click on preview, and there we go, we got a gun model. Now let’s just reposition it a bit so it’s in a bit of a better position. All right, so I’m gonna set the X translation here to be 0.2 I’m gonna set the Y here to be zero, which is a bit high so maybe -0.5 nope, we’ll probably wanna make that -0.2. There we go and Z we’ll put that -0.6, something like that. So here we go, we got our gun model. we got that pointing outwards and we are also in needing to create a new node, which is a child of the gun model. Actually it doesn’t have to be the child of the gun model. In fact, we are just gonna make it a child of the camera.
So right click on camera, go add child node and this is just gonna be a spatial node and this is gonna be for the gun muzzle. So where are we gonna be spawning the bullet to then shoot? Okay. So, this spatial here, I’m gonna rename it to muzzle and we want to position it basically just at the muzzle of the gun here. Now with this view, it’s kinda hard to orientate yourself.
So what we can do in Godot is have some automatic orientations applied to the camera here, the scene camera, and for that you do need Numpad, so, make sure on your Numpad, you have Numlock turned on so you have the light with the Numlock on and then I’m gonna press seven to have above view right here and what we’re gonna do with the muzzle is drag it forward a bit and in fact right now we’re in perspective view, you can see that things change perspective as we zoom in, but if we press five we’ll go into orthographic mode so that there is no depth shown.
So what I’m gonna do here is hold down shift and with middle mouse we can pan across like this. I’m gonna position this right about here, there we go. We can then press one to get a side view and actually we’ll press three to get this side view and then drag that down to line it up, luxor. You can press five to get out of the orthographic mode and there we go, we got our gun model, we have the muzzle and everything here should be ready to go.
If you go back into the main scene now, what we can do is drag in our player.tsen into the scene, set the transform here to be zero, zero, zero. They should be standing in the middle of the field here and they should be standing on top of the surface here. Now if we press play, you’ll notice that it says no main scene has been defined. So we’ll select the main scene right here, press play, and there we go. We got our camera, we got our gun model here and we’re ready to begin scripting. But before we do that it’s good practice to actually go to our player here, select the camera and enable current right here. Just in case you do have multiple cameras in the scene, it’s good to basically tell the game that this here is the camera we want to use.
So there we go. Thanks for watching and I’ll see you in the next lesson.
Scripting the Player – Variables
Welcome back everyone, in this lesson we are gonna begin to script air player, we gonna have the ability to look around via camera, move around as well, and jump and have gravity applied to us, we’re gonna create a first person controller here in Godot. So, in the previous lesson we set up air player scene right here, I’ll just open it up, we set up a kinematic body as air an air, then a collate, a camera and as a child of the camera we have the gun model and the muzzle where the bullets are gonna come out.
So we got that all set up, now what we need to do, is select the player node here and we are going to create a new script here in the inspector and this script we’ll just keep it called player by default. Okay, so we got the script right here, up and ready to go, so the first thing I wanna do is create a variable. First up, let’s create some start song and then separate these by, some comments and a comment you can just go hashtag and then write whatever you want, these won’t get compound with the code as these are just for us to see.
So first up, we’re gonna have some stats that we’re not really gonna be working with just yet but we’ll be needing them later on. So first up, we have our CurHp for our current health and that is gonna be of top integer and by default that will equal 10. We also need a maxHp to know how much health can go up to, that will also be an int of 10 by default. Then we got our ammo, which is int again and we’ll have that at 15 and we have a score which we’ll have as an int and that will be zero by default.
So we’re not going to be using these values just yet, instead, we’re gonna be going down here and we’re gonna create some physics variables, and these are going to be with the actual movement jumping and gravity. So first up we have a moveSpeed, of top float so we want very precise numbers we can have decimals and partifoar we gonna have this equal five, then we want to have a jump force, so how much force is applied upwards when we wanna jump, that is gonna be of top float again and we’ll have that as five by default. And then we also wanna have the gravity, which is also gonna be float, and this is going to be a… We’ll have it at around 12, we can tweak this depending on, if it’s a bit too strong or if it’s a bit too weak.
Okay, so we got that? As well as this goes I need some variables for a camera looking. So with our camera, so just look at Cam look here, we need to figure out what is the maximum angle we can look upwards and what is the maximum angle we can look downwards because we don’t want to be able to look up and down and just do a 360 that way, we want to sort of clamp the vertical rotation, so here we’ll have var for minLookAngle of top float, and this will equal negative 90.
Also have a max look angle, so maxLookAngle of top float and this will equal 90 as well so we can look 90 degrees up and 90 degrees down. Along with this we’ll also need a look sensitivity because when we are moving a mass around it might be a bit too slow or a bit too fast, so we do want to be able to change the speed at which we look around, so we go var and this will just be lookSensitivity of top float and this will equal 10.
So we got those set up as well as this you will also need some vectors. We need to store our current velocity and the massDelta which is basically how far, in which direction has the mass moved in the previous frame. So we’ll just have our vectors here, and these are going to be first of all var for vel for velocity is gonna be of top vector three so we’re storing a x, y and z-position because we are moving around in 3D space, so our velocity can be in any direction. And by default we’ll just make this a new empty vector three like so, and we also want the mouseDelta, now since the mouse only works on two axes, horizontal and vertical, we only need to have a vector two for this so is giving me old type vector two and we’re gonna make it a empty vector two by default, there we go.
So, look that here, now what we need to do is actually get components because our player node right here we have a few things that we need access to such as the camera and the muzzle. We need to know where the muzzle is in order to spawn bullets and we need to know what the cameras is in order to move it around. So am just gonna go here components, and we’re gonna have a var camera which is gonna be of type camera and we won’t be able to access this once the game starts.
So am gonna switch this variable over to an on ready variable, which basically means whatever is after this equal sign here will be called once this node here is initialized, and this allows us to basically look through air node structure and find the camera so we can get underscore node and then we can just search camera and it is gonna get the camera node that it finds.
Now we also need to get the muzzle so we can go on ready var muzzle is gonna be of type spatial because this here is just gonna be an empty node and this is gonna equal get underscore node. Now we need to get the node path to that node, now it is a child of camera. So first of all we need to enter in camera, slash muzzle, there we go, so that’s how we access the muzzle node right here. And with all that setup lets actually go ahead press play, make sure there’s no errors with any of these on ready variables right here so we press play and we are all good there’s no errors popping up here so we can exit out of this.
And from here we’ve got all our variables, now what we can do is actually start and setting up air Physics setting up air movement, setting up air jumping, air gravity and looking around with the mouse.
So first of all before we actually jump into that, what we need to do is set up air actions, air key actions, because right now the game doesn’t really know what move left, move right, move forward, move back means, it doesn’t know what the attack button is, it doesn’t know what the jump button is, so we need to define these things inside of Godot here. And to do that we can go over to project, project settings, input map and over here is where we can enter in air new actions.
So first up we gonna have one action, this is is gonna be move underscore forward, press enter to add it to the actions here, we also want move underscore backward, backwards, move underscore left, move underscore right we also then want jump and we want shoot. So we got these six new actions here and what we want to do is assign a key to it, ’cause right now they got no keys, you can see some of these other actions here.
There are default and Godot do have actions or do have keys corresponding to that action, so if we move forward lets click on the plus icon right, to its right select key and the we can just click on whatever key we want that to be assigned to. So to move forward I’m gonna set it to W, press okay, move backwards we gonna set that to S, move left we’ll set that to A, move right here can be D, jump we’ll have it as Space, and shoot here is gonna be a mouse button so am gonna click on the plus choose mouse button and as you can see by default it is left button right here you can choose from all the very several mouse buttons.
Device, with device here it doesn’t really matter what you select, you can select device zero but am just gonna select all devices, just to make sure, because there’s no multiple controllers in this game so all devices is just the safe way to go, click add and there we go, we got our move forward, backwards left, right, jump and shoot actions all set up ready to go so we can start detecting them inside of our script.
So click close right here, and what we gonna do now is, actually start to create air function which is going to run the physics, and this is going to be the underscore Physics underscore process function. So let’s create it right here, so am just gonna go func underscore physics and what you should see is it automatically pops up with a selection we can just enter, and it creates the physics process function, now this function is built into Godot, most specifically it’s built into air player’s kinematic body node right here, which we are extending from at the top, so we do have those attributes we can access and this function gets called 60 times a second. This is a consistent update function.
Now Godot also does has the default underscore process function which gets called every single frame, but doing physics in the process function at times might not be the best because that is not a steady call right, that gets called as many times as you have frames per second so you might be fluctuation between 60, 100, so the process function can be called any number of times during a second, where as the physics process function gets called at a consistent 60 frames per second, which is good for physics as you don’t want variations in the time step.
So we got the physics process function right here and we gonna be doing a number of things here, and we’ll be doing a number of things here such as detecting inputs, moving the player, jumping, having gravity being applied to us, and we’ll be working on that in the next lesson.
Scripting the Player – Movement
Welcome back, everyone, in the previous lesson we start to create our player script right here. We entered in all of our variables we’re gonna be using for now, and we also created the physics_process function which gets called 60 times a second. Now, there is gonna be an error right now because we don’t actually have anything in the function, so, it’s got some problems with it being empty, but let’s go fill it in.
So, first of all, what we want to do is reset our x and z velocity of this velocity vector right here because when we let go of a button, we don’t wanna continuously be moving in the same direction as when we were holding a button down, so, we wanna stop once we let go of a button, and the reason why we’re not resetting the vector as a whole is because we want to maintain the y velocity, because if we’re falling and we let go of a button, we don’t all of a sudden wanna reset our y velocity, we wanna keep falling down.
So, here we’re gonna reset the x and z velocity and to do that we’re just gonna go vel.x = 0 and vel.z = 0. Now what we need to do is create a new vector to basically get our inputs, because what we’re gonna do is we’re gonna be checking if we press WASD, and these keys are gonna correlate to moving forward, if we’re moving back, if we’re moving left, if we’re moving right, and we’re gonna store that in a temporary variable which is gonna be a Vector2. So, we’re gonna go var input = Vector2.
So, I’m gonna be storing the left, right, and up, and down, inputs in this vector right here, and we’re gonna do that in movement inputs. So we’re gonna be checking, first of all, if we’re pressing the forward button. So, if Input.is_action_pressed, every frame that this action is being held down, this is going to be true, so, we wanna check for move_forward, colon at the end, and what we’re gonna do if this is true then we’re gonna set input.y -= 1, but right now if we press move_forward, y is gonna be -1.
Now, we need to do this for all four movement axes, so, then we can go if Input.is_action_pressed and we wanna check for move_backward, then we are gonna go input.y += 1. As well as this, then, we need to check the left, right, then we’re good. So, I’m just gonna copy this right here and paste this twice more. We’ll check move_left and then move_right, like so. If we’re moving left, we want to go on the x-axis and go -= 1, and if we’re moving right, we want it to go += 1 on the x-axis. So, we’re gonna have movement inputs and this input vector here is being changed depending on which buttons we have held down.
Now what we need to do is normalize this vector, and what normalizing it does basically means that the magnitude or the total of all the axes added together will equal one. And the reason why we’re gonna do this, especially for a character controller, a player controller, is because if we were holding down, let’s just say the forward and right button, we’re gonna be moving at a diagonal angle, and this movement is actually gonna be faster than if we were just moving forward or backwards, or left or right. If we’re moving at an angle, by default, it is gonna move us faster, so we want to normalize this vector, so, no matter which direction we’re moving in, it is always gonna be the same speed. To do that, we’re just gonna input = input.normalized.
Now that we have our inputs set up and ready to go, what we’re gonna do is get our forward and right directions of our player. We wanna know which way is our forward direction and which way is our right direction, and we’re gonna need these in order to actually figure out which way should set our velocity, because right now if we just set our velocity, it’s not gonna take into consideration, which way we’re looking. It’s gonna move us along the global x and z axes.
So, what we need to do is we need to get the forward and right directions, and to do this, we are gonna create a variable here called forward, and this is gonna be equal to our global_transform. So, we’re getting our global properties instead of our local properties because local might be different, depending on if we’re a child of another object, so we’re getting the global_transform.basis.z. So, this returns us the direction we are looking forward. Now, to get the direction were looking towards, or, not direction we’re looking, but the direction to our right, which we need for moving sideways, we’re gonna go var right = global_transform.basis.x.
So, now that we have our forward and right direction what we can do now is create a new vector which is gonna store the relative directions. So, this is what we’re gonna be, then, assigning to our velocity in order to move in the direction we are facing. So, I’ll create a new var for our vector which is going to be called relativeDir here, and this is gonna be equal in parentheses here. We’re gonna do a bit of a calculation to figure out which way we’re facing with our forward and right direction, as well as our input here which we’re gonna be using to figure out which we’re gonna be moving.
So, we’re gonna go forward * input.y + right * input.x and this is gonna give us a Vector3 which is gonna be the direction we’re gonna move in. So, we got that, now what we need to do is set the velocity. Now, with our velocity vector, we don’t wanna set the x, y, and z, we just wanna set the x and the z, because the y is gonna be set a bit later on after this depending on if we’re jumping or not. So, for this, we’re gonna go vel.x = relativeDir.x multiplied by our moveSpeed because we do wanna have that variation in our moveSpeed. If we wanna increase it, we can increase it later on. Then we’ve got vel.z = relativeDir.z * moveSpeed as well. So, our velocity vector is being filled in.
Now, what we need to do is apply gravity. So, with gravity here, we’ll go apply gravity. All we’re gonna do for this, is just go vel.y -= gravity * delta. So, each section we are going to be adding this amount of downward velocity to ourselves, and this multiplied by delta pretty much converts this into per second rather than per frame, because if we didn’t have this, then we would be subtracting gravity which is around 12, at the moment, so we’d be adding in negative 12 velocity to our player along the y-axis every single frame, 60 times a second, which is a lot. Instead we’re gonna be adding that every second which is done by multiplying by delta which is the time duration between each frame, so we are applying our gravity.
Now what we need to do is just move the player. Have this velocity vector be applied to the KinematicBody so we can move, and what’s really handy of this is that the KinematicBody comes with a function which allows us to easily do this. So, move the player, what we’re gonna do is just go vel = move_and_slide which also includes some collision stuff as well, and we just wanna give it the property of our velocity and the ground normal.
So, which direction is the ground facing? That is gonna Vector3.UP, which is a built in vector which is just 010 for up, and then we go. So, we’re moving the player here, now all we need to do finally for this function is add in the ability to jump, and that can be done by going, so, we’ll just have jumping and that can be done by going if Input.is_action_pressed.
So, if we’re pressing down, the jump button, then, what we also wanna check is are we grounded, because if we can just press the jump button, then, we’ll be jumping continuously. So, we want to check also, and is_on_floor which is built into the KinematicBody as well. So, if so, if we’re on the floor, and we hold down the jump button, then, what we’re gonna do is go vel.y = jumpForce, so, we’re setting our y velocity to be whatever the force is to jump upwards, okay, there we go.
So, we’ve got our function right here. We’ve got all this functionality built in. Now, let’s press play and test it out. So, I press play. We can’t look around right now, but if I go WASD we’ll see that we can move, Space jumps us up. It’s a sort of big jump, but we could tweak that a bit, and, yeah, there we go, we can move around, we can jump, we have gravity applied to us.
In the next lesson what we’re gonna do is focus on setting up the mouse look so we can rotate our head around and move in the direction we’re looking. So, thanks for watching, and I’ll see y’all, then, in the next lesson.
Scripting the Player – Camera Look
Welcome back, everyone. In the previous lesson, we set up our ability to actually move around, jump, and have gravity being applied to us. So in this lesson, we’re gonna be focusing on actually being able to look around with our camera.
So, first of all what we need to do is figure out how and where is our mouse moving? What is the direction our mouse is moving in, and how far is it moving? And we’re gonna be checking that inside of a built-in function to Godot, which is called func_input. And it comes with an event parameter. And what this function does, is it gets called whatever an input is detected in Godot. So, whenever a keyboard input’s detected, if you click a mouse button, even if you move the mouse, this function here gets called with the corresponding information sent over in the event parameter here.
So, what we wanna do is check first of all, if this event right here, is that to do with the mouse motion, so is this to do with moving the mouse? If it is about moving the mouse then we want to set the mouseDelta, to be basically the direction that the mouse is moving in. So, we’re gonna go, if our event is InputEventMouseMotion, right here, so if the event is to do a mouse motion, then what we want to do is just go, mouseDelta = event.relative, like so, okay?
And what we can do now is up inside of process function which gets called every single frame, we’re doing it in the process function and not the physics process because if you got stuff that isn’t really to do with physics, it’s recommended that you just do it in the process function so I’m gonna create the process function here, _process, which gets called every frame.
And what we want to do here is, first of all, we want to rotate the camera along the x-axis. Because with this camera set up the way we’re gonna be doing it, is we’re gonna be rotating our camera vertically, so we’re gonna be rotating the camera node up and down, so we can look up and down. But we’re not gonna be rotating the camera left and right. Instead, we’re gonna be rotating the actual play node here left and right and the camera is gonna be staying still. So, the camera is only ever gonna be rotating up and down, and if we look left and right, we’re gonna be rotating the entire kinematic body node left and right. This just makes it a lot easier for when we’re calculating stuff, such as the forward direction, which we’ve done previously.
So, to do this, we’re gonna go camera.rotation_degrees.x, and what we’re gonna do is we’re gonna subtract equals, so we’re gonna take away from this the mouseDelta.y. So, the up and down of the mouse movement multiplied by lookSensitivity multiplied by delta, so it’s converted in terms of seconds, so it’s a bit smoother. And now what we’re going to do is clamp the rotation, because if we have our mouse and we move it upwards, the cameras gonna rotate upwards, and it’s gonna keep rotating upwards until it loops back around and it’s just gonna be really weird and not really fit with this first person controller. So, we wanna clamp it so we can only look so far up and so far down.
So, clamp camera x-axis, and to do this we’re gonna go camera.rotation_degrees.x = clamp. Now, this clamp function takes in three values. It takes in the value that we wanna clamp, then we need to give it a minimum and a maximum. So, the value we wanna clamp is gonna be the camera.rotation_degrees.x. The minimum is going to be the minLookAngle, and the max is going to be the maxLookAngle. Just like that, okay? So, got that all set up.
Now, we need to set up actually rotating left and right. Because right now we can look up and down. Let’s look left and right. So, we’re gonna rotate the player along the y-axis, here. And to do this, we can just go rotation_degrees, because this is, the script is attached to the player that we’re rotating. So, we go rotation_degrees.y =, oh we need to go minus equals, mouseDelta.x, multiplied by lookSensitivity multiplied by delta. And we don’t have to clamp this value because looking left and right, there’s no minimum or maximum angle we can look, we can look full 360 degrees horizontally, so we can just leave it like that.
Finally, we go to reset the mouse delta vector so that we don’t keep looking in the direction that the mouse is moving. So, we’ll go mouseDelta = Vector2 to reset it. And that is pretty much it.
So, what we can do now is press play and hopefully it works. All right, so we can look around and there you go. We can look left, right, up, down. But something you might want in this game is for the ability for the mouse to not be free like this. ‘Cuz right now if we look outside of the window the mouse, it doesn’t continue to track. If you move it in, it continues. But it’s very weird and it’s not that usable. So, what we need to do is lock the mouse cursor in the middle of the screen and hide it so when we move our mouse we don’t see the cursor and the cursor can’t go offscreen.
Now, to do that we’re gonna go to our player script here. We’re gonna go to the top of the script, and we’ll create the underscore ready function. Now, the underscore ready function gets called once the node is initialized, so this is gonna be called once right at the start of the game. And what we’re gonna do here is we are going to hide and lock the mouse cursor. So, to do this we are gonna go input.set_mouse_mode. And with this, we can give it a number of different modes right here. There’s captured, there’s confined, there’s hidden, and there’s visible.
Visible is what it is right now, it’s visible on screen, and we can move it around freely. Hidden basically just hides the mouse cursor so we can’t see it, but it’s still gonna be moving. Confined means that it is just gonna be confined to the screen, that’s kinda what we want, but we don’t want the mouse visible. So, we’re gonna be using mouse mode captured, which hides the mouse and locks it into the center of the screen. So there we go.
And now what would happen is if we press play here, you’ll see that when we press play, the mouse cursor disappears and here we are with our character. We can look around, the mouse doesn’t appear offscreen, and if we move, you’ll see that we move in whatever direction we’re looking at. That is being done by getting the forward and right directions and creating the relative direction in order to actually set this up. If we look up you’ll see that we don’t continue to look up, we sort of clamp at the top here. It’s kinda hard to see, so I’ll go near a tree. You see how we look up, it sort of stops. If we look down, it also stops. So we can’t look all 360 degrees up and down, but left and right, that is possible. Jumping works, as well.
And yeah, so that overall is our player controller setup. We have the movement implemented, we have the camera looking implemented, and that is pretty much how you set up a basic character controller inside of Godot. In the next lesson we’re gonna be focusing on actually setting up the ability to shoot bullets as that’s gonna be one of the main mechanics in this game. We’ve got our gun here, we’ve got that muzzle object set up, now all we need to do is be able to left click on the mouse button and shoot our bullet. And from there, we’ll also set up enemies that we can shoot, pick ups, and the UI system later on.
Just something quickly, also. You may notice that you can’t really get out of this window right here, you click escape, nothing really happens. It’s kinda hard to get out of this window. So what you can do is you can just hit alt f4 to quit out of that little gameplay window. It goes back to the Godot Editor, and it stops playing the game. So yeah, there you go. I’ll see you all in the next lesson.
Interested in continuing? Check out the full Build a First-Person Shooter with Godot course, which is part of our Godot Game Development Mini-Degree.

