You can access our newest full course on creating an FPS game here: Construct a First Person Shooter
Part 1
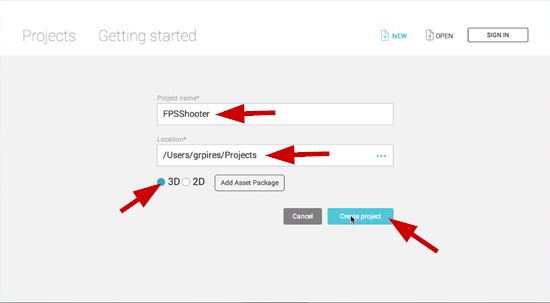
We will begin by creating a new Unity project and naming it “FPSShooter.” Save the project in a location on your hard drive where you keep your development files. Make sure 3D mode is enabled and click on the Create Project button:
Select the Assets>Import Package>Characters.
A new menu will open and you will see several folders with lots of assets in them.
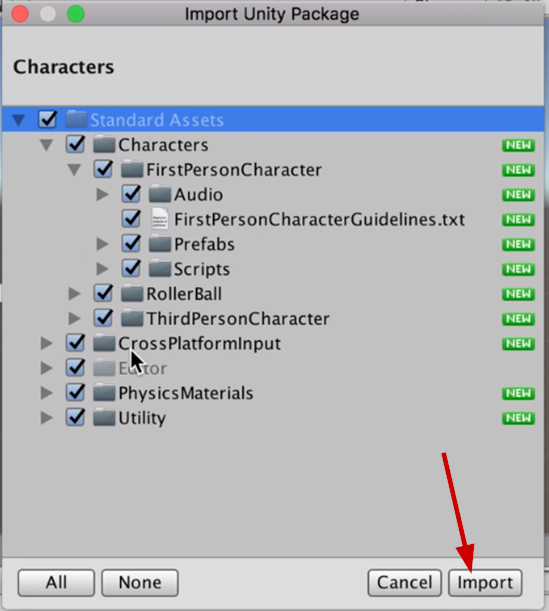
Make sure all the boxes are checked and then click on the Import button in the bottom right hand corner of the menu:
Once the assets have been imported navigate to the Assets>Standard Assets>Characters>FirstPersonCharacter folder and open it.
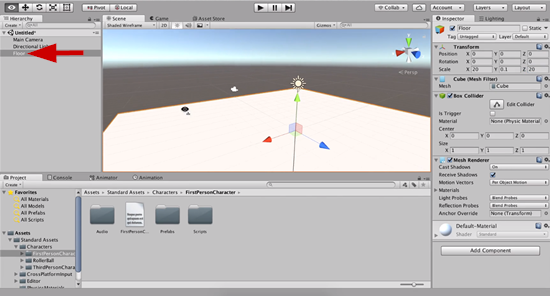
Right click in the Hierarchy and create a cube. Rename the cube to “Floor.” Reposition the Floor to the 0,0,0 position. Change the Scale value to be 20 on the X, 0.1 on the Y, and 20 on the Z.
Create a new folder and name it “Project.”
Open the Project folder and inside this folder create another folder and name this folder “Materials.”
Inside the Materials folder we are going to create a new material, rename this new material to “Floor.” We are going to use this material to shade the floor a darker color.
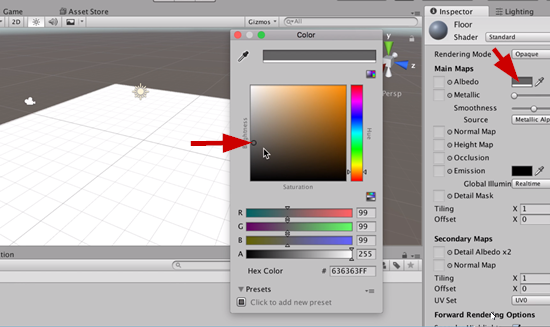
With the Floor material selected look at the Inspector window and click on the color picker to choose a new color for the floor:
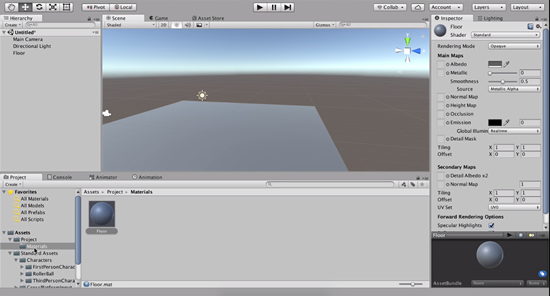
In order to apply the Floor material to the Floor in the Scene we just drag it and drop it onto the Floor object in the Scene:
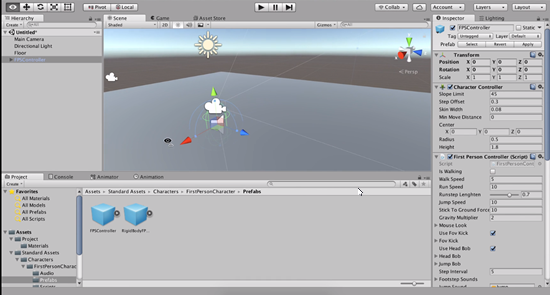
Now drag and drop the FPSController prefab into the Scene:
Because the FPSController came bundled with a camera we need to delete the Main camera from our Scene.
Now if you hit the Play button in the Unity editor you will be able to move around on the floor:
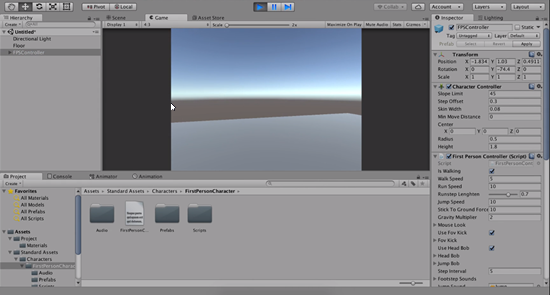
Part 2
Select the FPSController in the Hierarchy and take a look at the Inspector and find the First Person Controller script.
There are a lot of options here on this script component that can be adjusted.
You can adjust the Walk Speed to the value of 10, and this will make the player walk very fast.
There is also a Jump Speed value that can be changed, if you changed this value to 20 you can jump much higher than you were able to before.
If the Gravity Multiplier value was changed to 10, this would make the gravity stronger, and the character will barely leave the ground when they jump.
All of these values on the First Person Character script can be adjusted and experimented with in order to get the Player character working the way you want it to in your games.
Transcript Part 1
Hello, everyone. This is Glauco Pires, for Mammoth Interactive, and welcome to the First Person Shooter tutorial in Unity.
So to begin, we have to open the Unity software and click on this button to make a new project. And in this screen here we have to set a project name which is simply going to be FPS Shooter, or just Shooter, whatever you think is better for you. And, we also have to set the project location. So, I like to use a project folder that is right under my home folder, just to keep things organized. It’s not a good idea to leave things and documents under the desktop folder, because it’s going to mix up with other things. Okay, and once we do this we have to make sure that we have 3D enabled, just make sure you’re not going to make a 2D project. So we’re going to mark this one, and we’re now going to click on create project.
So we have to wait just a little bit for Unity to set up all the files for us for the beginning scripts and well, all of the procedures to open, and we’re going to be in this screen here.
Okay, so we want to make a first person shooter game, and there is one important thing to do. Unity is very friendly regarding using asset packages. So, some people from around the world, they use the asset store for Unity, and they build things that you can’t simply purchase or download for free depending on what’s available out there. And you can already use these things in your projects. So, there is no need to reinvent the wheel. Some things are already done so we can worry about making the game and not, uh well, reinventing the wheel.
So, for the first person shooter game there is a lot of work already done for us and already packaged with Unity. So if you installed your Unity software and you didn’t change anything regarding the standard assets, they should already be here in your project. And to include everything related to first person shooters, we’re going to the assets option here, we’re going to go to import package, and you’re going to see that there are several options available here.
There is custom package in the case you download it from the internet and you want to add anything to your project. But it also has other things here, like 2D, cameras, characters, effects, particle systems, vehicles, there are lots of things available here. But the one that we want is characters. So we’re going to select this option here, a new menu is going to open, and we’re going to see this window here that says import Unity package. This is where the magic is going to happen.
So, if you collapse a few of these folders here, you’re going to see several different things. So there are characters, cross platform input, editor. So all of these folders, they do all the necessary work to make first person shooter character’s work in a very simple way. So if you go to the character’s folder you’re going to see that we already have this first person character. And we even have two more options, rollerball and third person character.
But, lets get first person character, okay. And we have audio, we have prefabs, we have scripts, so everything’s already built for us. What we want to do now is, let’s make sure all of the check boxes are marked. You can just click on this one if you enabled or disabled anything, so make sure everything is going to be selected. And we now press import. So that package is going to basically decompress, and all of its files are going to be added to our project which is basically this assets folder.
Okay, we have to wait just a little bit, some images are going to be a process, they’re going to be compressed depending on the build settings that you adjusted for your project, but well, we just have to wait a little bit. And after this is done, you’re going to see that with a simple drag and drop, we’re going to be able to enable the first person shooter mode, okay. So, just a few more assets in, there we go.
So, in the assets folder we now have this standard assets folder and here we have characters. Let’s enter this folder. Okay, just click here. And in the characters folder we have first person character, we open that. And now we have audio, we have a text file that says some guidelines here that you can read here if you want, and we have prefabs and we have scripts. So if you take a look at the guideline, the first option, the first entry that they say in these instructions is, there should be a flat ground to walk around on. Because if you add the player in an empty scene, that player is basically going to fall.
So we’re going to come here into hierarchy, we right click, select 3D object, and we can add two things. Either a cube, or terrain, okay. Or, we could also use a plane as well. I’m going to start with a cube, okay even though the plane works just fine. We want to keep things simple and well, we’re just going to adjust this in a better way by using cubes. So I’m going to select this cube here, and we have a new entry in the hierarchy. I’m now going to re-name that so right click, choose Rename, and we can name this as Floor, something very simple.
And we have this cube here. In the inspector, we want to make sure its position is going to be in the center. Zero, zero, zero. And the scale on X, let’s make it bigger, like 20. Y is going to be smaller than that, so lets use 0.1. So it’s going to look like that, a really flat floor. And Z is going to be 20 as well. So we have that little sheet where we can basically walk on.
Okay, it’s going to be something very simple for us. And now that we have that floor here, we should just change its color a little bit to make it easier to see where we are going to walk on. So, we can go to the assets folder, right here. We can right click, choose create, and then folder, and here we’re going to name this folder as project.
So, why do I do this? I do this because in the root folder for your project, which means the Assets folder, you might include different asset packages and each of these packages are going to make a folder here. So we have standard assets, and maybe want to add a multiplier later, maybe you download an asset pack for a toonish level, and there’s going to be another folder. So there should be several different folders for every different asset that you make. So a good idea is to make a project folder because we’re going to ensure that everything is going to be in this folder is created by us. It’s not going to mix up with other folders. In your first projects it might not be necessary, but even though I just said that, it is important for you to organize things from the beginning.
Okay, it’s going to make a lot of difference once you evolve your project to something bigger. So here in this project folder, we now right-click, choose create, we’re going to make another folder, and we’re going to name this materials. And now inside this folder we’re going to make a material, which is basically the element that is going to shade this floor in a different way. So right click, create, then material, and I’m going to rename this as floor. Simple as that. And with that here, we’re going to change its color.
Okay, you can just select the floor and look at the inspector, so its information is loaded here. We’re going to click in this large rectangle and use the color picker to choose anything we want. I’m going to choose a dark orange, okay like that. Or maybe a dark gray, should be okay as well. So I’m going to click here, choose that, and to apply this material to this floor we can simply drag it and drop here. Okay, so we have a dark floor.
Alright, now, if you go back to the first person character and look at the second instructions, it’s going to say place the first person character prefab in the scene. So this is the magic that is going to happen. If you go to the prefabs folder, you’re going to see two prefabs. FPSController and RigidBodyFPS controller. So, if you get an FPS controller, and you drag and you drop in the hierarchy, you’re going to see this element here, okay. So lets use the transform tool to move it up a little bit. And click on this arrow and move it up to this position.
And you’re going to notice a few things. Okay, so that character contains a little audio icon and contains that camera here. Okay, so that means the character, the FPS controller, contains its own camera. And that makes sense because we are going to be looking through the perspective of a character, of a humanoid, or through a monster for example. It’s simply going to be here, and we’re going to see things like they see. That means we don’t need two cameras.
Okay if you look at the instructions, the 3rd instruction is going to say, if present, delete the main camera that exists in the new scenes by default. Okay, so if you look here, we already have a main camera in this scene. We have main camera, we have directional light, floor, and FPS controller. So, we’re going to delete this camera. No longer necessary. And now we have this FPS controller here. Okay, so at this point of this project, if we press the play button, we have to wait a little bit because this is the first time this game is going to be played.
But, once you are here, I can hear the footsteps of the player. You can’t hear them right now because of my recording. But well, if you walk, the footsteps are playing. If you press pace, you jump, and there is even a jumping sound, which is very good. If you don’t want to hear the sounds you can just press mute audio here, in the game window, and its going to be better for us to walk around the scene.
So, just with little adjustments we can already have a player here. We can even run if you hold shift, you can walk really fast in this game. And we can pretty much start working on the first person shooter.
Transcript Part 2
