You can access the full course here: Develop a Puzzle Platformer Game
In this lesson you will learn how to create the first level layout of this game.
This will include the following:
- Importing tile assets
- Creating tilemaps
- Setting up the tile palettes
- Painting the map
Importing the Sprite Assets
In Unity, you will want to make a new folder in your Assets folder. Name this folder Sprites. Inside the Sprites folder, make a new folder called Tiles. This will be where Unity will build the tiles to. Unity can automatically convert sprites into tile assets, which you will be doing soon.
We will be using the sprite shown below.
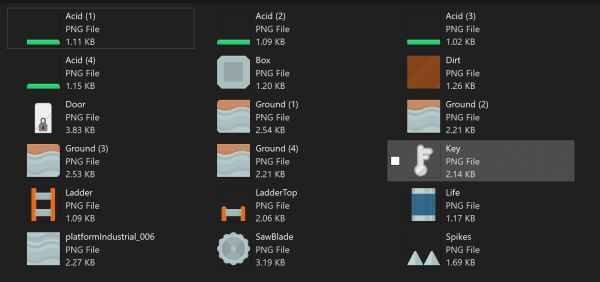
Select all of them and drag them into Unity then drop them into your Sprites folder.
Now, select the first sprite, hold down the Shift key, then select the last sprite. This should highlight all of them. Verify in the Inspector that the Texture Type field says Sprite (2D and UI), then change the Pixels Per Unit to be 70. This is because all of the sprites are 70 by 70, meaning that each sprite will be 1 by 1 in Unity units. Then click on the Apply button in the Inspector.
Setting Up the Tile Palette
Right click in the Hierarchy window. Select 2D Object then Tilemap. This will create a Grid object with a Tilemap as a child of that. Change the name of the Tilemap to be Ground, then duplicate it twice with Ctrl/Cmd + D. Name one of them Background and one Foreground. You could make more layers if you want, but it’s not necessary.
Now go to the Window tab, select the 2D option, then Tile Palette.
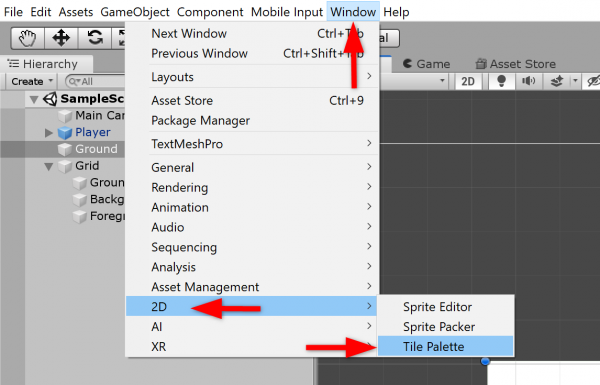
This will open up a new window that you can use to paint your tiles. For ease of use, it is recommended to dock this next to the Inspector by dragging the menu over, but you can put it wherever you’d like.
Now click on the Create New Palette button, then put Industrial for the name and click Create.
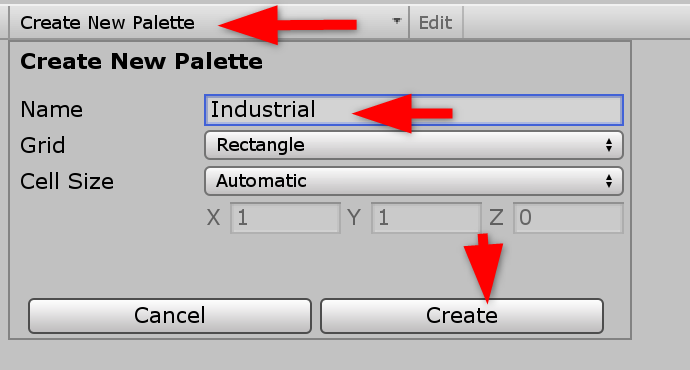
Select the Tiles folder that you made when the File Explorer pops up.
The next step is to select all of the sprites again, then drag them into the Palette window. This will again open the File Explorer, select Tiles and wait for it to generate the tile assets. When it is done, you should get something that looks like this.
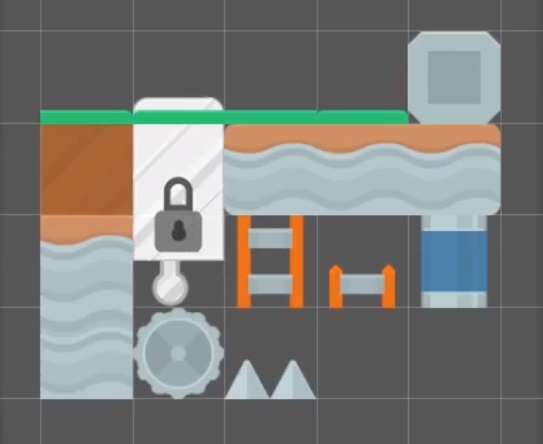
Don’t worry if yours looks a little different. You will notice that the Door is too large. This is because it won’t be used as a tile. Select the Edit button, then the Eraser, then click on the door. It will be removed from the palette. You will also need to erase the Key and the Saw Blade.
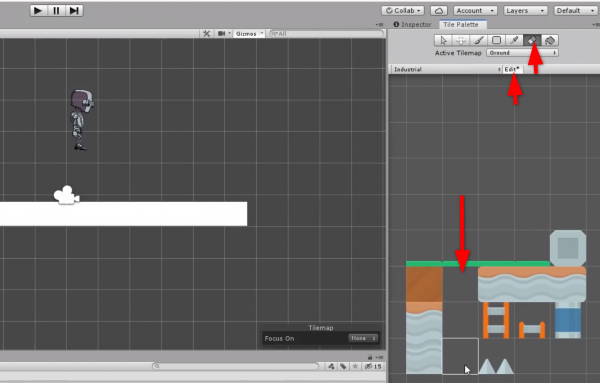
These items will be interactable, so to keep it simple they will be put in the game in a different method. There exists options to allow you to paint interactable items into the game, but they will not be covered in this course.
Painting the Level
Now you are ready to start painting the game. Remove the Ground sprite that you added, as it is no longer necessary. In the Tile Palette window, make sure that the Active Tilemap is set to Ground, then select the Paintbrush tool, or press the B key, and select the ground object without rounded edges. You can now click in the Scene window to add tiles.
The basic layout for the levels will be a loop system, where you can see a key but have to go through multiple different areas to get it. You can customize this layout however you’d like, but that will be the general system that this course will cover creating.
You can now start making your level. Make sure that the top layer always has the ground coloring and use the solid rock to fill below it. It is easiest to pick one tile type and put that where you want it to be, then come back after with a different type. Leave gaps for acid and for the ladder to get to the other locations.
For the sections that you will not be interacting with, like the interior of walls, change the Active Tilemap to Background. You can also make use of the box fill tool (press the U key) to easily fill in spaces. You’ll want to make sure to fill one tile past the edges to ensure that it is covered properly.
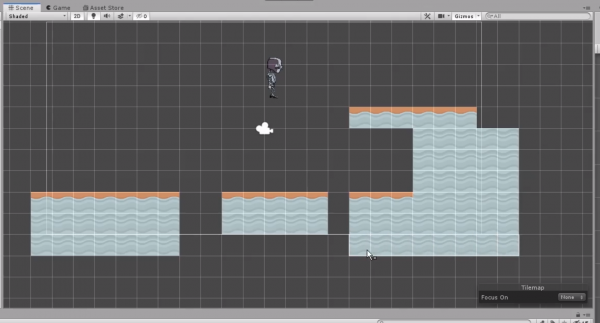
It should look something like this. If you want to check what each tile layer looks like, use the Focus On in the bottom corner, and select Tilemap. This is the Ground tilemap.
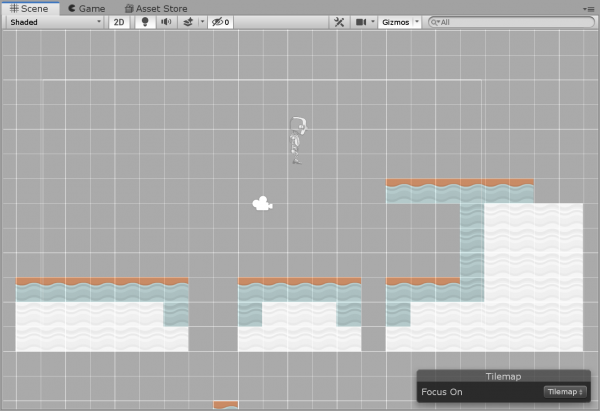
Now you can add some block tiles to the Ground tilemap, to prevent the player from getting into the top right section.
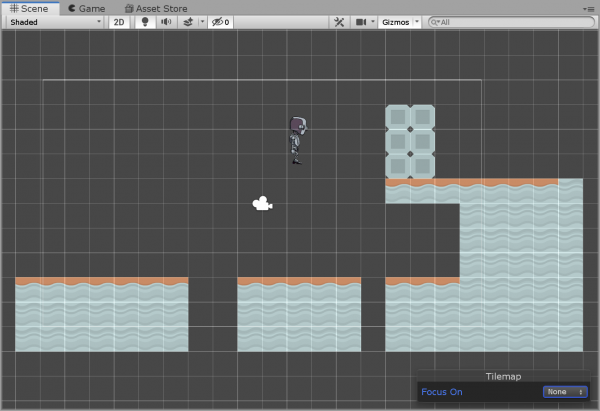
You can add a roof and another platform on the Ground tilemap.
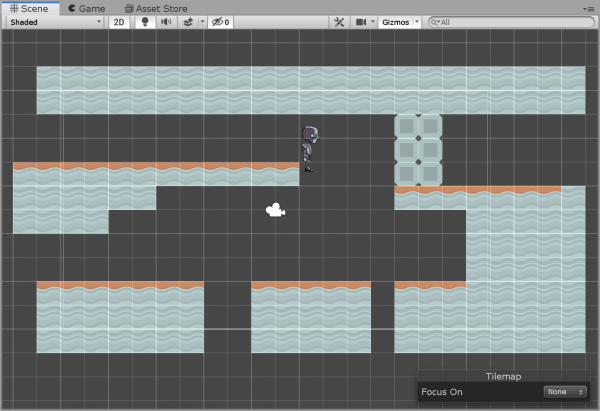
If you want, you can open up the space on the bottom right a little more to enable another key to be placed there.
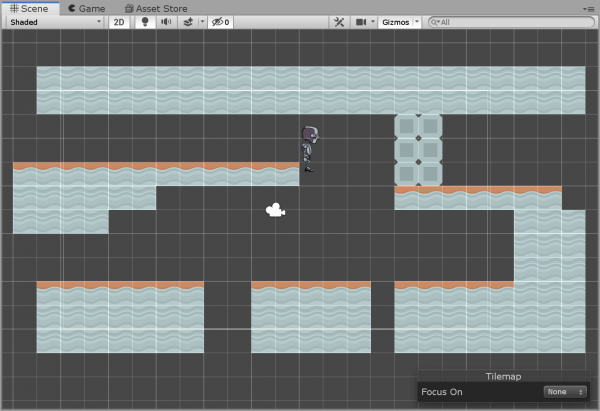
You can really make it whatever you would like, but this basic layout should be good. Try using the rounded edge tiles in the appropriate places if you’d like to make it look a little more natural.
Transcript 1
Hey guys, welcome back in this lesson. We’re going to start building our first level, which means we have to import our tile assets. Just our sprite images. We’re going to create a couple of tilemaps for that based on, you know, if it’s the ground, so we can add different colliders to the ground versus just the background or maybe the foreground – things you cannot collide with for instance. Then we’re going to set up a tile palette, which is just a grid of tiles that we can actually click on, and then paint in our scene view on the tilemaps that we just created.
So to do that, let’s jump back into Unity. And what I want to do is first of all is import my tile. So in my assets folder I want to create a new folder and I’m going to call it Sprites. Now, the way you organize this is obviously up to you. But this is how I want to handle this. And inside of sprites, I want to create a Tiles folder. Now this is where Unity is going to build my tiles to. When I take a sprite, I can let Unity convert them into a tile asset for me, and I’m going to put those right inside of that folder. But my sprites are all going to go inside of this sprites folder.
So now on my desktop and in the download a project files that you have, I have industrial Jones assets. And I just have all the sprites I’m going to use for this project. And what I want to do is bring all of these in at once, by just selecting them all and dragging them directly into Unity and dropping them in my folder. And there they all are.
Now if I were to select all these by holding down shift and selecting the last one there, I can see they’re all in 2D and UI, because I have my project set to a 2D project by default. But if it’s not the case, you can just select it just like that. And what I want to do is I want to change my pixels per unit to match what I want my – what – how I want my sprites to be sized in my game world. So I think it makes sense for my tiles to be one Unity unit in size. And to do that I have to take into account the size of my sprites in pixels.
Now I know for some reason these sprites are 70 by 70, I would recommend a power of two if you were to make yours. But in this case, these are Kenney assets or third party assets. So I’m just using them as they are. And I, in fact, created a couple of my own tiles to go with this, or a couple of my own sprites here with the key, the door, and the ladder top because of the way we’re handling this. I had to make it a bit differently. But these are all 70 by 70. And that means I want to set my pixels per unit, since I want one unit to be one tile to be 70. So we have 70 pixels per unit. And I’ll have to do now is apply this to make those changes. Just like that, pretty simple.
So now what I want to do is in my project hierarchy, I want to right-click 2D objects, I want to create a tilemap. That’s going to create a grid object for me and a tilemap object for me. Now, what I care about doing here is first of all, I want his name, this first tile map in my ground. And what I could do is just control D to duplicate that. And I could make one for background for instance, or I make another one for the foreground. How many layers you want to have here, you can go with that and do whatever you would like. But in my case is gonna be very, very simple.
So I want to take my ground, that’s where I want to start painting my ground tiles. But how do I do that? So I want to go up to Window. And I want to find the 2D option here and go over to tile palette. Now this is going to give me my palette that I can start painting from. Not from the default view here next to my inspector. And what I have to do is create a new palette first of all and tell it where my palatte’s going to be stored. So I want to call this palette industrial, because that is the type of tile palette I am creating. I’m using my industrial sprites here. And I want to click Create. And I want to tell it to put this in my tiles folder.
And now with the industrial tile palette selected, I want to take and select all of my tiles and drag them into that palette. And I want to select the tiles folder for it to use for that where it’s going to build my tiles out. And this is what you get. Now, in fact, the door that we’re using is not a tile nor is the key , because we’re using a very simple approach to this.
I, in fact, do not want to have the door in here. So I can do a select edit and the eraser tool and erase the door. And I do not want the key in here. And in fact, I do not want the sol blade in here. And that’s because these items are going to be interactive items in my game world. Now you can have them be interactable – you just have to write or just find a custom brush that allows you to paint, for instance, prefabs. And you’re seeing view which exists. You can find it on the official Unity GitHub, in fact, but for this simplicity of the project here, I’m just going to keep it very simple and just have my tiles be the static tiles in my world.
So now let’s just start painting our level. I want to remove this ground object that we have here, and that’s going to paint some kind of level here. I’m going to say maybe I’m coming into a level from the left here, this is going to be the start of the game maybe – or it’s going to be a circular game.
My idea here with the level is I can probably come out of this scene here into a scene over here, climb down a ladder, come down this way, go through a door over this way. Now I’m below this level where I can climb up a ladder and I can get to a section to grab a key that I could not get to from up here. But I can see the key you know, so I know I need to get this key to unlock this door. So I had to come down this way to grab that key that I go back around and unlock this door and I go over here and do something.
Anyway, we’re going to lay it out in a similar fashion. So it’s going to be like this loop of a level here. So I want to come in originally from the left here, and we’re going to have for instance will have a key up here making you climb down this way and go up there and get it. So I’m just going to do this right here, and I want to add the ground below that just come off a little – that just in case the edge bleeds through there, they would have maybe just come over a bit here. And then we’ll have a gap here for an acid pit. Then will have a gap for a ladder. And then a wall, then a platform here.
Now I have absolutely no idea where I’m going with this – on changes to background because these are not going to be something I can collide with. And if you want to, you can use the rectangle tool and draw a rectangle of sprites and back on the ground just in case I do collide with these right here. And then back to background.
Back on the ground here. Erase that background there. Maybe we could do something like this. So once you’re up here, you’re blocked by like a thing of blocks, you can’t go anywhere there. So you know, the only way to get to this key up here is to come through this door. How do I get to that door? Well probably go down this ladder, and I come up over here. And I climb up the ladder or whatever it’s called to you and that, but this is the idea that I’m working with here. I just had like a roof here, I don’t know.
I’m probably gonna speed through some of this just because, it’s, just you know, whatever I’m coming up with as I go here. And maybe we’ll have a ladder in the middle right here that goes up to a platform up here. And I can have the door that I want to unlock be up here. And the key to unlock it be over here. So it’s like how do I get there? Let’s bring this back a little bit so we can hide another key over here.
At this point, it’s just drawing. It’s just drawing wherever you want to draw.
Interested in continuing? Check out the full Develop a Puzzle Platformer Game course, which is part of our Unity Game Development Mini-Degree.

