You can access the full course here: Mobile Game Development for Beginners
Adding Mobile Components
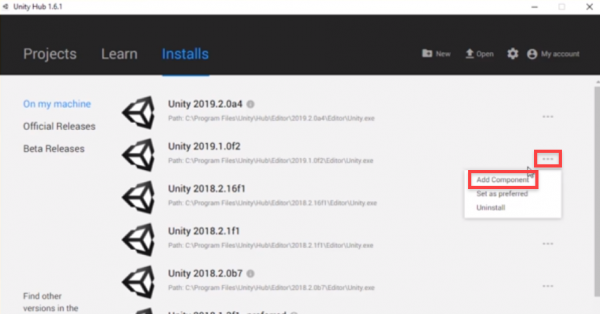
In order to build to Android or iOS, we need to add the corresponding components to our Unity version. In the Unity Hub, go to the Installs tab and identify the version of Unity you’re using. Click on the three dots and select Add Component.
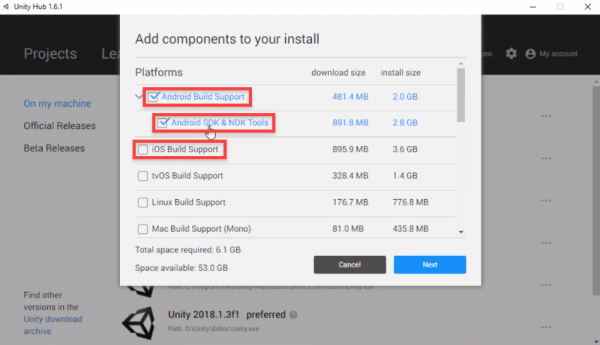
We can now either select Android Build Support and Android SDK & NDK Tools if we’re building to Android, or iOS Build Support if we’re building to iOS. Then click Next.
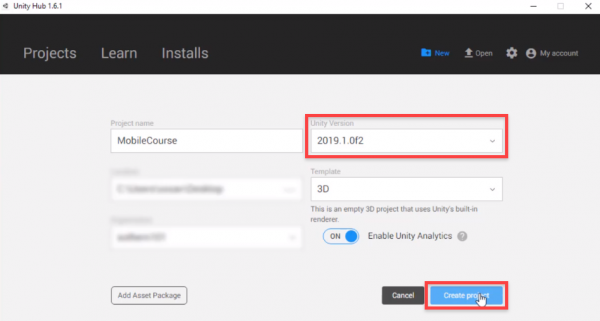
Now let’s create a new project, making sure that the version is the same one we added the components to.
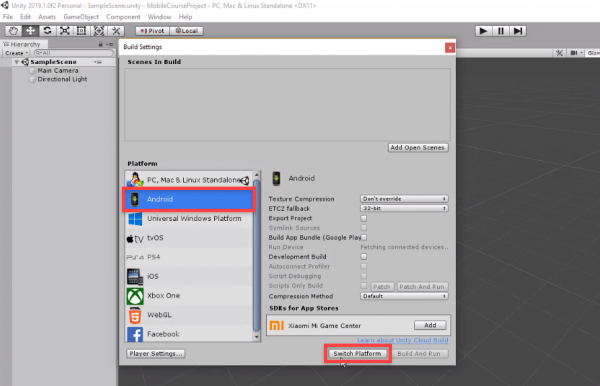
In the project, let’s go to the Build Settings screen (File > Build Settings…) and switch the platform to either Android or iOS.
In the next lesson, we’re going to setup the editor for mobile.
Transcript
Hey everyone. In this lesson we are gonna be going over how to set up Unity for Android or iOS so that you can then create a game, and build it to either your Android or iOS device.
First of all, I’m here inside of the Unity Hub. What we need to do is make sure that we actually have the Android or iOS components installed to our version of the Unity editor. I’m gonna click on the installs button up here to go to where I have all the different versions of the engine that are installed. And I’m gonna be using Unity 2019.1. As long as you’re using 2019, then building to Android you don’t actually need to download the external Android SDK or anything like that. It’s all built into Unity already.
All we need to do, once you have your version of Unity installed, we need to click on these three little dots here. And then select add component. What we want to do is we want to either select Android Build Support and the Android SDK & NDK Tools. This is about 4.8 gigs, and this will install all the stuff we need in order to build to an Android device. Otherwise, if you want to build to an iOS device, then you can just select the iOS Build Support down here. But, for now, in this course I’m gonna be building to an Android device, so I’ll be selecting the Android Build Support and Android SDK & NDK Tools. And then I’ll just click on next here. We can then click on I have read and agree with the above terms. Click done, and it should then begin to install.
Now, inside of Unity there isn’t really that many differences that we’ll be doing, depending on if you’re building to Android or iOS. It’s all relatively the exact same, except for when we’re actually building the project for Android where I would just build it directly to a device, whereas with iOS you do have to build it, and then build it again inside of Xcode. But if you’re building to an iOS device we’ll go over how to set up Xcode, how to set that all up, and connect it to your device.
All right, once that’s finished installing we can just check to see if we have all the components added. Yep, and it seems that I have Android Build Support already installed, or if you’d done iOS Build Support that will be installed as well. What we can do now is create a new Unity project. I’ll click on the new button up here. I’m gonna enter this as just MobileCourse. The Unity version, we want to use that 19.1, as that’s where we installed our Android component. And then we can just click create projects and get inside of the editor.
All right, here we are inside of the Unity editor. Now what we need to do is convert our platform over to either Android or iOS. Now, as you can see in the top of the screen here, it says we’re in the PC, Mac, and Linux standalone platform inside of Unity. To change that we can go file, build settings. And here in the build setting what we should see now is either the Android or iOS platform here. I’m just gonna select Android, and then click on the switch platform button.
Now, depending on how large your existing project is this could take some time. But since we are in a brand new project that’s empty it happens almost instantly. Now you can see at the top of the screen it says Android.
In the next lesson, we are gonna be going over just setting up the editor a bit. We’ll be adding in our folders, importing some assets, and just setting up a little basic scene where we can start going over all the different touch inputs and gestures in future lessons. We’ll also go over how to set up some different aspect ratios in the game view to match whatever your device is. So see you all in the next lesson.
Interested in continuing? Check out the full Mobile Game Development for Beginners course, which is part of our Unity Game Development Mini-Degree.
