You can access the full course here: UV Mapping in Blender for Beginners
UV Mapping
In this lesson, we’re going to see how to map our texture onto our object in Blender.
Start with a new cube as the only object in your scene. Go to the Material tab in the Properties window and add a new material. Select its base color to be white and apply the metal texture you’ve downloaded from the course files to it:

To move the texture around or scale it we’ll be using UV mapping. Go to the UV Editing layout, on the top bar, then for the object window select the ‘Material Preview‘ mode:

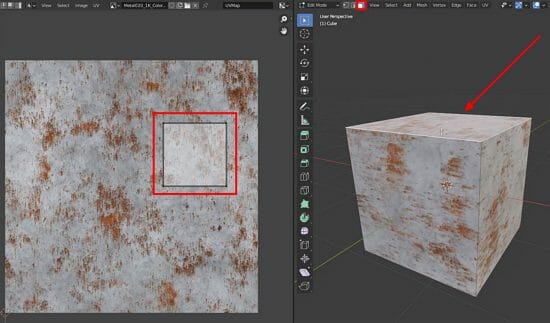
We can see all six faces of the cube laid out on top of our texture on the left window exactly as they are being displayed on the cube to the right.
If you go to the ‘Face select‘ mode, you’ll see where each particular face is located in the texture image:

In the texture window, we also have a face selection mode and if you select it you can move the faces around the texture image by pressing G:

We can scale a face up by selecting it and pressing S:

You can also press A to select all faces at once and rotate them by pressing R:

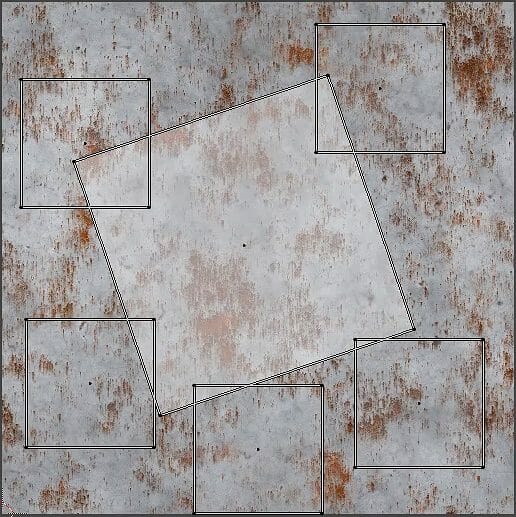
Notice that when we move one of the cube’s faces all faces near it get distorted. To avoid that, we can disconnect the faces from each other by changing the selection mode to ‘Disabled‘ in the dropdown menu at the top left corner:

Now we can position the faces freely on top of our texture:

So basically UV mapping unwraps our object for us by converting it from a 3D object to a 2D image so that we can lay it on top of a texture that our object will sample from. When exporting your model the UV mapping applied to it will be carried over automatically to the exported file.
Note that you can replace the texture image used with any other whenever needed. The UV mapping remains unaltered once the object will continue to sample from it in the same way previously arranged.
Transcript
Welcome back, everyone. In this lesson, we are going to have a look at UV mapping. So first of all, I’ve got ourselves a cube right here. I’m gonna go ahead over to the Materials panel. I’m gonna go ahead and create our material.
And I’m gonna set the base color to be an image texture here. I’m then going to apply a texture to this object right here. I’m gonna give it a, let’s give it a metal texture like this one right here, okay?
Now what happens if, for example, we want this part of the metal texture to be over here, or we want the texture, in general, to be scaled down, scaled up, moved around?
Well, in that case, we can look at UV mapping. So up at the top, you’ll see there’s a bunch of different layouts. We have Modeling, Sculpting, UV Editing, and that’s the one we wanna go to. So I’m gonna click on UV Editing right here. And what you’ll see is two windows.
On the right-hand side, we have our scene view like normal, and it set us over into Edit Mode. And on the left-hand side, we can zoom out here, and you’ll see that we have our texture laid out right here.
And on top of that texture, you’ll see we have each face of our cube. So we’ve got our six faces of the cube laid out on top of the texture right here.
And on the right-hand side, for example, if we go over, click on Material Preview up at the top right so we can actually preview the material, what we can see is if we go into face edit mode and we select a face, you’ll see that face gets highlighted here on the left-hand side.
If we select another, that one gets highlighted, and so on. We can press A to select all the faces. And on the left-hand side, if we then go up to the top left, and just like in Edit Mode, we have Vertex selection, Edge selection, and Face selection.
If we select Face selection, we can click on a face here and move it around. So if I select a face and I press G, you can see I can move it around. And look what happens on the right-hand side.
As I move the face around on the left-hand side, the area of the texture of which it is sampling from, in which all the other faces are sampling from, changes, okay? So as I move it around here, you’ll see it sampling from a different part of the texture.
And you’ll see it’s also getting stretched. Some of these cubes are getting stretched, so that’s why we do have that weird warping happening, but yeah. As you can see, this is basically how UV mapping works. We get a 3D object and we unwrap it, okay?
We basically convert a 3D object into a 2D image that we can then lay on top of a texture, and whatever texture is underneath it is the pixels that it is sampling in order to display on our screen. So for example, we can select the middle one here, press S, and we can scale it up.
So it’s sampling a much larger area, whereas these faces over here, we can scale it up. And as you can see, the texture is getting smaller, but if I scale it down, the texture is getting bigger because the area it’s sampling is changing. We can also rotate things.
So I can press A here to select all of it. I can press R and rotate it around like so. And as you can see, the texture is being rotated. Okay, so we’ve got that there. Right now we’ve got our cube. Now when it comes to cubes, they’re pretty simple objects.
They’re one of the most sort of simple 3D objects you can have, so unwrapping this sort of thing is fairly simple, okay? In fact, it does it automatically for us right here with each of the individual faces.
All right, so we’ve got a UV here on the left, but you’ll notice that when we select a square, for example, let’s just say we want to sample this face down here somewhere.
Well, if we select that face and press G to move it, you’ll see that it drags all the others with it and it just distorts it not in a nice way. So how can we, for example, get this face and sort of disconnect it from the rest so we can move it freely around?
Well, in order to do that, what we want to do is go up to the top left here and you’ll see there’s a little dropdown next to where we can select Vertex, Edge, or Face. And we wanna click on that, and there’s three different things. We have Disabled, Shared Location, and Shared Vertex.
This basically determines, when we select a face, how is it gonna modify other faces? And we, of course, wanna go to Disabled as that basically means now we can select any face here, press G, and move it around without any of the others being connected to it, okay?
Whereas before, if we were to click on one, it would sort of move the other vertices around as well. Whereas now, we are free to move these around wherever we want, rotate them, scale them, just like so, okay? And that is how we can do UV mapping inside of Blender.
And of course, when you go to export this model, all of the UVs are automatically baked into the model itself, so it will all be carried over. And you can even replace it with any other texture you want.
So for example, if you go into a game engine and you no longer want a metal texture, and instead you want some other texture, the same UV map is going to apply, okay? So you have this square image right here.
And no matter what texture you put on here, these exact UVs are always going to be here until you change them inside of a 3D modeling program like Blender ’cause it bakes this information into the model itself.
Now in the next lesson, we are gonna go over the process of unwrapping multiple different objects, okay? So I’ll see you all then in the next lesson.
Interested in continuing? Check out our all-access plan which includes 250+ courses, guided curriculums, new courses monthly, access to expert course mentors, and more!


