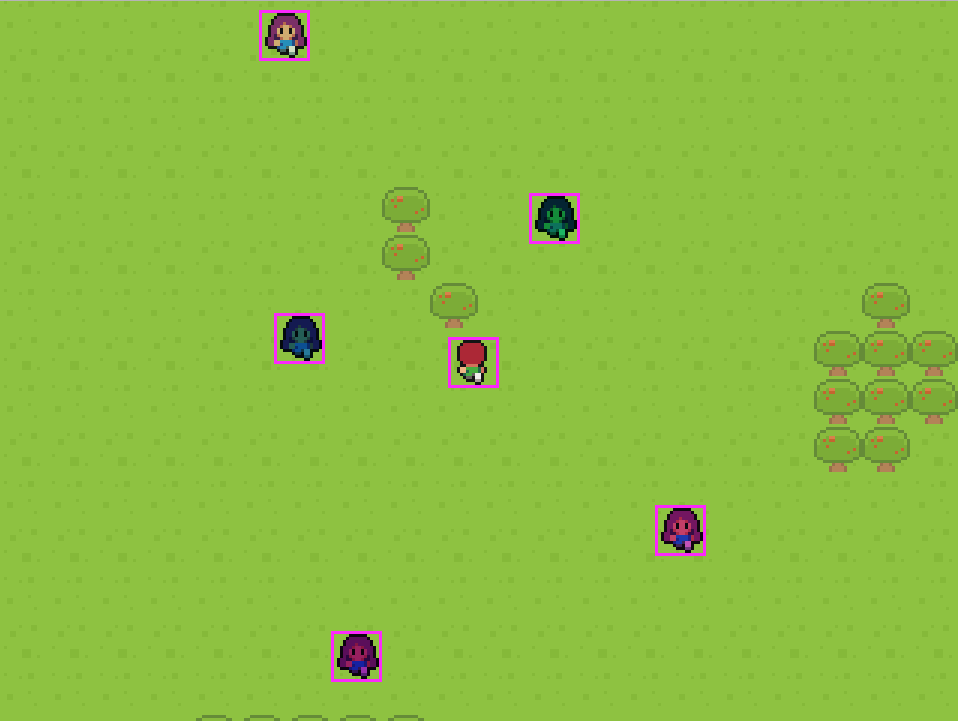
In this multi-part tutorial series, we will be creating a simple Phaser 3 MMORPG. This game will feature simple gameplay that will allow players to wander in a single area together, attack monsters, and chat. It will also include user authentication and use MongoDB for storing chat data. Therefore, it will be built using Nodejs, MongoDB, and Express.
You can download all of the source files for Part 1 here.
Tutorial Requirements
For this tutorial, we will be using Node.js and npm to install the required packages that are needed for this project. In order to follow along with this tutorial, you will need to have Node.js and NPM installed locally, or you will need access to an environment that already has them installed. We will also be using the Command Prompt (Windows) / Terminal (Mac) to install the required packages, and to start/stop our Node server.
Having prior experience with these tools is a plus, but it is not required for this tutorial. We will not be covering how to install these tools as the focus of this tutorial is making a game with Phaser. You will also need access to the Chrome Web Browser to follow along with this tutorial. The last thing you will need is an IDE or Text Editor for editing your code.
To install Node.js, click the link here: and choose the LTS version. You can download and use the current version with this tutorial, however, the LTS version is recommended for most users. When you install Node.js, NPM will also be installed on your computer. Once you have these tools installed, you can move on to the next part.
Also, at the time this tutorial was created, the latest LTS version of Node.js was v10.13.0. You can check your version of Node by running node -v from the terminal. It is recommended you be on this or a new version when following along.
You will also need access to a MongoDB instance in order to follow along with this tutorial. If you don’t have MongoDB installed locally, and would like to use a cloud solution, I recommend MongoDB Atlas. Atlas offers a free cluster for anyone that creates an account, and it does not require any billing information to get started. For more information, you can follow this tutorial here: Phaser 3 Leaderboard Tutorial
Lastly, for this tutorial, we are going to get a jump start on our game by reusing some of the code from the following tutorials:
- How to Create a Turn-Based RPG in Phaser 3 – Part 1
- Creating a Phaser 3 Leaderboard with User Authentication using Node.js + Express + MongoDB – Part 1
This starter code is going to set up our Node.js server that includes user authentication, login and sign up pages, and a Phaser game instance. The Phaser game instance will be the one from the turn-based RPG tutorial. We will not be covering that code in depth in this tutorial, and it is recommended that you go through those two tutorials. If you would rather not, you will still be able to follow along with this tutorial.
Let’s get started!
Project Setup
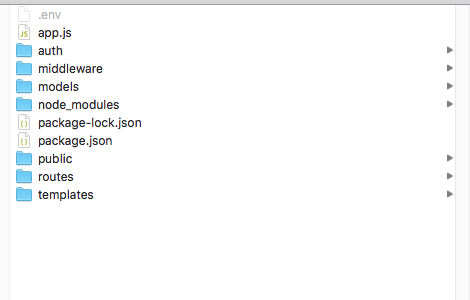
To get started, download the starter code here. After you have downloaded the file, unzip the contents, and you should have the following file structure:
Now that we have our code, let’s install the required dependencies and run our server. To install the required dependencies, open your terminal, navigate to your project, and run the following command: npm install.
Next, before we start the server you will need to update the .env file. This file includes your MongoDB connection string URL and your Gmail credentials. To update this file, just replace the NEEDS_TO_BE_UPDATED fields with your credentials.
Notes:
- You can also pass in these values through the terminal when you run your server code, but for the purpose of this tutorial, we will be loading them in through the
.envfile. - In case you will be using a version control system with your project code (like git), it is a best practice to make sure this file does not get committed with your source code and it is usually best to add the
.envfile to the file ignore list (.gitignoreif using git). For this tutorial, we will not be using a version control system.
Once everything is installed and you have updated your .env file, you can start the server by running the following command: npm run start. In your terminal, you should see a message about being connected to mongo and that the server has started.
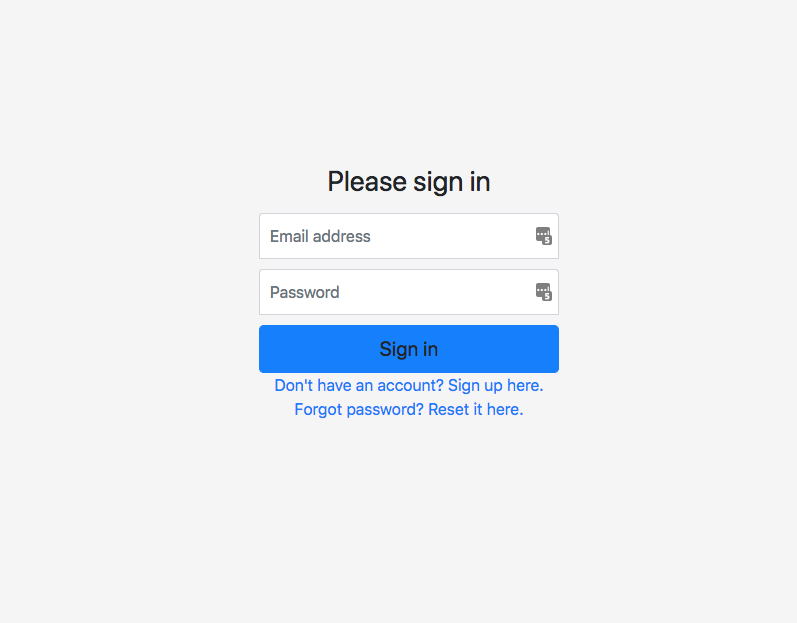
If you visit http://localhost:3000, you should see the login page.
In your browser, if you navigate to http://localhost:3000/game.html, you should see the game page.
Note: Currently, our server has been modified to allow anyone to access the game page, which will make it easier to test changes while developing. For our game, normally the player would be required to login before they can access this page.
Adding SocketIO – Server Side
With the project up and running, we will now start work on adding SocketIO to our game. If you are not familiar with SocketIO, it is a JavaScript library for real-time web applications that allows bi-directional communication between our server and the client-side logic. For our game, we will be using SocketIO for sending messages for the following events:
- When a new player joins the game.
- When a player leaves the game.
- Anytime a player moves.
To get started with SocketIO, we need to install the library in our project and we will do that using NPM. To do this, run the following command at the root of our project: npm install --save socket.io.
Next, we need to update app.js to include the SocketIO library. In app.js, add the following code below the const app = express(); line:
const server = require('http').Server(app);
const io = require('socket.io').listen(server);

const players = {};

io.on('connection', function (socket) {
  console.log('a user connected: ', socket.id);
  // create a new player and add it to our players object
  players[socket.id] = {
    flipX: false,
    x: Math.floor(Math.random() * 400) + 50,
    y: Math.floor(Math.random() * 500) + 50,
    playerId: socket.id
  };
  // send the players object to the new player
  socket.emit('currentPlayers', players);
  // update all other players of the new player
  socket.broadcast.emit('newPlayer', players[socket.id]);

  // when a player disconnects, remove them from our players object
  socket.on('disconnect', function () {
    console.log('user disconnected: ', socket.id);
    delete players[socket.id];
    // emit a message to all players to remove this player
    io.emit('disconnect', socket.id);
  });

  // when a plaayer moves, update the player data
  socket.on('playerMovement', function (movementData) {
    players[socket.id].x = movementData.x;
    players[socket.id].y = movementData.y;
    players[socket.id].flipX = movementData.flipX;
    // emit a message to all players about the player that moved
    socket.broadcast.emit('playerMoved', players[socket.id]);
  });
});
In the code above, we did the following:
- First, we added a new variable called
server, which uses Nodes built-inhttpmodule to create a basic HTTP server that uses our Express app. - Next, we created a new variable called
io, which creates oursocket.ioinstance and has it start listening on ourserverinstance. - Then, we created a new empty object called
playerswhich will be used for storing information about the players that are currently connected to our game.- For this tutorial, we will be storing this data in memory, however normally this type of data you would want to store this data in an external data store, that way it would be persistent and if the server failed, you would not lose this data.
- Next, we listened for the
connectionevent which is fired when a new user connects to our game instance. We listened for this event by usingio.onwhich takes two arguments, the first is the event we are listening for and the second is the function that is triggered when that event is fired.- This function will receive a socket object that has information about the socket connection.
- In the function that is triggered, we create a new player object that has the following fields:
xandy– which will be the starting position of the new player. These values are generated randomly.flipX– which be used for tracking if the player is facing left or right in the game.playerId– which will contain the socketId of this player. This value will help us update a player’s location in the game.
- We then stored this player object in our
playersobject, and then used theemitmethod to send a message to the player that just connected to our game.- This method takes two arguments: the first is the name of the message we are sending,
currentPlayersin this example, and the second is any data we want to pass along with that message, theplayersobject in this example.
- This method takes two arguments: the first is the name of the message we are sending,
- Next, we used the
broadcast.emitmethod to send a message to everyone else that is connected to our game. For this method, we passed thenewPlayermessage and the new players object. - Then, we listened for the
disconnectevent, which will be fired when this new player leaves our game.- In the function that is triggered when this event is fired, we delete that player’s information from our
playersobject and then useio.emitto emit a message to all players that are connected to our game. - In this method, we passed the
disconnectmessage and thesocket.idof the player that left the game.
- In the function that is triggered when this event is fired, we delete that player’s information from our
- Finally, we listened for the
playerMovementmessage, which is a custom message we will we send to the server any time a player moves in our game.- In the function that is triggered when this event is fired, we will receive a custom object that will have the player’s
xandyposition, along with the player’sflipXvalue. - When then update that player’s data that we have stored in the
playersobject, and we send aplayerMovedmessage to all other players and we pass the updated players data.
- In the function that is triggered when this event is fired, we will receive a custom object that will have the player’s
Before we can test our new server changes, we need to update how our server starts listening for requests. To do this, in app.js update the app.listen line to be server.listen. Your app.js should look like this:
// reads in our .env file and makes those values available as environment variables
require('dotenv').config();

const express = require('express');
const bodyParser = require('body-parser');
const mongoose = require('mongoose');
const cookieParser = require('cookie-parser');
const passport = require('passport');

const routes = require('./routes/main');
const secureRoutes = require('./routes/secure');
const passwordRoutes = require('./routes/password');

// setup mongo connection
const uri = process.env.MONGO_CONNECTION_URL;
mongoose.connect(uri, { useNewUrlParser : true, useCreateIndex: true });
mongoose.connection.on('error', (error) => {
  console.log(error);
  process.exit(1);
});
mongoose.connection.on('connected', function () {
  console.log('connected to mongo');
});
mongoose.set('useFindAndModify', false);

// create an instance of an express app
const app = express();
const server = require('http').Server(app);
const io = require('socket.io').listen(server);

const players = {};

io.on('connection', function (socket) {
  console.log('a user connected: ', socket.id);
  // create a new player and add it to our players object
  players[socket.id] = {
    flipX: false,
    x: Math.floor(Math.random() * 400) + 50,
    y: Math.floor(Math.random() * 500) + 50,
    playerId: socket.id
  };
  // send the players object to the new player
  socket.emit('currentPlayers', players);
  // update all other players of the new player
  socket.broadcast.emit('newPlayer', players[socket.id]);

  // when a player disconnects, remove them from our players object
  socket.on('disconnect', function () {
    console.log('user disconnected: ', socket.id);
    delete players[socket.id];
    // emit a message to all players to remove this player
    io.emit('disconnect', socket.id);
  });

  // when a plaayer moves, update the player data
  socket.on('playerMovement', function (movementData) {
    players[socket.id].x = movementData.x;
    players[socket.id].y = movementData.y;
    players[socket.id].flipX = movementData.flipX;
    // emit a message to all players about the player that moved
    socket.broadcast.emit('playerMoved', players[socket.id]);
  });
});

// update express settings
app.use(bodyParser.urlencoded({ extended: false })); // parse application/x-www-form-urlencoded
app.use(bodyParser.json()); // parse application/json
app.use(cookieParser());

// require passport auth
require('./auth/auth');

/*
app.get('/game.html', passport.authenticate('jwt', { session : false }), function (req, res) {
  res.sendFile(__dirname + '/public/game.html');
});
*/

app.get('/game.html', function (req, res) {
  res.sendFile(__dirname + '/public/game.html');
});

app.use(express.static(__dirname + '/public'));

app.get('/', function (req, res) {
  res.sendFile(__dirname + '/index.html');
});

// main routes
app.use('/', routes);
app.use('/', passwordRoutes);
app.use('/', passport.authenticate('jwt', { session : false }), secureRoutes);

// catch all other routes
app.use((req, res, next) => {
  res.status(404).json({ message: '404 - Not Found' });
});

// handle errors
app.use((err, req, res, next) => {
  console.log(err.message);
  res.status(err.status || 500).json({ error: err.message });
});

server.listen(process.env.PORT || 3000, () => {
  console.log(`Server started on port ${process.env.PORT || 3000}`);
});
If you save your code changes and restart your server, the server should start without any issues and you should still be able to view the game.
Adding SocketIO – Client Side
With the logic for SocketIO added to the server, we will now start working on adding the logic for the client. To do this, we need to reference the client side SocketIO library in our HTML file. Since we added SocketIO to our server, it will automatically add and server the client side library we need for establishing the connection on the following endpoint: /socket.io/socket.io.js.
To reference the file, open the public/game.html file and add the following code before the closing head tag:
<script src="/socket.io/socket.io.js"></script>
Next, we need to create a connection by updating our game logic. To do this, open public/assets/js/game.js and add the following code at the top of the create function:
this.socket = io();
With these new code changes, we should be able to test the socket connection. If you save your code changes, restart your server, and then navigate to http://localhost:3000/game.html, you should get a message about a player connecting to our game.
Conclusion
With logic for our web sockets in place, that brings Part 1 of this tutorial series to an end. In Part 2, we will do the following:
- We will continue adding the web socket logic to our client-side code.
- We will update the player logic to have our player created when the
currentPlayersevent is received. - We will add the logic for adding other players to our game when they connect.
- We will start adding logic for allowing the player to attack.
I hope you enjoyed this and found it helpful! If you have any questions, or suggestions on what we should cover next, please let us know in the comments below.


