Hello World! In this post, we’re going to lean how to access and use the Internet. This might seem like a simple task, but we’re going to learn all of what that entails. Specifically, we’ll look at how we can run networking operations on a different thread as well as how to use Android’s networking client to grab data. We’ll finally learn how to parse the result to find our specific value in a sea of other information. In our example, we’re going to pull weather data from a free weather API called OpenWeatherMap and display the current weather for a given location.
Grab the full source code here.
Before we can create the project, we first need to go to OpenWeatherMap and get an API key. For most online API services, developers need to create an account and request an API key. We send this uniquely-generated key whenever we need to use the API to get data from the online API. The identifies the API call with our signature. Anyway, at the website, sign up for a new account. After that, we should see a “My Home” page and the “Setup” tab active. Scroll down and there should be a field called “API key”. We need to write this down or copy it into a text file. We’ll need this unique String after we create the project. Don’t share this API key with anyone! OpenWeatherMap’s API service can cost money, but we’ll just be using their free tier of service. Sharing API keys could cause your usage to spill over into the paid tier!
After we’ve retrieved our OpenWeatherMap API key, let’s create the project! We’ll call it NetworkingDemo, give it an API level of Marshmallow, and create a blank Activity. Before we do start creating our app, we need to open up the app/manifests/AndroidManifest.xml file. Above the application tag, we need to add the following permission for internet access: <uses-permission-sdk-23 android:name=”android.permission.INTERNET” />. After we’ve done this, we’re going to set up our view so that it simply displays the current weather. Let’s go into our activity_main.xml layout file. Replace the TextView with the following TextView.
<TextView
    android:id="@+id/textView"
    android:text="Getting Weather..." android:layout_width="wrap_content"
    android:layout_height="wrap_content" android:layout_centerInParent="true"
    android:textSize="28sp"/>
This new TextView has an ID since we’ll need to populate it eventually. The default text is “Getting Weather…” in case the network is slow. For more complex cases, we would want to show a progress spinner to tell the user that we’re waiting on the network. Our case is trivial enough that changing the TextView will suffice. We also center this child on the screen and change the text size so that it’s easier to see.
Now we’re ready to add the Java code and handle all of the networking and JSON parsing. Let’s open up our MainActivity and add a private constant to the top for the API key that looks something like this: private static final String APP_ID = “INSERT YOUR API KEY HERE!”;. You’ll need to replace the value with your the API key from OpenWeatherMap.
Before we get into the actual networking, let’s first look at threads and threading. A thread is simply a sequence of execution handled independently of the main sequence. For example, Android has a main thread that we’ve been working with. Most of our code runs on main thread. In fact, we can only access UI elements on the main thread, hence it’s also called the UI thread sometimes. But we have a problem if we want to do networking. If we try to run networking calls on the main/UI thread, our entire app will freeze until we’re done with the networking request. Imagine you’re waiting for your news feed to load on a news app on your phone. If we didn’t have threading, your phone would freeze until the stories are ready to go! To prevent this, we can create another thread, grab the data from the network from that thread, and give it to our UI thread to update the UI elements. In some cases, we might want to update a download progress bar, for example. We can use a method to send progress updates to the main thread for it to update the download progress bar. After the networking is done, we can publish the result on the main/UI thread for further processing or for display. In fact, Android is now more proactive and forces you to take this approach so an error will be shown if you try to access the network on the UI thread!
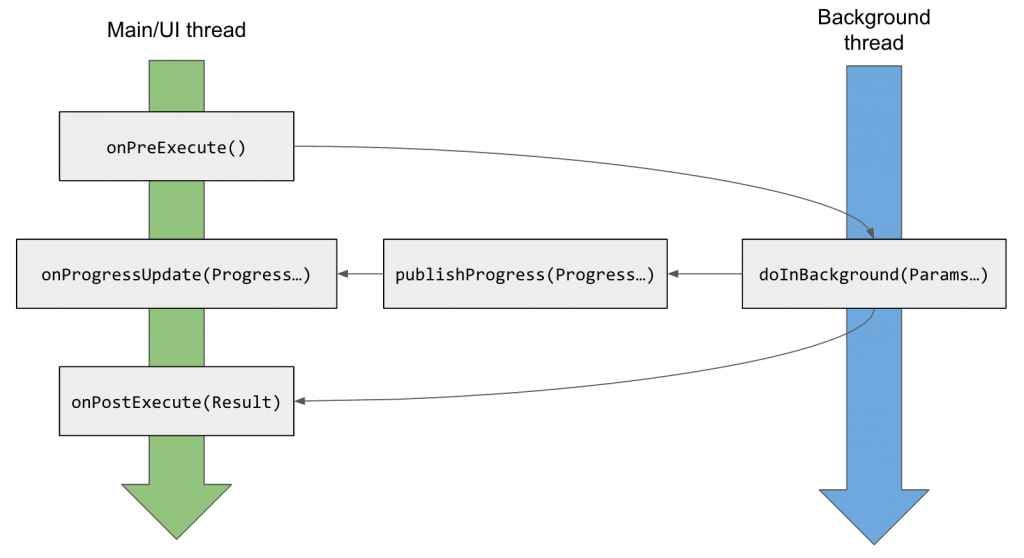
Instead of creating and managing these threads manually, Android provides us with an AsyncTask parameterized class to help us do exactly this! Above is a graphic of the different method calls and the order in which they are called and the thread they run on. First, onPreExecute() is called and then doInBackground(…) is called on the background thread immediately after. We can push progress updates to onProgressUpdate(…) by called publishProgress(…) in doInBackground(…) . Finally, after doInBackground(…) is finished, we run onPostExecute(…) .
Let’s create an inner subclass of AsyncTask to handle all of our networking after the onCreate(…) method. Notice that we’re accepting a String as an input, leaving the progress parameter unused (put in Void), and returning a String. Since AsyncTask is abstract class, we’ll need to implement doInBackground(…) at least. But we also need to override onPostExecute(…) . We’re going to be using aliasing to our benefit to populate the TextView. We’re going to pass in a reference to the TextView we want to populate in the constructor. Since we’re getting a temperature, we can simply set the TextView’s text to say that temperature in onPostExecute(…) with what we’ll soon get in doInBackground(…) .
private class GetWeatherTask extends AsyncTask<String, Void, String> {
    private TextView textView;

    public GetWeatherTask(TextView textView) {
        this.textView = textView;
    }

    @Override
    protected String doInBackground(String... strings) {
        return null;
    }

    @Override
    protected void onPostExecute(String temp) {
        textView.setText("Current Weather: " + temp);
    }
}
Now that we’ve done this, we can look at what we need to do in the background thread. Let me outline the approach we’re going to take in this background thread. Note that we get a varargs list, but we only need the first argument from that. However, we’ll need to grab just the first from that list. We need to create a valid URL from it and open up a connection. Then we’ll get some JSON back and we need to convert that input stream into a String and convert that into a JSON object. Then we can extract our value from the JSON. Finally, we need to close the connection. In code, this looks like the following.
@Override
protected String doInBackground(String... strings) {
    String weather = "UNDEFINED";
    try {
        URL url = new URL(strings[0]);
        HttpURLConnection urlConnection = (HttpURLConnection) url.openConnection();

        InputStream stream = new BufferedInputStream(urlConnection.getInputStream());
        BufferedReader bufferedReader = new BufferedReader(new InputStreamReader(stream));
        StringBuilder builder = new StringBuilder();

        String inputString;
        while ((inputString = bufferedReader.readLine()) != null) {
            builder.append(inputString);
        }

        JSONObject topLevel = new JSONObject(builder.toString());
        JSONObject main = topLevel.getJSONObject("main");
        weather = String.valueOf(main.getDouble("temp"));

        urlConnection.disconnect();
    } catch (IOException | JSONException e) {
        e.printStackTrace();
    }
    return weather;
}
The reason we use a String is so that in case we don’t get a response back, we can account for that. We need to surround most of this in a try-catch since many of these instance methods throw exceptions. In the next two lines, we create a new url and connect using Android’s awesome HttpURLConnection class. The next three lines essentially convert the input stream to a buffered format so we can read it a line at a time. If we wanted to be more robust, we could check the status code of the URL connection to make sure it’s an HTTP OK before grabbing an input stream. Then we have a StringBuilder that we append each line of the response to the StringBuilder. Converting to a JSONObject is a piece of cake since one of the parameterized constructors for JSONObject takes a String and parses it for us.
JSON stands for Javascript Object Notation and it’s a way to format and organize information in key-value pairs. We can essentially have JSON Objects with key-value pairs. We can also have JSON Arrays of objects, each with key-value pairs as well. Look at this link for more information about JSON and examples of it compared to XML. Looking at the OpenWeatherMap API, we know that we’ll get a top-level JSONObject. The temperature we’re looking for is another JSON object whose name is “main”. Then we can extract the temperature inside that object called “temp” and get the value of it. Finally, we close the connection.
Now that we have our AsyncTask subclass created, it’s very simple to execute it in our onCreate(…) method.
@Override
protected void onCreate(Bundle savedInstanceState) {
    super.onCreate(savedInstanceState);
    setContentView(R.layout.activity_main);

    double lat = 40.712774, lon = -74.006091;
    String units = "imperial";
    String url = String.format("http://api.openweathermap.org/data/2.5/weather?lat=%f&lon=%f&units=%s&appid=%s",
            lat, lon, units, APP_ID);

    TextView textView = (TextView) findViewById(R.id.textView);
    new GetWeatherTask(textView).execute(url);
}
Feel free to replace the lat and lon with your location! The one provided is that of New York City, New York, USA. The units can either be “imperial” or “metric” depending on your taste of units. If you want to see the raw JSON, copy the url link and put it in your browser and substitute the lat, lon, API key, and units. Your browser should show raw JSON text. You can format it by pasting into a JSON formatter here.
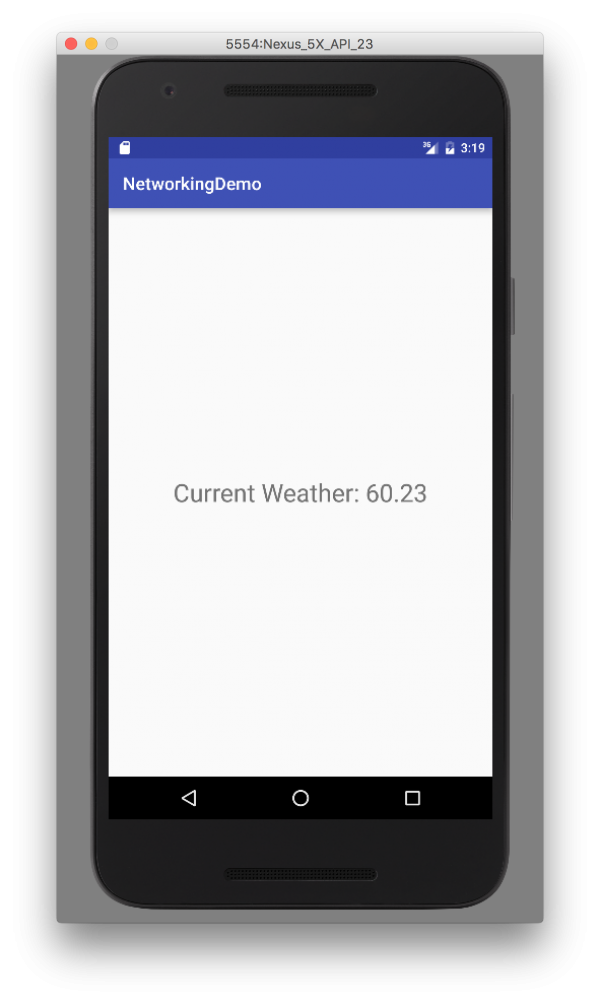
In this code, we grab a reference to the TextView to change and pass it to the AsyncTask to populate after the network call. In the final line, we create a new task and call execute with the single URL. We don’t need to store it in a variable since we won’t be do anything with it beside calling execute(…) on it. We can see the current weather at our provided location below!
Conclusion
In this post, we learned how to access the Internet using AsyncTask and HttpURLConnection. We also learned that all network calls need to happen on a separate thread and AsyncTask is the best way to create a background thread. We learned the different methods in AsyncTask and how threading works to our benefit. Finally, in AsyncTask, we covered how to connect to the OpenWeatherMap API by using HttpURLConnection as well as how to parse the resulting JSON.


