Hello World! In this post, we’re going to learn how we can pass data back and forth between two different activities. We’ll also learn how to reuse layouts and use our app’s manifest with Intents. The Intent object is the fundamental class that we use to pass data around in Android. It acts as a container of information to the system that we can manipulate. We’re going to see how we can transfer to an Activity and get a result back from that Activity as well.
Note: To make this easier on us, we’re going to use source code from a previous post on Toolbars so if you have any questions as to the specifics of ListViews or Toolbars, please read those respective articles!
We’re going to be building an app that displays a list of countries, and, when the user taps on an entry, it brings them to another view that simply displays the name of the country. The interesting part is that the second Activity will receive the country to display from the first Activity.
Let’s create a new Android Studio project and call it IntentDemo. We’re going to start by adding the following to the res/values/strings.xml file to act as our database backend.
<string-array name="countries_array">
    <item>Afghanistan</item>
    <item>Albania</item>
    <item>Algeria</item>
    <item>American Samoa</item>
    <item>Andorra</item>
    <item>Angola</item>
    <item>Anguilla</item>
    <item>Antarctica</item>
    <item>Antigua and Barbuda</item>
    <item>Argentina</item>
    <item>Armenia</item>
    <item>Aruba</item>
    <item>Australia</item>
    <item>Austria</item>
    <item>Azerbaijan</item>
    <item>Bahrain</item>
    <item>Bangladesh</item>
    <item>Barbados</item>
    <item>Belarus</item>
    <item>Belgium</item>
    <item>Belize</item>
    <item>Benin</item>
    <item>Bermuda</item>
    <item>Bhutan</item>
    <item>Bolivia</item>
    <item>Bosnia and Herzegovina</item>
    <item>Botswana</item>
    <item>Bouvet Island</item>
    <item>Brazil</item>
    <item>British Indian Ocean Territory</item>
    <item>British Virgin Islands</item>
    <item>Brunei</item>
    <item>Bulgaria</item>
    <item>Burkina Faso</item>
    <item>Burundi</item>
    <item>Cambodia</item>
    <item>Cameroon</item>
    <item>Canada</item>
    <item>Cape Verde</item>
    <item>Cayman Islands</item>
    <item>Central African Republic</item>
    <item>Chad</item>
    <item>Chile</item>
    <item>China</item>
    <item>Christmas Island</item>
    <item>Cocos (Keeling) Islands</item>
    <item>Colombia</item>
    <item>Comoros</item>
    <item>Congo</item>
    <item>Cook Islands</item>
    <item>Costa Rica</item>
    <item>Cote d\'Ivoire</item>
    <item>Croatia</item>
    <item>Cuba</item>
    <item>Cyprus</item>
    <item>Czech Republic</item>
    <item>Democratic Republic of the Congo</item>
    <item>Denmark</item>
    <item>Djibouti</item>
    <item>Dominica</item>
    <item>Dominican Republic</item>
    <item>East Timor</item>
    <item>Ecuador</item>
    <item>Egypt</item>
    <item>El Salvador</item>
    <item>Equatorial Guinea</item>
    <item>Eritrea</item>
    <item>Estonia</item>
    <item>Ethiopia</item>
    <item>Faeroe Islands</item>
    <item>Falkland Islands</item>
    <item>Fiji</item>
    <item>Finland</item>
    <item>Former Yugoslav Republic of Macedonia</item>
    <item>France</item>
    <item>French Guiana</item>
    <item>French Polynesia</item>
    <item>French Southern Territories</item>
    <item>Gabon</item>
    <item>Georgia</item>
    <item>Germany</item>
    <item>Ghana</item>
    <item>Gibraltar</item>
    <item>Greece</item>
    <item>Greenland</item>
    <item>Grenada</item>
    <item>Guadeloupe</item>
    <item>Guam</item>
    <item>Guatemala</item>
    <item>Guinea</item>
    <item>Guinea-Bissau</item>
    <item>Guyana</item>
    <item>Haiti</item>
    <item>Heard Island and McDonald Islands</item>
    <item>Honduras</item>
    <item>Hong Kong</item>
    <item>Hungary</item>
    <item>Iceland</item>
    <item>India</item>
    <item>Indonesia</item>
    <item>Iran</item>
    <item>Iraq</item>
    <item>Ireland</item>
    <item>Israel</item>
    <item>Italy</item>
    <item>Jamaica</item>
    <item>Japan</item>
    <item>Jordan</item>
    <item>Kazakhstan</item>
    <item>Kenya</item>
    <item>Kiribati</item>
    <item>Kuwait</item>
    <item>Kyrgyzstan</item>
    <item>Laos</item>
    <item>Latvia</item>
    <item>Lebanon</item>
    <item>Lesotho</item>
    <item>Liberia</item>
    <item>Libya</item>
    <item>Liechtenstein</item>
    <item>Lithuania</item>
    <item>Luxembourg</item>
    <item>Macau</item>
    <item>Madagascar</item>
    <item>Malawi</item>
    <item>Malaysia</item>
    <item>Maldives</item>
    <item>Mali</item>
    <item>Malta</item>
    <item>Marshall Islands</item>
    <item>Martinique</item>
    <item>Mauritania</item>
    <item>Mauritius</item>
    <item>Mayotte</item>
    <item>Mexico</item>
    <item>Micronesia</item>
    <item>Moldova</item>
    <item>Monaco</item>
    <item>Mongolia</item>
    <item>Montenegro</item>
    <item>Montserrat</item>
    <item>Morocco</item>
    <item>Mozambique</item>
    <item>Myanmar</item>
    <item>Namibia</item>
    <item>Nauru</item>
    <item>Nepal</item>
    <item>Netherlands</item>
    <item>Netherlands Antilles</item>
    <item>New Caledonia</item>
    <item>New Zealand</item>
    <item>Nicaragua</item>
    <item>Niger</item>
    <item>Nigeria</item>
    <item>Niue</item>
    <item>Norfolk Island</item>
    <item>North Korea</item>
    <item>Northern Marianas</item>
    <item>Norway</item>
    <item>Oman</item>
    <item>Pakistan</item>
    <item>Palau</item>
    <item>Panama</item>
    <item>Papua New Guinea</item>
    <item>Paraguay</item>
    <item>Peru</item>
    <item>Philippines</item>
    <item>Pitcairn Islands</item>
    <item>Poland</item>
    <item>Portugal</item>
    <item>Puerto Rico</item>
    <item>Qatar</item>
    <item>Reunion</item>
    <item>Romania</item>
    <item>Russia</item>
    <item>Rwanda</item>
    <item>Sqo Tome and Principe</item>
    <item>Saint Helena</item>
    <item>Saint Kitts and Nevis</item>
    <item>Saint Lucia</item>
    <item>Saint Pierre and Miquelon</item>
    <item>Saint Vincent and the Grenadines</item>
    <item>Samoa</item>
    <item>San Marino</item>
    <item>Saudi Arabia</item>
    <item>Senegal</item>
    <item>Serbia</item>
    <item>Seychelles</item>
    <item>Sierra Leone</item>
    <item>Singapore</item>
    <item>Slovakia</item>
    <item>Slovenia</item>
    <item>Solomon Islands</item>
    <item>Somalia</item>
    <item>South Africa</item>
    <item>South Georgia and the South Sandwich Islands</item>
    <item>South Korea</item>
    <item>South Sudan</item>
    <item>Spain</item>
    <item>Sri Lanka</item>
    <item>Sudan</item>
    <item>Suriname</item>
    <item>Svalbard and Jan Mayen</item>
    <item>Swaziland</item>
    <item>Sweden</item>
    <item>Switzerland</item>
    <item>Syria</item>
    <item>Taiwan</item>
    <item>Tajikistan</item>
    <item>Tanzania</item>
    <item>Thailand</item>
    <item>The Bahamas</item>
    <item>The Gambia</item>
    <item>Togo</item>
    <item>Tokelau</item>
    <item>Tonga</item>
    <item>Trinidad and Tobago</item>
    <item>Tunisia</item>
    <item>Turkey</item>
    <item>Turkmenistan</item>
    <item>Turks and Caicos Islands</item>
    <item>Tuvalu</item>
    <item>Virgin Islands</item>
    <item>Uganda</item>
    <item>Ukraine</item>
    <item>United Arab Emirates</item>
    <item>United Kingdom</item>
    <item>United States</item>
    <item>United States Minor Outlying Islands</item>
    <item>Uruguay</item>
    <item>Uzbekistan</item>
    <item>Vanuatu</item>
    <item>Vatican City</item>
    <item>Venezuela</item>
    <item>Vietnam</item>
    <item>Wallis and Futuna</item>
    <item>Western Sahara</item>
    <item>Yemen</item>
    <item>Yugoslavia</item>
    <item>Zambia</item>
    <item>Zimbabwe</item>
</string-array>
Now, before we make changes to our view, since we’re going to need a Toolbar in both Activity’s views. Instead of copying and pasting code from one file to another, we can declare a layout file that can be inserted in both views. This way, we only need to edit one layout file, not every single one! Let’s right-click on the res/layout folder and create a new layout file whose name toolbar and whose root element is android.support.v7.widget.Toolbar . Now we add properties to this toolbar like so.
<?xml version="1.0" encoding="utf-8"?>
<android.support.v7.widget.Toolbar xmlns:android="http://schemas.android.com/apk/res/android"
    android:id="@+id/toolbar"
    android:layout_width="match_parent"
    android:layout_height="wrap_content"
    android:minHeight="?attr/actionBarSize"
    android:elevation="4dp"
    android:background="@color/colorPrimary" />
Since we’ve created this layout file, we can insert it into any number of other layout files as well. For example, let’s go into the activity_main.xml file and insert the following.
<?xml version="1.0" encoding="utf-8"?>
<LinearLayout xmlns:android="http://schemas.android.com/apk/res/android"
    xmlns:tools="http://schemas.android.com/tools"
    tools:context=".MainActivity"
    android:orientation="vertical"
    android:layout_width="match_parent"
    android:layout_height="match_parent">

    <include layout="@layout/toolbar" />

    <ListView
        android:layout_width="match_parent"
        android:layout_height="match_parent"
        android:id="@+id/listView" />
</LinearLayout>
In the above code snippet, we can insert the contents of the toolbar layout into this layout by using the include tag and layout attribute. Let’s first have our list configured before we move on to create another Activity. Open up the MainActivity class and add the following code snippet to set up our list.
private ListView listView;
private ArrayAdapter<CharSequence> adapter;

@Override
protected void onCreate(Bundle savedInstanceState) {
    super.onCreate(savedInstanceState);
    setContentView(R.layout.activity_main);

    listView = (ListView) findViewById(R.id.listView);
    adapter = ArrayAdapter.createFromResource(this, R.array.countries_array, android.R.layout.simple_list_item_1);
    listView.setAdapter(adapter);
    listView.setOnItemClickListener(this);

    Toolbar toolbar = (Toolbar) findViewById(R.id.toolbar);
    setSupportActionBar(toolbar);
    toolbar.setTitleTextColor(Color.WHITE);
    toolbar.setTitle(R.string.app_name);

}
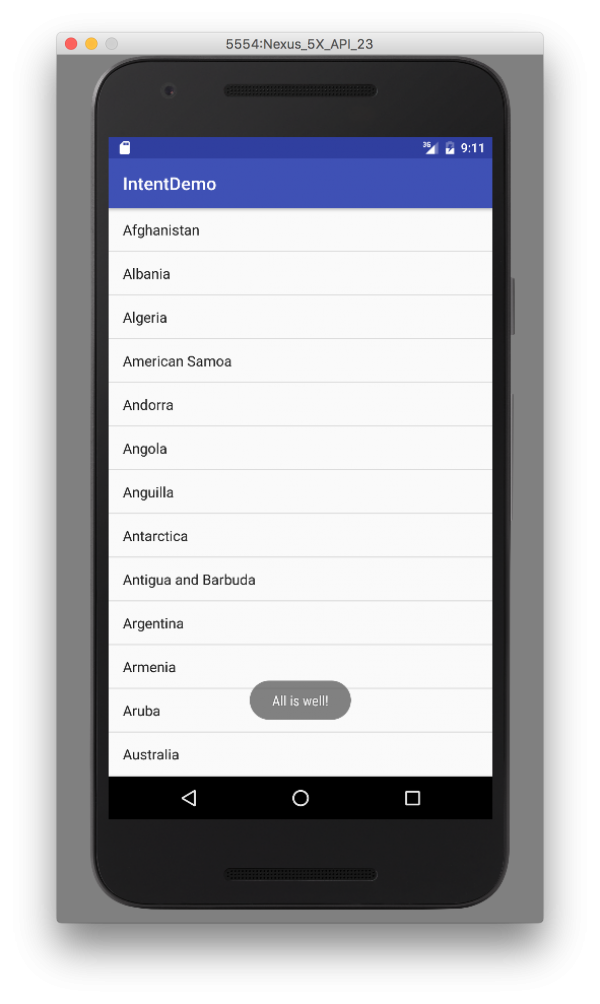
You’ll notice that we can access the Toolbar even when it’s actually in another file thanks to the include tag. The call to setSupportActionBar(Toolbar) simply sets this Toolbar to act as the system Toolbar; we’ll see more of this when we get to the other Activity. In the final line, we’re using the overload of the setTitle(int) that accepts a string resource ID. We’ll be forced to implement the interface that will add the onItemClick(…) method, but we can leave that empty for now. Run the code now and verify that you get a list of countries as a start.
Now we’re ready to create a new Activity. There are several steps involved in this process: creating the Java class, creating the XML layout, and registering the Activity with the app manifest. Luckily, Android Studio can do all of this for us with a single wizard! Right-click on the package name of our MainActivity and go to New → Activity → Empty Activity. We’ll call ours DetailActivity and Android Studio will create the corresponding layout file and register it with the app manifest. Let’s first look at the layout and replace it with the following.
<?xml version="1.0" encoding="utf-8"?>
<LinearLayout xmlns:android="http://schemas.android.com/apk/res/android"
    xmlns:tools="http://schemas.android.com/tools" android:layout_width="match_parent"
    android:layout_height="match_parent"
    android:orientation="vertical"
    tools:context="com.deshpande.intentdemo.DetailActivity">

    <include layout="@layout/toolbar" />

    <RelativeLayout
        android:paddingLeft="@dimen/activity_horizontal_margin"
        android:paddingRight="@dimen/activity_horizontal_margin"
        android:paddingTop="@dimen/activity_vertical_margin"
        android:paddingBottom="@dimen/activity_vertical_margin"
        android:layout_width="match_parent"
        android:layout_height="match_parent">
        <TextView
            android:id="@+id/textview_detail"
            android:layout_width="wrap_content"
            android:layout_height="wrap_content"
            android:textSize="22sp"
            android:layout_centerInParent="true"/>
    </RelativeLayout>

</LinearLayout>
We’re just simply declaring a TextView that will display our country. We need a top-level LinearLayout so that the Toolbar appears first. Then we use the include tag to insert the Toolbar into this layout. We need a RelativeLayout after the Toolbar so that the TextView is centered on the screen. Now we can go back to our MainActivity and start the other Activity when a list item was clicked. Let’s add the following code to the onItemClick(…) method. We also need some constants to keep track of uniqueness so we’ll add those as fields at the top of the Activity.
public static final String EXTRA_COUNTRY = "EXTRA_COUNTRY";
private static final int REQUEST_RESPONSE = 1;
@Override
public void onItemClick(AdapterView<?> adapterView, View view, int position, long id) {
    Intent intent = new Intent(this, DetailActivity.class);
    intent.putExtra(EXTRA_COUNTRY, adapter.getItem(position));
    startActivityForResult(intent, REQUEST_RESPONSE);
}
In this code snippet, we’re creating a new Intent object, giving it some data, and starting up the other Activity. The first parameter to the constructor is the Context and the second is the class we want to start. Each class in Java has a class property that uses Java’s Reflection API (where a program can know about itself so to speak). This particular parameterized constructor uses Java Reflection to launch the appropriate Activity. In the next line, we call a method to store the country into the Intent with a unique String ID. We’ll retrieve this value later in the other Activity. Then, we call the method to start the other Activity through the Intent. Since we want a response back, we’re also passing in a unique request code that we’ll be checking later. Now let’s open up the DetailActivity and add the following code in the onCreate(Bundle) method.
String country = getIntent().getStringExtra(MainActivity.EXTRA_COUNTRY);
TextView textView = (TextView) findViewById(R.id.textview_detail);
textView.setText(country);

Toolbar toolbar = (Toolbar) findViewById(R.id.toolbar);
setSupportActionBar(toolbar);
toolbar.setTitleTextColor(Color.WHITE);
toolbar.setTitle("Country");
toolbar.setNavigationOnClickListener(this);

getSupportActionBar().setDisplayHomeAsUpEnabled(true);
In the very first line, we grab the String hidden away in the Intent. We need the unique ID to grab it however. Then we set the TextView’s text to be that country. We grab the Toolbar and set the system’s ActionBar to be this Toolbar. The reason for this is so we can provide backwards-navigation for the user to get back the the previous Activity. You might have noticed in other apps that it looks like a left-facing arrow to the left of the Toolbar’s title. Instead of having to import and manage that image, we can have the system display that for us by getting the ActionBar, in other words our Toolbar, and tell the system to display that backwards-navigation icon. We just have to make sure we implement the callback. We set this callback when we call setNavigationOnClickListener(…) . This will force us to implement an interface and a callback method.
Before we do this, we need to tell Android that the parent activity of DetailActivity is MainActivity. We can only do this in our app’s manifest file. In our Project view, let’s open up the app/manifests/AndroidManifest.xml file and find and replace the tag relating to DetailActivity with the following.
<activity android:name=".DetailActivity" >
    <meta-data android:name="android.support.PARENT_ACTIVITY" android:value=".MainActivity" />
</activity>
The above code snippet tells Android that the parent activity of DetailActivity is MainActivity. Now that we’ve done this, we can go back to our DetailActivity and configure the navigation. To do this however, we’ll need an extra constant to do the same task as EXTRA_COUNTRY did in MainActivity.
public static final String EXTRA_RESPONSE = "EXTRA_RESPONSE";
@Override
public void onClick(View view) {
    Intent intent = new Intent();
    intent.putExtra(EXTRA_RESPONSE, "All is well!");
    setResult(RESULT_OK, intent);
    finish();
}
We’re creating a new Intent object and putting in a small verification message. This method setResult(…) will be helpful when we go back to MainActivity to read the response. RESULT_OK is a constant of Activity so we don’t need to declare it. Then we pass the Intent that we created with the data as well. The final call will finish this current Activity and transfer control back to the Activity which started DetailActivity, which is MainActivity. Let’s take a look at what this Activity is going to look like.
Now let’s go back to MainActivity and display the response. Let’s override onActivityResult(…) method.
@Override
protected void onActivityResult(int requestCode, int resultCode, Intent data) {
    if (resultCode == RESULT_OK) {
        if (requestCode == REQUEST_RESPONSE) {
            Toast.makeText(this, data.getStringExtra(DetailActivity.EXTRA_RESPONSE), Toast.LENGTH_SHORT).show();
        }
    }
}
In this code, we first check if the resultCode turned out to be RESULT_OK, which it did. Then we make sure that the requestCode corresponds to the code we sent initially. Finally, we create a Toast message and extract the string from the Intent using the key. This is all there is to do! Let’s run our app!
You can see that when we tap on a list item, we transition to DetailActivity that has the name of the country in the center of the screen. When we press on the backwards-navigation arrow, we have a Toast message that says “All is well!”
Conclusion
In this post, we covered how we can use Intents to start other Activities and pass data to them. We also learned how to pass data back to the initial Activity as well. As a bonus, we also went over how to reuse layouts through the include tag and a bit about the mysterious AndroidManifest.xml file. Intents are very important since we can use so that we don’t have to create an Activity for everything! For example, if we want an image, we ask the system, via an Intent, to take the user to the Camera app. Then we can get the image back in onActivityResult(…) ! It’s really that simple! To summarize, Intents are powerful objects that will make our Android coding go a lot smoother!


