Hello World! In this post, we’re going to talk about Toolbars from a design perspective and then we’ll actually build an app that uses Toolbars. We’re all familiar with the top bar of an app that houses the logo or name of the app as well as a navigation drawer perhaps. One of the most prominent items on that top bar are the actions and the action overflow menu! We’re going to cover how we can create this Toolbar and put actions on it!
Download the source code for this post here. You’ll need some of the resources in the project later on!
Before we get into the source code for building menus, I want to take a short bit of time to think about our toolbar actions and do some design instead of jumping straight into developing. We’ll be focusing on the actions that can go on the Toolbar.
When considering whether or not an action should go on the Toolbar, follow the FIT principle. If an action is Frequent, Important, or Typical, it should go on the Toolbar. By Frequent, ask yourself, will people use this action almost every time they come to this screen? For example, in a social media app, the action to publish a new post would definitely be Frequent. By Important, ask yourself, does this action align with the main purpose of my app? For example, in an email app, composing a new email is absolutely important and the entire point of the app! By Typical, ask yourself, given the context of this screen, would it be strange if this action were missing or hidden somewhere? For example, in a photo editing app, users would be surprised if the ability to edit photos were hidden away in the action overflow.
If you’ve answered yes to any of these questions, put that action in the Toolbar! Keep the number of actions on the Toolbar to a minimum so that your app looks very clean and fresh. Nothing puts off of your app than a million items on a small Toolbar!
Now that we’ve thought carefully about the design of our toolbar, let’s actually begin developing one! Let’s create a project in Android Studio and call it ToolbarDemo. We’ll just need a blank Activity called MainActivity. We’re going to create a quick ListView for the sake of having some content. If you’d like to know more about ListViews in-depth, check out the blog post on simple ListViews. Anyways, let’s open up res/values/strings.xml and add the following code block to serve as our main content for the ListView:
    <string-array name="countries_array">
        <item>Afghanistan</item>
        <item>Albania</item>
        <item>Algeria</item>
        <item>American Samoa</item>
        <item>Andorra</item>
        <item>Angola</item>
        <item>Anguilla</item>
        <item>Antarctica</item>
        <item>Antigua and Barbuda</item>
        <item>Argentina</item>
        <item>Armenia</item>
        <item>Aruba</item>
        <item>Australia</item>
        <item>Austria</item>
        <item>Azerbaijan</item>
        <item>Bahrain</item>
        <item>Bangladesh</item>
        <item>Barbados</item>
        <item>Belarus</item>
        <item>Belgium</item>
        <item>Belize</item>
        <item>Benin</item>
        <item>Bermuda</item>
        <item>Bhutan</item>
        <item>Bolivia</item>
        <item>Bosnia and Herzegovina</item>
        <item>Botswana</item>
        <item>Bouvet Island</item>
        <item>Brazil</item>
        <item>British Indian Ocean Territory</item>
        <item>British Virgin Islands</item>
        <item>Brunei</item>
        <item>Bulgaria</item>
        <item>Burkina Faso</item>
        <item>Burundi</item>
        <item>Cambodia</item>
        <item>Cameroon</item>
        <item>Canada</item>
        <item>Cape Verde</item>
        <item>Cayman Islands</item>
        <item>Central African Republic</item>
        <item>Chad</item>
        <item>Chile</item>
        <item>China</item>
        <item>Christmas Island</item>
        <item>Cocos (Keeling) Islands</item>
        <item>Colombia</item>
        <item>Comoros</item>
        <item>Congo</item>
        <item>Cook Islands</item>
        <item>Costa Rica</item>
        <item>Cote d\'Ivoire</item>
        <item>Croatia</item>
        <item>Cuba</item>
        <item>Cyprus</item>
        <item>Czech Republic</item>
        <item>Democratic Republic of the Congo</item>
        <item>Denmark</item>
        <item>Djibouti</item>
        <item>Dominica</item>
        <item>Dominican Republic</item>
        <item>East Timor</item>
        <item>Ecuador</item>
        <item>Egypt</item>
        <item>El Salvador</item>
        <item>Equatorial Guinea</item>
        <item>Eritrea</item>
        <item>Estonia</item>
        <item>Ethiopia</item>
        <item>Faeroe Islands</item>
        <item>Falkland Islands</item>
        <item>Fiji</item>
        <item>Finland</item>
        <item>Former Yugoslav Republic of Macedonia</item>
        <item>France</item>
        <item>French Guiana</item>
        <item>French Polynesia</item>
        <item>French Southern Territories</item>
        <item>Gabon</item>
        <item>Georgia</item>
        <item>Germany</item>
        <item>Ghana</item>
        <item>Gibraltar</item>
        <item>Greece</item>
        <item>Greenland</item>
        <item>Grenada</item>
        <item>Guadeloupe</item>
        <item>Guam</item>
        <item>Guatemala</item>
        <item>Guinea</item>
        <item>Guinea-Bissau</item>
        <item>Guyana</item>
        <item>Haiti</item>
        <item>Heard Island and McDonald Islands</item>
        <item>Honduras</item>
        <item>Hong Kong</item>
        <item>Hungary</item>
        <item>Iceland</item>
        <item>India</item>
        <item>Indonesia</item>
        <item>Iran</item>
        <item>Iraq</item>
        <item>Ireland</item>
        <item>Israel</item>
        <item>Italy</item>
        <item>Jamaica</item>
        <item>Japan</item>
        <item>Jordan</item>
        <item>Kazakhstan</item>
        <item>Kenya</item>
        <item>Kiribati</item>
        <item>Kuwait</item>
        <item>Kyrgyzstan</item>
        <item>Laos</item>
        <item>Latvia</item>
        <item>Lebanon</item>
        <item>Lesotho</item>
        <item>Liberia</item>
        <item>Libya</item>
        <item>Liechtenstein</item>
        <item>Lithuania</item>
        <item>Luxembourg</item>
        <item>Macau</item>
        <item>Madagascar</item>
        <item>Malawi</item>
        <item>Malaysia</item>
        <item>Maldives</item>
        <item>Mali</item>
        <item>Malta</item>
        <item>Marshall Islands</item>
        <item>Martinique</item>
        <item>Mauritania</item>
        <item>Mauritius</item>
        <item>Mayotte</item>
        <item>Mexico</item>
        <item>Micronesia</item>
        <item>Moldova</item>
        <item>Monaco</item>
        <item>Mongolia</item>
        <item>Montenegro</item>
        <item>Montserrat</item>
        <item>Morocco</item>
        <item>Mozambique</item>
        <item>Myanmar</item>
        <item>Namibia</item>
        <item>Nauru</item>
        <item>Nepal</item>
        <item>Netherlands</item>
        <item>Netherlands Antilles</item>
        <item>New Caledonia</item>
        <item>New Zealand</item>
        <item>Nicaragua</item>
        <item>Niger</item>
        <item>Nigeria</item>
        <item>Niue</item>
        <item>Norfolk Island</item>
        <item>North Korea</item>
        <item>Northern Marianas</item>
        <item>Norway</item>
        <item>Oman</item>
        <item>Pakistan</item>
        <item>Palau</item>
        <item>Panama</item>
        <item>Papua New Guinea</item>
        <item>Paraguay</item>
        <item>Peru</item>
        <item>Philippines</item>
        <item>Pitcairn Islands</item>
        <item>Poland</item>
        <item>Portugal</item>
        <item>Puerto Rico</item>
        <item>Qatar</item>
        <item>Reunion</item>
        <item>Romania</item>
        <item>Russia</item>
        <item>Rwanda</item>
        <item>Sqo Tome and Principe</item>
        <item>Saint Helena</item>
        <item>Saint Kitts and Nevis</item>
        <item>Saint Lucia</item>
        <item>Saint Pierre and Miquelon</item>
        <item>Saint Vincent and the Grenadines</item>
        <item>Samoa</item>
        <item>San Marino</item>
        <item>Saudi Arabia</item>
        <item>Senegal</item>
        <item>Serbia</item>
        <item>Seychelles</item>
        <item>Sierra Leone</item>
        <item>Singapore</item>
        <item>Slovakia</item>
        <item>Slovenia</item>
        <item>Solomon Islands</item>
        <item>Somalia</item>
        <item>South Africa</item>
        <item>South Georgia and the South Sandwich Islands</item>
        <item>South Korea</item>
        <item>South Sudan</item>
        <item>Spain</item>
        <item>Sri Lanka</item>
        <item>Sudan</item>
        <item>Suriname</item>
        <item>Svalbard and Jan Mayen</item>
        <item>Swaziland</item>
        <item>Sweden</item>
        <item>Switzerland</item>
        <item>Syria</item>
        <item>Taiwan</item>
        <item>Tajikistan</item>
        <item>Tanzania</item>
        <item>Thailand</item>
        <item>The Bahamas</item>
        <item>The Gambia</item>
        <item>Togo</item>
        <item>Tokelau</item>
        <item>Tonga</item>
        <item>Trinidad and Tobago</item>
        <item>Tunisia</item>
        <item>Turkey</item>
        <item>Turkmenistan</item>
        <item>Turks and Caicos Islands</item>
        <item>Tuvalu</item>
        <item>Virgin Islands</item>
        <item>Uganda</item>
        <item>Ukraine</item>
        <item>United Arab Emirates</item>
        <item>United Kingdom</item>
        <item>United States</item>
        <item>United States Minor Outlying Islands</item>
        <item>Uruguay</item>
        <item>Uzbekistan</item>
        <item>Vanuatu</item>
        <item>Vatican City</item>
        <item>Venezuela</item>
        <item>Vietnam</item>
        <item>Wallis and Futuna</item>
        <item>Western Sahara</item>
        <item>Yemen</item>
        <item>Yugoslavia</item>
        <item>Zambia</item>
        <item>Zimbabwe</item>
    </string-array>
Before we go editing the view, we need to configure some things regarding styles first. Open up res/values/styles.xml. In this file, we can configure any special properties that we want our app to have. In our case, we need to remove the system-provided action bar so we can use the more flexible Toolbar widget. In order to do this, we need to add a few properties to this file. The end result should look like the following.
<resources>

    <!-- Base application theme. -->
    <style name="AppTheme" parent="Theme.AppCompat.Light.DarkActionBar">
        <!-- Customize your theme here. -->
        <item name="colorPrimary">@color/colorPrimary</item>
        <item name="colorPrimaryDark">@color/colorPrimaryDark</item>
        <item name="colorAccent">@color/colorAccent</item>

        <item name="windowActionBar">false</item>
        <item name="windowNoTitle">true</item>
    </style>

</resources>
Now that we’ve added that, let’s go into our main layout in res/layout/activity_main.xml. We need to position our Toolbar before our ListView, and, in accordance to Material Design, it should be above our ListView as well. The best layout to accomplish our task is the LinearLayout. We can declare one as the top-level element and set its orientation to be vertical so we can put our Toolbar first, then our ListView after it. Replace the contents of the layout file with the following:
<?xml version="1.0" encoding="utf-8"?>
<LinearLayout xmlns:android="http://schemas.android.com/apk/res/android"
    xmlns:tools="http://schemas.android.com/tools"
    tools:context=".MainActivity"
    android:orientation="vertical"
    android:layout_width="match_parent"
    android:layout_height="match_parent">

    <android.support.v7.widget.Toolbar
        android:id="@+id/toolbar"
        android:layout_width="match_parent"
        android:layout_height="wrap_content"
        android:minHeight="?attr/actionBarSize"
        android:elevation="4dp"
        android:background="@color/colorPrimary"/>

    <ListView
        android:layout_width="match_parent"
        android:layout_height="match_parent"
        android:id="@+id/listView" />
</LinearLayout>
You can see that we have a minHeight and a layout_height. By including both properties, we can let our Toolbar grow in size, like on tablet layouts, but not be less than the Material Design guideline for size. This helps us achieve the best of both worlds. The question mark syntax queries the system’s value of actionBarSize and sets our Toolbar’s minHeight to be in accordance with what the system uses. This enforces conformity among apps, which is always good for your user!
We can use the elevation property on the Toolbar so that it appears to be “above” the ListView. All of the shadows will be drawn for us! Toolbars also need to have a color: the primary color of our application. Each application, according to Material Design, has a primary color for the most common elements, a dark primary color for the status bar, and an accent color for EditText underlines and other smaller elements. The Toolbar is definitely a primary element so we should have it’s background be our primary color. We can change these colors by editing the res/values/colors.xml file. Now that this is configured, we should see a view similar to below if we click on the design tab.
Now we can start populating our ListView, and, to make it interesting, let’s add listener so that our app displays a Toast message when the user clicks on an ListView item! Add the following code to the MainActivity class.
    private ListView listView;
    private ArrayAdapter<CharSequence> adapter;

    @Override
    protected void onCreate(Bundle savedInstanceState) {
        super.onCreate(savedInstanceState);
        setContentView(R.layout.activity_main);


        listView = (ListView) findViewById(R.id.listView);
        adapter = ArrayAdapter.createFromResource(this, R.array.countries_array, android.R.layout.simple_list_item_1);
        listView.setAdapter(adapter);
        listView.setOnItemClickListener(this);
    }

    @Override
    public void onItemClick(AdapterView<?> adapterView, View view, int position, long id) {
        Toast.makeText(this, adapter.getItem(position), Toast.LENGTH_SHORT).show();
    }
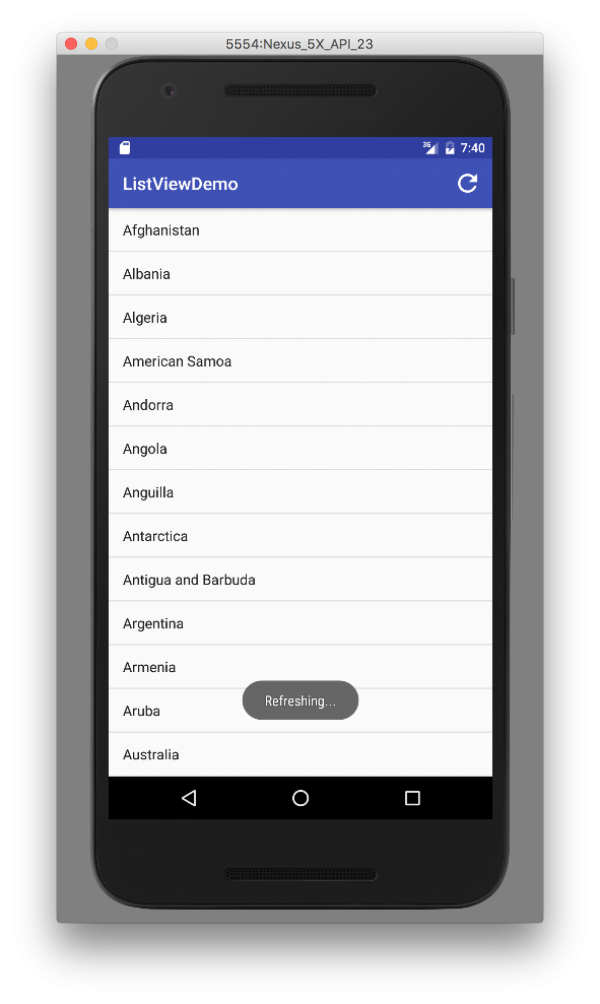
Now let’s run our app we should see a very simple app with a populated ListView. But now let’s get more into actually using the Toolbar. Let’s add a refresh menu item to the Toolbar and have it also display a Toast message.
One of the best ways to do this is to create an XML file that describes our menu. Right-click on the res folder and select New → Android resource directory. In the dialog that appears, select menu under Resource type and click OK. A new folder should be in the res directory called menu. Right-click on that and go to New → Menu resource file. We’ll call it toolbar.xml. Before we can declare this item, we need an app icon for it! Download the source code (link is at the beginning of this post!) and navigate to ToolbarDemo/app/src/main/res/drawable and there should be an icon called ic_refresh_white_48dp.png. Copy this into your own drawable folder in your project (exact same path). You should see it in Android Studio because the drawable folder will be populated now. As a side note, Google has a ton of free material design icons that you are free to download and use! This is where I originally got the refresh icon. You can download this library of icons here! Now that we have an icon, let’s go back to our toolbar.xml menu and replace the contents with the following.
<?xml version="1.0" encoding="utf-8"?>
<menu xmlns:android="http://schemas.android.com/apk/res/android"
    xmlns:app="http://schemas.android.com/apk/res-auto">
    <item android:id="@+id/action_refresh" android:title="Refresh" android:icon="@drawable/ic_refresh_white_48dp" app:showAsAction="ifRoom" />
</menu>
You’ll notice that we needed to declare another namespace app so that AppCompat can make our app backwards compatible, particularly for the showAsAction attribute. This attribute tells Android in what circumstances to put this action at different places on the Toolbar: always visible, only visible if there’s room, or put it in the action overflow menu (three vertical dots on the far right of the Toolbar) Now we’ve declare a menu item with an ID of action_refresh. It’s common to prefix IDs for menu actions with action_. We’ve also given it a text title and set it’s icon to be the image we just put in our drawable folder.
This is all it takes to define a menu! Now we can tell our Toolbar to inflate this menu. We’re also going to wire it to an action as well: display the Toast message! It would also be nice if we could add a custom title and color to our Toolbar as well. Let’s go back to the MainActivity class and set some properties on our Toolbar programmatically. Inside of the onCreate(Bundle) method, let’s add the following lines of code after we configure the ListView.
Toolbar toolbar = (Toolbar) findViewById(R.id.toolbar);
toolbar.setTitleTextColor(Color.WHITE);
toolbar.setTitle("ListViewDemo");
toolbar.inflateMenu(R.menu.toolbar);
toolbar.setOnMenuItemClickListener(this);
In this code snippet, we grab a reference to the Toolbar and set the title and its color. We also inflate that menu we were just editing and set the listener. Android Studio will want us to handle the listener so Alt+Enter at the error and allow MainActivity to implement the handler interface. Inside, we need to make sure that we only display the Toast if we clicked on the item whose ID matches the ID of the refresh action. To make this future-proof (in case we decide to add more actions later), we can use a switch-case statement. Add the following to the onMenuItemClick(MenuItem) method.
@Override
public boolean onMenuItemClick(MenuItem item) {
    switch (item.getItemId()) {
        case R.id.action_refresh:
            Toast.makeText(this, "Refreshing...", Toast.LENGTH_SHORT).show();
            return true;
        default:
            return false;
    }
}
Now we can run our app and see the results below!
Conclusion
In this post, we learned how to use Toolbars and Menus. We covered some of the design considerations for adding actions to the Toolbar. Actions must be either Frequent, Important, or Typical. We created our own Toolbar and populated it with an action. We even set up an event listener for that action as well. As a reminder, Google has a ton of free material design icons for all platforms that you can use in your apps!


