In this post we’re going to see how to use Core Image to build a face detector. We’ll use a static image that we load into Xcode using the asset manager and draw on the region that we’ve identified as a face.
Download the source code for this post here.
Before we delve into the Swift source code. Let’s first discuss what face detection is and how it is commonly implemented. Face detection answers the question “is there a face in this image?” DO NOT confuse it with face recognition which answers the question “whose face is this?” Face detection is generally simpler than face recognition since face recognition usually has face detection as a stage. Before identifying whose face this is, we need to know if there is a face in the image to begin with!
Face detection can not only tell is if there is a face in an image, but it can also tell us more information about the face, like if the face is winking or smiling. We will first discuss some of the most common techniques of face detection, then see how Core Image helps abstract away some of those lower-level algorithms.
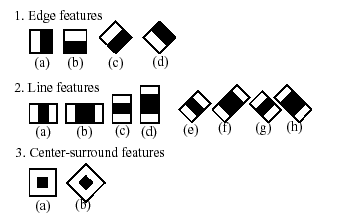
The most common technique used for face detection is called Viola-Jones Face Detection. It uses Haar-like features to distinguish between the two possible outcomes: face or no face. Below are some of the Haar-like features used to make this distinction.
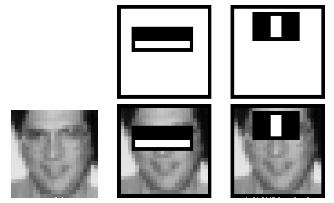
Notice that these features line up with facial features like noses or eyes.
We take these features, slide them across the image, and perform a mathematical operation called convolution. Using convolution, we can tell if certain areas of the image conform to those features. Using many thousands of example images, we can train a machine learning classifier on the images using the Haar-like features and measure the response from the convolution operation. We compare that with the true outcome of the training image, and our model will learn the orientation, dimensions, and the combination of features required to determine if an image has a face in it or not.
In most cases, this model is usually very slow to learn! Because of this, we usually don’t train our own model from scratch. Many other people have pre-trained models that we can download and use directly.
Now that we understand how face detection works on the surface, let’s use Core Image and build our own face detector! Open up Xcode and create a Single-View application called FaceDetector. We’ll need to add an image of a face to our project. Xcode has its own image assets system. In the project pane, there is a file called Assets.xcassets. Open it up and drag-and-drop the picture of the face into the main pane.
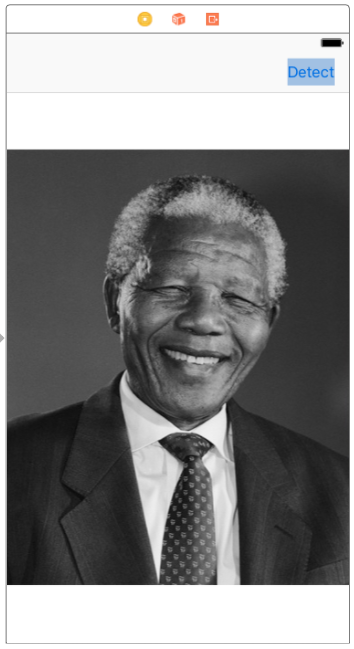
Now that our image asset is registered in the Assets.xcassets file, it is much easier to use it in our code, Interface Builder, and Xcode in general. Now let’s open up our main storyboard. To make our image as large as possible and our UI as clean as possible, click on the view controller and embed it in a navigation controller so we get a top navigation bar. Then drag out a UIImageView and resize it so that it fits the entire screen excluding the top navigation bar.
Click on the UIImageView and in the Attributes Inspector and change the image attribute to the image that we added. Since we added the image to the Assets.xcassets, Xcode will provide us with autocomplete options.
We might need to change the Content Mode attribute depending on our image. By default, it will resize and warp our image so that it fits snugly inside of our UIImageView. However, for some smaller images, this may warp the image so much that the face detection algorithm might not accurately detect a face! To prevent the image from being rescaled, change the Content Mode attribute to be Center or Aspect Fill.
Now let’s add a Bar Button Item to the right side of the top navigation bar with the text “Detect”. When the user presses this button, we will run the face detection algorithm and draw on the image.
Now that our UI is completed, let’s create an outlet to the UIImageView called imageView and an action to the UIBarButtonItem called detect.
class ViewController: UIViewController {

    @IBOutlet weak var imageView: UIImageView!
    override func viewDidLoad() {
        super.viewDidLoad()
        // Do any additional setup after loading the view, typically from a nib.
    }

    override func didReceiveMemoryWarning() {
        super.didReceiveMemoryWarning()
        // Dispose of any resources that can be recreated.
    }

    @IBAction func detect(_ sender: UIBarButtonItem) {
    }

}
Now let’s build our face detector! First we need to import Core Image by adding an import statement at the top under the one for UIKit: import CoreImage . Now add a method called detectFaces that will do the actual detection.
We first need to get the image from the UIImageView and convert it into a CIImage for use in Core Image (hence the CI prefix to Image).
func detectFaces() {
    let faceImage = CIImage(image: imageView.image!)

}
Then we need to create our face detector.
let faceDetector = CIDetector(ofType: CIDetectorTypeFace, context: nil, options: [CIDetectorAccuracy: CIDetectorAccuracyHigh])
We specify that this detector is for faces and pass in the dictionary of options where we specify the accuracy. Now to detect the faces, we simply call the features:in method.
let faces = faceDetector?.features(in: faceImage!) as! [CIFaceFeature]
We forcibly cast the result to an array of CIFaceFeature since we know we’re using the face detector and not some other detector (like QR code for example). Now we can iterate through the faces and report the bounds of the face and other face properties! To verify that our image has a face, we can check the length of this faces array. Here is the entire method.
func detectFaces() {
    let faceImage = CIImage(image: imageView.image!)
    let faceDetector = CIDetector(ofType: CIDetectorTypeFace, context: nil, options: [CIDetectorAccuracy: CIDetectorAccuracyHigh])
    let faces = faceDetector?.features(in: faceImage!) as! [CIFaceFeature]
    print("Number of faces: \(faces.count)")
}
It took only a few lines of code to have working face detection! Now we can simply call this method in our UIBarButton action.
@IBAction func detect(_ sender: UIBarButtonItem) {
    detectFaces()
}
Let’s run our app to see if we have a face! In the console at the bottom of Xcode, we should see a number greater than zero.
Excellent! Now we can get more information about those faces and even draw on the image! Let’s draw a red box around the face! To do this, we can create a generic UIView around the same bounds as the face, add a red border, make it transparent, and add it to the image.
for face in faces {
    let box = UIView(frame: face.bounds)
    box.layer.borderColor = UIColor.red.cgColor
    box.layer.borderWidth = 2
    box.backgroundColor = UIColor.clear
    imageView.addSubview(box)
}
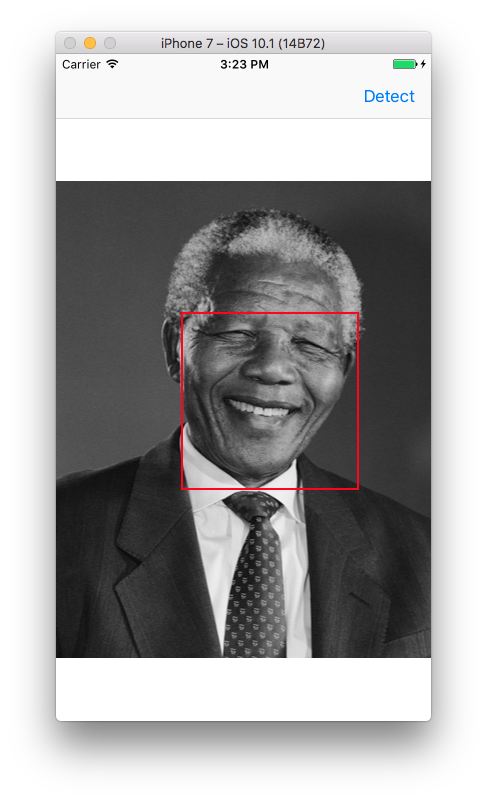
Now let’s run our app and see the box!
That’s not quite right! Why is our box is a little off? This is because the UIView coordinate system for placing views on the screen is different than the Core Image coordinate system!
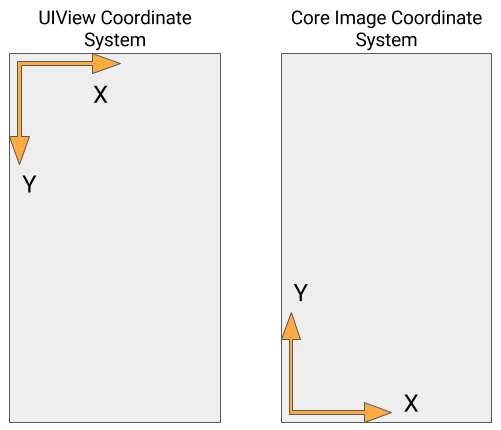
For Interface Builder, the origin is at the top left, but, for Core Image, the origin is at the bottom left. The X directions are both increasing to the right, but the Y directions are different. This is what is causing the issue in positioning our view.
We have to make a transform to convert from the Core Image coordinate system to the UIView coordinate system. We could do this manually, but The CGAffineTransform class exists solely for the purpose of these kinds of transforms. We first define the transform fully; then we can apply it to points or rectangles. We also have to consider the case where the image is smaller than the UIImageView that is holding it in either height or width. To account for this, we have to execute the image transform, but we also have to do some additional scaling and repositioning to move the bounding rectangle of the face to the appropriate position. Here is the completed code for the detectFaces method.
func detectFaces() {
    let faceImage = CIImage(image: imageView.image!)
    let faceDetector = CIDetector(ofType: CIDetectorTypeFace, context: nil, options: [CIDetectorAccuracy: CIDetectorAccuracyHigh])
    let faces = faceDetector?.features(in: faceImage!) as! [CIFaceFeature]
    print("Number of faces: \(faces.count)")

    let transformScale = CGAffineTransform(scaleX: 1, y: -1)
    let transform = transformScale.translatedBy(x: 0, y: -faceImage!.extent.height)

    for face in faces {
        var faceBounds = face.bounds.applying(transform)
        let imageViewSize = imageView.bounds.size
        let scale = min(imageViewSize.width / faceImage!.extent.width,
                        imageViewSize.height / faceImage!.extent.height)

        let dx = (imageViewSize.width - faceImage!.extent.width * scale) / 2
        let dy = (imageViewSize.height - faceImage!.extent.height * scale) / 2

        faceBounds.applying(CGAffineTransform(scaleX: scale, y: scale))
        faceBounds.origin.x += dx
        faceBounds.origin.y += dy

        let box = UIView(frame: faceBounds)
        box.layer.borderColor = UIColor.red.cgColor
        box.layer.borderWidth = 2
        box.backgroundColor = UIColor.clear
        imageView.addSubview(box)
    }

}
To convert to the Interface Builder coordinate system, we have to move the box up by the height of the image and negate the height, which is what we do in this code above. Then we can apply the transform to the bounds of the face. If our image fit perfectly within the UIImageView, we would be done!
However, we also account for cases where this doesn’t happen. In that case, we have to appropriately scale our rectangle and translate it so that we account for the smaller (or larger) height of the UIImage inside of the UIImageView.
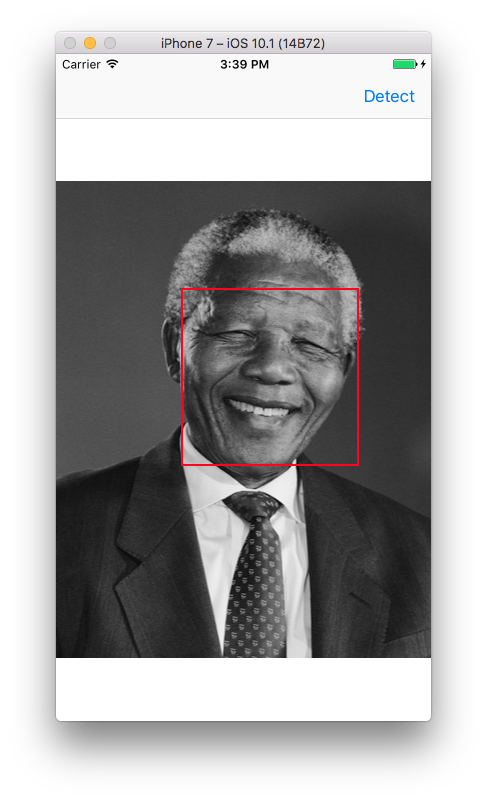
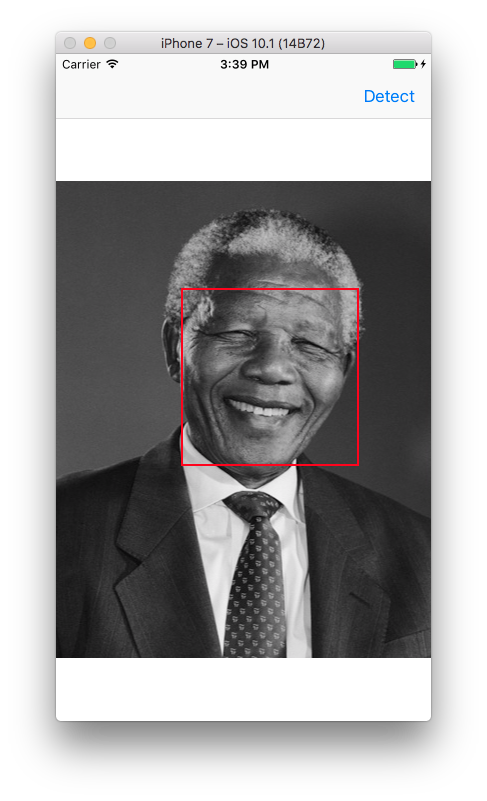
Finally, let’s see the results of our code. Run this code and see the results below!
Note that there are many properties on face that we can leverage to gain even more information about the face: winking, smiling, etc.
In this post, we discussed a popular method of face detection: Viola-Jones Face Detector. We applied this to Core Image and built a face detector for iOS. Given a static image, or one taken from a camera, it draws the bounding box around what it detects as a face.
