Hello world! This is the last half of the Taskr post where we’ve been creating a project management app. In the previous post, we built the UI and the model of Taskr. In this post, we’re going to connect the model to our UI using the controller. The convenience methods that we built into the model will really shine here! We’ll also see how to handle notifications after they’ve been pushed.
Learn iOS by building real apps
Check out The Complete iOS Development Course – Build 14 Apps with Swift 2 on Zenva Academy to learn Swift 2 and iOS development from the ground-up with an expert trainer.
Before notifications, we should start connecting our model to our view. Open up the TaskrDetailViewController and let’s implement the save functionality. We can do this by using the initializer for the Task object. Then we can add that Task to the Singleton and return to the main list.
@IBAction func save(_ sender: AnyObject) {
    let task = Task(ID: UUID().uuidString, title: titleTextField.text!, description: descriptionTextView.text!, deadline: deadlineDatePicker.date)
    TaskList.sharedInstance.addTask(task)
    self.navigationController?.popToRootViewController(animated: true)
}
In the last line, we’re asking the navigation controller to go back to the root view controller (in other words, the controller that’s directly connected to the UINavigationController in the storyboard).
There’s a problem that we’ve been ignoring until now: the 64 notification limit. To preserve system resources and the user’s patience, iOS has as 64 notification limit. This means that the system will only schedule the first 64 notifications for your app. Afterwards, any requests to schedule are simply ignored.
There are several ways we can get around this limit. The simplest way is to not allow the user to schedule any more notifications. This is the simple approach that we’ll be taking. However, if that’s not an option for your app, you can schedule 64 notifications, and, At regular intervals, like when the app opens, you can check how many notifications are scheduled. If that number is less than 64, schedule the next set of notifications until you have scheduled 64. Using a queue data structure makes this approach even easier. You can dequeue the first 64 notifications, then, after some have fired off, dequeue more until you have scheduled 64.
We’ll just be disabling adding tasks when we’ve hit 64 scheduled notifications. In our TaskrTableViewController, add the following property and method.
var taskList: [Task] = []

func refreshList() {
    taskList = TaskList.sharedInstance.allTasks()
    if taskList.count >= 64 {
        self.navigationItem.rightBarButtonItem!.isEnabled = false
    }
    tableView.reloadData()
}
This will disable the add action if we already have 64 notifications. We also need to tell the UITableView to redraw the cells. Speaking of UITableView, we can implement the override methods for the UITableView. We need to update the views when the UITableView is about to show. Since we have an array of tasks, implementing the tableView:numberOfSectionsInTableView and tableView:numberOfRowsInSection methods becomes trivial.
override func viewWillAppear(_ animated: Bool) {
    super.viewWillAppear(animated)
    refreshList()
}

override func numberOfSections(in tableView: UITableView) -> Int {
    return 1
}

override func tableView(_ tableView: UITableView, numberOfRowsInSection section: Int) -> Int {
    return taskList.count
}

override func tableView(_ tableView: UITableView, cellForRowAt indexPath: IndexPath) -> UITableViewCell {
    let cell = tableView.dequeueReusableCell(withIdentifier: "taskCell", for: indexPath)
    let task = taskList[indexPath.row]
    cell.textLabel?.text = task.title
    if task.pastDeadline {
        cell.textLabel?.textColor = UIColor.red
        cell.detailTextLabel?.textColor = UIColor.red
    } else {
        cell.textLabel?.textColor = UIColor.black
        cell.detailTextLabel?.textColor = UIColor.black
    }

    let dateFormatter = DateFormatter()
    dateFormatter.dateFormat = "'Due' MMM dd 'at' h:mm a"
    cell.detailTextLabel?.text = dateFormatter.string(from: task.deadline as Date)

    return cell
}
For tableView:cellForRowAtIndexPath, we need to dequeue a cell and get the task that corresponds to the UITableView row. We can then set the main text. For the detail text, we can convert an Date into a string using a formatter. You can look up the documentation on DateFormatter for exactly which sequence of characters produces which string. Then we can pass in the Date to be converted into a string. If this task is past the deadline, we change the color of all of the text of the row to be red, which is a nice visual clue to the user.
Let’s handle deletions. We can accomplish this using editing modes. First, we need to tell the UITableView that we support editing. Then, if we’re deleting, we remove the task from the array, the Singleton array, and the UITableView. We also need to enable the add button since we’re definitely under 64 items by our app design.
override func tableView(tableView: UITableView, canEditRowAtIndexPath indexPath: NSIndexPath) -> Bool {
    return true
}

override func tableView(tableView: UITableView, commitEditingStyle editingStyle: UITableViewCellEditingStyle, forRowAtIndexPath indexPath: NSIndexPath) {
    if editingStyle == .Delete {
        let task = taskList.removeAtIndex(indexPath.row)
        tableView.deleteRowsAtIndexPaths([indexPath], withRowAnimation: .Fade)
        TaskList.sharedInstance.removeTask(task)
        self.navigationItem.rightBarButtonItem!.enabled = true
    }
}
Now we can move on to notifications. There are a few issues we should fix. We need to refresh the UITableView when a notification is fired off in case the user took action on it and when the app is resumed as well. Luckily, iOS supports the Observer pattern through the NSNotificationCenter class (not to be confused with UILocalNotification!)
In the Observer pattern, we have any number of observers that are registered to execute code whenever an event is fired. We can register an observer to refresh the UITableView whenever a notification was fired and when the app is resumed. Open up the TaskrTableViewController and add the following method.
override func viewDidLoad() {
    super.viewDidLoad()
    NotificationCenter.default.addObserver(self, selector: #selector(TaskrTableViewController.refreshList), name: NSNotification.Name(rawValue: "TaskListRefresh"), object: nil)
}
This will register the observer to refresh the list when the TaskListRefresh event is fired. Open up the AppDelegate class and add the following code to the respective methods.
func applicationDidBecomeActive(_ application: UIApplication) {
    NotificationCenter.default.post(name: Notification.Name(rawValue: "TaskListRefresh"), object: self)
}
...
func application(_ application: UIApplication, didReceive notification: UILocalNotification) {
    NotificationCenter.default.post(name: Notification.Name(rawValue: "TaskListRefresh"), object: self)
}
This will fire the event when a notification is fired or when the app resumes. Now let’s move on to badging the app icon. There are two times when we need to update the badge: immediately after the user quits the app and when a new task is added or removed. We can handle the first case in our AppDelegate class like the following.
func applicationWillResignActive(_ application: UIApplication) {
    let tasks: [Task] = TaskList.sharedInstance.allTasks() // retrieve list of all to-do items
    let overdueItems = tasks.filter() { (task) -> Bool in
        return task.deadline.compare(Date()) != .orderedDescending
    }

    UIApplication.shared.applicationIconBadgeNumber = overdueItems.count
}
To add a bit of variety, we’re using a trailing closure while implementing the closure for the filter method. This filter method does exactly what the name implies: filters elements of an array using criteria. For the second scenario, we can create a method to update badge numbers whenever a task is created or deleted in our TaskList class.
func resetBadgeNumbers() {
    let notifications = UIApplication.shared.scheduledLocalNotifications!
    let tasks: [Task] = allTasks()
    for notification in notifications {
        let overdueItems = tasks.filter({ (task) -> Bool in
            return (task.deadline.compare(notification.fireDate!) != .orderedDescending)
        })
        UIApplication.shared.cancelLocalNotification(notification)
        notification.applicationIconBadgeNumber = overdueItems.count
        UIApplication.shared.scheduleLocalNotification(notification)
    }
}
Since there’s no way to update an already-scheduled notification, we need to cancel it and reschedule it. Make sure that you call this method at the end of addTask
func addTask(_ task: Task) {
    var taskDictionary = UserDefaults.standard.dictionary(forKey: TASKS_KEY) ?? [:]

    taskDictionary[task.ID] = ["ID" : task.ID, "title" : task.title, "description" : task.description, "deadline" : task.deadline]
    UserDefaults.standard.set(taskDictionary, forKey: TASKS_KEY)

    let notification = UILocalNotification()
    notification.alertBody = "Task \"\(task.title)\" Is Overdue"
    notification.alertAction = "open"
    notification.fireDate = task.deadline as Date
    notification.soundName = UILocalNotificationDefaultSoundName
    notification.userInfo = ["ID": task.ID]
    notification.category = "TASK_CATEGORY"
    UIApplication.shared.scheduleLocalNotification(notification)
    resetBadgeNumbers()
}
and removeTask.
func removeTask(_ task: Task) {
    if var taskItems = UserDefaults.standard.dictionary(forKey: TASKS_KEY) {
        taskItems.removeValue(forKey: task.ID)
        UserDefaults.standard.set(taskItems, forKey: TASKS_KEY)
    }

    for notification in UIApplication.shared.scheduledLocalNotifications! {
        if notification.userInfo!["ID"] as! String == task.ID {
            UIApplication.shared.cancelLocalNotification(notification)
        }
    }
    resetBadgeNumbers()
}
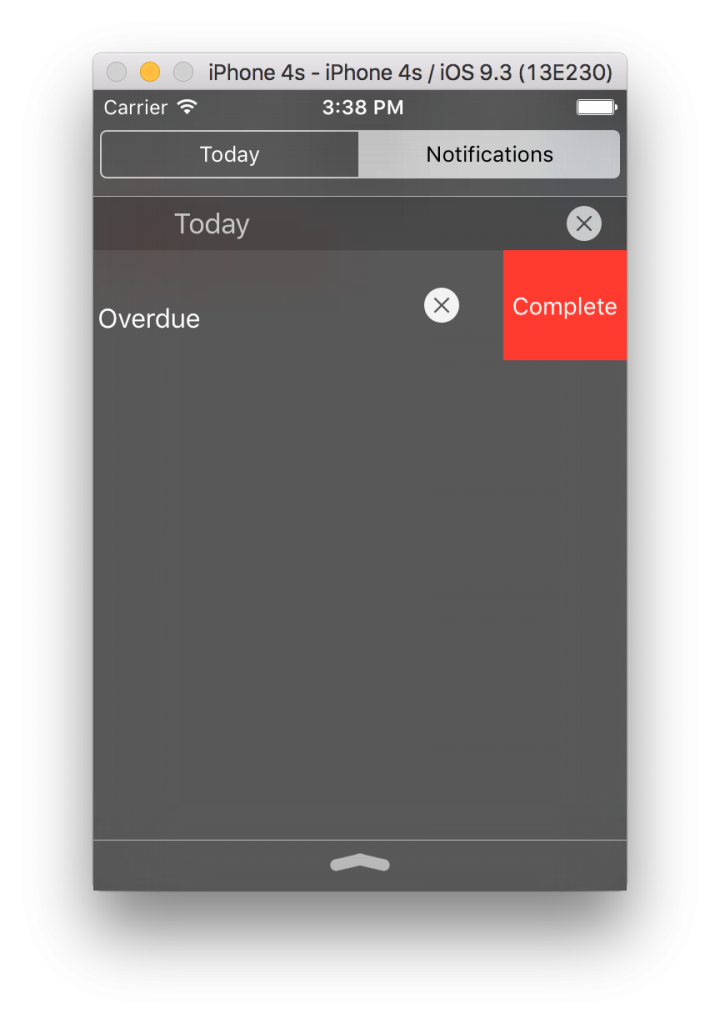
Since iOS 8, we can add actions to notifications. Let’s add an action to complete the task in the notification. We have to configure these options back in the AppDelegate. We create a new UIMutableUserNotificationAction for each action and set their various properties. The activationMode can run the command in the background (.Background) or bring up the app (.Foreground). The authenticationRequired property requires the user to unlock their phone before executing this operation. The destructive property simply colors the background of the action red to indicate to the user that this operation is destructive.
func application(_ application: UIApplication, didFinishLaunchingWithOptions launchOptions: [UIApplicationLaunchOptionsKey: Any]?) -> Bool {
    let completeAction = UIMutableUserNotificationAction()
    completeAction.identifier = "ACTION_COMPLETE"
    completeAction.title = "Complete"
    completeAction.activationMode = .background
    completeAction.isAuthenticationRequired = true
    completeAction.isDestructive = true

    let taskCategory = UIMutableUserNotificationCategory()
    taskCategory.identifier = "TASK_CATEGORY"
    taskCategory.setActions([completeAction], for: .default)

    application.registerUserNotificationSettings(UIUserNotificationSettings(types: [.alert, .badge, .sound], categories: [taskCategory]))
    return true
}
Then we need to create a category and put this action in the category as the default ordering of the actions. Finally, we need to change our call to registerUserNotificationSettings to add that category instead of nil. Double-check that the identifier of the category matches the category in the addTask method of the TaskList class.
Notice that this only configures the notification actions; this does not tell the system what to do when those action are called! For that we need to implement another method in the AppDelegate: application:handleActionWithIdentifier:forLocalNotification.
In this piece of code, we build a pseudo-task from the information in the notification. For the removeTask method to work, we really only need the correct ID stored in the userInfo dictionary in the notification. The title, description, and deadline can really be anything as long as the ID is correct. Then we use a switch case for the identifier to make sure we have the right identifier. This is also for future-proofing our app in case we want to add more actions later. Finally, we execute the completionHandler closure since we’re supposed to by documentation.
func application(_ application: UIApplication, handleActionWithIdentifier identifier: String?, for notification: UILocalNotification, completionHandler: @escaping () -> Void) {
    let task = Task(ID: notification.userInfo!["ID"] as! String, title: "", description: "", deadline: notification.fireDate!)
    switch identifier! {
    case "ACTION_COMPLETE":
        TaskList.sharedInstance.removeTask(task)
    default:
        // Should never get here!
        break
    }
    completionHandler()
}
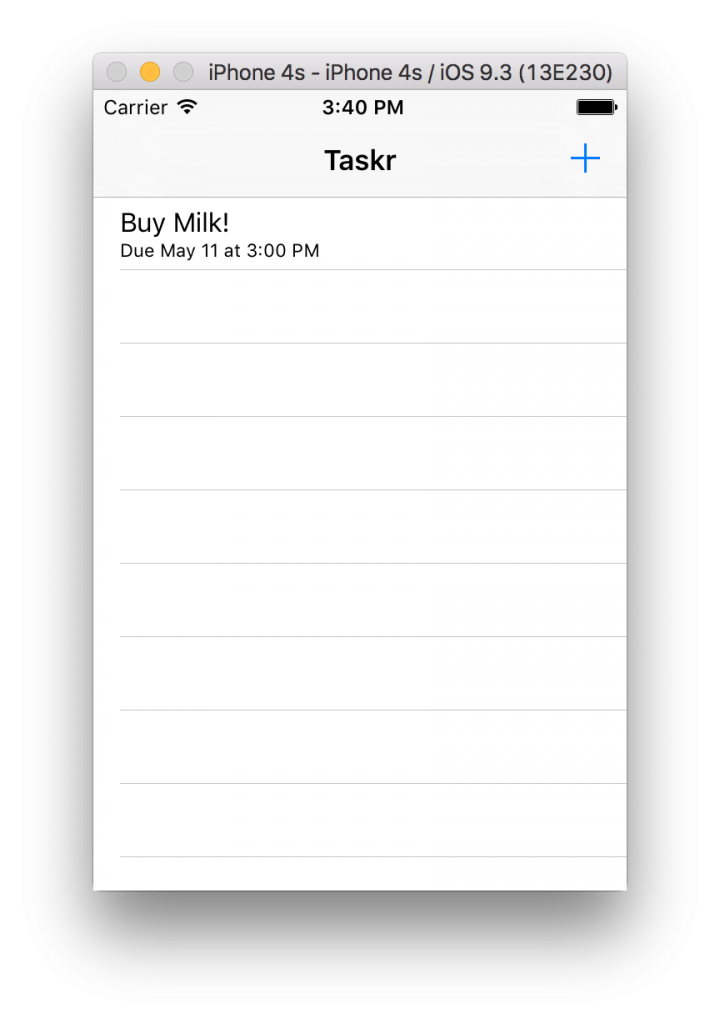
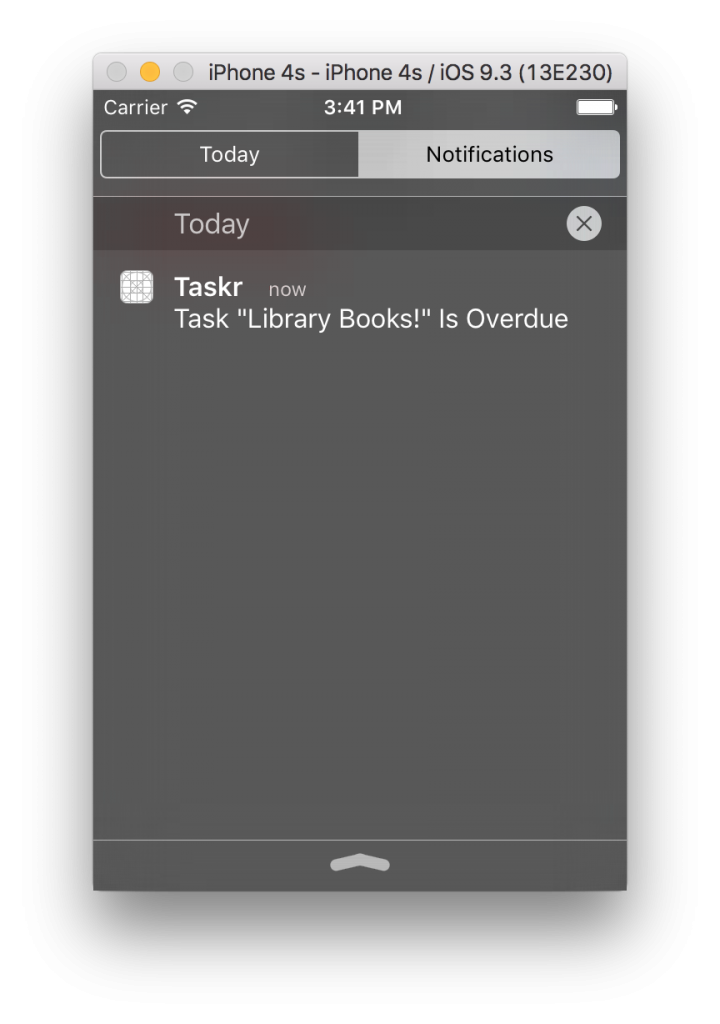
That’s all we need for our Taskr app! Let’s run it and see it work! Below are some screenshots.
In two posts, we have successfully built a project management app Taskr that can keep track of different tasks we need to accomplish. It also keeps track of deadlines and can notify the user at these deadlines. We have learned much about iOS over these two posts about data persistence, notifications, badging the app icon. We also learned about some Swift constructs such as the filter, map, and sort methods, computed properties, and trailing closures.
