Learn WebGL and Babylon.js at your own pace
Feel free to check out our online course 3D Programming with WebGL and Babylon.js for Beginners on Zenva Academy. The course covers the Babylon.js framework and explains all you need to get started with using this fantastic library in new or existing projects.
What you could expect
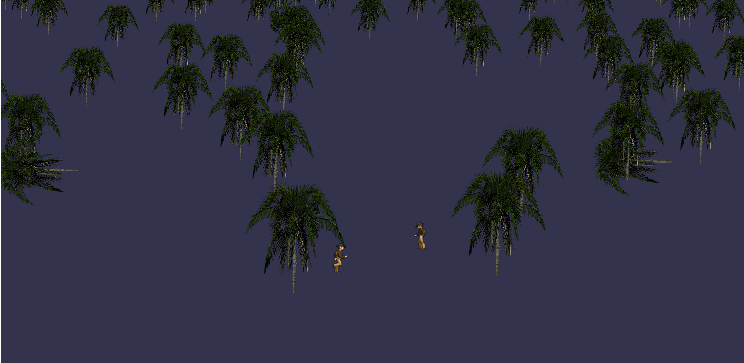
In this tutorial, we are going to learn how manipulate Sprites. Sprites are 2D image/animation, and we will use them to display an image with alpha channel always facing the camera.
Nowadays, those sprites are often used to display animated characters, for particles, or to simulate 3D complex objects like trees.
Final result
How can I do this ?
1- Sprite manager
If you want to use sprites, you need to create a “sprite manager” to optimize GPU resources by grouping in one place multiple instances of a sprite. This manager is mandatory, even if you want to create one sprite. You just have to write:
// Create a sprite manager
var spriteManagerTrees = new BABYLON.SpriteManager("treesManagr", "Assets/Palm-arecaceae.png", 2000, 800, scene);
When creating a manager, you have to decide a few parameters:
- Name: a name for this manager
- The 2D image URL (most of time, you would rather use an image format which contain alpha channel like .PNG)
- The capacity of this manager : the maximum number of instances in this manager (in our example, we could create 2000 instances of trees)
- The cell size, corresponding to the size of your image, like we’ll see below.
- The actual scene, to add this manager to the scene
To give another example, look at this snippet:
var spriteManagerPlayer = new BABYLON.SpriteManager("playerManagr","Assets/Player.png", 2, 64, scene);This time, we only want 2 instances, and we said that our sprite’s size is 64. Here is what our image look like:
Each image of a sprite must be contained in a 64 pixel square, no more no less.
2- Create an instance
Now that we have our manager, we can create instances of our sprite linked to this manager. Creating an instance is as much easy as:
var playerInstance = new BABYLON.Sprite("player", spriteManagerPlayer);Voilà, you have got your sprite displayed!
If you want to add parameters to this instance, you can manipulate it like any other meshes:
player.position.y = -0.3;
But because it’s a sprite, you may use specific parameters: you can change their size, of their orientation:
player.size = 0.3;
player.angle = Math.PI/4;
player.invertU = -1;
3- Sprite animation
One of the advantage of sprites is animations. You only have to load one large image file which will contain all animations images, one next to another. Just be careful to respect the square size you had specified in your manager (e.g. 64 pixel).
Here is what a complete sprite image looks like:
This will animate our players in more than 40 positions, depending on the situation (walking, jumping,…). Babylon engine is automatically reading sprites on more than one line, so no more works for you 🙂 If you want to begin the animation, simply call this function:
player.playAnimation(0, 40, true, 100);
By calling « playAnimation » with those parameters, our player will be animated from frame 0 to frame 40. The third parameters is indicating if animation loop or not. And the last one is the delay between two frames (smaller it is, faster the animation is).
Finally, if you want to go to a precise image (e.g. the last one, when the character is not moving), just call:
player.cellIndex = 44;


