- Construct 2 RPG Series by Aryadi Subagio (@AryadiPS):
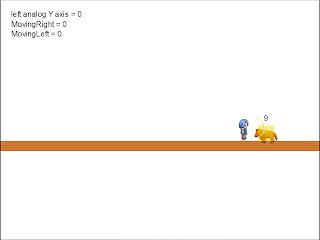
After talking about battle design in the second part of my tutorial, I will implement what we have designed in the third part. Here, I’m starting to think of how to code the character stats, and how to use the weapons / equipments. First I want to show you the screenshot of the final result of this part:

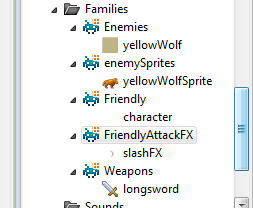
First, I’m going to add a few new families. Families are a Construct 2 feature that’s not available in the free version. I’m using a personal edition.

The explanation of each family is as follows:
- Enemies: Contains the list of enemies in this game
- EnemySprites: graphical sprites of the enemy, has the same name as its enemy characters.
- Friendly: Family of player character and other party members who participated in battle. Members of this family can’t be hurt by player’s character attacks, but can be healed or be a target of supportive magics.
- FriendlyAttackFX: Special effect sprites of Friendly’s attacks, this will be tested for collision detection against the enemy
- Weapons: List of all weapons in the game, the weapon doesn’t need to be equipped by the player character or other party members, this will be some kind of a database of weapons.
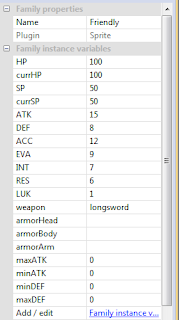
I actually wanted to make a family of EnemyAttackFX but since the enemy still can’t attack the player, I think I will make it later. In every family there are instance variables that are different from each other, but useful for the family’s own purpose. This is an example of instance variables of Friendly family.

The instance variables are the same that we have designed previously, but there are some changes. The weapon and armors instance variables are for us to know what weapon or equipment the player character is wearing right now.
Let’s go on with the code. The first change is on the second event where we included the value of equipped weapons minAtk and maxAtk to the player. We do this so the attack FX knows how much added value from minAtk and maxAtk are included in the damage calculation. The next change is way down the events list, below the on charaAttacks() function, this is a bit long but actually it only writes what we have designed previously into code form. I maybe don’t need to explain this part because I wrote it in my previous post, but there are some things I want to explain.
First, everytime I make a random number I always use floor(random(x)) where x is the value that I want + 1. I do this because the random function will generate a random number between 0 and 1 value below our desired number, and that’s why I added 1. The reason I use floor is to round the number down, because sometimes we get a value like 0.43672 or 12.38429 or something like that. That decimal value is not needed, so I round the number down.
Second, I make a different thing between calculating physical damage and magical damage, but the hit possibility is still the same. This way I can experiment with various kinds of enemies and an attack that’s effective against it.
Third, I added a text that shows damage dealt to the enemy, or if the attack missed. This is a visual feedback for the player. The capx file can be downloaded here: https://dl.dropboxusercontent.com/u/22420086/My%20RPG%20project.capx
(NOTE: like before, the file may be different because my Indonesian blog post is already ahead of this one and I don’t really remember which part is edited.)
You can now attack the monster and see how much damage you make. Some attack will hit and some will miss. The enemy stats are stats that I assume would be enough for an enemy of level 1 character, but you can experiment with your own values.
I’ll see you on my next post.


