The easiest way to have your users automatically redirected from an old URL to a new one is by using an HTML Redirect. Whether you’ve changed your domain name, restructured your website, or simply reorganized some of your web pages, avoiding the dreaded 404 Page-Not-Found error is paramount.
Regardless of your reason for website changes, in this HTML Redirect tutorial, we’ll show you through simple examples how to confidently enhance your website, while protecting your user’s experience and the SEO you have built over time.
Let’s dive in!
About HTML Redirects
HTML redirects are one of three techniques that provide instructions to your visitor’s web browser to automatically take your user from the URL they keyed into their browser to the URL where your content now resides. In this way, you can retire an old HTML page and send users to a brand new HTML page entirely.
How to Code HTML Redirects
Modern websites have a formally structured HTML file, often called index.html, that serves as the main entry point to your site. Your site then has zero to many less formal web pages, HTML fragments, or components that return HTML which varies depending on if you’re using no JavaScript (JS), vanilla JS or one of the many JS libraries or frameworks that are so popular today (React, Angular, and Vue, just to name a few). In its simplest form, the HTML structure consists of three HTML tags: html, head, and body.
<!DOCTYPE html>
<html lang="en">
  <head>
  </head>
  <body>
  </body>
</html>
HTML redirects are coded with a <meta> tag inside the <head> section which contains the metadata written for web browsers rather than the <body> section which contains the HTML elements visible on the displayed webpage.
HTML Redirect Syntax Explained
An HTML redirect, sometimes referred to as meta redirect or meta refresh, has two attributes containing three pieces of information important to the web browser.
<meta http-equiv="refresh" content="time_delay; url=new_url">
The first property is http-equiv. For HTML redirects, its value is set to “refresh”. Since browsers work within an HTTP Request-Response cycle, this attribute provides information to the browser “equivalent” to what can be found in a similarly-named HTTP header.
The second attribute is content which has two values. Its syntax may seem a little odd so it’s important to note that you have two values inside a single set of double quotes separated by a colon (“time-delay; new_url”).
HTML Redirect Syntax Example
In the code below, the browser redirects to the URL provided (https://example.com) after a delay of 3 seconds.
<meta http-equiv="refresh" content="3; url=https://example.com">
If you changed the first value in content to 0, the page would immediately redirect. If you changed the value to 10, the browser would wait 10 seconds before going to the new URL (in this case the website example.com). Always set this value to zero for accessibility compliance unless you have a strong use-case not to. If you do need to introduce a delay, it is important to keep the user top of mind. Too short a delay may be frustrating while a longer delay should probably be accompanied by a “click here” link that allows the user to manually perform the redirect. This can easily be accomplished in the <body> section using an anchor <a> tag.
<h3>My Important Message...</h3>
<p>You will be automatically redirected in 5 seconds.</p>
<p>Please <a href="https://example.com">click here</a> to be taken immediately.</p>
Essential HTTP Status Codes
What is HTTP?
HTTP is an acronym for Hyper Text Transfer Protocol. In simple terms, web technologies communicate using an HTTP Request/Response cycle.
Why is this Important for Redirects?
When working with web technologies, it’s good to know the meaning of at least a few of the many HTTP Status Codes that are returned when a user enters a URL into the browser or in our case redirects one web page URL to another.
Essential HTTP Status Codes for Redirects
HTTP Status Codes contain three digits with the first number indicating response type (1xx – 5xx). Within this block, there are many codes that you can learn over time. If we ignore for the moment codes that start with 1 (informational) and codes that start with 5 (server-side) there is a small subset of the remaining codes that are essential to redirects:
- 200 – success
- 301 – permanent redirect
- 302 – temporary redirect
- 404 – page not found
Our goal in redirects is to receive 200 (our web page loaded successfully) and avoid 404 (our web page could not be found). If our content has been permanently moved, we want our redirect strategy to send the browser a 301 status code (known as a permanent redirect). If our content is only temporarily residing at a different location we want our redirect strategy to send the browser a 302 status code (known as a temporary redirect).
HTML Meta Redirect Website Example
An HTML redirect is actually quite simple and best illustrated with an example. In the first code snippet, we add the meta refresh tag redirecting visitors to our new URL after a delay of 3 seconds.
<!DOCTYPE html>
<html lang="en">
  <head>
    <meta charset="UTF-8" />
    <meta
      http-equiv="refresh"
      content="3; url=http://127.0.0.1:5500/new_url"
    />
    <title>Old Website</title>
  </head>
  <body>
    <h1>Old Website URL</h1>
    <h3>http://127.0.0.1:5500/old_url</h3>
  </body>
</html>

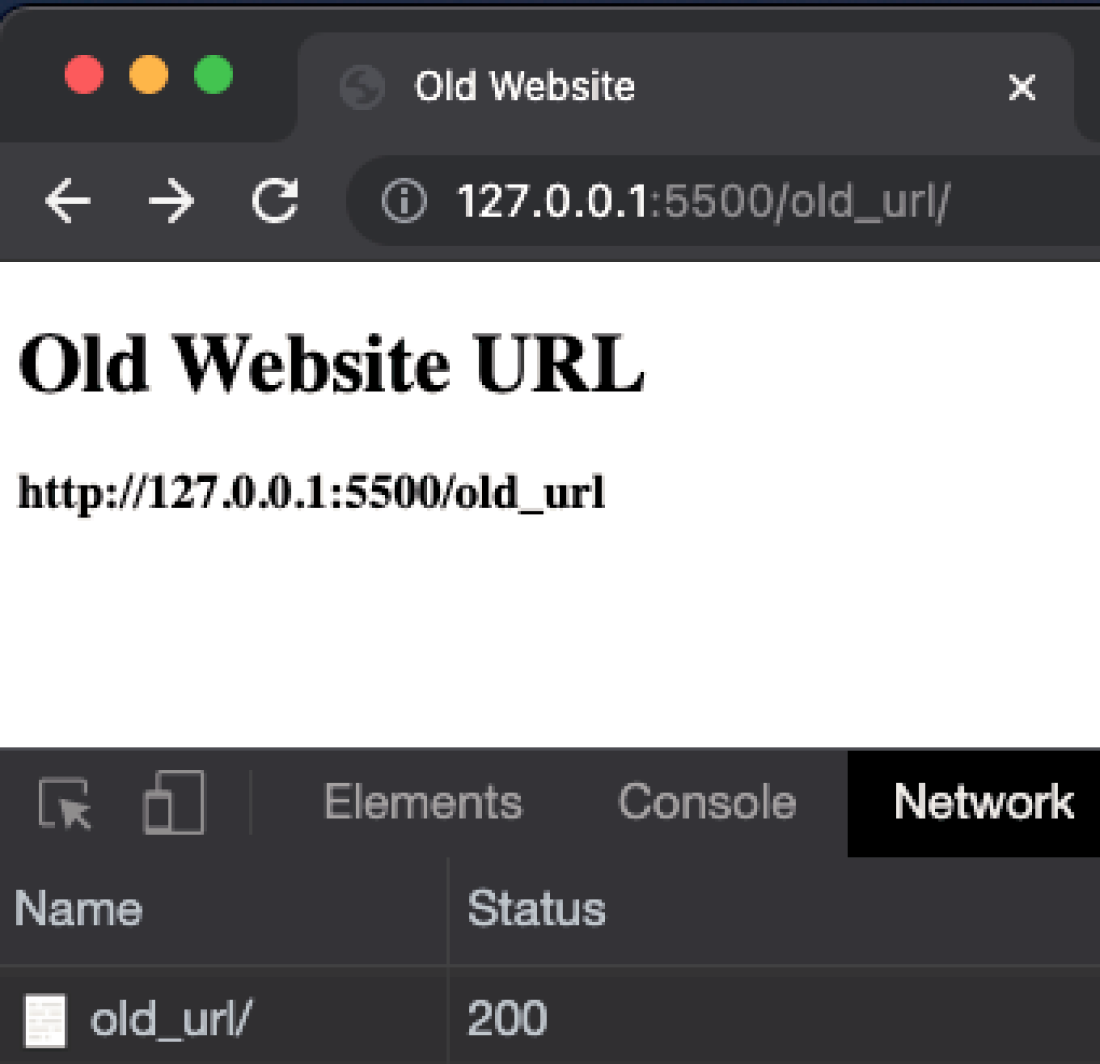
Note the HTTP Status Code of 200 in the browser’s Network tab indicating our old website loaded successfully. After the 3 second delay we coded, the new website is loaded.
<!DOCTYPE html>
<html lang="en">
  <head>
    <meta charset="UTF-8" />
    <title>New Website</title>
  </head>
  <body>
    <h1>New Website URL</h1>
    <h3>http://127.0.0.1:5500/new_url</h3>
  </body>
</html>

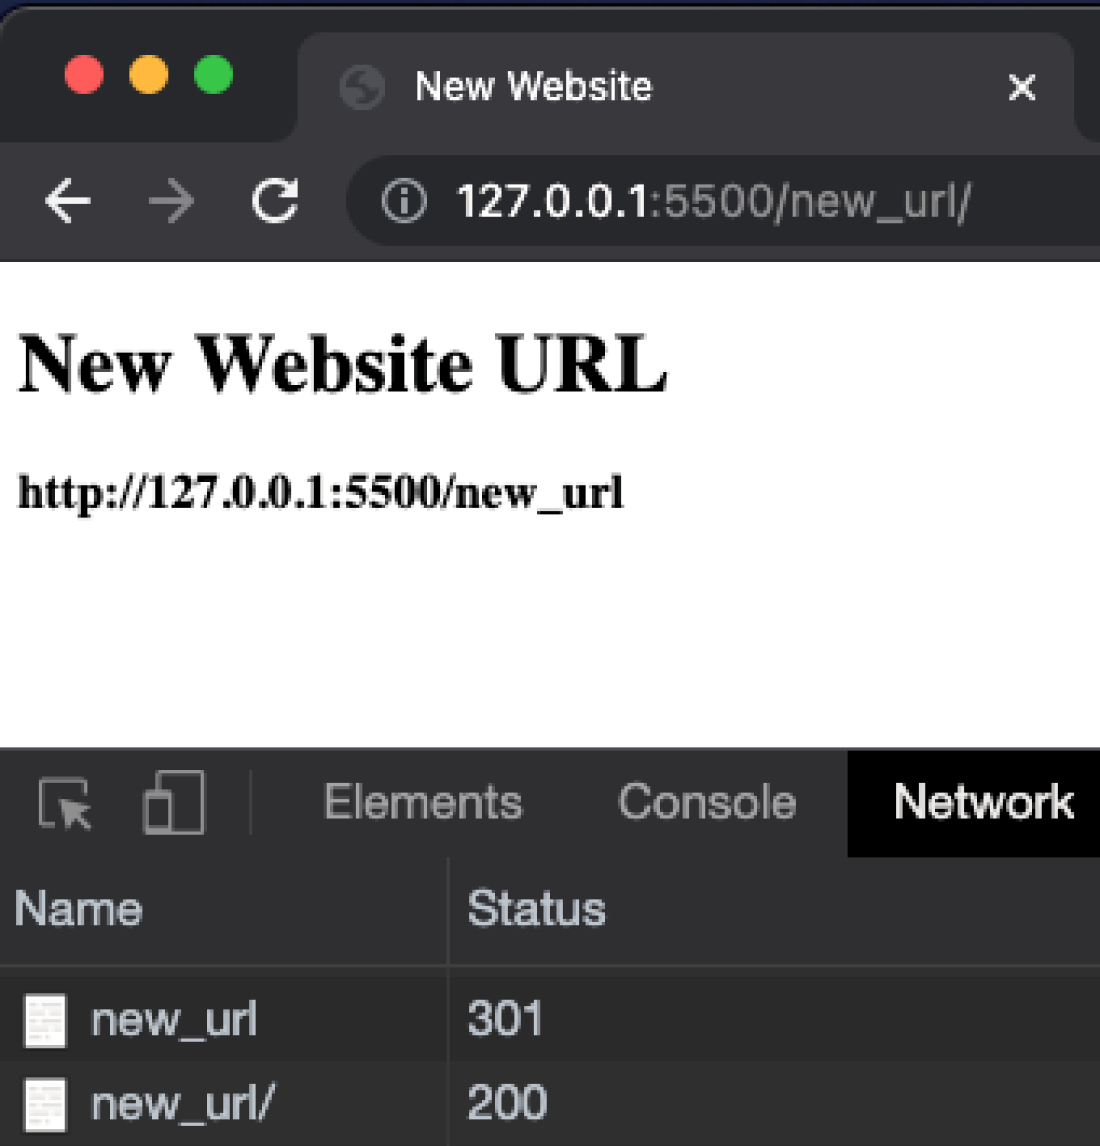
Note the two HTTP Status Codes for our new website. The code of 301 indicates a successful redirect while code of 200 indicates our new website was successfully loaded.
Alternative Methods to Perform Redirects
While HTML redirects may be the easiest way to perform redirects, it is not the only way or even the best. As we mentioned in the opening “About HTML Redirects” section, there are two other ways to define redirections. The two other methods are:
- HTTP Redirects
- JavaScript Redirects
HTTP Redirects
HTTP redirects (also known as 301 redirects, URL forwarding, or URL redirection) are done server-side and are the most powerful and reliable way to ensure that users and search engines are directed to your new content location with no loss of traffic or SEO page ranking.
For Google’s guidance on using 301 redirects where SEO is an important consideration, you can watch this video from Google Search Central YouTube channel.
Important note: In cases where your content is at a new location temporarily it is important to use a 302 (temporary redirect) instead of the 301 (permanent redirect).
While all the concepts we’ve discussed in this article apply, when it comes to HTTP redirects there are so many combinations of technology stacks, hosting services, and domain providers your best approach is to search “301 redirect” followed by “your-technology-stack” followed by “your-service-provider” and follow the guidance of official sources when possible.
JavaScript Redirects
JavaScript redirects provide another simple option to automatically take your user from the URL they keyed into their browser to the URL where your content now resides. At first glance, JavaScript offers a lot of cool benefits for triggering redirections. Let’s explore the JavaScript way by mirroring the results we accomplished above using the HTML redirect technique.
In the code below, the browser redirects to the URL provided (https://example.com) immediately.
window.location = 'https://example.com';
The following are other techniques you may use to achieve the same result.
window.location.href = 'https://example.com';
window.location.assign('https://example.com');In the code below, the browser redirects to the URL provided (https://example.com) immediately as above. The difference from using the assign() method is that after using replace() the current page is not saved in history which simply means the user cannot navigate back to the original page using the browser’s back button.
window.location.replace('https://example.com');Another interesting thing with using JavaScript is that you can make the URL dynamic, update the URL in response to events, and basically provide any programming logic to determine which URL to navigate to.
let urlBase = 'https://';
let domainExtention = '.com';
window.location.assign(urlBase+'example'+domainExtention);
In the HTML redirect section above we also showed how you could introduce a delay in redirecting to a new URL. This can be easily accomplished in JavaScript as well by using a setTimeout() function. In the code below, the browser redirects to the URL provided (https://example.com) after a delay of 3 seconds.
let urlBase = 'https://';
let domainExtention = '.com';

setTimeout(() => {
   window.location.assign(urlBase + 'example' + domainExtention);
}, 3000);
Learning Resources
Learn more about HTML, JavaScript and HTTP Redirect details from the Mozilla Developer Network documentation and from this insightful article from CSS-Tricks.
Continue your HTML learning with this free HTML & CSS 101 – Web Development Fundamentals course or take your skills to the next level in just over an hour with this free COMPLETE COURSE – Learn HTML and CSS in 80 MINUTES. You might also consider trying this HTML Tutorial for Beginners from Programming with Mosh or decide to master the foundations of all web development with this premium Full-Stack Web Development Mini-Degree.
Conclusion
There are many reasons why you might want to provide URL redirection and send people to another page – including seamlessly transitioning to a new domain, restructuring your existing website, directing visitors to a secure version of your site (from http://example.com to https://example.com), allowing people to access your site from multiple domain names (there are now well over 1000 domain extensions and it’s still growing), and many other scenarios.
Regardless of your reason, ensuring that users and search engines are directed to your new content, maintaining other internet sites’ backlinks to your content, user’s bookmarks and of course, no loss of traffic or SEO page ranking make awareness of this topic essential in today’s world. Just think of how many times you’ve been frustrated trying to access an old HTML page that no longer exists.
In this article, we focused on the simplest of three techniques, HTML redirects, and briefly discussed the other two (HTTP and JavaScript). While HTML redirects are a simple solution and JavaScript provides a powerful developer experience, it’s important to keep your end goal in mind when deciding which approach to take. One site’s best way for sending someone to another page may not work for you.
With this foundational knowledge, you can confidently enhance your website by finding and implementing the steps that match your requirements and technology stack ensuring people continue to find you and your valuable content!


