In this post, we’re going to explore the popular JavaScript library of React and learn the fundamentals of creating our own web app by using Create-React-App.
Why React? Well, considering it is used by over 9 million websites and is ranked as the 2nd most popular framework, you can bet these skills will pay off greatly in your success as a web developer.
Let’s get started in exploring React!
About React
React is a powerful open-source JavaScript library created by Facebook for a very specific purpose – building user interfaces. React enables developers to create complex and interactive UIs by composing together React components built with JavaScript that encapsulate UI, state, and logic.
There are several important points to note with React:
- When you write code in React you can render it in different environments including the web (using React-DOM), server (using Node), and on mobile (using React Native)
- React focuses on the UI and makes no assumptions about the rest of your website or app’s technology stack
- React forms the basis for static, dynamic, and hybrid server-side frameworks for building web apps and websites such as Next.js and Gatsby
While React’s approach creates a lot of options for developers, it can be a little overwhelming to those new to React. Options mean choices. Choices with the development environment tooling, testing, and optimization for production as well as the other technology layers involved in any full-stack app.
This is where Create-React-App (CRA) shines! CRA (https://create-react-app.dev/) is a free, open-source, command-line interface (CLI) tool created and officially supported by the React team at Facebook. CRA has been used to create millions of React apps and there’s a very good reason for that.
If you’re an experienced developer and you know you want server-side rendering (SSR), static-site generation (SSG), or any Hybrid combination then you may want to consider starting with Next.js or Gatsby. Otherwise, go ahead and use Create-React-App. In the following sections, we’ll show you how!!!
Create-React-App: An Overview
Whether creating a demo or building a new website or app, Create-React-App (CRA) gets you set up with a new React app, preconfigured for development with build tools chosen, maintained and hidden from the developer. The other great thing is the demo app created by CRA is pre-wired to run in the browser in development mode using a pre-configured development server. You can easily modify this demo to start your project.
CRA also comes with other built-in commands to test your app, build an optimized version for production deployment, as well as an “eject” option that exposes all the hidden configuration files for the developer to take full control at any time.
The CRA environment is perfect for beginners learning to create their first React Web App, experienced developers looking to quickly start work on an idea for a Web App that will be deployed to the world and all scenarios in between. That’s why millions of apps have been created with CRA including almost every demo, tutorial, or course you’re likely to watch!

How to use Create-React-App
Normally, this is where we would talk about installation instructions except with Create-React-App (CRA) there are none! Really… you don’t need to install, configure or maintain any of the build tools normally required to create a modern web app because CRA sets up your environment using a package runner (no installs required), preconfigures your development environment and hides all this complexity so you can focus on the code.
Let’s get started by creating a project with some initial project structure, complete with a properly-wired demo React App that you can easily modify to quickly start prototyping an idea, following a tutorial, or creating the next big thing!!!

Before You Begin
The only two things you need on your local development machine are Node.js (version 10 or higher) and the Node Package Manager (NPM version 5.2 or higher). Chances are you have both tools already. To verify simply open your computer’s command prompt or terminal window and enter the commands: node --version and npm --version
node --version
v14.15.0
npm --version
7.17.0
If you get an error indicating command not found visit nodejs.org and follow the installation instructions for your operating system (Windows, Mac, or Linux). These easy-to-follow instructions (choose LTS version) will install both node and npm.
As a note, do make sure to enable JavaScript on your browser as well – as a JavaScript-based library, even new React projects need this to function correctly.
Now you’re ready to begin!
Create App
Open your computer’s command prompt or terminal window (from now on simply referred to as terminal) to the directory location where you want to create your new project. When you run the CRA command, it will create a new folder, based on the name you provide, inside the current directory and install your entire development environment as well as React demo project in it.
Terminal Command:
npx create-react-app my-app
This command has three parts:
npx
- NPM Package Runner CLI Tool
- Available since NPM version 5.2
- Execute packages from the online NPM Registry without needing to install the code package first
create-react-app
- NPM Package to execute
- This is the Create-React-App Command Line Interface (CLI) tool used to create your local React development environment and demo app
my-app
- Name of the folder that will be created to store the local React development environment and your project code
- This could be any folder name as long as it meets npm naming restrictions including no capital letters and URL-friendly characters (example: no spaces)
Running the npx CLI command above temporarily installs the latest version of create-react-app, and then executes it to create the dev environment and demo app. The following output displays in the terminal after successful completion.
Terminal Output:
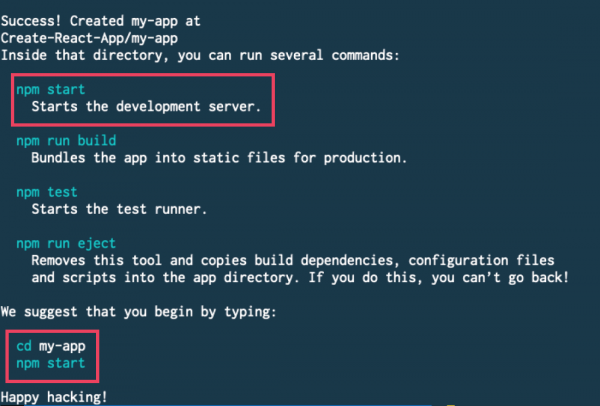
This output lets you know that CRA has completed the environment setup. It also provides the list of CRA available commands with brief descriptions (more detail in an upcoming section) and suggests your next two actions:
- Change directory to your new project folder (cd my-app)
- Start the development server which launches the demo app and makes it available in the browser (at localhost:3000 by default)
Let’s start now by running these commands in the terminal and checking out our newly created project.
Launch App
Change to the new project folder (my-app):
cd my-app
Launch the app:
npm start
This command launches the app by starting the CRA development server. The following output displays in the terminal:

The demo React app will automatically open in your default browser window at localhost:3000
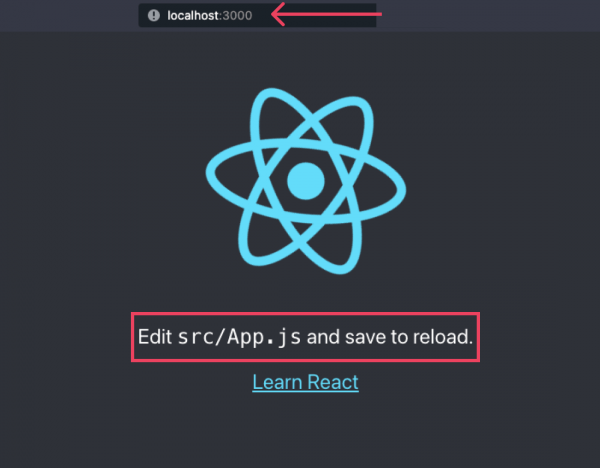
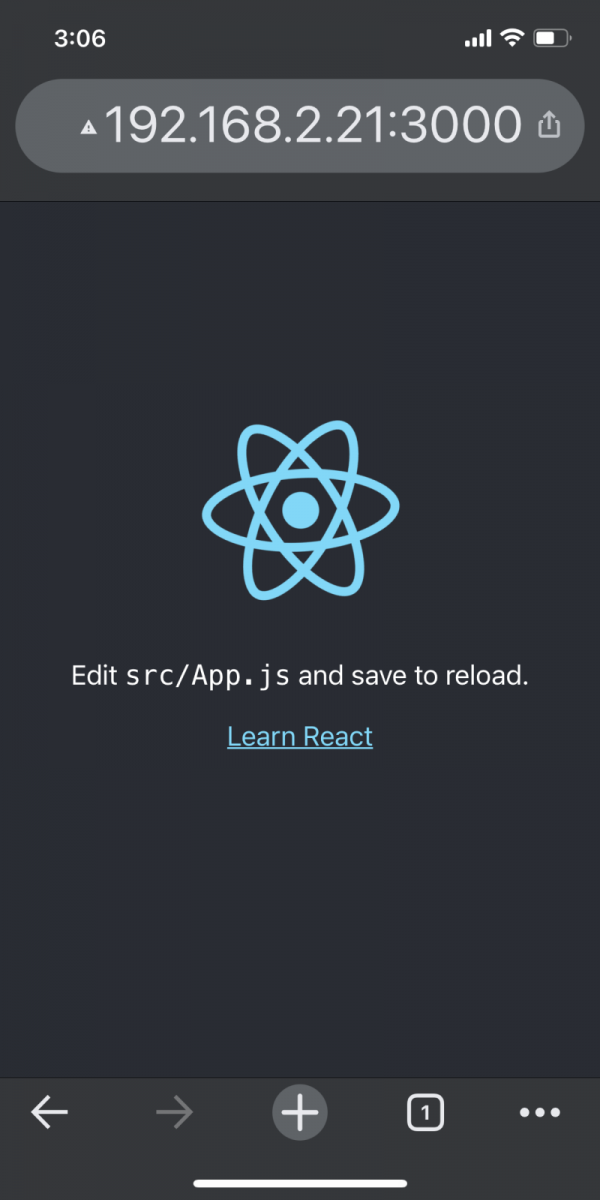
You could also open up another browser to localhost:3000 and the app will appear there as well. It’s also interesting to note the “On Your Network:” address in the above terminal message. Not surprisingly you could enter this address into a web browser and it will also show the app. What’s more interesting is that if you have a phone or other device on the same wifi network as your computer, you could open your device’s browser and enter this address and the React app will open on your device.
Essential Files and Folders
Open your newly created React app in your favorite code editor and let’s explore the files and folders that were created by default.
Create-React-App Defaults
Running npx create-react-app my-app creates a project folder named my-app inside the current directory. Inside my-app, Create-React-App (CRA) generates a React web app development environment along with a demo project resulting in the following project (files and folders) structure:
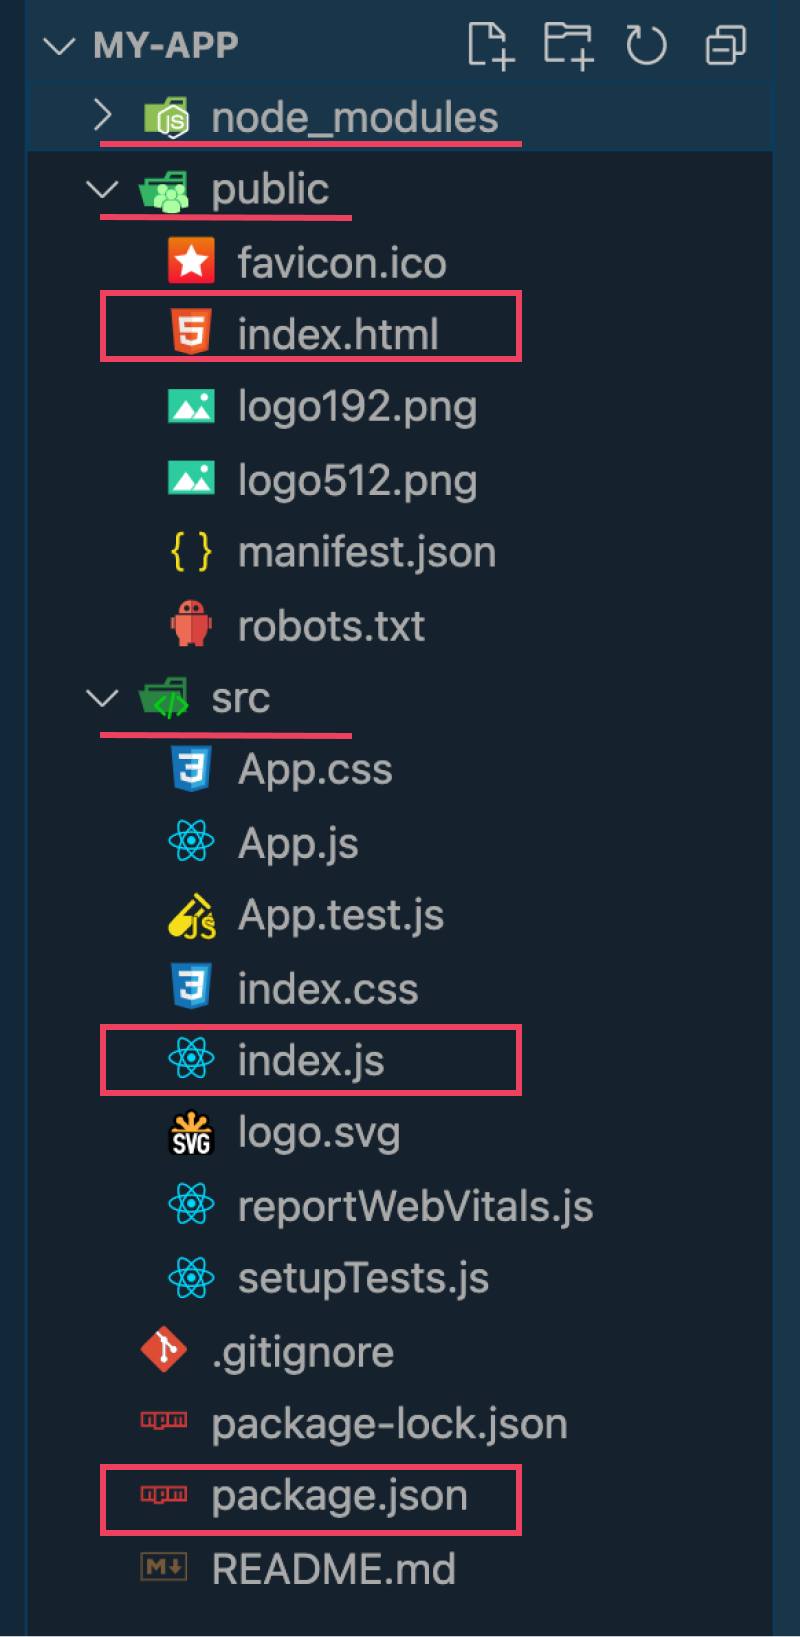
The project structure generated by CRA is relatively simple by default and contains everything you need to develop, test, and optimize your app for production deployment.
If you’re new to React or simply creating a demo or following a course it’s worth understanding what the generated files are, how they’re connected and what files can be deleted, added, or renamed. Chances are if you’re watching a tutorial the first thing you’ll notice the instructor do after running CRA to generate the project is start deleting a bunch of files! The following sections contain the essentials you need to know.
Development Essentials
In the image above, showing the default project structure generated by CRA, you’ll notice three folders and three files have been highlighted. The key thing they all have in common is that they must exist and have these exact names.
- node_modules (folder)
- public (folder)
- index.html (file)
- src (folder)
- index.js (file)
- package.json (file)
The node_modules folder contains all packages (code) downloaded from the online NPM Registry. These are the development and production dependencies of your React app. This folder is automatically updated when npm install/uninstall commands are run so it’s best if you just ignore this folder and let it remain closed. If the folder or its contents are accidentally deleted it can be recreated by running the following command (as long as the package.json file exists):
npm install .
The public folder contains the web page (index.html) which is the “single-page” in the Single Page App (SPA) generated by CRA. The other files are image and config files that are only required when building an app for production. In that case, the image and icon files would be replaced with your own and the config files would be modified accordingly. If just learning React, it’s best to ignore this folder and let it remain closed.
The index.html file is the web page which is the “single-page” in the Single Page App (SPA) generated by CRA. For a SPA, this is the only file directly fetched from the server when a user visits your web page. When the browser parses (reads) this HTML file it fetches any files referenced inside. The key reference we’re interested in is our React app which is a JavaScript file. When this file is loaded and executed by the browser, the React app comes to life and you now have a dynamic web app. For those learning React, these are the only important lines of code in the index.html file:
<!DOCTYPE html>
<html lang="en">
  <head>
    <title>React App</title>
  </head>
  <body>
    <div id="root"></div>
  </body>
</html>
The src folder contains ALL the JavaScript code and CSS styles processed by Create-React-App. If it’s not in this folder, it doesn’t exist!!! Inside the src folder, you can create as many subfolders as your want including subfolders of subfolders. You can also name these subfolders anything you like. Perhaps the most common folder name you’ll find is “components”. Many React developers will create a components folder inside the src folder to hold all React Components developed for use in the app.
As for CSS, you’ll often find two variations: separate .css files that are then imported into JavaScript components (the default option seen in the CRA demo – example below) and CSS styles embedded directly in JavaScript files (styled-components is a popular option for this approach). Note that all images, fonts, and files are added the same way as shown below with the import of both the CSS and the logo image into the App Component.
import logo from './logo.svg';
import './App.css';

function App() {
  return (
    <div className="App">
      <header className="App-header">
        <img src={logo} className="App-logo" alt="logo" />
        <p>
          Edit <code>src/App.js</code> and save to reload.
        </p>
        <a
          className="App-link"
          href="https://reactjs.org"
          target="_blank"
          rel="noopener noreferrer"
        >
          Learn React
        </a>
      </header>
    </div>
  );
}

export default App;
The index.js file is the JavaScript entry point CRA uses to start the build and render of your React app. In this file, React takes the code we’ve written as Components and renders them on the web page. There are several key things to note in the index.js code below:
-
import React from 'react';Including the main React library -
import ReactDOM from 'react-dom';React can render on more than just the web so its render logic is in a separate code file. In this case, we are including the React code necessary to render on a web page (HTML) in what is known as the Document Object Model (DOM) import App from './App';Including the App component which makes it available to use inside the index.js file. React builds User Interfaces (UI) by bringing together Components. In the code above, we show the App Component that contains the code to create what you see in the browser when we launched the app with thenpm startcommand in a previous section- The
ReactDOM.render()method places the App component UI inside the<div id="root"></div>element inside the index.html file as shown above in the index.html file description
import React from 'react';
import ReactDOM from 'react-dom';
import './index.css';
import App from './App';

ReactDOM.render(
  <React.StrictMode>
    <App />
  </React.StrictMode>,
  document.getElementById('root')
);
The package.json file is the only configuration that CRA exposes to the developer. Normally this file would contain a large list of development and production code dependencies as well as build tools. There are only two key things of note for us in this file:
- The required entries in “dependencies” section are “react”, “react-dom”, and “react-scripts”. The references to “react” and “react-dom” are the code dependencies we noted above as being imported into the index.js file so React can do its work and render that work to the web page. The reference to “react-scripts” is actually the CRA magic!!! In this single reference is the entire React web app development environment including commands to be run that we’ve been referencing throughout this article
- The “scripts” section is the commands that CRA provides. We’ll discuss these in more detail in the next section. For now, note that each command runs the “react-scripts” and this is how CRA allows us to execute the commands to “start” the development server as well as create an optimized “build” to deploy to production
Create-React-App Built-in Commands
There are two main JavaScript Package Managers (NPM and Yarn) that interact with the online NPM Registry and also run commands (“scripts”) locally in the terminal. As the following examples indicate, you can use npm or yarn (if installed).
Create-React-App (CRA) offers four built-in CLI commands, by default, when it sets up your local React development environment. These commands are exposed as a set of “scripts” defined in the package.json file and executed in the terminal. These four commands or “scripts” are:
Start
npm start or yarn start
Starts the development server which launches your React app in development mode. You can view the app by opening localhost:3000 in the browser. The dev server will automatically reload the page any time you make changes to the React code. You’ll also be able to view build errors and warnings in the console.
Test
npm test or yarn test
Starts the test runner in an interactive “watcher” mode. By default, runs tests against all files that have been changed since the project was last committed to a git repository.
Build
npm run build or yarn build
When you are ready to deploy your app to production, running this build command will bundle React in production mode, minifying and optimizing all code and assets for best performance. The build produced is stored in a folder created named build. This folder contains everything needed to deploy your app to production.
Eject
npm run eject or yarn eject
It’s important to note that this command is a one-way operation. Once you “eject” you are completely removed from the CRA environment and you can not go back! For experienced developers, this provides a great option because it enables a developer to get a quick start on creating their React app without being concerned about being locked into a controlled environment once their project had outgrown it or they wanted more configuration control.

Start React App Development
The best way to learn to code… is to write code! Follow a tutorial, code along, change the code, break the code, fix the code and code something new! Focus on learning more from lessons not on completing more lessons. “I see how that works… now what if I tried this?”
To begin, let’s understand how the demo app works. Then let’s understand the basics of building and composing React components by separating the UI into several simple components which we’ll compose back together.
Installing React Developer Tools
Before we start developing it’s a great idea to install the free and officially created and supported browser extension called “React Developer Tools” which is available for most modern browsers (Chrome, Firefox, Brave, Edge).
For example, search the “chrome web store” for “React Developer Tools” and press the “Add” button. This adds two React-specific tabs (Components and Profiler) to the existing browser dev tools.
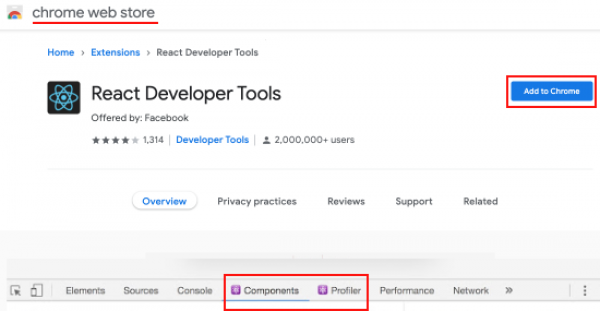
The components tab is a great asset for both developing a React app as well as learning React as it helps you visualize and interact with React components and subcomponents including any information they’re holding in React State, Props, Hooks and more.
Open your browser dev tools with your menu (dev-tools), keyboard shortcut (Option + ⌘ + J on Mac | Shift + CTRL + J on Windows) or right-click your web page and select “inspect”. With dev tools open select the “Components” tab when on a page running React.
How Components are Composed and Rendered
Start by opening a terminal window in your project’s main folder then execute the “start” command to open the React development server:
npm start
The following output displays in the terminal:

Your React app will automatically open in your default browser window at localhost:3000
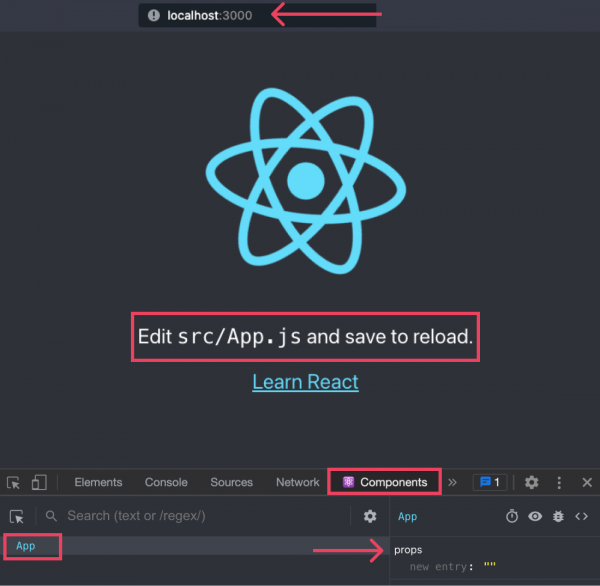
Open the browser dev tools and select the Components tab. Notice that we have only one component (App).
This page is rendered by linking three key files:
- public/index.html
- src/index.js
- src/App.js
public/index.html
The important line of code to notice is <div id="root"></div> which is where our React app will be placed.
<!DOCTYPE html>
<html lang="en">
  <head>
    <title>React App</title>
  </head>
  <body>
    <div id="root"></div>
  </body>
</html>
src/index.js
The three important lines of code to notice are:
import App from './App';which is how we include the file named App.js containing our App Component<App />which is how we place the App Componentdocument.getElementById('root')which is how we link to the HTML element where we want to place the React app
import React from 'react';
import ReactDOM from 'react-dom';
import './index.css';
import App from './App';

ReactDOM.render(
  <React.StrictMode>
    <App />
  </React.StrictMode>,
  document.getElementById('root')
);
src/App.js
This file contains the App Component with the JSX (HTML- looking syntax in the JavaScript code) to be displayed on the Web page where this component is placed.
import logo from './logo.svg';
import './App.css';

function App() {
  return (
    <div className="App">
      <header className="App-header">
        <img src={logo} className="App-logo" alt="logo" />
        <p>
          Edit <code>src/App.js</code> and save to reload.
        </p>
        <a
          className="App-link"
          href="https://reactjs.org"
          target="_blank"
          rel="noopener noreferrer"
        >
          Learn React
        </a>
      </header>
    </div>
  );
}

export default App;
Building an App with Components
Next, Let’s divide the App.js code into several Components. Normally each component would be placed in its own file within a components folder adhering to naming conventions. For example, the file’s name and component’s name should be the same and both should start with a capital letter. For simplicity of illustrating the point in this lesson, we’ll keep all components within the App.js file.
import logo from './logo.svg';
import './App.css';

function App() {
  return (
    <div className="App">
      <header className="App-header">
        <Logo logo={logo}/>
        <Message/>
        <Message text="Bootstrapped with Create React App"/>
        <ReactLink linkText="Learn React"/>
      </header>
    </div>
  );
}

export default App;

/* Logo component
- normally in separate file: src/components/Logo.js*/
function Logo(props) {
  return (
    <img src={props.logo} className="App-logo" alt="logo"  />
    );
  }

/* Message component
- normally in separate file: src/components/Message.js*/
function Message({text}) {
  return (
    <p>
    { text || 'My React App'}
  </p>
  );
}

/* ReactLink component
- normally in separate file: src/components/ReactLink.js*/
function ReactLink({linkText}) {
  return (
    <a
          className="App-link"
          href="https://reactjs.org"
          target="_blank"
          rel="noopener noreferrer"
        >
         {linkText}
        </a>
  );
}
When the React development server is running, any change you make to your code is automatically reflected on the web page. You can see in the Components tab that originally we had only one component (App) and now we still have App but nested inside App is four other components including the Message component that we used twice.
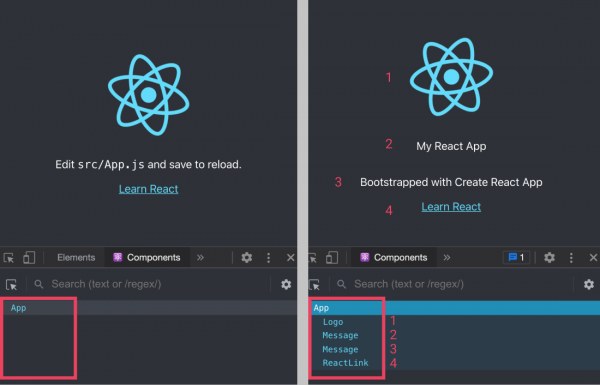
Important React notes about code above:
- props are used to pass static data (text) or dynamic data (variables)
- props are passed using a syntax similar to HTML attributes except that variables are enclosed in curly braces ( {…} ) whereas static data (text) is enclosed in quotes ( “…” )
- props are received by a component within the function parameters as an object variable named “props”. The properties and values of this object are the names and values you used on the component in the parent. For example, “logo” for the Logo component and “text” for the Message component. The value can be referenced within the component by using
{props.[name]} such as {props.logo}or destructured as it is passed intofunction Message({text}) {...}. When destructured, the property can be used directly<p>{ text || 'My React App'}</p>and in fact, we can use any JavaScript expression inside the curly braces. In this case, we have default text which will appear if no text is passed in as a prop
This ability to compose small, self-contained, reusable components is one of the things that make working in React a great developer experience.

Test App
Testing is critical for any application intended for actual use!!!
With the importance of testing in mind, Create-React-App (CRA) includes running tests as one of its core features. The default React development environment generated by CRA has several important “test” elements:
- Built-in test runner (Jest)
- CLI command (“script”) to start the test runner
- Working test file coded to test the demo app
To start the test runner inside CRA, execute the following command:
npm test
This command starts the test runner in an interactive “watcher” mode. By default, tests are run against all files that have been changed since the project was last committed to a git repository. The interactive test runner then asks you what files you want it to watch for changes the next time you run a test. The following is what appears in the terminal window after executing the “test” command above.
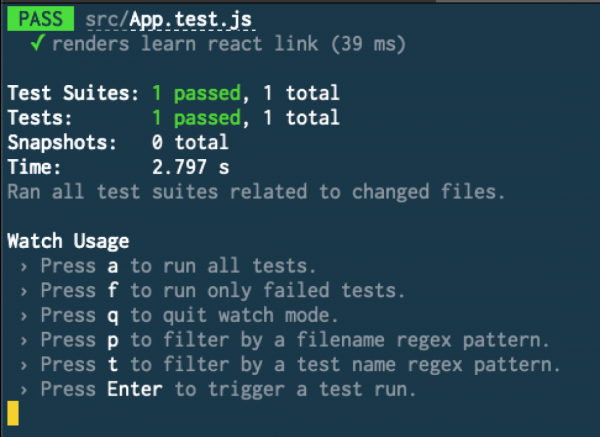
Testing is a huge topic in itself and guidance on how to write tests is outside the scope of this tutorial. If you are new to programming or new to React and your focus is on following tutorials to learn the fundamentals of React then you’ll likely avoid writing formal tests. At this level, writing code along with a tutorial likely won’t focus too heavily (if at all) on working with a test runner and that’s okay.
The reason it’s okay is that coding along with a React fundamentals course likely won’t meet the standard of necessity stated at the beginning of this section “intended for actual use”. When you’re ready to learn more about testing in React you can start with the official React testing docs, Create-React-App testing docs, and the Jest test runner website.
As a final note, if you are new to programming, you may hear developers talk about unit testing and debugging. Each time you update your code and the browser refreshes the act of noticing if the page is working as expected and observing if there are errors in the console means you are “unit testing” your app. When you take action to determine the cause of the errors and fix them you’re entering the territory of “debugging”. This can involve logging information to the console, ensuring the information inside the React Developer tools, that we installed in a previous section, is as expected and taking action in your code to fix the issue, using the browser’s developer tools for debugging, using your code editor’s debugging tools or working with external developer tools.
As we noted above, both “testing” (identifying errors) and “debugging” (finding the root cause of the error and fixing it) are huge topics in themselves. As you work professionally, perhaps as part of a team, you’ll become aware of various levels of testing ranging from the “unit testing” we’ve discussed so far (which is generally performed by a developer) to “integration testing”, “system testing”, “end-to-end” testing and more (which are generally performed by business or functional roles). Generally, the higher you go, the more critical the application being tested, and the context of the application within a larger ecosystem of related apps the more higher-level testing will be required and the more likely test runners, code coverage, and continuous integration testing will become your reality.
For now, when you’re ready to learn more about debugging options you can start with the Create-React-App debugging docs and take it from there!

Build and Deploy React App
Software applications are never done!!! When you complete an iteration of your application that you’re ready to move to a production environment that makes it available to a wider group of users or to a public Internet address for the world to discover there is one important step to complete first – optimizing your app and its static assets.
Build – Optimize React App
npm run build
When you are ready to deploy your app to production, running this build command will bundle React in production mode, minifying and optimizing all code and assets for best performance. The build produced is stored in a folder created named “build“. This folder contains everything needed to deploy your app to production.
The best way to test your optimized app before actually deploying it to production is to install an HTTP server locally that will serve your main web page ( index.html file from the newly created build folder). This way, you ensure that your app and all its links and static assets work in production mode. To do this install an NPM package called “serve” as follows:
npm install serve
This “serve” package (which is an HTTP server) is installed locally on your computer and added to the node_modules folder with a config reference placed in the package.json file. If this is something you’ll be using often across multiple projects then it can be installed globally by adding the (-g) flag: npm install -g serve
To serve our optimized app (from the build folder) run the following command:
serve -s build
This command serves our static site on localhost:5000. Open a browser to this address and you’ll see your production React app just as someone visiting your site from the Internet would see it.
Deploy – Hello World!!!
While you wrote all your code in the src folder and perhaps made adjustments to the index.html file, images, icons, or other static assets in the public folder; everything you need to deploy to production is placed in the build folder after the npm run build is executed.
There are many options (locations) to deploy your React application for the world to see. The best place to start is the Create-React-App deployment docs which contain options, instructions, and links to guide you through the deployment process.

Beyond the Basics
Selecting a Package Manager
There are two main JavaScript Package Managers (NPM and Yarn) that interact with the online NPM Registry and also run commands (“scripts”) locally in the terminal.
If you do not have Yarn installed on your computer, CRA will use NPM to set up the React development environment as well as install any development and production dependencies.
If, however, Yarn is installed when CRA creates a new app, the CLI will use Yarn instead of NPM. If you prefer to use NPM, you can append --use-npm when running the CRA creation command.
npx create-react-app my-app --use-npm
Uninstalling Old CRA Versions
Before the NPM Package Runner concept (npx) was introduced in npm version 5.2, create-react-app was generally installed globally via npm install -g create-react-app. While this method of installation is not recommended, it is still an option.
If you have previously installed create-react-app using this method, it is recommended that you uninstall this package to ensure npx always uses the latest version.
You can easily uninstall create-react-app global installations (-g) using one of the following commands (either from npm or yarn).
npm uninstall -g create-react-app
or
yarn global remove create-react-app
Create-React-App using Templates
Create-React-App (CRA) templates serve two purposes:
- Local React development environment including build tools and commands as well as NPM code packages required for both development and production
- Files and Folders that your React project will contain when initially created
When you run the basic npx command to create your React development environment it uses the Create-React-App official base template named cra-template.
You can now optionally start a new app by appending officially supported templates such as TypeScript (–template typescript), Redux (–template redux), or Redux-Typescript (–template redux-typescript):
npx create-react-app my-app --template redux-typescript
You can also append community-created templates in the same manner. Search NPM ( https://www.npmjs.com/search?q=cra-template-* ) to see the many available options.
npx create-react-app my-app --template [template-name]
You can also build your own template following these official instructions: https://create-react-app.dev/docs/custom-templates/
Adding TypeScript to React App
TypeScript is an open-source language that builds on JavaScript by adding optional static type definitions. This brings to JavaScript the tooling and development power of strongly typed languages (such as Java and C#) without losing the reach and flexibility of JavaScript itself. Since any valid JavaScript is automatically valid TypeScript, it can be gradually adopted.
While JavaScript frameworks such as Google’s Angular use TypeScript by default its use in React is optional (but growing). You can start a new React app using TypeScript by appending the officially supported TypeScript template (–template typescript) to the Create-React-App npx command.
npx create-react-app my-app --template typescript
If you want to add TypeScript to an existing React app, just follow these official instructions: https://create-react-app.dev/docs/adding-typescript/
Analyze React App
By default, CRA includes the ability to measure and analyze the performance of your React app using different metrics. In the src folder is a file named reportWebVitals.js. This file contains a function named reportWebVitals() that accepts a function (such as console.log ). When this function is included in the index.js file, it is fired when the values of any of the metrics you’re tracking calculate on the page. The captured values can simply to logged locally or sent to an online endpoint.
Measuring app performance is a significant topic in itself. To get started, you can check out the CRA official documentation on web vitals and capturing analytics.

Conclusion
React is an awesome JavaScript library loved by developers all over the world. While React’s approach creates lots of options for developers, it can be a little overwhelming to those new to React. Where there are options, there are decisions to make. These decisions include your local development environment and extend into all areas of software development, testing, and optimization.
To avoid the daunting task of setting up and maintaining your build tooling as well as wiring up your initial app, Facebook (creator and maintainer of React) has released an official command-line interface (CLI) tool called Create-React-App (https://create-react-app.dev/) to take care of all this complexity for you.
If you’re an experienced developer and you know you want server-side rendering (SSR), static-site generation (SSG), or any Hybrid combination then you may want to consider starting with Next.js or Gatsby. Otherwise, Create-React-App is what you want to quickly kickstart your next React project, prototype an idea, follow a tutorial or create the next big thing!!!
Good luck and happy coding!!!


