You can access the full course here: Responsive Admin Pages with Semantic UI
Part 1
An important part of using Semantic UI is getting familiar with the website. It’s a copy-and-paste framework so learning how to navigate the website to find the widgets and frames that we want will save us time in the long run. Here we will take a look at the Semantic UI documentation, examine a few elements to see what the source code looks like, and then see how to add the element to our webpages. For now, we will spend most of our time in the documentation:
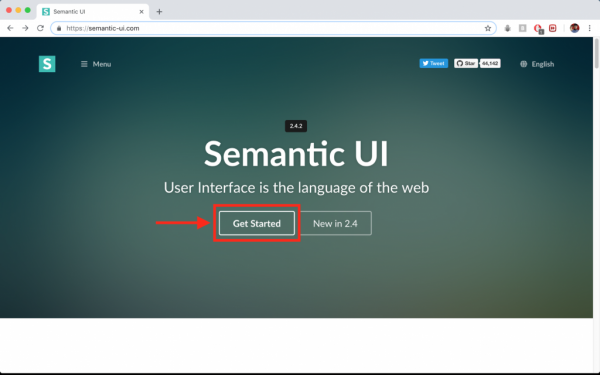
In the documentation, we can find the layout and frame elements under the tab “Layout” and the widgets and other components are spread over multiple different tabs. There are different kinds of elements or groups of elements under the tabs: “Elements”, “Collections”, “Views”, and “Modules”.
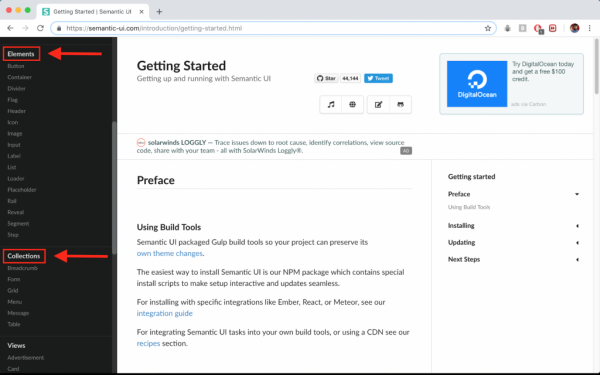
Let’s quickly check out a few of the components to get a feel for how Semantic UI code works. Each component page gives an overview of what the element is used for and provides various examples with the source code and the output. We will examine Buttons, Cards, and Forms.
Buttons
Buttons are used to trigger some action when pressed; almost every webpage will use buttons at some point. You can find these under the “Elements” tab in the Semantic UI documentation. Some examples of colored buttons with the source code look like this:

<button class="ui red button">Red</button>
<button class="ui orange button">Orange</button>
<button class="ui yellow button">Yellow</button>
<button class="ui olive button">Olive</button>
<button class="ui green button">Green</button>
<button class="ui teal button">Teal</button>
<button class="ui blue button">Blue</button>
<button class="ui violet button">Violet</button>
<button class="ui purple button">Purple</button>
<button class="ui pink button">Pink</button>
<button class="ui brown button">Brown</button>
<button class="ui grey button">Grey</button>
<button class="ui black button">Black</button>
In order to display the source code, simply click on the “<>” button shown above. Note how each of the elements is of the type “button”. However, by assigning the class of “ui button”, each button will adopt the basic Semantic UI styling. Adding in the color will choose from one of the predefined colors available.
Cards
Cards are used to display a picture with some information and can be found under the “Views” tab in the Semantic UI documentation. These elements are perfect for displaying some profile information similar to how a playing card may be formatted. A basic example looks like this:

And the source code to generate this is:
<div class="ui card">
  <div class="image">
    <img src="/images/avatar2/large/kristy.png">
  </div>
  <div class="content">
    <a class="header">Kristy</a>
    <div class="meta">
      <span class="date">Joined in 2013</span>
    </div>
    <div class="description">
      Kristy is an art director living in New York.
    </div>
  </div>
  <div class="extra content">
    <a>
      <i class="user icon"></i>
      22 Friends
    </a>
  </div>
</div>
Note how this one is a set of elements enclosed in the “ui card” class. The separate classes of “image”, “content”, “header”, “meta”, “data”, “description”, “extra content”, and “user icon” all apply various predefined styles that help make the card look complete.
Forms
Forms provide a way to take in user input, validate the input, and perform some action. A prime example of form usage would be a login system in which users have to enter a username and password and can only proceed to their account page if the input is valid. Forms can be found under the “Collections” tab but rather than explore the element itself, we will focus more on Semantic UI form validation for now. That can be found at the bottom under the “Behaviours” tab. A form setup might look like this:
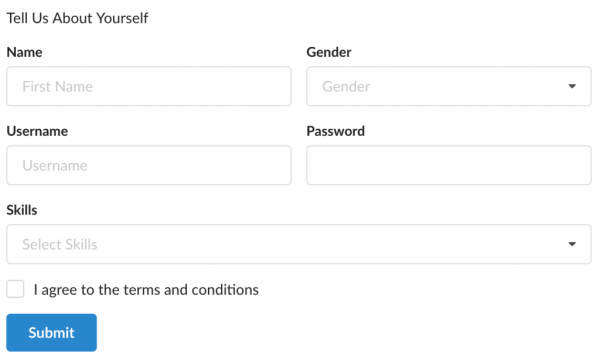
With the short-form validation rules and criteria looking something like this:
$('.ui.form')
  .form({
    fields: {
      name     : 'empty',
      gender   : 'empty',
      username : 'empty',
      password : ['minLength[6]', 'empty'],
      skills   : ['minCount[2]', 'empty'],
      terms    : 'checked'
    }
  })
;
Note how each of the fields has a distinct name and a rule beside it in a dictionary format. Each rule describes a behaviour that must not occur in order to be a valid input. In this example, none of the text fields may be empty, the password must be at least 6 characters long, there must be at least 2 skills selected, and the terms box must be checked in order for the form to be valid and submit to work properly.
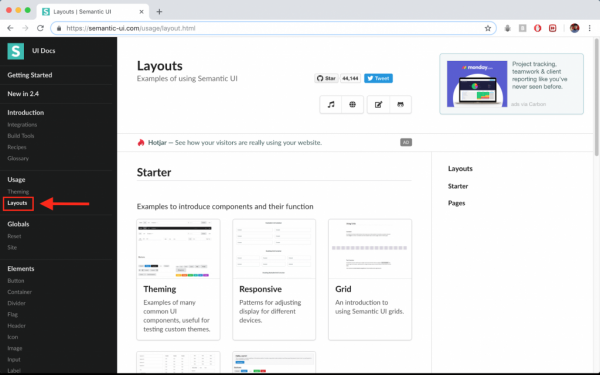
So now you have an idea of how Semantic UI builds and styles the elements, let’s take a look at how to add the Semantic UI library to an HTML file. It might be worth checking out some of the completed examples under “Layouts” in the “Usage” tab. There are examples of full page layouts, content, themes, and even a completed login form.
Part 2
Before we can use Semantic UI, we have to install the package and start a new npm project. You’ll have to make sure you have Node.js installed and start up terminal (command prompt for Windows users). Next we’ll run the command:
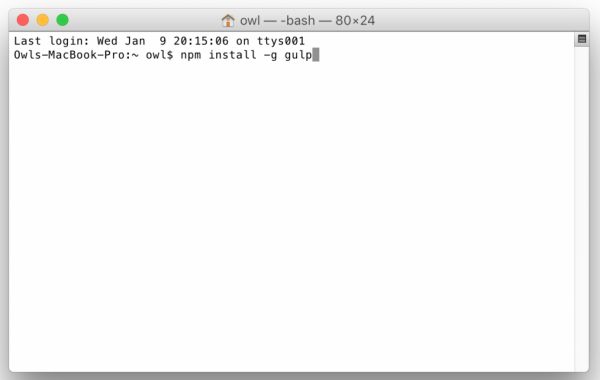
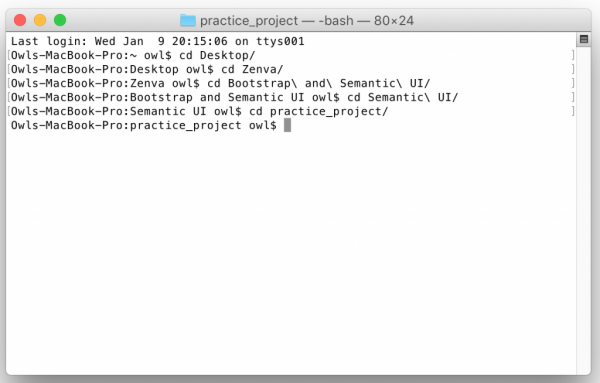
You may need to add sudo in front of the command or if you’re using windows, run the command prompt as an administrator. Next create a new project folder (I’ve named mine practice_project) and navigate to it:
Next, start a new npm project by running:
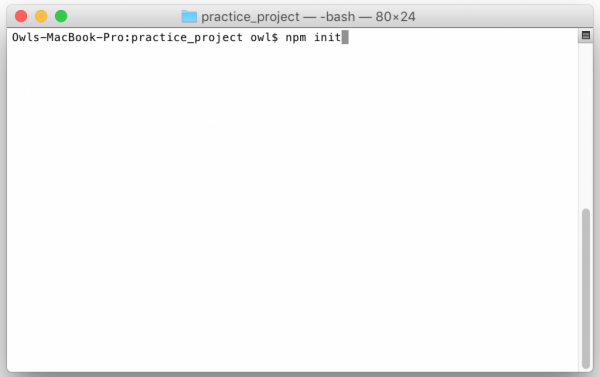
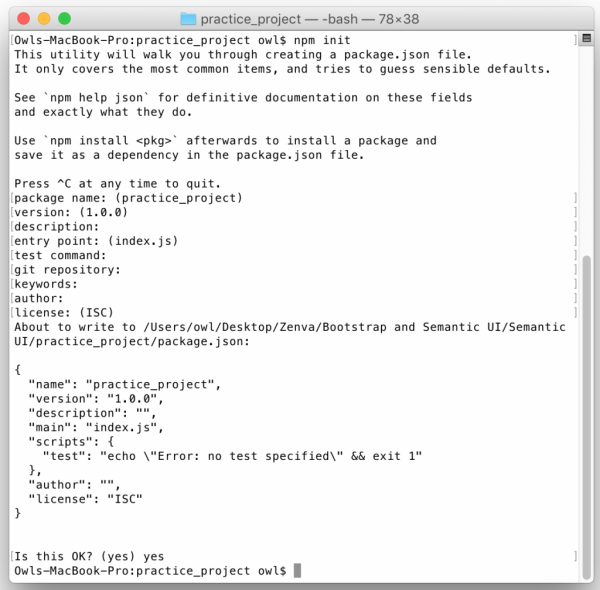
It will prompt you to enter some info to create a package.json file. Just hit enter through each of the items and it will fill in the defaults. It should look something like this:
Now add the Semantic UI dependencies by running:
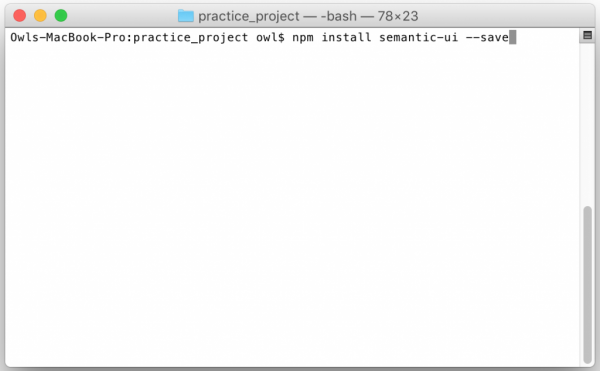
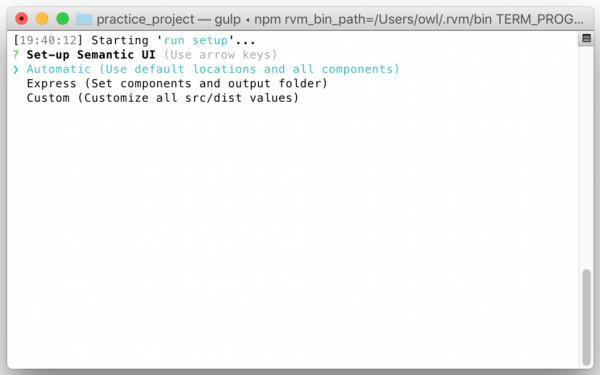
Note the double dash before “save”. It will prompt you to enter some info. For now, just use the automatic setup. Navigate to “automatic” and press enter:
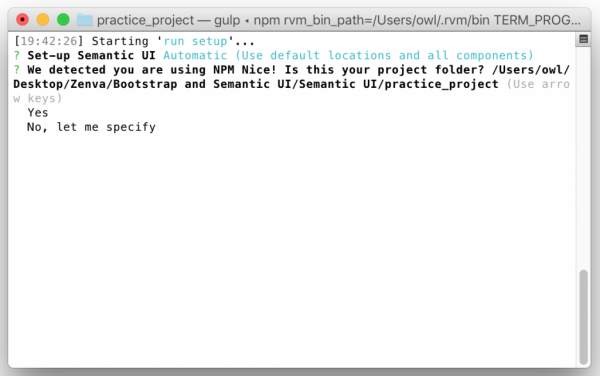
Make sure that the project folder is correct or select “No, let me specify” and enter the correct path:
Save the semantic UI components in the folder “semantic” so just hit enter:
Navigate to the semantic folder and display all items. You should see a gulpfile.js.
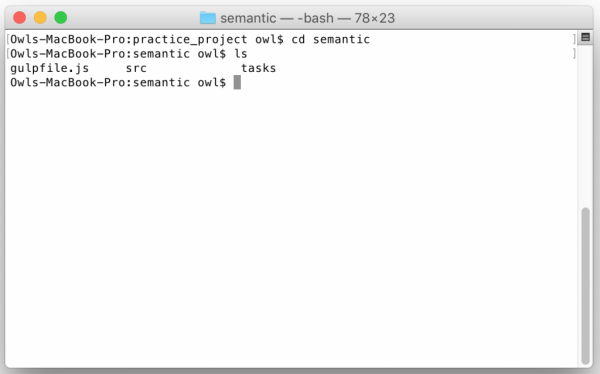
Now build the gulpfile.js by running:
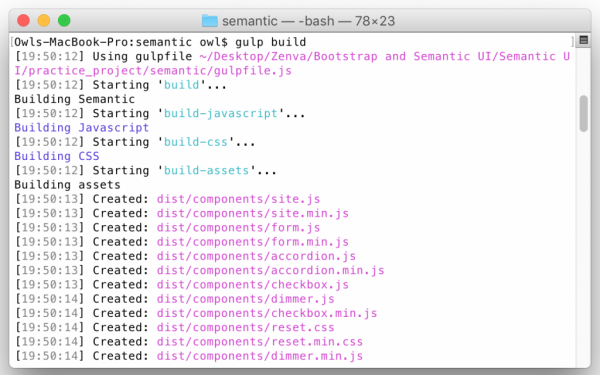
That will have created a semantic.json file as well. Now our project is set up and ready to use! We still need to create an HTML file with the correct headers in it. Create a file called index.html with the basic HTML page setup and copy the headers from the Semantic UI “Getting Started” page into the “head” tag.
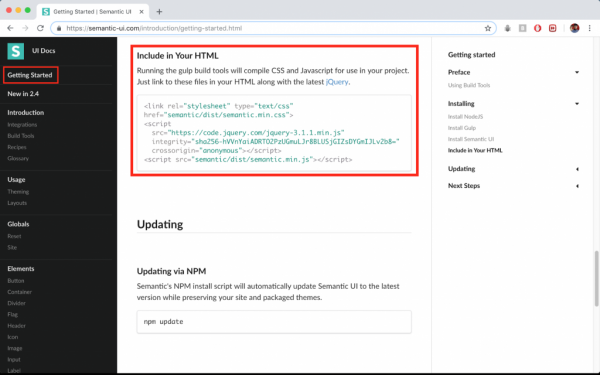
Your code should look like this:
<!DOCTYPE html>
<html>
  <head>
    <meta charset="utf-8">
    <meta name="viewport" content="width=device-width">
    <title>Semantic UI Pratice</title>

    <link rel="stylesheet" type="text/css" href="semantic/dist/semantic.min.css">
    <script
      src="https://code.jquery.com/jquery-3.1.1.min.js"
      integrity="sha256-hVVnYaiADRTO2PzUGmuLJr8BLUSjGIZsDYGmIJLv2b8="
      crossorigin="anonymous"></script>
    <script src="semantic/dist/semantic.min.js"></script>

  </head>
  <body>

  </body>
</html>
You’re now all set up and ready to begin adding Semantic UI components to your webpage! Don’t be afraid to use your project for your portfolio, as it will be an eye-catching addition as you pursue your hobbies or newfound career skills!
Transcript 1
What is up, everyone? And welcome to our course on an Intro to Semantic UI. My name is Nimish, and I’ll be guiding you through these tutorials, in which we’ll learn about the popular framework Semantic UI, and how to use it to create beautiful, and appealing websites with ease.
So, in this course we’re going to first go into an Intro into Semantic UI itself, discussing what is it, and how we use it. And then we’ll explore the Semantic UI website. Using the website to copy and paste elements is a massive part of Semantic UI and especially in this course. So, it’s good that we get to learn how to use the website properly. Then we’ll move to installing Semantic UI. Then we’ll learn about how to properly structure our pages with the Semantic UI grid.
For those of you who have use bootstrap before you’ll see Semantic UI is similar to that, especially when it comes to the grid layout system. After this we’ll go into some individual Semantic UI widgets and components. We’ll show you how to examine them, select the options you want, choose them, and then copy and paste them into your code, and customize them further. And then we’ll wrap this section up with the final project. And I think that final project is going to take the majority of the time. And we’ll put everything that we’ve learned in these intro sections to the test.
Now for starters, what is Semantic UI? Well, Semantic UI is simply a Front-end framework very similar to bootstrap. If you guys have ever used bootstrap before, this course should be a breeze. And I personally found Semantic UI even more enjoyable to work with than bootstrap. For those of you who’ve never used bootstrap before don’t worry about it, bootstrap is not necessarily a requirement here. We’ll show you how to do things without it.
Semantic UI is powered by LESS and jQuery. And this means that it’s a free, open source copy-and-paste framework. That means that everything on the website is open source. You can literally copy and paste the code and you’re not gonna face any repercussions, in fact, it’s almost encouraged that you do so. And we can use Semantic UI to create web apps, and websites with ease.
So, I mentioned that this is a Front-End Framework, this applies to most of you who’ve never used bootstrap before. A Front-End Framework is simply a library that contains templates for HTML elements with CSS styling. So, that means that, let’s say we were to select a button, where we don’t just get that boring unformatted HTML button. That means the button that we select, with a Front-End Framework like Semantic UI will automatically have a bunch of styling already applied to it. This way the items we choose already look really good, before we personally do anything to add any CSS.
Now we use these Front-End Frameworks to very quickly and easily develop appealing interfaces. They generally contain intuitive and easy to understand syntax, especially Semantic UI and sometimes they even provide some basic behavior as well. So, why use Semantic UI in particular?
Well, Semantic UI makes developing web apps, and websites easier, and faster than if you had to do it from scratch. In fact, it can cut down the time by half, if not more. There’s easy to understand syntax, and it’s lightweight, yet, very, very flexible. This means there are lots of different widgets, and customizations to choose from. And you end up with these beautiful and modern-design looking webpages. Again, the main emphasis on this is the fact that it makes things really, really fast and easy.
We’ll see that we can build up a really good looking webpage in probably less than an hour, maybe like 40 minutes or so. Finally, how do we use Semantic UI? Well, I mentioned that it’s a copy-and-paste framework. So, this means we essentially search through the website util we find the elements we want. We can then choose from a variety of different element themes.
The documentation is very clear, and provides you a bunch of different options for each of the widgets and elements. We can then copy and paste the element with the themes we want into our code, and we can customize a bit further with CSS. Okay, so that is it for our intro. What we’ll do is we’ll launch right into exploring the website. As like I said, a lot of this is gonna be copy and paste, and examining the elements we want. So, let’s get to know how to use our website properly, and that’s gonna be crucial for the rest of the course. So, I really hope you guys enjoy this. I really enjoyed making this course, and I love working with Semantic UI.
It’s a fantastic framework that, like I said, has made building web apps and websites so, so much easier. Okay, cool! Well, thanks for signing up, we’ll see you guys in the next tutorial.
Transcript 2
Hello guys, and welcome back. We’ve got a really easy tutorial here for you, all we’ll be doing is exploring the Semantic UI Website. It’s important that we get familiar with he website structure, as a lot of the next tutorials are gonna be kind of copy and paste from that website into our web pages.
So, what are we going to do here? Well, we’re simply going to head on over to semantic-ui.com. We’re going to explore the website layout, get to know where to find the things that we need. We’ll then examine just a couple of elements really quickly, so that you can get the idea of what the source code might look like and how to grab it and put it in our pages. And then we’ll examine some finished page examples by inspecting the source code there. So, let’s head on over to the browser. I’ve got this one open, this is just Chrome. Opening a new tab, and I’m just gonna search for Semantic UI. So let’s just do a quick Google search, or something. We’ll head to this first link, semantic-ui.com. Okay, so this is the home page.
As you can see, it tells you a little bit about Semantic UI, gives you some code examples. What we’re gonna do is actually jump right in to get started. And don’t worry about the installation, we’ll actually cover that in the next section. I just want to get us used to the website itself. So, if you see on the left-hand side, there may actually just be like a little menu open button. So, if that’s the case, go ahead and click that until you see this menu bar on the left-hand side. So, this gives us access to all of the different components of Semantic UI.
First some Introduction, we’ve got some basic examples under Usage, some global stuff under Globals. We’ve got various Elements that we can use here, so you can see Button, Icon, Image, et cetera. We’ve got some Collections. These will be used to group together different elements. We’ve got various Views. These provide some pre-formatted templates for containing, well, kind of putting a few different views together into one. So we’ve got stuff like Feeds, Card, which we’ll be exploring later on. We’ve got some other Modules. These are just gonna be more interactive elements, like above. Okay, and finally, we’ve got some Behaviors such as Form Validation, Visibility, et cetera.
Okay. So, we can basically just pick and choose what we want to look at in this web page. You don’t look at it all, we’ll be exploring different components as we go. I would recommend that after this tutorial you take a few minutes to get to familiarize yourselves with the website. Otherwise, let’s just take a quick look at some of these Elements. Maybe we’ll go with the Button. That’s a pretty classic one. We’ll need lots of buttons in the tutorials to come.
Okay, so most of the web pages are kind of laid out in this format. We’ll have the Element name, or the feed name, et cetera. And then just a bit of a description. This is just a general button, it’s a possible user action. We’ve all seen buttons before, no doubt you’ve used buttons to get here in the first place. And so here we have the kind of basic description. In this case, it’s just a basic button here. We’ve got an example of what it will actually look like. And if we open up these brackets here, we get the source code that generates that. So it has the example and then the actual source code.
So, no doubt at some point we have all added buttons to some kind of an HTML page. You can use a button tag, just like before. Here you can provide a custom class and then use some CSS to style it, but no doubt, unless you’ve used a framework, like Bootstrap or Semantic UI, it doesn’t look like this right off the bat. Typically, to be honest, it’s kind of ugly right off the bat. We have to do a bit of CSS styling to format it. This is the benefit of using stuff like Semantic UI, is that we can actually just use the pre-built-in classes.
A lot of the Semantic UI classes do begin with ui, and then something, in this case ui button is the class name. And it automatically applies all the styling attached to this class into this button. So, this button might not look like much but there’s actually quite a lot already done for us. For example, we get a nice gray background, we have these rounded edges, a better font than before.
We get this nice on-hover behavior, okay. And we can click it, it says Follow or Following. That’s actually a bit of JavaScript behavior. All right, so if we want to copy and paste the code, we can simply select it here, or we can just do copy code. It will copy it to the clipboard. And again, this is this whole theme of this course is gonna be this kind of copying and pasting items that we want, into our web pages and then a bit of further customizing them.
Let’s say we wanted to customize this button further. You could actually customize the entire ui button class, or you could maybe attach an ID to it and customize things that way. So that’s a very basic button. There’s lots of different variations on buttons that you can see as you scroll up or down. We’re not gonna cover them in great detail here, as we’ll be kind of going into the greater details later on. It’s just that any of the source codes are, I think, hidden by default. So you just need to open and close them by doing that, and then you can kind of see all the different behaviors.
Moving to a different item, maybe let’s check out a Card or something. This is a pre-built view. A card will look something like this. This is the default card, okay. And a card just displays some site content in a manner similar to, let’s say, like a playing card. So we’ve got the picture. We’ve got maybe the name of something, a bit of information about them. Maybe there’ll be like a button, or something that has some extra behaviors. If we want to examine this source code, again we simply open it up.
Okay, and as you can see, there’s this collection with a bunch of different stuff within it. So this is a ui card. Like I said, we’ll be taking a look at these in greater detail later, but as you can see, it’s got a /div, that’s an image. It’s got some content. It’s got some extra content here. And this is just gonna be the stuff down at the bottom.
Okay, so as you can see from the source code, we’re still building up our pages, websites, web apps, whatever, with the HTML source code, but instead of having to type this all out by hand and having to think about exactly what components go where, how it’s all gonna come together and how it’s gonna look, we can simply take a look at this, say okay, this is what I want. We’re gonna copy and paste this code in here, using the Semantic UI classes, such as card or content, et cetera, to add that pre-formatting in. Okay, and then we’re basically just good to go.
Now, the last thing I want to take a really quick look at before we move to the final examples, is gonna be way down at the bottom into Behaviors. So, let’s take a quick look at Form Validation, because we’re definitely gonna use Forms later on, so it’s a good idea to get somewhat familiar right now. But I’m sure most of you, if not at least some of you, have used forms at some point. Well, all of us will have used forms, but some of you will have created them yourselves. It’s basically just a way to enter some input and validate that input.
So we use forms for things like logins, for example, maybe if you were creating an account, we’ll use a form. If you’re creating an order, like you’re maybe ordering something off of Amazon, they’ll be using probably some kind of a form. And so, there needs to be some behavior attached to the form, as well as some kind of validation. Well, Semantic UI has actually provided more than just the front-end, it’s provided a bit of actual behavior here. So, by using Semantic UI’s form JavaScript here, we can actually provide some real validation.
For example, let’s say within our form we have, let’s see if there’s the actual example here. And yes, so the actual example looks a bit like this. We have a First and a Last Name, or First Name and a Username, a Gender, Password and a Skills set, we have this agree, and a Submit. So, there’s gonna be a few rules.
Likely we’ll need none of these to be empty. Perhaps our Password has to be a certain length, or something, and we need a certain number of skills. Well, we can use Semantic UI’s Form Validation to do so. So, we have a type of rule, which is make sure it’s not empty. We need at least two skills. Again, gender, it can’t be empty. Username can’t be empty. Password has to be at least six characters. And we need to make sure that this is checked. Okay? So this is just to quickly demonstrate that Semantic UI goes beyond just providing style themes, it actually provides a bit of behavior, as well. However, we will be taking a look at this in greater detail later. I just wanted to quickly introduce it to you. The last thing we’ll do here is take a look at the Usage.
We’re gonna take a look at some of these Layouts. Okay, and I’m actually gonna leave this rest of the part up to you guys. So, there’s some Pages, for example, a Homepage, Fixed Menu. There’s actually a pre-built login form. There’s some items up here. And these are all just ways to demonstrate some of the Semantic UI widgets, as well as some of the layouts.
So for example, let’s say we want to take a really quick look at this Login Form. We can open it up. And if we want to see the Semantic UI code that generates this, we can do two things: we can do the View Page Source that actually opens up the entire source code on the next page, in another tab. I simply right clicked, by the way, View Page Source; or we can do Inspect, in which case we can actually examine the source code right in the same tab here. Okay. So I’ll leave the rest of that up to you.
Again, these are, actually, I’ll just get rid of that. These are all found under our Usage tab. If you go to Layouts, then there’s a few examples. I encourage you to look at a couple of those examples, view some of the source code to get an idea, explore the web page a bit more.
And once you’re done, head on over to the next tutorial, in which we’ll be actually setting our files up to use Semantic UI. So, thanks for watching. We’ll see you guys in the next one.
Transcript 3
What’s up, everyone? Welcome back. Here we’ve got a fairly straightforward tutorial.
We’re just going to install Semantic UI and we’re gonna get our project set up and ready for us to use, because in the next section we want to jump right into exploring some individual components. So our steps here are going to be to first install Node.js. If you’ve already installed that, that’s great, you can basically skip a step there. After this we’re going to install gulp, that’s only gonna take a minute or so, and then we’ll start a new npm project, we’ll run that npm in it to get ourselves set up and once we have that project ready to go, we’ll install Semantic UI into that project.
We may as well start up an indexed html file and install the necessary headers as well, just so that next section we can launch right into the actual development. So let’s head on over to the Semantic UI website, again this is just semanticui.com, and I’ve clicked on Getting Started, that’s gonna be this link at the top left here. So this actually gives you most of the installation instructions, it doesn’t actually say anything about starting an npm project, so I’ll guide you through the entire process. You can follow this or follow along with me.
So that first step again is gonna be getting your hands on Node.js. If you don’t have Node.js then you can search for it under download Node.js or something like this, and go to that Downloads page and just download the correct installer, Windows or Mac, 32 or 64 bit, depends on which system you’re using.
Once that installer comes up then simply open up the package, install Node.js, and when you’re ready to move on we’ll go to the next part of this, which is going to be installing gulp. So let’s get Terminal up and running. For you Windows users this will be Command Prompt. You want to make sure that you’re running Command Prompt as an administrator or some of these commands may not work. For those of you who are using Macs, just type in sudo before any command to give those administrator privileges. So we’ll install gulp, we’ll do sudo npm install -g gulp, so make sure you have the dash and gulp. Windows users, just enter your password, Windows users, you can do this command without, or npm install without sudo, okay?
So if you’re using Windows, you’re running this on an administrator Command Prompt, don’t include the sudo portion. Okay, so it’s updated one package, that’s good. If you’ve never installed it before it will say success, installation success, or something like that. Assuming that you have no problems there, let’s move to the next portion. So at this stage you do need to have npm ready to use. So we’ll now start up a new project folder. You can do so in the Command Prompt. I find it a little easier to do so in Finder, especially easier for you guys to see.
So I have this Semantic UI project that’s just under Desktop, Zenva, Bootstrap Semantic UI. Just find a good place for your project, we’re gonna create a new folder, I’m just gonna call this something like practice. Ah, maybe that’s, yeah, we’ll do it like practice_project, something like that is fine. All right, and then we’re gonna need to navigate to that practice_project in our Terminal now.
So just take a second to do that. Just going to navigate to where that is now. Okay, and ls we’re gonna to go to, we’re gonna go right into that practice_project folder, or whatever you’ve called yours. There shouldn’t be anything in there right now. We’re going to initialize npm, so I’m gonna do npm init right here, okay? And we can have this package named practice_project, that’s fine, version I don’t care about, or description, entry point is fine, test command doesn’t matter, git repo doesn’t matter, keywords and author, they also don’t matter, license, that’s fine. Is this OK? We’ll just go with yes.
This is just modifying our JSON file, by the way, so if you do wanna specify stuff in there, like a specific author, specific description, please feel free to go ahead and do so, but for me this is just practice, so I’m not gonna bother filling it in. So if we do an ls we should now see this package.json file, so we’re on the right track. Now what we’ll do is we’ll actually install the Semantic UI into this project, so we’re gonna go, actually I’ll make sure we’re doing sudo.
For those of you who are Windows users, don’t bother with sudo, we’ll do sudo npm install semantic-ui –save, like so. All right, and now this is gonna take a few seconds and then it’s going to prompt us to kinda do a similar thing to up here, so it’s going to ask us to use either a custom installation, an express installation, or the default automatic installation, okay? So whichever one is more convenient, which is probably gonna be the automatic one, unless you really know what you’re doing. You can do the custom one if you’d like, but I’d recommend just going automatic for now.
So you see it pops up this, there’s a few options to choose from, you can scroll through them with the arrow keys and then press Enter to select. So I’ll just go with automatic, that’s fine. So yep, you’re using npm, is this your project folder? So do make sure that that project folder is correct. This should be the path to wherever we just created that practice_project, okay? So we’re going to go ahead and select yes if that’s right, or no let me specify and then parse in that complete project path. So semantic should be in semantic/, that’s fine, yes, okay and we’re just gonna go ahead and let that happen.
Okay, so as long as there aren’t many warnings here, this is fine. What we’re gonna do next is install gulp, or rather build gulp, and that will download all of the necessary packages. So if we do an ls now we should see that we’ll have a directory semantic, we’re gonna cd to that directory and we should see this gulp file .js, so now we’ll just do gulp build, okay? And this is just going to download and install all the components, so as you can see it’s downloading stuff like site, form, checkbox, dimmer et cetera and this is basically just installing all of these guys that you’ll see on the left hand side, so it’s giving us access to all of the different components there.
So it should just take a few seconds, maybe 15 to 20 or so, and once that’s done then we basically have everything set up and ready to go. Okay, good stuff. Cool, so let’s do an ls again, actually we’ll do, we’ll null navigate up, so in our project directory we should have node_modules, we should have package-lock, package.json, semantic and then semantic.json here.
All right, just gonna do a little bit of basic html page setup, so we’re gonna do the DOCTYPE html, like so, and actually I think that’s a bit small, so let me make that font a bit bigger, okay, I’ll start with html here and we’ll start with the head. And not loving that four-tab space, we’ll just do two tabs, okay? Good stuff, okay.
So we’ve got html, now we’ll need head and body tags, so we’ll do head, okay, and we’ll need the body tags as well, good stuff. So in our head file we’ll just do the classic, little bit of classic setup, we’ll do meta charset=”utf-8″ is good. We’ll do meta name, so we’ll change charset to name and we’re gonna do viewport, okay, content is going to be width=device-width, like so, and why don’t we go ahead and give this guy a title, whoops, not time, we want title, like so, and this is just gonna be our practice, Semantic UI Practice.
So we can go ahead and clear this and we’re actually done with the Terminal stuff for now. All right, so what we’ll do next is head on over to a text editor of our choice, I’m gonna use Sublime Text, I just really like how it works, how it’s laid out, but it really comes down to personal preference, so feel free to use whichever text editor you want.
What we’re gonna do is we’re gonna start a new file, okay, this one is gonna be simply index.js, so let’s go ahead and save that as, or not index.js, this is gonna be index.html rather, okay? And I’m gonna make sure that it’s in my practice_project root directory. This is, again, that project I just created. So you go into Semantic UI, practice_project, gonna make sure it’s in there. Okay, this will automatically make it an html file. Again, it doesn’t really matter too much which kind of file you’re using or which kind of text editor you’re using, as long as you have one available.
All right, so this isn’t gonna be our final project, we can actually create a different project and really get set up there, but for now this is just gonna be a way to practice using Semantic UI. So the next step is gonna be to copy and paste some of the get started code in here, as kinda typing it out by hand’s a bit of a pain. So we’re gonna go back to Chrome, or whichever browser we have this guy open in, and we’re gonna scroll all the way down to Include in Your HTML, okay? We’re going to just take this, gonna copy it and we’re gonna put it in the file’s header.
So let’s go back to our editor, okay? And we’ll just paste it right in there. Just gonna fix the indentation. Let’s give this guy a save and if we wanna make sure that we are actually using Semantic UI properly and we do have access to everything, let’s just grab one single element and then we’ll include it in that page, so back to Chrome. I’m just gonna grab, let’s say, like a button or something.
All right, just gonna do a little bit of basic html page setup, so we’re gonna do the DOCTYPE html, like so, and actually I think that’s a bit small, so let me make that font a bit bigger, okay, I’ll start with html here and we’ll start with the head. And not loving that four-tab space, we’ll just do two tabs, okay? Good stuff, okay.
So we’ve got html, now we’ll need head and body tags, so we’ll do head, okay, and we’ll need the body tags as well, good stuff. So in our head file we’ll just do the classic, little bit of classic setup, we’ll do meta charset=”utf-8″ is good. We’ll do meta name, so we’ll change charset to name and we’re gonna do viewport, okay, content is going to be width=device-width, like so, and why don’t we go ahead and give this guy a title, whoops, not time, we want title, like so, and this is just gonna be our practice, Semantic UI Practice.
And when you’re ready to move on let’s learn about proper layout techniques. All right, so thanks for watching. We’ll see you guys soon.
Interested in continuing? Check out the full Responsive Admin Pages with Semantic UI course, which is part of our Full-Stack Web Development Mini-Degree.
