You can access the full course here: Bite-Sized jQuery
Part 1
In this course, we’re going to learn how to use jQuery to build interactive websites.
jQuery Introduction
When it comes to jQuery, there are two methods in how to add it to your website. The first method is simply going to the jQuery website and downloading the full jQuery file. By including this file in your webhost folder, you have access to the jQuery library. The second method is to use a jQuery CDN, or Content Delivery Network, to dynamically load in the jQuery file from elsewhere. This second method has the benefit of making your website faster if the user has already encountered the CDN before and downloaded necessary files in the background. To learn how to use a jQuery CDN in your own projects, you can go to https://code.jquery.com/ for instructions.
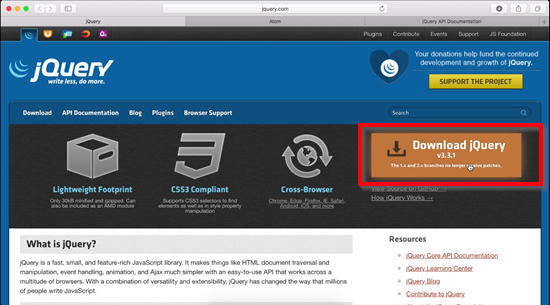
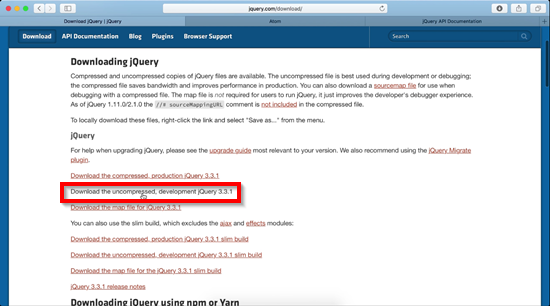
For our project, we’re going to use the first method and download the jQuery file. Head over to the main jQuery website (https://jquery.com/), hit Download jQuery, and download the uncompressed, development file (this version will be the easiest for us to read).
Project Structure Setup
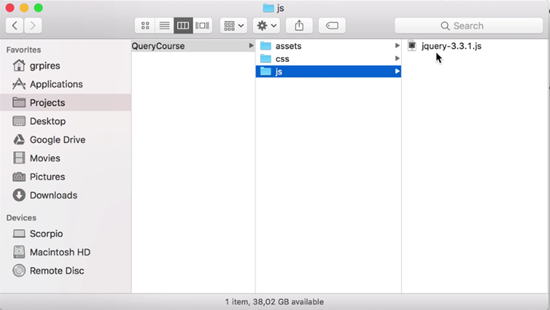
We will now set up our project folder. First, right click and create a New Folder named jQueryCourse wherever you’d like to save the project. Within this folder, we’re going to create three more folders:
- assets
- css
- js
In the js folder, we’re going to add the jQuery file we just downloaded by cutting and pasting it from where it downloaded onto the computer.
For our next steps, you need to make sure you download and install Atom so that we can write and edit our code. You can find Atom via its website: https://atom.io/
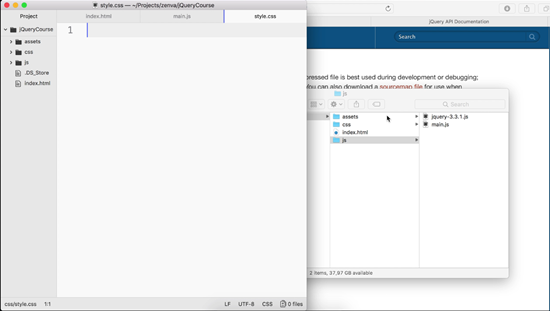
Once you’ve downloaded Atom, open the the program. We’re going to create three New Files (Control N or Command N for the shortcuts). First, we’ll create index.html and save this in the main jQueryCourse folder. Next, create main.js for our javascript and save this in the js folder. Last, creates a file called style.css for our CSS and add this into the css folder.
Project Base Code Setup
Now we’ll start setting up the basic code for our project. In index.html, we will first add in our boilerplate HTML to start off the page. Once in, you can verify that it works by opening index.html in your web browser.
<html>
  <head>
    <script src="js/jquery-3.3.1.js"></script>
    <script src="js/main.js"></script>
    <link rel="stylesheet" type="text/css" href="css/style.css">
  </head>
  <body>
    Hello world!
  </body>
</html>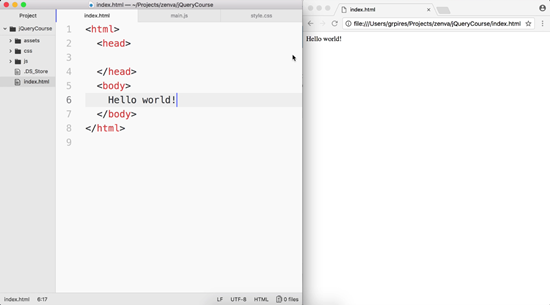
In order for us to have access to the other files we created, we need to link them in index.html. In the head section, we will add the code below. By sourcing and linking our javascript, jQuery, and CSS files, we now have access to them.
<script src="js/jquery-3.3.1.js"></script>
<script src="js/main.js"></script>
<link rel="stylesheet" type="text/css" href="css/style.css">
Let’s test that our main.js file is linked. Remove “Hello world!” From index.html and move over to main.js. In this file, add the following line so that the javascript writes “Hello world!” instead.
console.log('Hello world!');In order to see this in our browser properly, you need to view it in the Inspector. If you’re using Chrome, you can right click and select Inspect from the menu.
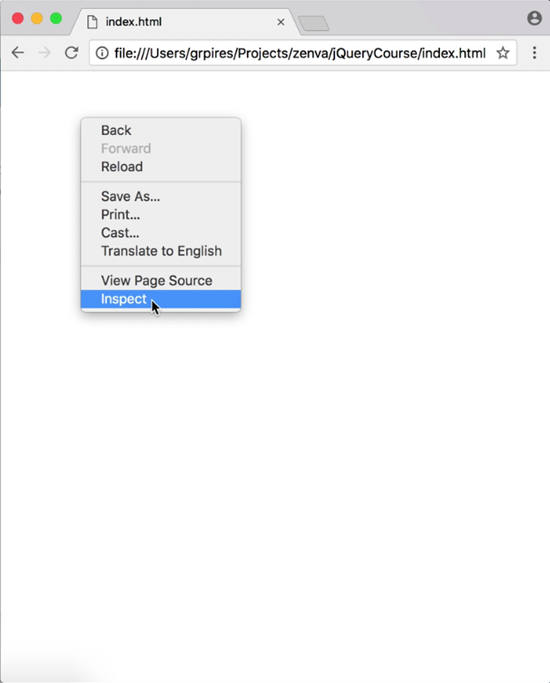
On our new interface we can select Console, and there you should see our message.

That’s it for our project setup. In our next lesson, we’re going to begin learning how to use jQuery to dynamically add the “Hello world!” message to our body.
Part 2
In this lesson, we’re going to learn necessary concepts about using jQuery to dynamically write “Hello world!” to the body.
About Document Ready
Unlike executable applications which come as is with the entire code ready to go, websites and web applications rely on constant downloading and execution of the code line by line. As such, we need to be careful and often wait for the document to be ready to use before we inject any jQuery. In order to add in “Hello world!” to our body, for instance, we need to make sure our body tags are loaded before our jQuery executes.
Fortunately, there is a common jQuery call we can use to make sure the document is ready. In main.js, we will delete our previous code and add the following:
$(document).ready(function(){
    console.log('We are ready!');
});(Note: You can write jQuery instead of the dollar sign to call jQuery functions, but the dollar sign gives a cleaner look).
With this code, we target the document and make sure it is ready before we call the function that writes to our console. If you test index.html, you should see the new message in the Console.
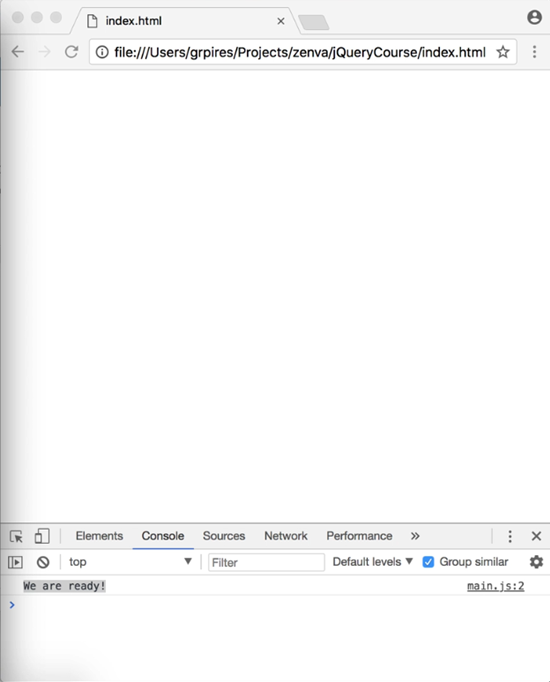
In the next lesson, we’ll continue working with adding “Hello world!” now that we know how to wait for the document to be ready.
Transcript 1
Hello everyone, my name is Laghu Pieris, and welcome to the jQuery course. jQuery is the most used java script library in the world because, it does operations that are very very basic.
We do things like searching for elements, changing element values and adding classes so, things that are used whenever you are performing web development work that are not included by the full in Javascript. With jQuery you can also perform rich interactions. You can perform click events, you can listen for whenever you change values in a forum, in a drop down menu.
And, we’re also going to be able to work with data. Whenever you’re working with jQuery and whenever you’re working with web development in general, you need to keep in mind something called DOM. This is D-O-M. Document Object Model. It’s kind of the base object whenever you’re working with the web.
So, we have a DOM for this image. For this text here. For this style. For this paragraph. So, there are objects everywhere in the web page and, we need to be able to know how to manipulate all of these objects. There’s some requirements to learn this course, even though something, this is going to be a very light introduction. You need to know how to work with HTML.
Something very basic, very introductory. You also need to know how to work with CSS. Javascript is essential because well, we’re going to work with Javascript to be able to communicate with jQuery. And, you also need two, at this point, two different pieces of software. You need to have Google Chrome installed and, you’re also going to need a code editor.
We’re going to use an open source one, okay, a free one to use, which is Atom. Another very important link for you to have open at all times, whenever you’re developing with jQuery, is api.jquery.com. So, now that we have gone through this introductory lesson, We’re now going to move to the next video where we’re going to set up our entire environment and work with jQuery. See you soon.
Transcript 2
The first thing we need to know right in the beginning of this project is how to use jQuery. So, I’m going to need click on this big download jQuery button. There you go, you have it. Using jQuery with a CDN. And to use CDNs, you can can go here to code.jquery.com.
If you click here on uncompressed, for example. You’re going to have instructions on how to use it. You just copy this tag and paste into your HTML file. So back to jQuery here I’m going to download the uncompressed development version. Download link file, or just download file. I’m going to copy it, okay. And now that we have this file here we need to create our project. For making projects I like to have a projects’ folder under my home folder. We have the zenva folder here. And now, I’m going to right click, choose new folder. And I’m going to name this jQueryCourse.
Inside this folder we’re going to make a few other folders. So I’m going to create a new folder. This one is going to be called js. We’re going to have CSS and I’m also going to make an assets folder. And the first step here is to go to the JavaScript folder and paste our jQuery file. Now, we’re going to Atom. Okay, assuming you already have downloaded Atom. And I’m going to create some files.
So we go to file, new file. I’m going to save this new file here in projects, zenva, jQueryCourse and I’m going to name it as index.html. But we also need a file for JavaScript and CSS. Control N, or Command N. Save it and in js this is going to be main.js. You save it here in CSS. And this is going to be named style.css. So first of all let’s add the html tags. Like this, I’m going to add the head tag, the body tag. In the head tag we’re going to include our scripts in our style sheet.
So this should be pretty simple. We add a script tag and the source on this script tag is going to be js/jquery-3.3.1.js. We’re going to add another script tag with the source, js.main.js, style sheet. The type is going to be text/CSS. And the href, well that going to be CSS/style.css. And, what we need to know now is how to work with jQuery. How can I use, how can I add dynamically the text hello world to the body? We’re going to work with this in the next video.
Transcript 3
So we’re going to do something really common and necessary in every jQuery application. First of all, we want to call jQuery, and we do this by typing either jQuery, which is quite lengthy, or typing the dollar sign, which is much cleaner.
So dollar sign, we open and close parentheses, and between parentheses I’m going to type document. So we’re going to work with the document object as a jQuery object. Okay? Then dot ready. This is going to be a function call.
We’re going to write what’s going to be the ready call back here. So, let’s open and close parentheses and add a semicolon. And here I’m going to type a function, open and close parentheses and open and close curly braces. So whenever the document is ready, this function is going to be executed.
And here I’m just going to type console.log and the message, “We are ready!” Like this. So we’re going to save this script. And here in Google Chrome, I’m going to refresh the page, and we have the message we are ready. Okay, so that’s perfect.
Since we are now ready to work, and we have this ready function, then that means our path is clear into changing the body tags and adding whatever content we want here.
Interested in continuing? Check out the full Bite-Sized jQuery course, which is part of our Bite-Sized Coding Academy.
