You can access the full course here: Build Web Applications with React
The instructions in the video for this particular lesson have been updated in the written portion below.
In this lesson, we’re going to start making a new web application and render our first bit of React. While this lesson will not be reflective of how practical application of React works, it will allow us to get our feet wet. You may find it helpful to have both Atom and your chosen web browser open.
Project Setup and Hello World
Within Atom, open up the Terminal and use cd to change into whatever directory you use to store your projects (remember that Terminal defaults to your home directory). Projects tend to be centralized to a single folder, so we’re going to make a new directory called hello-world. After it’s created, we will change into that new directory.
mkdir hello-world
cd hello-world
Next, we will create a simple HTML file called index.
Mac:
touch index.html
Alternative for Windows:
echo index > index.html
Let’s open our entire project in Atom now. By clicking File and then Open, we can find the project folder we created earlier and open up the entire folder. Once open, you should be able to see the entire folder listed on the left side under the Project tab.
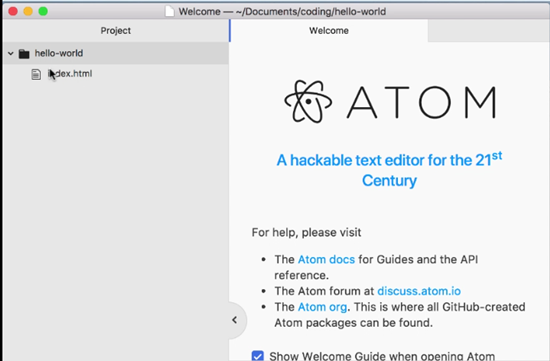
Now, to open the files for the project, all we have to do is click them from that side bar. Knowing this, we will open index.html and populate it with some simple HTML. For this file, and besides the usual HTML required tags, we will have a simple div with “Hello World!”
<!doctype html>
<html lang="en">
<head>
</head>
<body>
    <div>Hello World!</div>
</body>
</html>
To test the file, locate index.html in its project folder and open it up in your browser.

Adding React
The following section’s instructions have been updated, and differs slightly from the video:
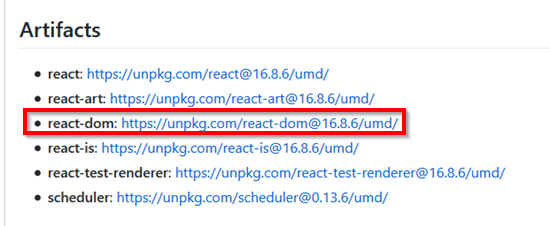
We have our file rendering, but obviously we aren’t using React (https://reactjs.org/) at all for this project yet. In order to use React, we first need to head over to its GitHub page (https://github.com/facebook/react/releases). For this course, make sure to use the latest release of version 16, as there might be breaking changes otherwise. The minor version, like .2 or .8, doesn’t matter. After locating the correct version to use, select the react-dom option from the Artifacts list:
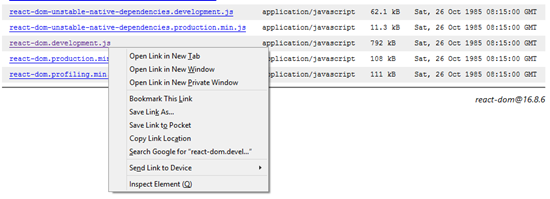
Next, locate the react-dom.development.js file and right click to select Save Link As. From there, you can navigate to the hello-world directory and save the file.
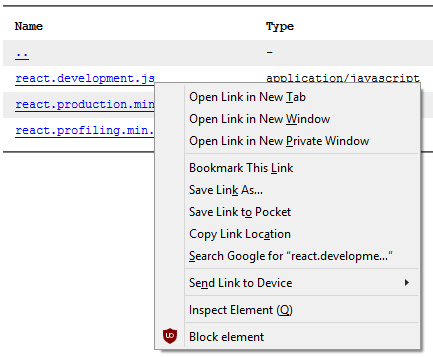
After this, head back to the Artifacts list on the GitHub page and select react. There, you should find a react.development.js file that you can also right click and save to the hello-world directory.
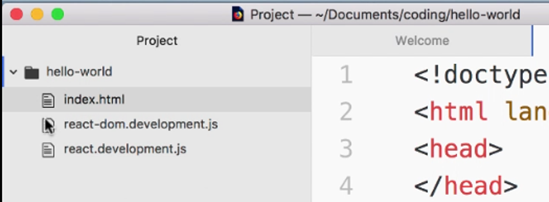
Back in Atom, you should see both files listed in the Project sidebar now.
Using React on the DOM
Now that we have our files, we can add them to our index.html file. Under our “Hello World” div, we will add both scripts via script tags. However, we will also add our own custom Javascript for testing purposes and log a simple message to the console.
<script src="./react.development.js"></script>
<script src="./react-dom.development.js"></script>
<script type="text/javascript">
  console.log('it is working')
</script>
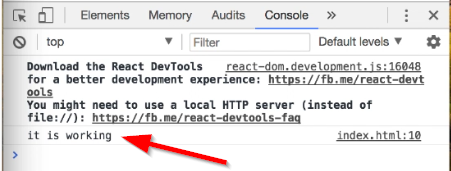
If you refresh and test the page again in your browser, you can right click and then use Inspect to look at the page. At the bottom, if you hit the Console tab, you should be able to see our printed console message, verifying all is working.
However, this barely uses React at all, so let’s fix that. Back in Atom, locate the “Hello World” div now. We will delete the contents of the div while also giving the div an ID of root.
<div id="root"></div>
Under our console.log message, but in the script tag, we’re going to set up a variable that selects the root by its ID.
const mountElement = document.getElementById('root')(Note: Const is from ES6 and is used for variables that aren’t meant to change).
The next thing we’re going to do is mount a React element onto the DOM. Using the render function on ReactDOM, we can create an element. Within this createElement function, we can specify the tag type as the first argument and the tag’s contents, in this case “Hello World”, with the third argument. After which, we just need to mount it to our mountElement variable, which as you may recall is our root div.
ReactDOM.render(
  React.createElement('h2', null, 'Hello world'),
  mountElement,
)
When we refresh index.html in the browser, we can still see our “Hello world” text.

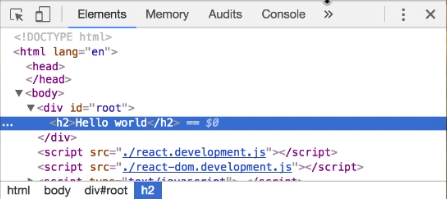
If you Inspect the element, you can see in the Elements tab that the div had the h2 tag from create element function added dynamically.
In the next lesson, we will learn about components. In the meantime, you can learn a bit more about ReactDOM via the following documentation: https://reactjs.org/docs/react-dom.html
Transcript
In this video we’re going to use Atom’s terminal to start making your brand new app. And we are going to render your first React component. I hope you’re excited.
Okay, so what we have here is our Atom browser, our Atom editor, and a web browser on the right side. In the Atom browser, open up your terminal and if you forgot, that is the plus button up here or it is Control + back tick. And what we’re going to to do is get into your project’s directory. Now some people like to put their projects in their home folder. I put mine in a directory called coding, because this is my coding project. So I’m going to do cd, and cd is short for make the terminal go into this directory. You can think of it as equivalent to double clicking a folder in your computer.
So cd Documents/coding. And now I’m in the coding directory. Once you’re in your projects directory, we’re going to make a new directory. For the most part, web applications tend to be centralized in one directory, so as long as you have one directory that contains all of your source code, then you should be good to go.
This app is going to be simple. It’s gonna be called hello world. So let’s make a directory called that. The command for that is mkdir. It stands for make directory. So make directory hello-world. And let’s cd into that directory. And here we are. We are in the hello-world directory.
And now let’s make an html file. So remember the syntax for making a file is touch index.html. Now let’s go see our project. We can open up our entire project in Atom by clicking on File, Open, and then just navigate to your project. I clicked on hello-world and now I see the project browser on the left side where I have a folder called hello-world and then I had my index.html, which is empty.
Let’s populate with some simple html. Start with the doctype. And then I start with html. Language is English. Direct to close it. The head, I don’t really know what should go in there, so I’m gonna just leave it empty. We’re gonna have a body. And let’s just say div. Hello World, close div.
You might wonder, why are we writing in html when this is a React course? Well, I’m gonna show you how to make, write React code right in an index of html file, even though this isn’t how it’s done in the real-world at all. But just to get your feet wet with React, and not have to commit to the giant boiler plate known as Create React App.
What I’m gonna do now is, I’m gonna show this in Finder. And I’m just gonna open it. So I’m gonna drag it over to my Chrome, because right now my default browser’s set to Firefox, so I drag it to Chrome. Get rid of that guy for a second. And you can see that I have Hello World rendering. Well that’s nice.
What about React? Well to get React, we are going to do this one time download of the library. So go to reactjs.org. And click on get started. Okay, so it’s a little bit actually to the right. Click on this version up here, so 16.2.0. Now it’s important that you do use the same version of React as I am, at least version 16. This minor version, the two, it could be three, four, five. What I’m concerned with is the major version, because every time they increment this number, it has always had breaking changes.
Now I will do my best to keep this course as up to date as possible. But for the time being, 16 is the latest, so go ahead and use 16, because if 17 is out by the time you are viewing this, and you use 17, but follow the 16 tutorial, things might be broken. And I don’t want that to happen to you ’cause it’s really hard to debug when you have different versions. What we’re gonna do is get two libraries, react-dom and react. So you want the development version, ’cause we are in development. So right click on this and click on save link as. Okay and what we’re gonna do is navigate to our folder. Coding, and it’s under hello-world. Save that there. And then do the same thing with react.development.js.
Okay so now you should have two files in your hello-world project. Or three files, index.html, react-dom.development.js, and react.development.js. Okay so what we’re going to do now, let’s get this a little bit smaller so there’s more room. What we’re going to do now is use these scripts. So the syntax for using the script is, script source equals and since they’re right in the same directory, we can navigate to that react-dom.development.js. Close the script tag and let’s do it again with react.development.js. End the script tag. Save it.
Okay and now, let’s actually write some JavaScript. Script, let’s see. Type is text javascript. And just to make sure that this javascript is working, it added it twice, just do a console.log. It’s working. Okay, so no contractions there. Okay, let’s make this window a little bit smaller so I can make this a little bit bigger. Great. And so if I refresh this and I inspect it, I’m gonna take a look at the console, it has an error. So it says react.dom was loaded before react. Make sure you load react, before loading react.dom. Okay, so let’s go ahead and do that. I don’t like big red errors. So hit save. And I refresh. And now they’re saying to download React DevTools. Well I already have that, so let’s ignore that, but we do have our console log that said, it is working.
Okay so the first thing we’re going to do is we are going to make a div, which we already have. Let’s delete the contents of this div and give it an id of root. Now the only reason we are giving this an id is because we need to select it. So let’s make a variable called mount. So const mountElement equals document.getElementById root. And in case you’re not familiar with with ES6, const is another, is a block scoped variable declaration. So in the past, in ES5 and below, you used to declare variables using var. Var is still valid, but var has a lot of different overhead that a lot of people don’t really understand. So what I like to do is I like to use const to signify that I have a constant variable that is not meant to change.
If you have variable that will change, you would use let. And of course, you are perfectly free to use var anywhere you see const or let. And I’ll go forward with using const because it’s good to use ES6 when you can. And what we are going to do is we are going to mount a React element onto the dom. And before we had hello-world, well let’s go ahead and do that. So the syntax with that is ReactDOM.render and we are going to create an element. So React.create.element. Let’s make an h2 and we’re gonna put null here. Don’t worry about what it is right now, but the third argument is the text that we wanna put in, so Hello world. And notice the difference in capitalization, that lowercase w, no exclamation point. Before, I did not have that. So let’s go ahead and save.
Pretty air does it’s work and I actually forgot a argument. We need to put mountElement. Okay, so what is this code doing? It’s creating a React element of the h2 variety and it’s mounting it to this mountElement variable, which is the root, the div with the id of root. Okay, so let’s see it in action. All right so we see it is working. We see this Hello world. We can inspect it. And we say an h2 with Hello world and let’s take a look at our React DevTools. Unfortunately, since we are serving from our file system, we actually can’t use React DevTools.
Notice this little error here that says you might need to use a local http server instead of file://. Well that’s what we’re doing right here. That doesn’t mean that we can’t use React DevTools when we develop, it just means that we would need to have an actual development server. And once we actually get into the nitty gritty of building our app, then we will be able to use that development server so that we can use React DevTools, because that is invaluable for programming in React.
Okay, so what have we learned? Well we made a basic html file. There’s nothing really exciting about that. All we did to make React work is we included the react.development.js. We included the react-dom library and then we just have a basic script tag that just has a console.log. It declares a mountElement where we’re going to mount our entire app. And then ReactDOM goes ahead and renders this React component right onto the mountElement. So if we take a look at the inspector again, we see our h2 right under the div with the id of root.
Interested in continuing? Check out the full Build Web Applications with React course, which is part of our Full-Stack Web Development Mini-Degree.
