You can access the full course here: Express for Beginners
In this course, we’ll be covering the Express framework (https://expressjs.com/) used for web applications in node.js. For this lesson, we’ll be installing necessary tools and getting our basic environment set up.
Setting up Node.js
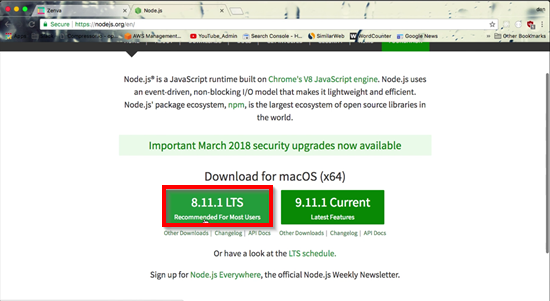
To begin, we need to make sure to download and install the latest LTS version of node.js (https://nodejs.org/en/). This will be the most stable version of node.js that allows us to simulate a server to test our application.

Once you have node.js installed, open Terminal on Mac or Command Prompt on Windows. By typing in the following, you can verify that you have the most current version of node.js:
node -v
Now, using Terminal/Command Prompt, navigate to your desktop.
cd ~/desktop
If using Windows, the following code may be more appropriate if you are in your profile directory:
cd desktop
Next, we’ll create a new directory on the desktop called my-first-app.
mkdir my-first-app
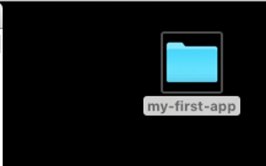
On your desktop, you should now see a new folder to contain our project ready and waiting for you. We will continue working in Terminal/Command Prompt, but you can create folders and files via your operating system GUI.

Back in Terminal/Command Prompt, change into that project directory.
cd my-first-app
We can now create our node project by running the command below. This will add in the necessary package JSON to serve as a configuration file for the project.
npm init
During this process, you will be prompted about things regarding the file. For most of the entries, you can simply hit enter and accept the defaults. When it comes to description, though, we’ll enter “my first express project”. Before confirming yes, verify that the file being written appears like below:
{
    "name": "my-first-app",
    "version": "1.0.0",
    "description": "my first express project",
    "main": "index.js",
    "scripts": {
        "test": "echo \"Error: no test specified\" && exit 1"
    },
    "author": "",
    "license": "ISC"
}
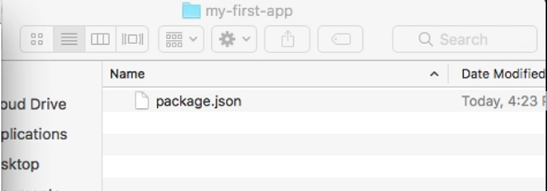
You can verify that the file was created by checking the my-first-app folder and locating the package.json file.

Installing the Express Framework
Our next task is to install the Express framework. Using the following command, make sure to use –save, as this will automatically add required dependencies to the package.json file for you.
npm install express --save
Once again, you can check the my-first-app folder to verify all the necessary components were added. Besides package.json, you should also have package-lock.json and a node_modules folder.

The next step in our setup is to create our entry point, which will be index.js as was specified in our package.json file. Make sure to use the command below that is appropriate for your operating system. If using Windows, also make sure to delete the placeholder text that appears in the new file.
Mac:
touch index.js
Windows:
echo index > index.js
Once again, you should see the new file within the my-first-app folder.
First Get Handler
For this course, we’ll be using the Sublime text editor (https://www.sublimetext.com/) to write our code. If you don’t have a preferred code editor, please be sure to download and install Sublime before we begin.
With Sublime (or other code editor), open up the my-first-app folder so we can begin working on the project. In our index.js file, the first thing we want to do is import our Express framework and also get a reference to our Express application itself.
const express = require('express')

const app = express()
Our next step is to define a route for incoming requests. Since get requests are the most common kind servers receive, we’ll be creating what’s known as a get route handler. Within this handler, we need to pass in two arguments. The first argument is the route itself, whether the home page or some other page that is part of the application/URL. The second argument is a function that takes three arguments. We will worry about the third argument in a bit, but know that the first argument in the function is the incoming request and the second argument is the response we want to occur when that request comes through.
With our first route handler, we’ll be using a backslash to designate the home page as our route/path. Thus, anytime the user tries to access the home page, they will be serviced by this specific handler. For the function,we will use the built-in send function to send back a simple string as our response.
app.get('/', (req, res, next) => {
    res.send('My First Express App!')
})
Let’s test our handler. To do this, we need to add the following line at the bottom of index.js. With this code, we assign a port number (in this case 5000) so that we can open a local host server that only exists on our computer. While an advanced topic, just know that browsers can be set to listen to different ports for different functionality.
app.listen(5000)
In Terminal/Command Prompt, we need to set up the server using the index.js file to run it.
node index.js
Finally, in your browser, you can open localhost:5000 as the address and see the response.

If you’d like confirmation in Terminal/Command Prompt that the server is running, you can use a console log command to notify you. This should go below your app.listen command in index.js.
console.log('Server running on http://localhost:5000')Each time you want to test your page, hitting Ctrl/Command + C will terminate the server. Then, you can start the server again to reload all the information This will be a necessary step throughout the course so keep it in mind.
Other Response Types
Now that we can create a basic route handler, let’s try two more that have different response types. This time, we’ll create a route handler that activates when we try to go to localhost:5000/json. In regards to our response, instead of send, we will use json for this one. This response type will return a standard Javascript object. To demonstrate, we’ll create a Javascript object in the handler’s function to return the appropriate response type.
app.get('/json', (req, res, next) => {
	const data = {name:'David', location:'Sydney'}
	res.json(data)
})
Make sure to shutdown and start up your server in Terminal/Command Prompt. Then, in your browser, open localhost:5000/json. You should now see the Javascript object as the response.

Our next test case will be to respond back with formatted HTML. This time, we will use a send function to send back the response. However, within the string we send back, we’ll use various HTML markup.
app.get('/html', (req, res, next) => {
	const html = '<html><h1 style="color:red">This is an HTML response</h1></html>'
	res.send(html)
})
Restarting your server again, you can try localhost:5000/html (the route we set up above) to see the page in action. As you can see, the HTML renders as HTML instead of plain text.

In the next lesson, we’re going to work with more dynamic responses and paths using query strings and route parameters.
You can learn more about routing with Express by checking out the documentation: https://expressjs.com/en/guide/routing.html
Transcript 1
Hello, welcome to our introduction to Express.js. Express is a very popular web application framework which is used in conjunction with the Node.js runtime.
Node.js of course is the JavaScript based runtime which is used in many websites, web applications, APIs today. And over the past 10 years or so it’s become very, very popular. Express is the most popular web application framework for Node.js. There are a couple others but Express is the most popular one so this is a great place to begin. Web application frameworks in general are very popular because it helps us developers make websites much more efficiently. Usually by extracting away a lot of repetitive tasks as well as providing a set of tools and libraries that help us implement functionality much more quickly.
So web application frameworks are definitely a very popular tool to use and Express is certainly a very powerful one for Node.js. In this session we’re going to create a simple Express server that responds to GET requests. A GET request is the most common type of request servers receive. When your browser goes to a certain website, such as academy.zenva.com, your browser is sending a GET request to the Zenva servers, which then responds with an appropriate type of response.
There are several types of responses but the most common ones are going to be text, just regular text responses, JSON response, which is JavaScript object notation, which is a standard structure of a response typically returned by APIs and regular HTML of course, what you see on the browser, an actual website. There are many others but these are the ones we’re going to look into in our first session. Also, requests can be more specific or more dynamic by adding more details to the request in two different ways. That can be done through a query string or url parameters. By adding either a query string and or url parameters you’re making a more specific request.
For example, one request might be a request for all profiles in the database. Another request might be, we want all the profiles only in Sydney, Australia. And that level of specificity would be provided by either a query string or a url parameter or both sometimes, it depends on the actual website. So we’re going to investigate that as well. So, to see this in action. Here is the home page of the Express application we’re going to build and this is rendering HTML. If I go here, this is rendering a plain text response. And if I go here, to /json, this is a json response.
I’m currently using a Chrome browser and this formatting is done through a Chrome plugin. So if you don’t have that plugin, you’ll probably see this, which is fine too. If you want to see it formatted using this plugin it’s very simple. Just go to Google and json formatter, Google for that, and you want this results right here. And go ahead and add that to your Chrome plugins and they will automatically format your json like that. Next, we will look into the query strings for making more specific responses. So here if we do query, and then a query string is denoted by question mark followed by a key value pairs for your query parameters.
So if I say ?name=Chris, I’m passing through a query string with a key value pair. The key is name and the value is Chris. So if I press enter, you will see name is Chris. And in a query string you can add as many query values as you want by appending it with a ampersand. So I can do location is Sydney and you’ll see that right here. And I can add another one, occupation is lawyer and so forth and so on. This can go on for quite some time. So this is a query string, specifically everything after the question mark. So we will be building that into our project as well. And last but not least, we are going to use url parameters or what’s called route parameters to make more specific requests. So in our project that will look like this.
And here, everything after the word params will constitute our route parameters. So you can see we have name here and location here. If I change these values, the route parameters correspondingly change and we return the values back in json form.
So we will build that in our first session and hopefully you were able to follow along. Thank you for watching and stay tuned for the first session. Thank you.
Transcript 2
Hello, welcome back to our Intro to Express JS.
In the last video, we briefly went through the project we’re going to build during this session, and explored the basic functionality. In this session, we’re going to install the necessary tools, get our environment properly set up, and get started with the source code. So, let’s get started with that right now. So first thing we’re going to do is make sure your Node runtime is the proper version.
Head over to nodejs.org, right here, and make sure you have the LTS version and I think I’m running eight point, 8.1, I think. So, we’ll find out in a minute. Make sure you have that, and after you do, open up your terminal, and check your Node version by typing in node -v, so I’m running, I’m sorry, 8.9, which is the version I’m running, so I’m a couple points behind, but that should be okay. And once you confirm that you have an updated version of the Node LTS, head over to your desktop.
And let’s create a directory for our project. So I’m going to create a directory called my-first-app, and that’ll create this folder right here. Change directory into that, so cd into my-first-app, and let’s set up our, our Node project. So first thing we wanna do is run npm init, which will create a Node project, which is basically a package.json with a few default configuration options. Package.json is basically your Node sort of configuration file. So let’s go ahead and create that. We’re gonna go with the default here, version 1.0 is fine. Description: my first express project. Entry point, which will be the index for us as well.
Don’t worry about tests for now, and the git repository, don’t worry about all these, we can just go with the default on all of these. And confirm that your package.json looks like that. So once you have that set up, you should have package.json inside your directory, your project directory, just like mine is showing right here. So now let’s install the Express library, excuse me, the Express framework. So npm install express –save.
This save flag will insert the Express dependency in your package.json, that way if you, if you wanna commit this to a repository, when you clone from that repo, it’ll already be in there. So, let’s go ahead and run that installation. Okay, so now you should see this. And we have our package.json set up with the Express framework installed, so if we open that up in your text editor, I’m using Sublime, you will see the Express framework in the dependencies. So, we’re set to go with that.
So, now let’s create our entry point, which is going to be index.js. So we create the index.js. Which is now over here, and that’s where we will create our Express server. So let’s go ahead and open this up and get started. So here is our index.js. So first thing we wanna do is import Express. So now we have Express imported into the index.js, and now we wanna create the Express application, which is just a function from Express.
And now here we have a reference to our Express application. Now what we need to do is define some, a route, to respond to incoming requests. And as I said in video one, the git route, the git request is the most pop, most, excuse me, the most common kind of request servers receive. So we’re going to set up a git route handler to respond to incoming requests. So let’s do that right now.
So that is app.get, so here we are telling the Express server to respond to git requests according to the following details. We have to insert two arguments here. One is called the route, and this backslash means the home route, so when we go to the homepage, all requests will be serviced by this route handler that we are currently running. And then the second argument is a function argument, with three arguments inside of it. So, we set up a function, and we’re gonna use ES6 Syntax here, and the functions in here takes three arguments: request, response, and next.
The request is the incoming request, so from the browser, or it might be from a mobile device, or some other internet-connected hardware. The response is the object that, where we decide how the server will respond to that request. And the next, do not worry about for now, but we will get to it shortly. So right now what are, the important things are the request and the response arguments. So as I said a moment ago, the response is the argument we use to determine how to respond to individual requests. So right now what I’m going to do is I’m going to send back a response. This is the response.
So, the response has a function method called send, upon which, inside which I can send back a string response to the browser or whoever’s making the request. And now I need to actually run the server. So here, I type in app, and then listen, and inside the listen method, I assign what’s called a port number, so in this case I’m going to use 5,000. So, a port number determines which port that you want the server to listen on, and there are a series of ports that, that servers open up for requests and responses.
Certain ports are assigned for certain specific functionality. It’s a bit more of an advanced topic, so I’m not gonna get into that in this case, but a typical localhost port is 5,000 or maybe 3,000, and on, on the actual server on live production it’s typically 80, but for localhost we normally use 3,000, 5,000, sometimes 8,000. So this is a typical localhost port. So now we’re going to run the server locally on localhost, which means we’re only going to run the server on our computer, it’s not actually live on the internet. So, we go back here to our root directory.
And to run the server, we do node, and then the file, index.js, the entry point. And the server is actually running now. So if we head over to localhost:5000, you should see the response that we have just wrote in our Express server right here. So if we change this, My First Express App, I now have to go back to the terminal, turn off the server by doing Control + C on Mac OS, I’m using Mac OS. Actually on Windows it’ll be the same command, it’ll just give you an extra prompt asking, “Are you sure?” and you just type in yes and that’s it. And then we do it again, node index.js. And then we reload the page, and then here we have, “My First Express App!”
However, it’s a little bit confusing if we don’t see any kind of confirmation that the server is, in fact, running, so what most developers, including myself, usually do is a console.log right here, where we, where we make it clear, we clearly indicate that the server is running, so, Sever running on localhost:5000. So now, if I turn the server off by doing Control + C, and then I relaunch the server again by doing node index.js, now we get a good little visual confirmation, and we can test the server again, and that is all set to go. So good.
So now I’m going to set up a couple more responses with different response types. So I’m going to set up a get with a route called j.son and I’m going to pass in a function with request, response, and next again. Now here, I’m defining what’s called a route handler, so that we can go to different routes on the website and the route, depending on the route handler, we will see different responses.
So in this case, I am going to send back a j.son response. And that’s a different function on the response object, called j.son. And inside the response object, we pass in a JavaScript, a standard JavaScript object. So for example, if I do const and data, and just pass in a regular JavaScript object, populated with whatever fields we want, so. I can now pass in this data object into the j.son response, and this will render in the json response based on this route.
So if I go to localhost:5000, I still get the home response, and then the j.son response will show that. And then I’m going to set up another route. Called HTML, and again we have to pass in a function argument with request, response, and next as its own arguments. And then here, I’m going to send back formatted HTML. So we set up a very simple HTML document. I’m going to separate this as a, its own variable, and we are going to have it render a simple header tag. And once again, turn off the sever, and then restart it, and now we have another route defined.
So we have our home route, which is the same as before, we have a j.son route, which is rendering raw j.son objects, and then we have an HTML route now, and here is the HTML response. And this is just standard HTML, so we can do normal HTML stuff to this, so for example, I’m going to assign a style attribute, rendering the color as red text, and then I’m going to reload the server, and then now we get red text. And this is how we set up a very simple server on localhost:5000 and render a few basic types of responses that are very common in web applications using Node and Express. Very, very typical Node Express types of responses.
In the next session we are going to handle dynamic responses by dealing with query strings and route parameters, which are two different ways of making responses more dynamic, more specific, I should say, and we can respond to those requests in a more dynamic fashion based on that. So, thank you for watching, and I hopefully, and I will see you in the next video. Thank you.
Interested in continuing? Check out the full Express for Beginners course, which is part of our Full-Stack Web Development Mini-Degree.


