Intro
Augmented Reality (AR) gives users the power to become Pokemon Trainers, zombie slayers, and so much more with just their handy dandy mobile device. All great careers to dive into so let’s build an AR Business Card to easily showcase our talents. In this tutorial, you’ll be doing just that by using Apple’s ARKit 2.0 that will wow everyone at your next networking event.
The complete Unity project for this tutorial is available here. All images and models used in this tutorial have been created by me.
This tutorial was implemented in:
Xcode 10.1
Unity 2018.3.8f1
Tutorial Outline
- Download ARKit 2.0
- Setup the Unity Project
- Create an AR Business Card
- Prepare the Unity project for building iOS*
- Modify the Xcode Project
- Build the Xcode project
- Build the project to your device
- Test the Project in Unity
*Building to Android with ARCore is outside the scope of this tutorial, we encourage you to research how to do so if you would like to.
Download ARKit 2.0
Before we open Unity, you’ll need to download the Unity ARKit 2.0 demo project files from Bitbucket here. Unzip the project file and place the folder in your Document directory. Now that you have the necessary project files, let’s head over to Unity to set up your project.
Click Open. Your file directory dialogue box should appear. Navigate to where you placed the ARKit project file, select the folder and click Open.
Setup Unity Project
Once opened, you will see in the Project panel that your Assets contain a folder labeled UnityARKitPlugin. This folder houses Examples ARKit 1.5 and ARKit 2.0.
Note: ARKits 1.5 and 2.0 include Image Recognition, a feature that detects an image and triggers a digital experience. The difference between the two is that version 2.0 incorporates Object Tracking, a feature that follows the detected object as it is moved.
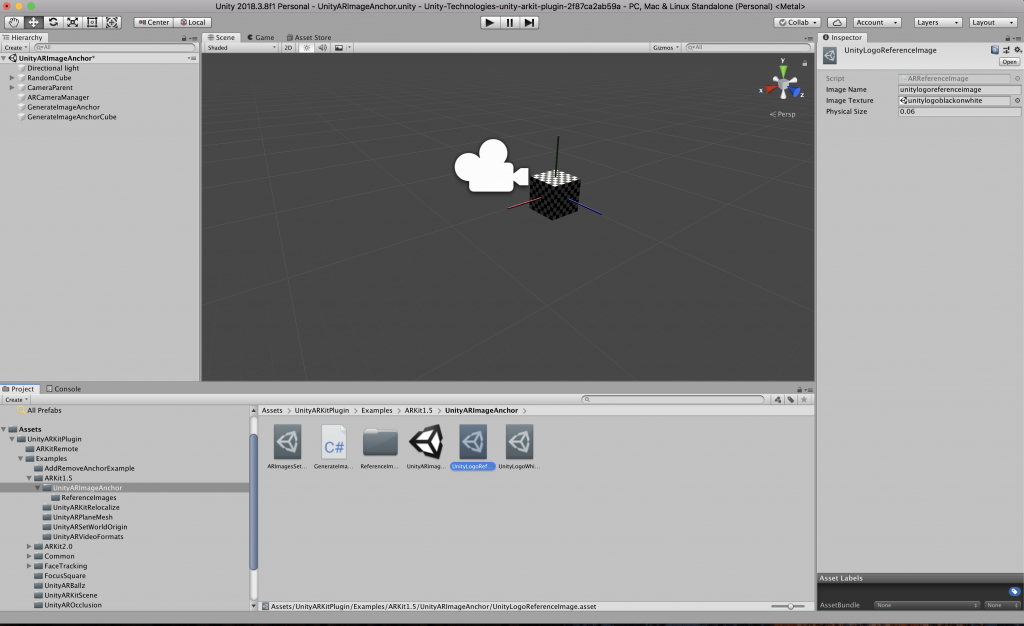
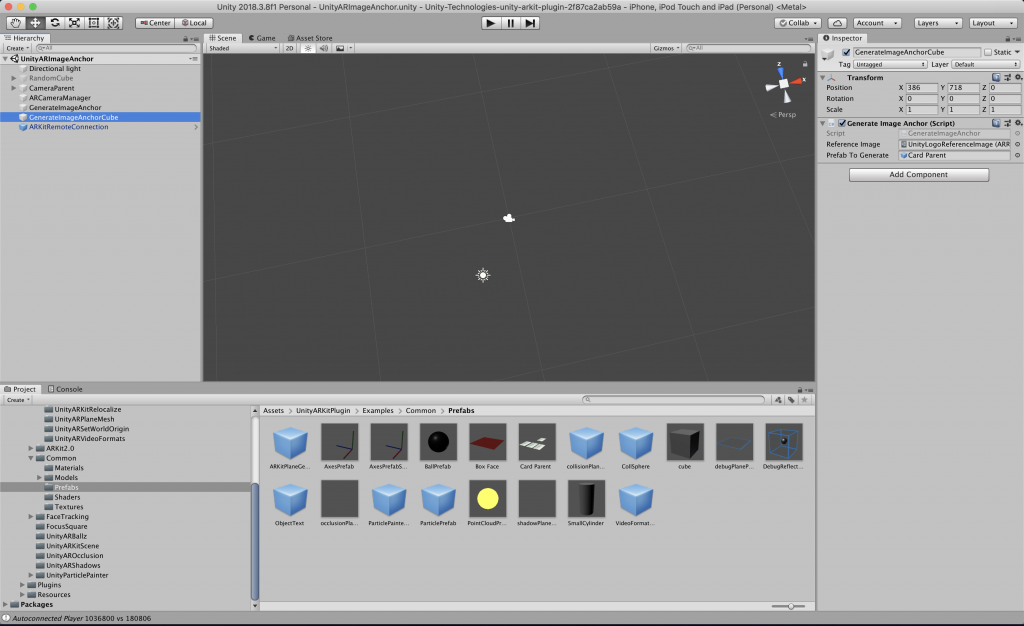
You’ll be using the ARKit 1.5 demo project folder to make your business card. Open said folder and double click the Image Tracking scene labeled UnitARImageAnchor to load it to the Hierarchy panel. Now you’ll see a number of new gameObjects:
Directional Light
Random Cube
Camera Parent
AR Camera Manager
Generate Image Anchor
Generate Image Anchor Cube
Please do not delete the above gameObjects, as you will be using them in your project by simply redefining a few elements within.
Create AR Business Card
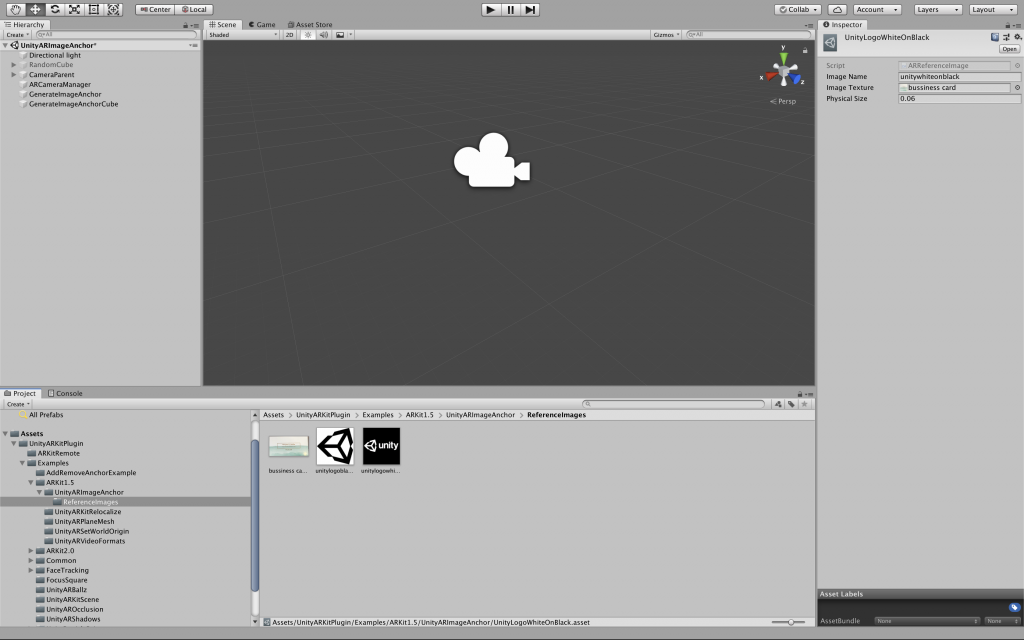
With the initial setup completed locate your business card image and drag it into the project files ReferenceImages Folder.
This folder already contains 2 image targets due to the fact that it is an AR Kit demo project. Image Targets are housed within the AR Reference Image Set, these images can be detected by the AR Camera (i.e. our phone camera) to then place two different 3d objects on top of them.
If you take a look at the ARReferenceImage object you will see that it holds two elements, UnityLogoReferenceIamge, and UnityLogoWhiteOnBlack, these are your image targets. Corresponding to these image targets are anchors, GenerateImageAnchor and GenerateImageAnchorCube. The anchors contain prefabs, which allows you to create, configure, and store a gameObject complete with all its components, property values, and child gameObjects as a reusable Asset. In this instance, the prefab is an AR element.
You’ll need to modify UnityLogoReferenceIamge so that your business card image becomes the new image target. To do so, select UnityLogoReferenceIamge making its properties appear in the Inspector panel then drag and drop your business card image into the Texture Image field, replacing the demo image.
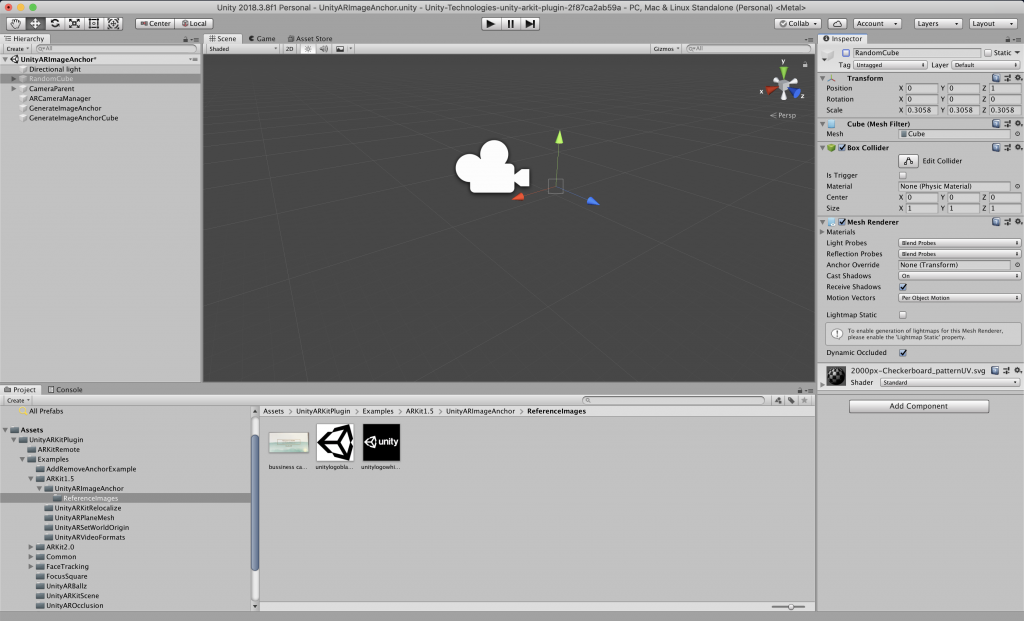
At this time go ahead and disable the Random Cube gameObject by selecting it within the Hierarchy Panel then deselecting the checked box beside its Random Cube in the Inspector Panel.
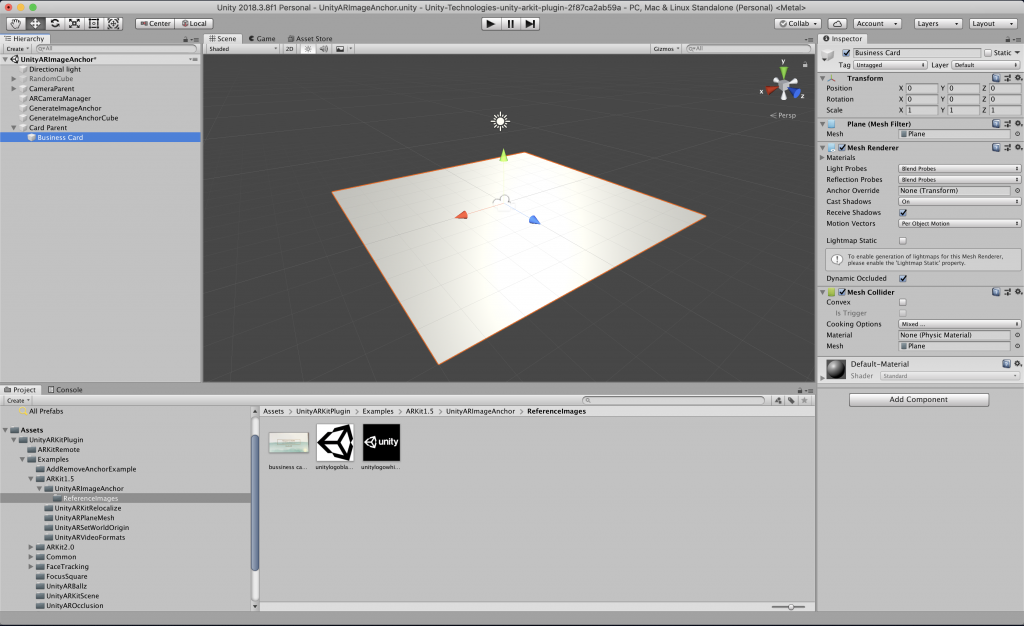
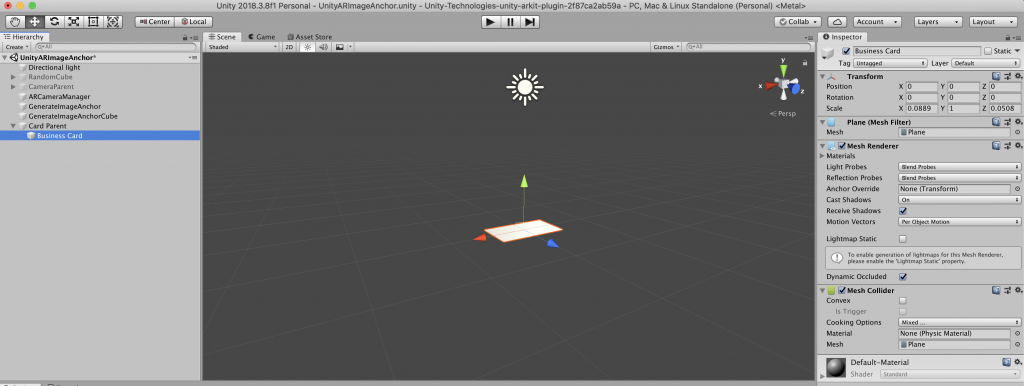
Next, you’ll need to create a prefab that will spawn once you scan your image target with your phone camera. Create a new gameObject by right-clicking in the Hierarchy panel, selecting Create Empty and naming it Card Parent. Inside of the Card Parent create a business card reference, by right-clicking Card Parent, selecting 3D Object > Plane, and naming it Business Card. Make sure that both Positions are x:0 y:0 z:0.
Right now, the Business Card is an arbitrary size. Go ahead and change that to the size of your business card. While you still have Business Card selected make the Scale properties to x: 0.0889 y:1 z: 0.0508.
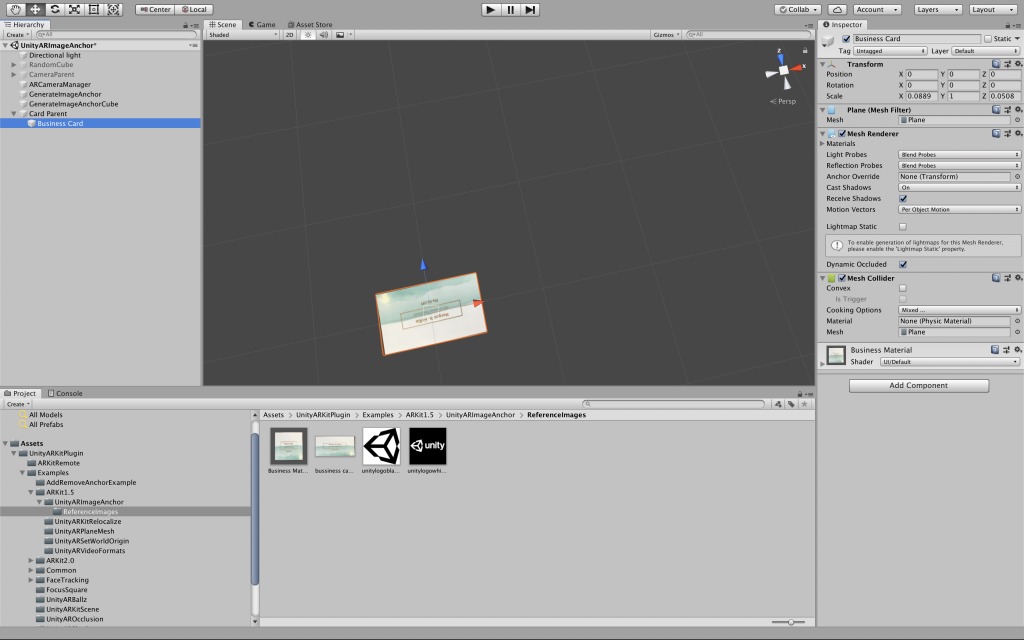
That flat grey color is not very attractive. Let’s create a material to overlay on the Business Card. In your ReferenceImage folder right click, select Create > Material and name it Business Material. In the drop-down for Shader select Legacy Shader > Diffuse, click Select inside of the Texture box below and choose your business card image in the dialogue box that appears. Change the Shader to UI > Default. The material now looks like a or business card image. Drag the Business Material on to the Business Card object.
Currently, the Business Card is inverted you’ll need to change that by rotating it 180 degrees, change the y-axis rotation parameter to 180.
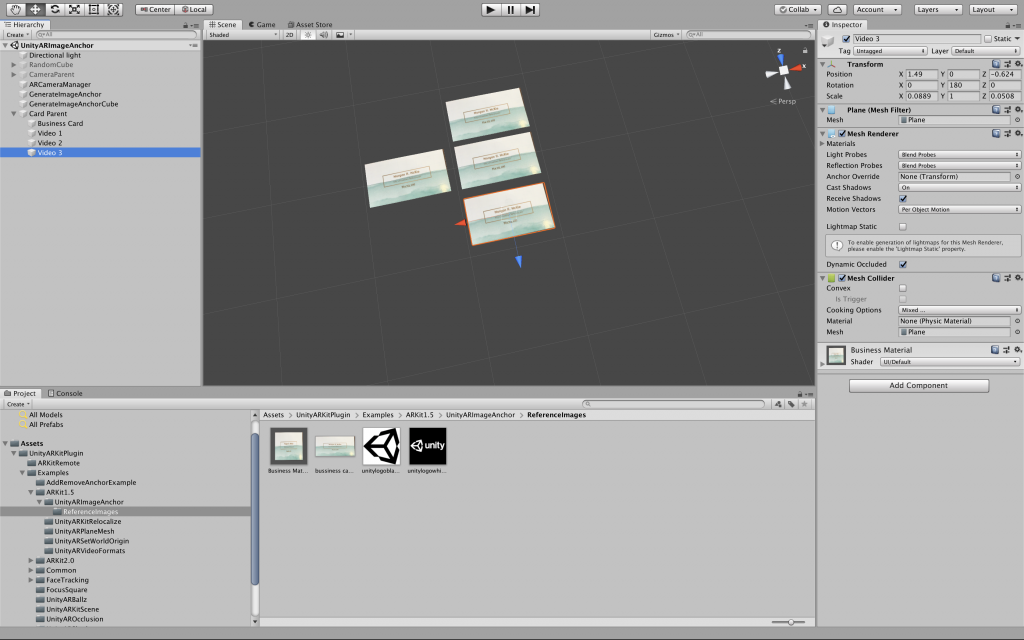
You have created your first AR element, but you aren’t done just yet. We’ll need to create the videos that will follow your business card. Let’s duplicate the Business Card prefab by pressing Cmd+D (Mac) or Crtl+D (PC) then use the handles to move the object. You’ll do this process three times. Don’t worry about the texture at this time, just go ahead and rename the duplicated objects Video 1, 2 and 3 respectively.
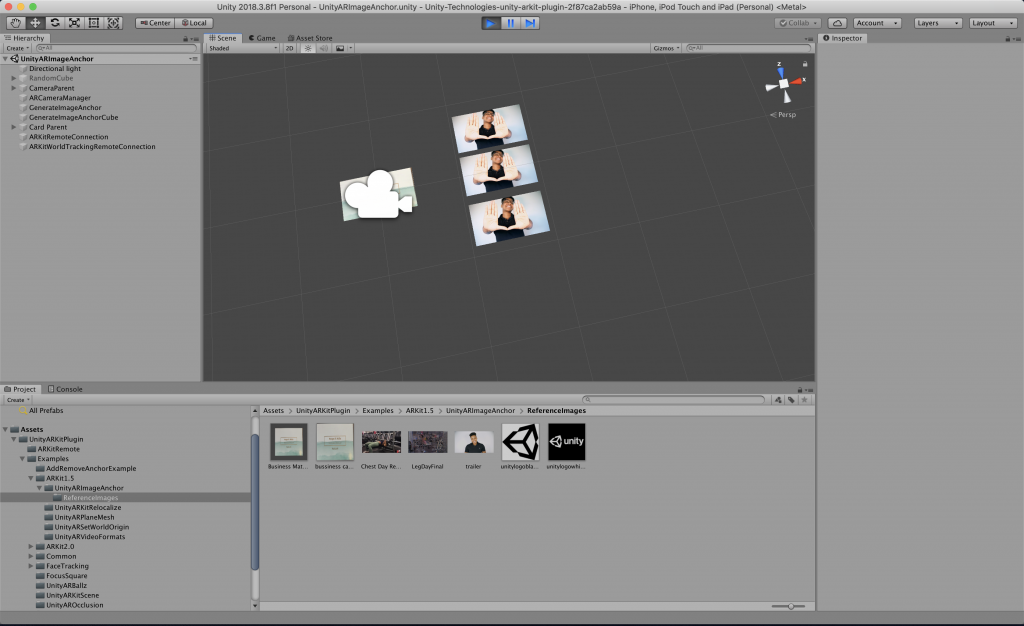
Now you’ll need to add videos to the duplicated planes. Drag three desired videos into your project file ReferenceImages folder. From this folder drag the videos to their respective video objects. If you run, the project the videos play.
It works: eureka! Your prefab has been created, now all you’ll need to do is drag the Card Parent object into the global Assets folder and delete it for the Hierarchy panel. As I previously stated, the Card Parent is the prefab or AR element that will replace the demo prefab that is contained within the GenerateImageAnchorCube object. Navigate to the GenerateImageAnchorCube and drag the Card Parent prefab into the Prefab to Generate field.
You’re one step closer to having a completed project. All you need to do now is prepare your Unity project for building to iOS, build your Xcode project, modify it and build your project to your device for testing.
Prepare Unity project for building to iOS
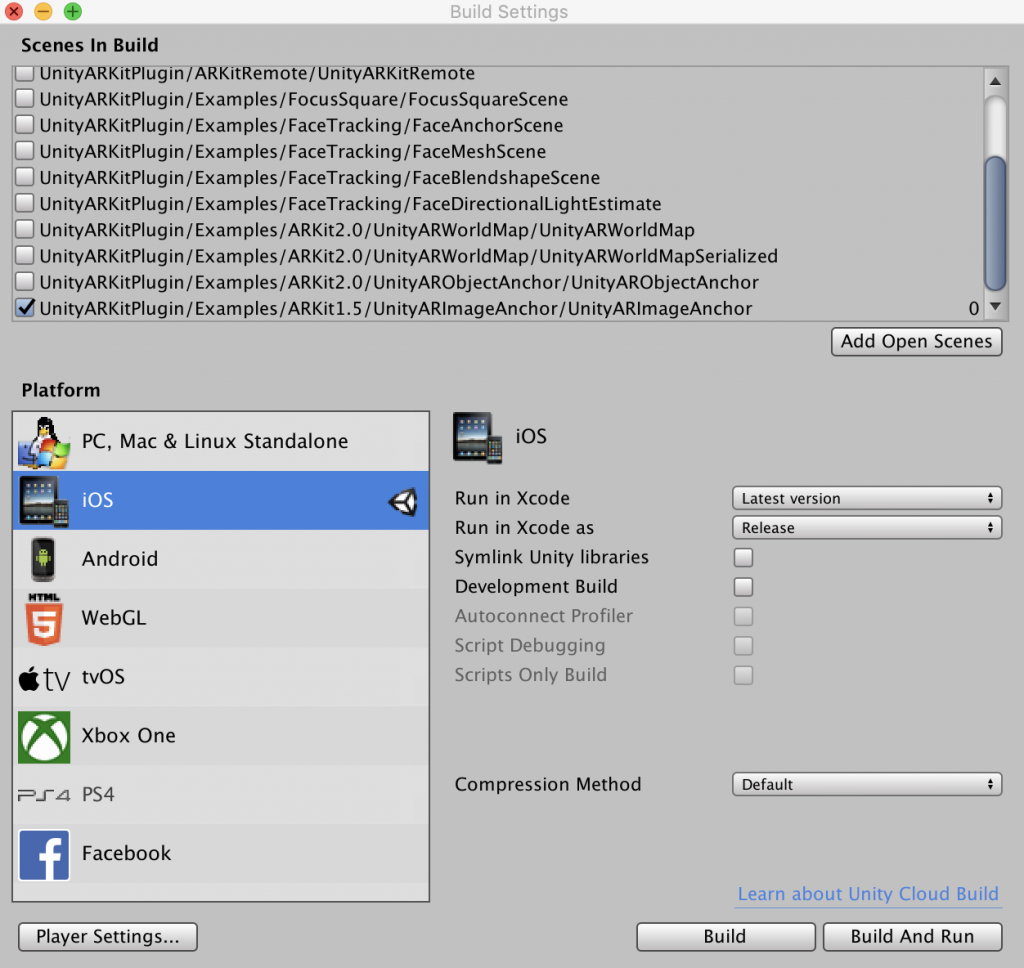
You’ve done it! Your AR Business Card is complete and ready to be built for the iOS platform. To do so, open the Build Settings from the main menu, File > Build Settings. In the dialogue box that appears select iOS from the list of platforms on the left and select Switch Platform at the bottom of the window. Switching Platforms sets the build target of our current project to iOS. This means that when we build, Unity will create an Xcode project.
Next, you’ll need to enter the bundle identifier for our game. A bundle identifier is a string that identifies an app. It’s written in the reverse-DNS style, following the format com.yourCompanyName.yourGameName. Allowed characters are alphanumeric characters, periods and hyphens. You’ll need to change the bundle identifier from the default setting in order to build to your desired platform.
It is important to note, once you have registered a bundle identifier to a Personal Team in Xcode the same bundle identifier cannot be registered to another Apple Developer Program team in the future. This means that while you are testing your game using a free Apple ID and a Personal Team, you should choose a bundle identifier that is for testing only – you won’t be able to use the same bundle identifier to release the game. The way some developer do this is to add “Test” to the end of whatever bundle identifier they were going to use – for example, com.yourCompanyName.yourGameNameTest.
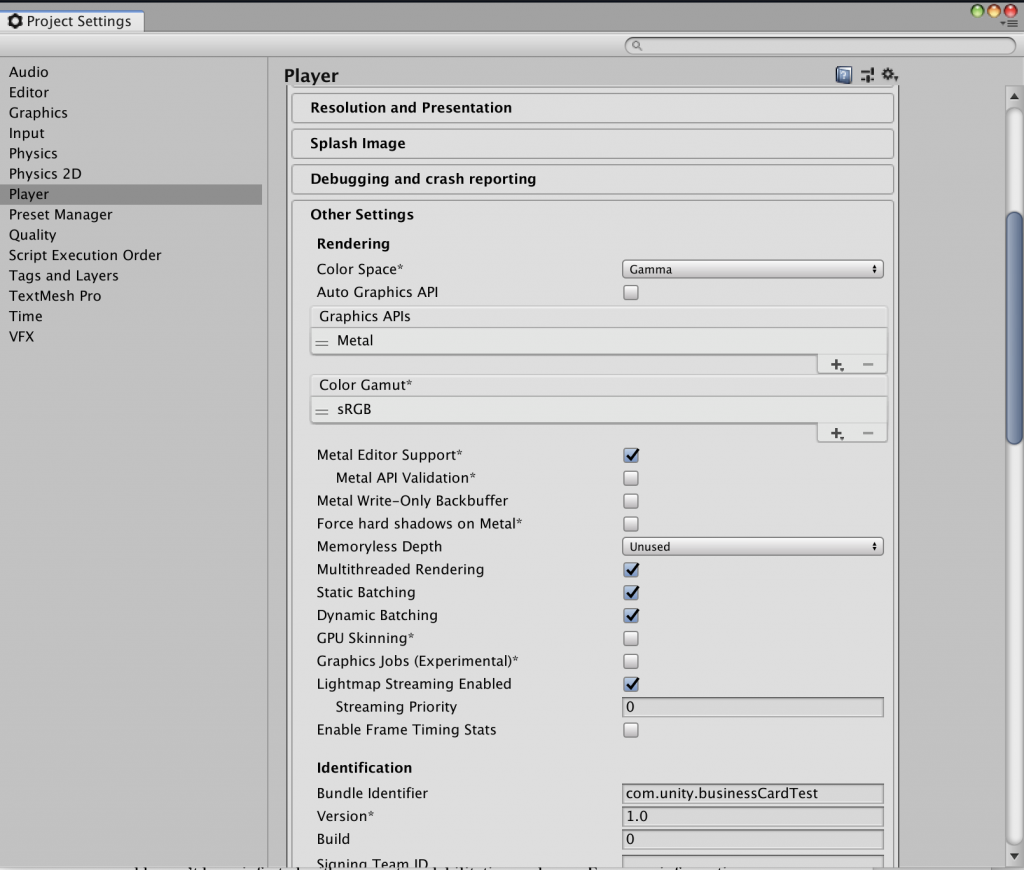
With that said, to change the bundle identifier, open the Player Settings field in the Inspector panel by going to Edit in the main menu, Edit > Project Settings > Player. Expand the section at the bottom called Other Settings and enter your bundle identifier in the Bundle Identifier field.
Build an Xcode project
Once all preparations are complete you are ready to build your Xcode project. If this is the first time you have built an iOS project Unity exporting your application is a two-step process, because Apple uses a technique called code signing to ensure that apps come from known sources and haven’t been infected with any system debilitating malware. For more information on code signing, see this Apple documentation.
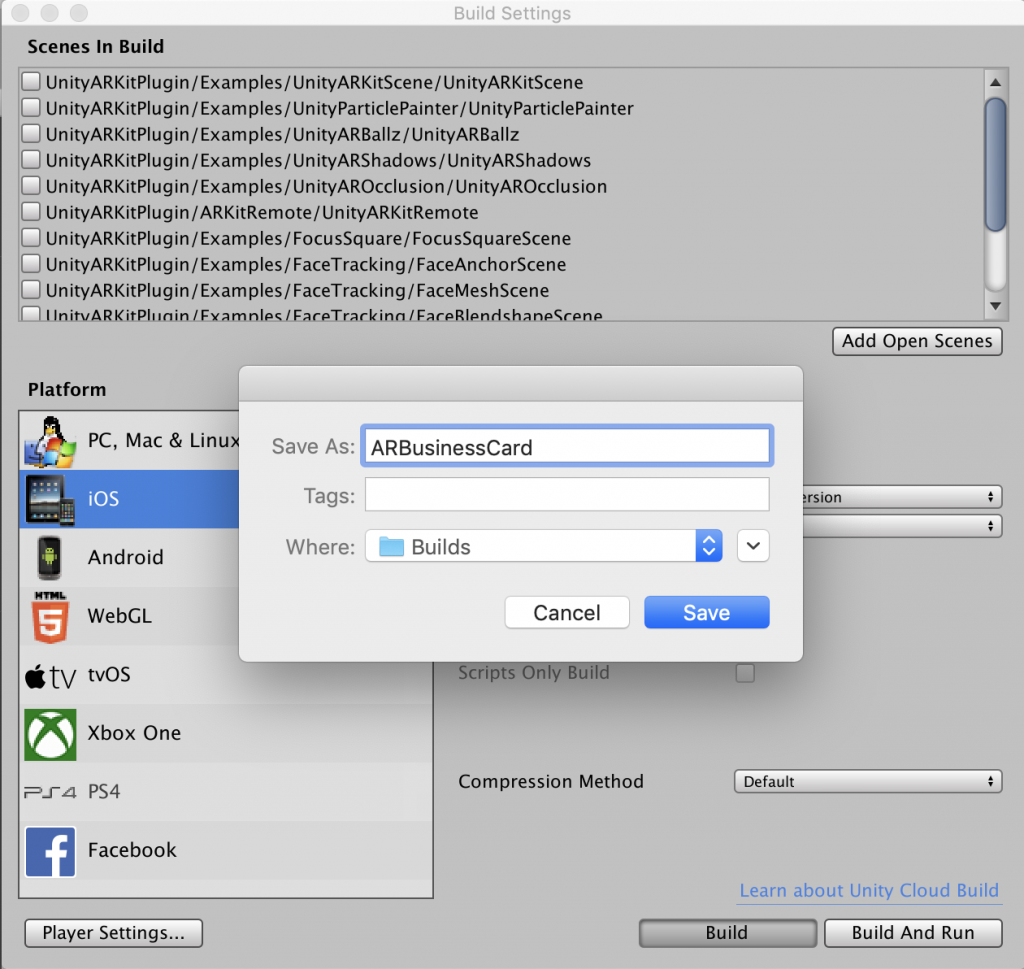
First, let’s build the Xcode project first. Open the Build Settings from the main menu, File > Build Settings. Click Add Open Scenes to add the Main scene to the list of scenes that will be built. Click Build to build.
You will be prompted to choose where to build your Xcode project. Best practice mandate that you have a dedicated builds folder within your project folder. To make said new folder, click the down arrow in the top right of the prompt to expand it, and then click New Folder. When prompted to choose a name, enter Builds and click Create. This will create a new folder called Builds in the root directory for your project. In the Sava As filed, enter AR_Business_Card and click Save.
Unity will now create an Xcode project called ARBusinessCard in the Builds folder.
Modify Xcode Project
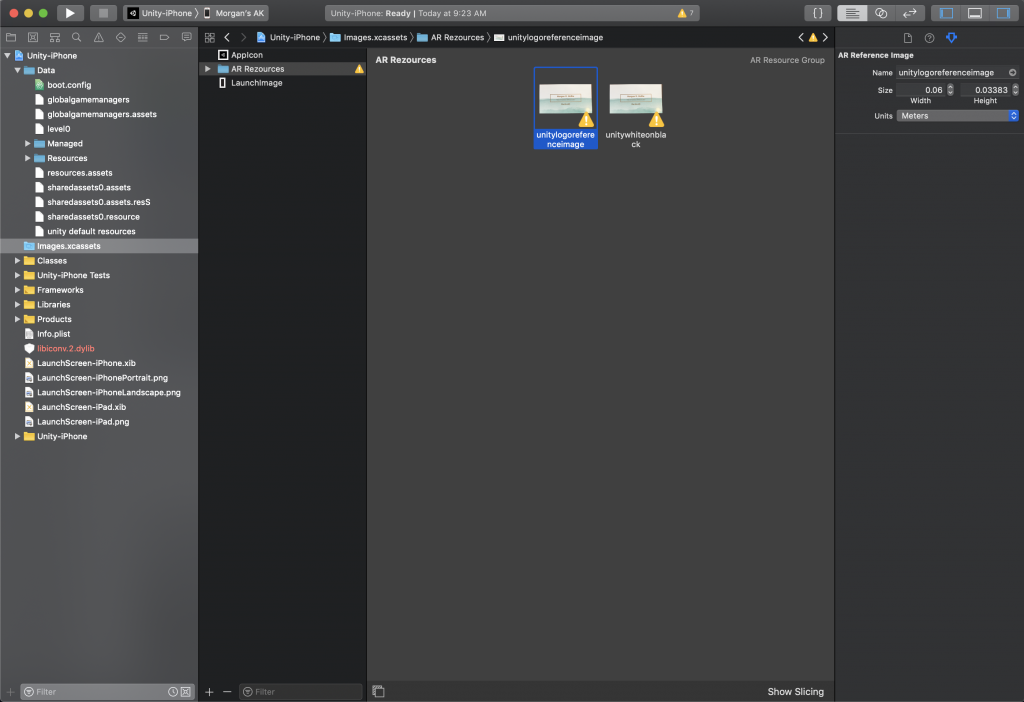
Your project is ready to be modified so that you can build it to your device for testing. Double click your AR_Business_Card.xcodeproj file to open the project with Xcode. You’ll need to modify the size of your business card reference image located in the Image.xcassets. To open the said folder, in the Navigator panel to the left (make sure you have the Project navigator selected) double click the Image.xcassets folder. Select your business card reference image in the Inspector panel to the right, select the Utility icon and change the units to inches and the size to width 3.5. The width will resize proportionally once you change the width.
Build the project to your iOS device
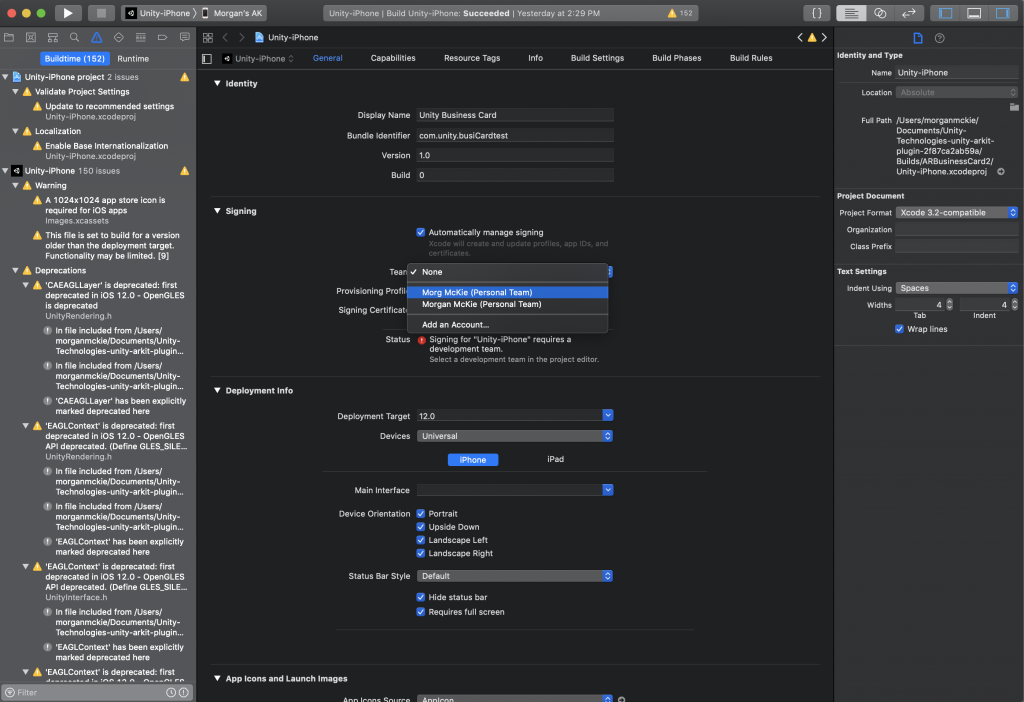
With your Xcode project now ready, let’s build it to your iOS device. Navigate back to the Project Settings by selecting your project in the Navigator panel. In the top left, select Unity-iPhone to view the project settings. It will open with the General tab selected. Under the topmost section called Identity, you may see a warning and a button.
This warning doesn’t mean that anything is wrong with your project: it just means that Unity-iPhone applications need a development team.
In the General page under Signing select your personal development team from the Team dropdown menu.
Testing Project in Unity
To test and debug your project without having to completely deploy it you will need to set up the ARKit Remote that comes packaged with the ARKit 2.0 download. Setup up is pretty simple, you’ll just have to build UnityARKitRemote Scene on to your iOS device. When building Xcode project in Unity make sure to check “Development Build” in build settings and a change product name and a bundle identifier. Then open Xcode and build project to your iOS device.
With the ARKit Remote now on your iOS device, while it is still connected to your computer navigate back to your Business Card project in Unity. Once you have the scene open, open the ARKit Remote application on your iOS device. On the said device you will see a message stating: “Waiting for editor connection…”
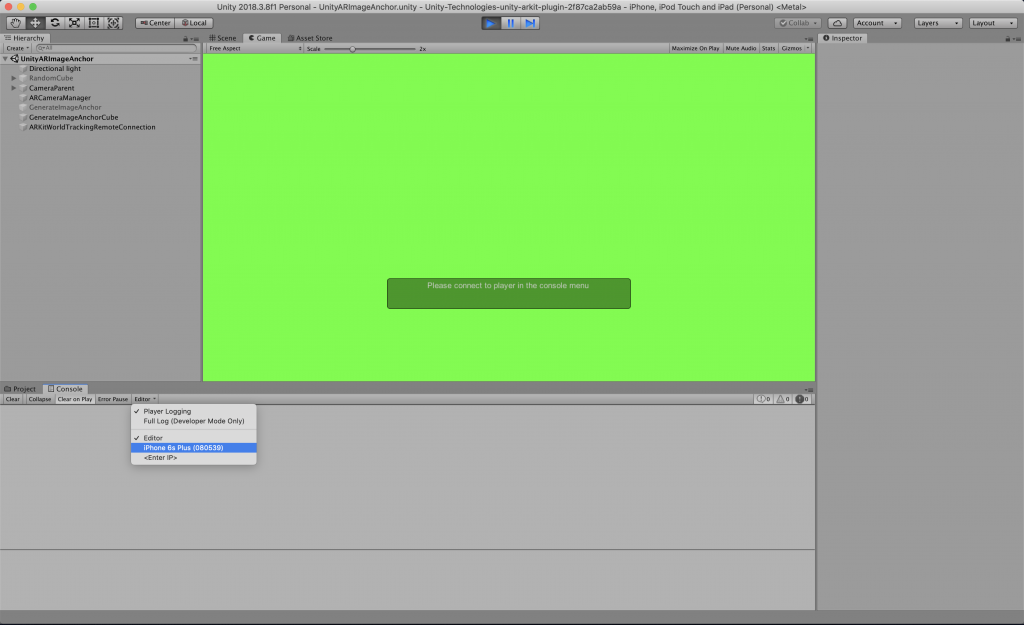
In Unity’s Game panel, you’ll see that the screen goes lime green with a message “Please connect to a player in the console menu.” In the Console, change the Editor by clicking the Editor dropdown and select your iOS device.
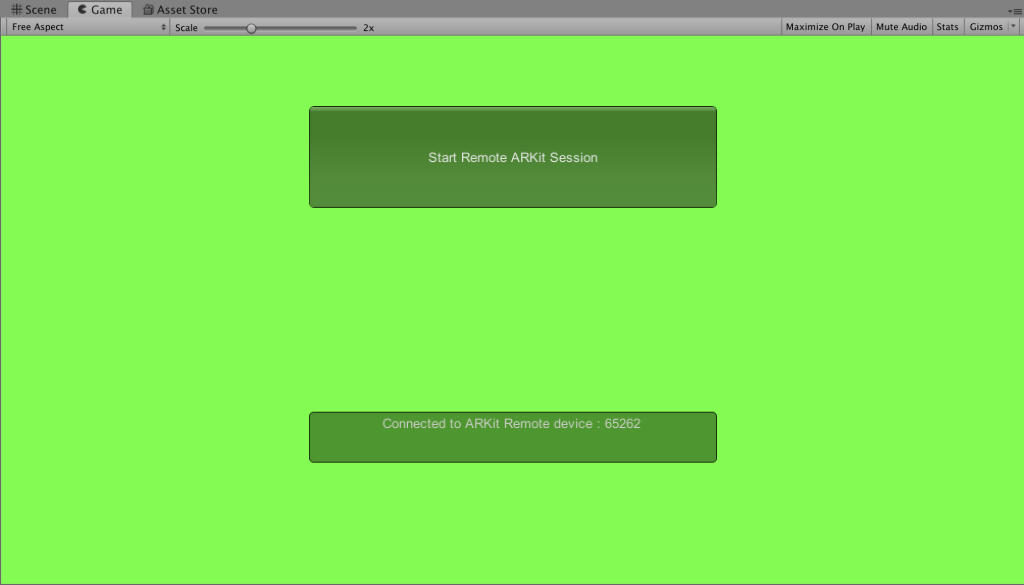
Allow the remote application to access your iOS device camera. Once you do so a button with the message “Start Remote AR Kit Session” will appear. Click said button and the feed from your iOS device will appear in the Game panel.
Conclusion
In this tutorial, you learned how to manipulate the iOS ARKit Demo Project to:
- Build your very own AR Business Card
- Switch build targets in Unity
- Use a bundle identifier
- Set up ARKit Remote for debugging in Unity
- Use Xcode to build your Unity application to your device for testing
Go forth into the AR universe and create more!

