You can access the full course here: VR Pointers – Space Station App
Part 1
How we can Interact with Objects
There are 2 main ways that we can interact with objects in VR.
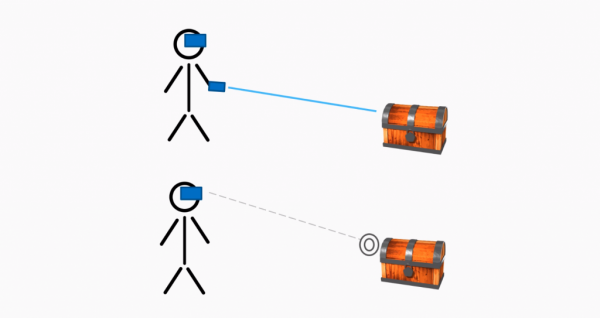
Using a laser pointer, allows us to point at objects with our controller/s. If we don’t have any controllers or choose not to, we can use a reticle. This is like a traditional game, where we look at what we want to interact with.
Interactable Object Events
Let’s think of the events we’ll need to create when setting up an interactable object system.
- Over is called when the pointer / reticle enters the collider of the object.
- Out is called when the pointer / reticle exits the collider of the object.
- Button Pressed is called when a button / trigger is activated while hovering over the object.

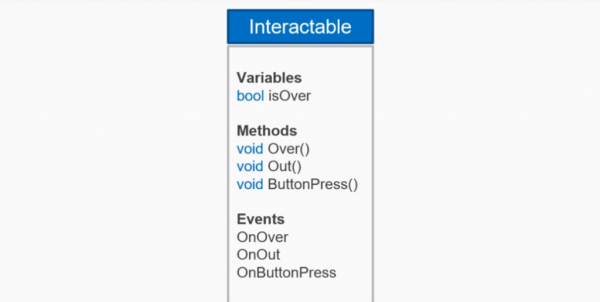
In Unity, we’ll have a script for our interactable object.
Variables
- isOver – is true when we’re pointing at the object, and false otherwise.
Methods
- Over() – invoked by the OnOver event.
- Out() – invoked by the OnOut event.
- ButtonPress() – invoked by the OnButtonPress event.
Events
Events are a collection of functions that can be called at a specific time. You can subscribe a function to an event, so that when it gets invoked – that function gets called. Let’s say you want to scale up and change the color of the chest when we click on it. You’d have 2 functions listening to the OnButtonPress event, which would then be called when we invoke that event. You can see that our methods are similar to our events – as these are listening to the corresponding events.
- OnOver – called when our pointer enters the collider of the object.
- OnOut – called when our pointer exits the collider of the object.
- OnButtonPress – called when we press our controller button while pointing at the object.
Part 2
Parts of a VR Pointer System
When we create our VR pointer system, we’ll need to layout the individual parts / variables for it.
- The starting position is the source of the pointer (hand, face, etc).
- The direction is the Vector3 direction of where the pointer is moving to.
- The ending position is the end of the pointer. This would be on the object we’re pointing at, or at the max distance away from the start position.
- The maximum distance is the furthest distance the pointer can go. This is to prevent the user from interacting with objects far away.
- We’ll need the ability to detect interactables. This would be done with a raycast from the starting position to the ending position.
- Then we’ll need to be able to trigger events in interactables. This will be done by reading the user input.
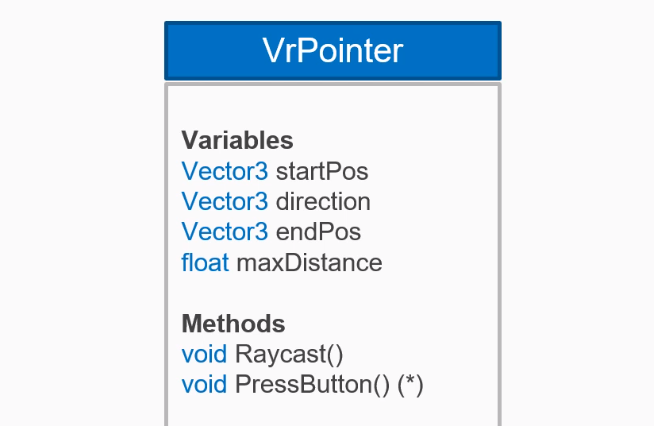
Our script will look something like this:
Variables
- startPos – position of the start of the pointer.
- direction – normalized direction of the pointer.
- endPos – position of the end of the pointer.
- maxDistance – max distance the pointer can reach.
Methods
- Raycast() – shoots a raycast from the start pos to the end pos, detecting any possible interactable objects.
- PressButton() – called when we press the button on the controller.
Transcript Part 1
Hello, and welcome to the course. My name is Pablo Farias Navarro, and I’ll be your instructor. People say space is the final frontier, but thanks to virtual reality, that is now within your reach.
In this course, you’ll create this space educational experience, which can allow people to learn about the International Space Station and its different components. In order to build this experience, we’ll develop a reusable VR pointer and interaction system, which can be used in hand track controllers in all the major platforms, and also a reticle adaptation for Google Cardboard. You will be learning about creating interactable objects in virtual reality, how to work with different events, and how to put it all together in this really cool experience.
Now, our learning goals. You’ll be developing a system to create interactable objects, a VR pointer system so that we can interact with these objects from a certain distance that will be adapted for a hand track controllers, and also a reticle for gaze-based interactions. And lastly, we’ll put it all together in the educational experience that you just saw.
At ZENVA we’ve been teaching programming online since 2012 to over 400,000 students from basically every country in the world. And one of the core elements in our teaching style is that we empower you to learn in whichever manor works for you the best. You can watch the videos, play around with the source code, and read the lesson summaries, so that all learning styles are catered for. You can revisit the lessons, which seem that that helps a lot of students to get more out of the courses. And also we strongly recommend you build your own projects while you are coding along while you are watching, so that you can put all of the concepts in practice.
Lastly, we’ve seen that those who get the most out of our courses are those who really plan for their success. Thanks for watching this intro. Look forward to getting started.
Transcript Part 2
In virtual reality experiences, you’ll often want to interact with objects from your surroundings. A commonly used system in games-based experiences is that of the reticle. Think of it as a mouse cursor in your virtual world that you can use to select things and to point things in your virtual environment. When you have a hand track controller, it is common to use what I like to call the laser pointer, and that allows you to interact with elements around you as well. Regardless of the system, they both share a lot of things in common. It all starts with an origin and a ray that finds an intractable object, and that object can have different behaviors.
Let’s think of the events that such an object would need to have. First of all, when you select an object, when you hover your cursor, your reticle, or your laser pointer over that object, you can have an over event. That’s when you can highlight your interactable object. You can maybe change its size, or have some kind of animation which points out to the user that that is now ready to be interacted with.
When you, on the other hand, go away from that object, that object can have an out event, and that is when you could make that object go back to normal. When you are hovering on an event or selecting an event, and then you press the button of your system, it could be a hand track controller or a Google Cardboard, or any other system. We can also define a button pressed event.
Now, here’s a challenge for you. Think of how you would implement an interactable object class in Unity. I would like you to pause the video, and to list what variables it should have, what events it should have, and what methods it should have, and then I will show you a solution. There’s definitely not a single answer to this, and the next challenge is that we’ll be doing, so, pause your video, have a go, and join us back.
Thanks for having a try, let’s look at my solution here. I’m defining just that one variable here, which will be a boolean that will keep track of whether we are pointing at our object or not. So, this is gonna go from true to false, depending on where we are selecting the object. Now, what about those methods? Well, those methods are going to be public methods, and when you call any of those methods from the outside, that will trigger the corresponding event. For example, when we execute the method Over, that will trigger the event OnOver.
What exactly is an event in C#? The best way to think of events in C# is to think of an array of actions, of methods. So, let’s say that we want our chest to grow in size, and to change color when we are over it, so, then you would have a method that, let’s say, changes the color, a method that changes the size, and you put all of those things in the OnOver event, so, it’s like an array of different things you want to happen. And then, when you call your Over method, this one here, when you call that method, then, all the methods that are in this event are going to be executed. We’ll look into the implementation in the following lessons.
Well, that is all for this lesson, thank you for watching. I will see you in the next video.
Transcript Part 3
In this lesson we’re going to do an overview of what a VR pointer system should have. Whether this is for hand track controllers or for guess based interaction. So a quick recap here our interactable objects are able to detect an over event, an out event, and a button pressed event.
But now our focus is going to go on the pointer system itself, and there are different parts of our VR pointer system that are common to both a hand tracked system and a guess based system, so let’s concentrate on those similarities. They both have a starting position, which in one case can be the hand.
In the other case it can be the head of the user in virtual reality. They both have a direction, which is most likely going to be the forward direction, and they both have an ending position which could either be when they hit an interactable object or some kind of maximum distance, because you will most likely have some kind of maximum distance in your scene. And you’re not going to allow the player, the user to interact with objects that are beyond that distance, especially if there’s teleportation or if the users are able to move around somehow. Our VR pointer system needs to be able to detect when it hits when it reaches an interactable object, so that’s an important part.
We need to be able to trigger events in this interactable object, so it’s not just a matter of reaching them. We actually have to tell our -in this case- our treasure chest. It’s like we are looking at it right now so that it can glow or change its size. And we also need to read user input. For that we are not going to implement that inside of the VR pointer system.
We are going to use XR input mapping, a separate component and that is just going to tell the VR pointer system, “Hey VR pointer system, we just pressed this button.” And then the VR pointer system can pass that on to our treasure chest to our interactable object. So now it is the time for a challenge: I would like you to think of how a VR pointer system should be implemented. Mainly just list the variables that it should contain, list the methods and the events or if any.
And let’s not worry about how to show how to draw this pointer system, so don’t worry about drawing the laser pointer or drawing the reticle we are actually going to create a VR pointer system that then can be rendered in a different manner. So the laser pointer itself, the laser itself is going to be a separate class- and same thing with the reticle; it’s going to be separate functionality.
So have a go and there’s no single correct answer even if you don’t know how to do it. Just try, because the process of thinking how a system works is a really good skill, so I don’t want to just give you the answer or my answer. But I think developing the skill of practicing trying to think how a system works will be very helpful, especially in virtual reality because not everything has been invented yet.
So you will have to come up with unique solutions in your project. So pause the video and I will see you soon.
Welcome back, thanks for trying the challenge. So I’m going to show you my solution now, and again this is just a solution it’s not a single correct solution here. So in my case I declare these variables here, starting position, direction, ending position, and maximum distance. Now when we actually go and implement this, we might not have these variables, because we might be reading them from the game object and things like that like if the game object forward direction or getting the game object’s position. Then when it comes to methods, I will implement the method that basically throws a raycast and tries to detect an interactable object.
You could have the detection part as a separate method, that’s fine. And then when it comes to button pressing we’re actually going to just have a method that presses the button. We’re going to call that from the outside if we actually press the button on our controller, our controller input functionality will take care of calling that method.
Again this is just an overview, a conceptual overview. We might not implement in that exact manner, and like I said before, we’re going to have separate objects or separate functionalities for the reticle drawing for guess based and the laser pointer for hand tracked controllers.
Well thanks for watching, that’s all for this lesson. I will see you in the next video.
Interested in continuing? Check out the full VR Pointers – Space Station App course, which is part of our Virtual Reality Mini-Degree.
