You can access the full course here: Real-time Strategy Project – Resource Gathering
Creating the Resource Object
To begin, let’s create a new empty GameObject called Resource_Tree. Next, drag the Tree model into the scene as a child of the empty object.
- Set the Position to 0, 0, 0
- Set the Scale to 0.12, 0.12, 0.12
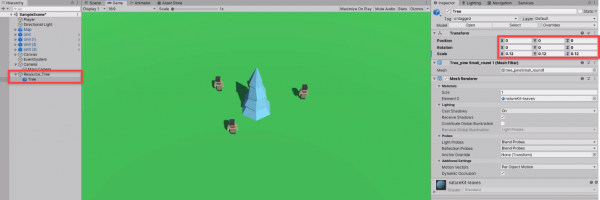
Next, select the Resource_Tree object.
- Set the Tag to Resource
- Set the Layer to Resource
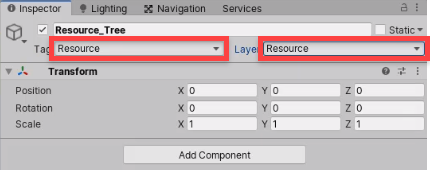
Resource Components
Now let’s work on the scripts. Create two new C# scripts and attach them to the Resource_Tree object.
- ResourceSource
- ResourceSourceUI
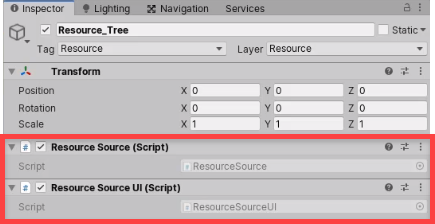
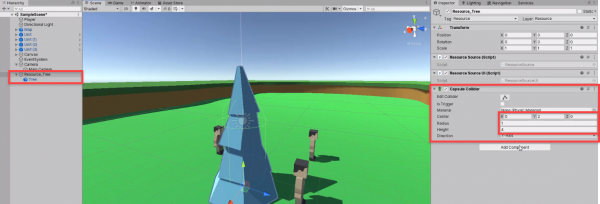
Next let’s work on the collider which will detect mouse clicks. Add a new CapsuleCollider component.
- Set the Center to 0, 2, 0
- Set the Radius to 1
- Set the Height to 4
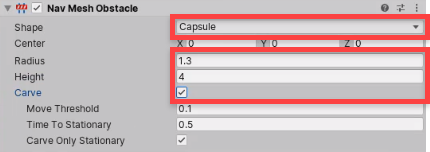
For AI navigation, let’s add a NavMeshObstacle component.
- Set the Shape to Capsule
- Set the Radius to 1.3
- Set the Height to 4
- Enable Carve
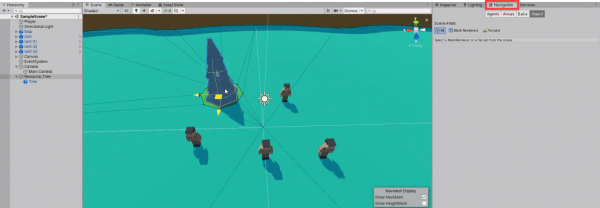
Now if we go to the Navigation window, you’ll see that the tree is carving into the nav mesh.
ResourceSource Script
Let’s now open up the ResourceSource script with Visual Studio and begin scripting.
First, let’s add a new library at line 4.
using UnityEngine.Events;
Then, just above the class, let’s create an enumerator to store our resource types. Right now, we just have food but in the future you may want to add more.
public enum ResourceSource
{
    Food
}
Back in the class, let’s create our variables.
public ResourceType type;
public int quantity;

// events
public UnityEvent onQuantityChange;
The GatherResource function will be called when a unit is at the resource, gathering it. They will send over the player to collect the resource, and the amount to collect.
public void GatherResource (int amount, Player gatheringPlayer)
{
    quantity -= amount;

    int amountToGive = amount;

    if(quantity < 0)
        amountToGive = amount + quantity;

    if(quantity <= 0)
        Destroy(gameObject)

    if(onQuantityChange != null)
        onQuantityChange.Invoke();
}
Back in the editor, let’s set the properties.
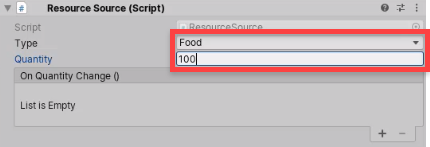
- Set the Type to Food
- Set the Quantity to 100
In the next lesson, we’ll be working on setting up the resource UI to display the remaining quantity.
Resource UI
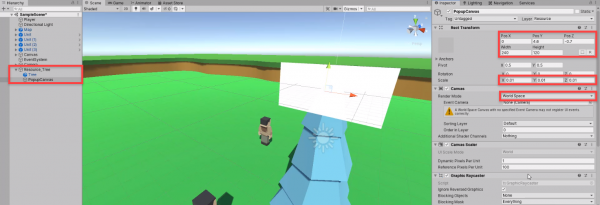
As a child of the Resource_Tree object, create a new canvas object. This will hold our UI elements. Rename it to PopopCanvas.
- Set the Position to 0, 4.6, -0.7
- Set the Width to 240
- Set the Height to 120
- Set the Scale to 0.01, 0.01, 0.01
- Set the Render Mode to World Space
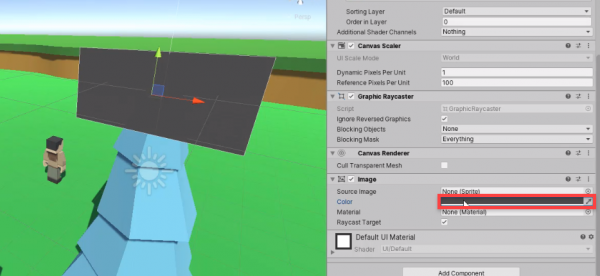
- Attach a new Image component
Set the color of the image component to a dark grey.
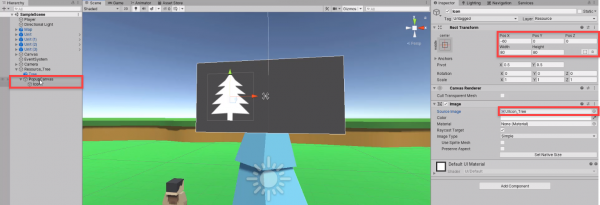
As a child of the canvas, create a new image object.
- Set the Position to -60, 0, 0
- Set the Width to 80
- Set the Height to 80
- Set the Source Image to UIIcon_Tree
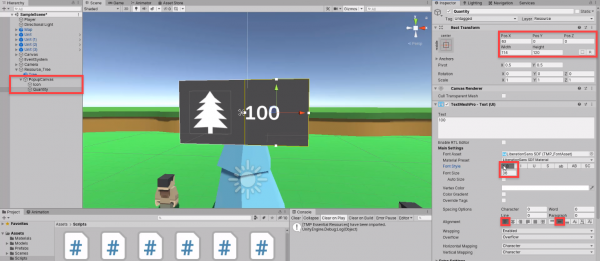
As a child of the canvas, create a new Text – TextMeshPro object. Rename it to Quantity.
- Set the Position to 63, 0, 0
- Set the Width to 113
- Set the Height to 120
- Set the Font Style to Bold
- Set the Font Size to 50 (different to image)
- Set the Alignment to left-middle
LookAtCamera Script
In order for the canvas to be looking at the camera, let’s create a new C# script called LookAtCamera. Attach this to the canvas and open it up in Visual Studio.
[ExecuteInEditMode]
public class LookAtCamera : MonoBehaviour
{
    private Camera cam;

    void Awake ()
    {
        cam = Camera.main;
    }

    void Update ()
    {
        transform.eulerAngles = cam.transform.eulerAngles;
    }
}
The ExecuteInEditMode attribute means that this script will run in the editor, even if we’re not playing the game. So when you save the script and go back to the editor, you’ll see that the canvas is now looking at the camera.
ResourceSourceUI Script
Now let’s work on the ResourceSourceUI script. Open that up in Visual Studio. We’ll begin by adding in the Text Mesh Pro library.
using TMPro;
In the class, let’s create our variables.
public GameObject popupPanel;
public TextMeshProUGUI resourceQuantityText;
public ResourceSource resource;
The OnMouseEnter function is built into Unity’s MonoBehaviour. It gets called when our mouse enters the collider of the object.
void OnMouseEnter ()
{
    popupPanel.SetActive(true);
}
Then in the OnMouseExit function, we’ll de-activate the panel.
void OnMouseExit ()
{
    popupPanel.SetActive(false);
}
The OnResourceQuantityChange function is going to be a listener to the onQuantityChange event in the ResourceSource script.
public void OnResourceQuantityChange ()
{
    resourceQuantityText.text = resource.quantity.ToString();
}
Back in the editor, let’s fill in the properties.
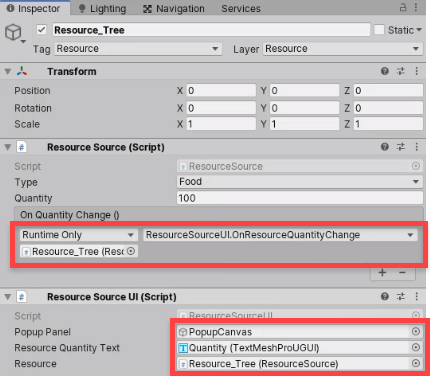
- Add a new listener to the OnQuantityChange event and link that up to the function we just made
- Set the Resource Source UI’s component properties to their respective objects
If we press play, you can see that the canvas gets enabled and disabled when we mouse over the resource.
Transcript
Hey everyone, and welcome back. In this lesson we’re gonna work on starting to create our resource, which is gonna be a tree that the units can then gather and which gives them food, and with this food, they can then spawn more units.
So to begin, I’m gonna create a new empty game object. I’m gonna call this one here our Resource_Tree. And I’m gonna set it to zero, zero, zero position so that we can get it in the center of the screen for now. Now with this resource tree, if we go on the scene view and press F to focus on it, there’s nothing there right now. So, let’s actually go to our Models folder and drag in the tree as a child of the empty object. Let’s bring the tree to the center.
As you can see, it is very large. We probably don’t want it that large. So, I’m gonna bring the scale down here to maybe 0.12 as that looks fairly to scale. And if we go to the game view here, we can see that the tree is in view, and it looks fairly decent size.
So now what we can do is go back to our Resource_Tree object here and let’s start off by changing the tag to resource and the layer to resource as well. If this here pops up we can just click no, this object only. And now we can begin with the components. Now with our resource, we are gonna have a script, which manages the quantity of food that is in it, the type of resource, and whenever a unit wants to get that resource, it will go for this script, so you can check okay, do I have enough of this to give away? If so, give it. If not, give what I have left and then destroy the resource.
So in our Scripts folder, I’m gonna create a new C# script here called ResourceSource. Go to our Resource_Tree here and I’m gonna drag and drop that script on. Let’s also add in another script. And this is gonna be our resource UI because with this tree, we’re gonna have it so that if we hover over the tree, then a little window is gonna pop up that shows us basically the quantity of food left in this resource.
So, let’s create a new tree. This is gonna be called our ResourceSourceUI. We can then select our Resource_Tree and attach that as well. So, we have these two scripts on right now. And we need to add two more components. The first is a capsule collider, and this is going to be here to detect our mouse clicks ’cause we’re gonna have enemy selected or we’re gonna have units selected. And then we’re gonna be right-clicking on this tree, so we need a collider for that to be detected. For this capsule collider, I’m gonna set the radius here to about one, a height of four, and let’s bring this Y center up to about two so it’s, so the capsule sits around there.
Along with this capsule collider, we also want to add in a navmesh obstacle. In the previous course, we did work on setting up a navmesh, which, if we go to the navigation panel right here, you can find that by going Window, AI, Navigation. It has basically a blue plane for the surfaces that the units can walk on.
Now, with this tree here, we could select this tree, and then go to where it says object, and then we’ll select the model, then go navigation static, not walkable. But the problem with that is, when these trees then eventually get destroyed once the resource is over, then there will still be a gap here in the navmesh where that tree once was. Because these navmeshes, by default when you bake them, they’re not dynamic, as the name entails they’re baked, So they’re baked into the actual mesh.
So a way we can get around this by making this a dynamic object, is by adding a component called a navmesh obstacle. So, navmesh obstacle right here, we want to make it a capsule shape, let’s set the center here to zero, zero, radius of, we can set that to 1.3, and we can have a height of 4. Now if we go to navigation, you’ll see that nothing’s happening. And the reason why is because we need to set this navmesh obstacle to carve, which will then carve into the existing navmesh.
So if we go back to the navigation panel now, you’ll see that this navmesh now has a big gap in it, where this tree is. And if we actually move this tree around you’ll see that that gap also follows along. So if this tree was then to all of the sudden be destroyed, then this would just be filled in, and then units would be able to walk across it.
So now that we have our tree objects set up and ready to go, What we can do now is actually begin to implement the resource here. We’re gonna begin by looking inside the resource source script here, so let’s open that up inside of Visual Studio, and inside this script what we’re gonna be focusing on is setting it up so that whenever a unit wants to get a resource, it’ll check if it can, if so, it’ll give it. Otherwise it will destroy itself.
So I’m gonna remove the start and update functions, here, and I’m gonna add in two variables, the first is gonna be the resource type. Now we could have this as a string, or an integer to refer to a certain ID, but what I’m gonna do is use an enumerator, which is basically a list of different things that we can assign as a variable. So I’ll show you what I mean.
First up, to do this we’re gonna go public enum for enumerator, and I’m gonna call this one our ResourceType. Now in two brackets here we can then enter in all the different possible values for this enumerator, so really right now we’re only gonna have one, so I’m just gonna enter in food, but if you had multiple, you could go food, comma, and then you could go something like wood, comma, stone, and et cetera. But we only have food, so I’m just gonna leave that there.
And back inside the class, I’m gonna create that as a variable, so I’ll go public ResourceType, and call this one type, so now in the inspector or in script, we can basically set type to be food, or stone, or wood, or whatever we would have inside this enumerator, here. Since we have only one, it’s gonna default to food, so we don’t really have to modify that in any way.
So with the type now what we can do is also add in a quantity for how much of this resource there is, so we can go public int quantity, and after this we also want to have a event. And this event is gonna be called whenever the quantity gets changed, and this is gonna be useful for alerting the UI system for the resource to update its UI to display the new quantity.
Now to do that, I’m just gonna add in a using UnityEngine.Events library right here so we can use events, and then I’m just gonna go events, just to label this off, and I’m gonna call this one our public UnityEvent onQuantityChange. Now we can get into our main function, which is gonna be gather resource, and this here is just going to be a public void GatherResource, and it’s gonna send over two things. First of all, an amount for how much it wants to gather, and the play for the gatheringPlayer.
Now we’re not gonna be sending over the unit that’s gathering this, because it doesn’t really matter, all we need to know is what player are we going to be giving the resource to? Because each unit has an owner player, the player that owns that unit, so that unit is going to send over its owner player here, and then we are going to give this player here the resource, pretty much.
So what we want to do, first of all, is subtract amount from quantity, so we can go quantity -= amount and then we need to figure out an amount to give, because we can’t just give them the amount here that they want, because what if this is, for example, five, and we only have two left? Then we can only possibly give them two, so that’s something we need to keep in mind. So I’m just gonna go here, int amountToGive, and by default, I’ll make this amount.
Now to check if we need to modify this a bit, we can go if quantity is less than zero, so if the quantity right now is less than zero, then that must mean we’re in the negative, which we don’t want, so we wanna balance that out and give the player here less than they want. So for this we can go amountToGive = amount + quantity. So for example, if we are on, currently, a quantity of five and we want to get 10, we can’t do that.
So right here, we’re setting quantity to be -10, since we’re doing basically five take ten, quantity is now -5, amountToGive, we can only give them five since that’s all we really had left, so we’re setting amountToGive to be equal to the amount plus quantity, so 10 plus -5 is going to be five. So we’re gonna give them five, even though they asked for 10 but you know, we only have five left. Apart from this then, we just want to go if our quantity is less than or equal to zero, we want to destroy the resource, so I’m just gonna go destroy gameObject.
And now all we need to do on this function here is call the onQuantityChange event since the quantity here has changed, we want to call the event. So first of all, we need to check if there is any listeners on the event, because if there’s not, it’ll throw up errors. So if onQuantityChange doesn’t equal null, then onQuantityChange.Invoke. And there we go, that’s pretty much all we have to do for this script here, so let’s go back into the editor now.
And what I’m gonna do is set the type here on the resource source to food of course, ’cause that’s the only one we have left, and quantity, we can just set that to 100, or whatever really you want. You can test this out later on once we set up our units’ ability to gather the resource, where we can set up their rates of gather, and stuff like that.
So in the next lesson we’re gonna be working on setting up the resource source UI right here, which is gonna make it so when we hover over the resource it is gonna show us the remaining quantity. So thanks for watching, and I’ll see you all in the next lesson.
Welcome back everyone. In this lesson we are gonna be continuing on with our resource tree over here. In the previous lesson we set up the object and the resource source script. Which just allows us to actually get some of that resource, and when it reaches a quantity of zero it gets destroyed. So in this lesson we’re gonna be working on the little UI panel that appears whenever you hover over the resource. It shows you basically the quantity remaining.
So to do that let’s open up our resource tree here, and as a child of the resource tree I’m gonna create a new canvas, which is gonna be holding our UI. I’m gonna rename this here to our PopupCanvas. And in order to make this a canvas that we can shrink, resize and position, we need to change it from a random mode of screen space to world space. And this makes it so it isn’t attached to our camera screen, rather it is a object in the world that we can move in 3D space.
So now that we have that done, we can then modify the X,Y position. I’m gonna set X to zero and Y to around a 4.6, and the width we’ll have that at about 240 and height of 120. And right now you’ll look at it see, see that is a very large canvas, so a way to fix this is by then shrinking down the scale. I’m gonna bring the scale down to .01 on the X, Y and Z axis. And as you can see, here it is, right here, we have the canvas, which is around the size we want. Now let’s also set the position on the zed to be negative .7, just so it is in front of the tree, and that we can see it then.
So what we wanna do now is, let’s add a component to this canvas. And I’m gonna add in an image component, so we can have a little background here. And the color I’m gonna make this is going to be a dark gray color, something similar to this right here. And with this image now, we can also, on this canvas object, we can remove the graphic raycaster component. This just means we won’t be able to raycast anything, so we won’t be able to click on any buttons, but that’s not really necessary, so we can just remove that.
So we’ve got the popup canvas here setup, now let’s add in the two elements which are gonna make it up. That is going to be the tree icon here on the left, and on the right hand side, the quantity text. So on the canvas I’m gonna right click go UI image. And this here is gonna be our icon. Now all we need to do here is, I’m gonna set the position on the X to be around negative 60, and then we can also shrink it down a bit, so I’m gonna bring the width down to 80, and the height down to 80 as well. And then we can set the source image right here, to be the UI icon tree. There we go, we got the tree icon.
And after that we can work on the actual quantity text. So to do that, I’m gonna right click on our popup canvas, go UI, text, TextMeshPro, and this is gonna ask you to import some TMP essentials. Text Mesh Pro is basically a new sort of UI system for Unity. It’s a replacement for their default one, which really isn’t the best. Text Mesh Pro makes it so that the text is actually in mesh, rather than just a pixel image. So the text is a lot crisper and there’s also a lot more basically options that you can do to apply to the text.
So we got our text here, I’m rename this here to our Quantity. Let’s also set the width here to be 114, height of 120, and I’m gonna sext the X position to be 63, so it’s on the right hand side right here. We can just put an example text for now, I’m just gonna put 100. Let’s make it centered, so we’re gonna go alignment here to be in the middle. And let’s also make it bold so it’s a bit bigger. It’s also pretty small text so we can increase the size to around let’s just say 50.
If you look in the game view, we can see the panel right there, but it’s not lookin’ at the camera. Well we could just rotate it upwards to face the camera, but then what happens if we want to maybe adjust our camera position over time? Well the problem with that is that, it is then going to require us to re-rotate the canvas again. So something we can do is create a script that can automatically rotate the canvas to look at the camera.
And what I’m gonna do is create a brand new script here. And this is going to be called look at camera. Okay, we can then open this up inside of Visual Studio, and what this script basically does is just rotates the canvas, or any object really. You can attach it to any object, and it will be looking at the camera. So, we can remove the start function, and I’m gonna replace this with the awake function, but first let’s create our variable, which is gonna be a private camera cam, so we can access the camera.
And then in the void awake function, we are going to set cam to be equal to camera dot main. And then in the update function, which gets called every frame, we can rotate the object to face the camera. And to do that, we can just match the camera rotation, so transform dot eulerAngles equals cam dot transform dot eulerAngles. And now what we can do is hop back inside the editor and as you can see nothing happens yet, but when we press play, we’ll see that the canvas is not lookin’ at the camera ’cause we haven’t attached it yet.
So on our popup canvas, let’s attach the look at camera script, press play, and there we go. It’s lookin’ at the camera, we can move around. But you might want to have this canvas look at the camera while we are in, not playing the game. And a way to do that is, if we go back to our script here. What we can do is add in an execute in edit mode attribute to this class. So up at the top of the class, I’m just gonna go in square brackets, ExecuteInEditMode, and what this means is this script here is going to be running inside of the edit mode, when we’re not playing the game.
So if we save this and go back to the editor, what you’ll see is, the actual panel is now looking at the camera. And this is because it is running that update function, even when we’re not playing the game. So that it can automatically adjust to look at the camera at all times. Which is pretty cool.
So apart from that, what we can do now, is start to work on the actual UI script that the popup canvas has. And that is going to be the resource source UI script, which we have attached to our resource underscore tree object. Let’s open this up inside of Visual Studio, and in here we can begin to actually start scripting.
So what we’re gonna have in here, is just a few things, first of all let’s add in the using TMPro library, because we need to access the TextMeshPro classes. And then for our variables we can have our public gameobject popupPanel, and this is what we’re gonna enable or disable if the mouse is over or not. And then we have a public textmeshproUGUI for the resource quantity text. Then we have a public resourceSource for the actual resource that this is attached to.
And now what we can do is enable or disable the panel when it is hovered over or hovered out. And to do that we can just use a inbuilt function in monobehaviour, which is void OnMouseEnter, so when the mouse enters the collider of this object, we want to go popupPanel, dot, SetActive, true. And when the mouse exits we’ve OnMouseExit, then what we can do is basically disable the panel, so popupPanel dot SetActive, false.
Now we’re setting the panel to be true or false, but what happens when we want to update the quantity text? Well if you remember in our resourceSource script here, we have an event called onQuantityChange, which gets called whenever a unit has gathered the resource. So what we want to do is create a function that will be called when that event is called, and that is going to be a public, void, OnResourceQuantityChange, and all this is gonna do, is set the text to be our resources quantity right here, so we can just go rsourceQauntityText, dot text, equals our resource, dot quantity.
Now you see that an error pops up, and this is because we are trying to assign a string, which is the text here, to be an integer, which is quantity. So a way we can convert this integer to a string is just by going dot, ToString, at the end, like so.
Now let’s hop inside of the editor again, and let’s connect this script up to it’s various objects and the event. So we can drag in the Popup Canvas here for the PopupPanel. The resource quantity text, that is our quantity here. Resource that’s the ResourceSource and then let’s add a new event here on the onQuantityChange event, drag in the ResourceSource UI, and set the function to be ResourceSource UI, dot, on resource quantity change.
Now if you press play, you’ll see, of course, nothing really happens, and that is because we don’t have the units actually able to mine the resource yet. So what we’re gonna be working on in the next lesson is actually having these units begin to understand that there’s a resource here and allow them to move over to it, and start mining it. So thanks for watching and I’ll see you all in the next lesson.
Interested in continuing? Check out the full Real-time Strategy Project – Resource Gathering course, which is part of our Strategy Game Development Academy.
