In this tutorial, we are going to build a simple demo to learn how to use Unity multiplayer features. Our game will have a single scene where we will implement a multiplayer Space Shooter. In our demo multiple players will be able to join the same game to shoot enemies that will be randomly spawned.
In order to follow this tutorial, you are expected to be familiar with the following concepts:
- C# programming
- Using Unity Editor, such as importing assets, creating prefabs and adding components
We’ll be using an asset known as Mirror. This is an expansion on Unity’s default networking system, adding in new features and fixing a large amount of bugs and problems.
Before You Begin
This tutorial assumes basic familiarity with Unity. If this is your first time into the world of Unity, we first suggest learning through some of our free Unity tutorials or through some amazing online courses.
For teachers wanting to incorporate Unity into the classroom or into school-related activities, Zenva Schools is also an option. This platform offers Unity courses for classroom use alongside useful features such as course plans, classroom management tools, reporting, and more.
Creating Project and Importing Assets
Before starting to read the tutorial, you need to create a new Unity project and import all sprites available through the source code. In order to do that, create a folder called Sprites and copy all sprites to this folder. Unity Inspector will automatically import them to your project.
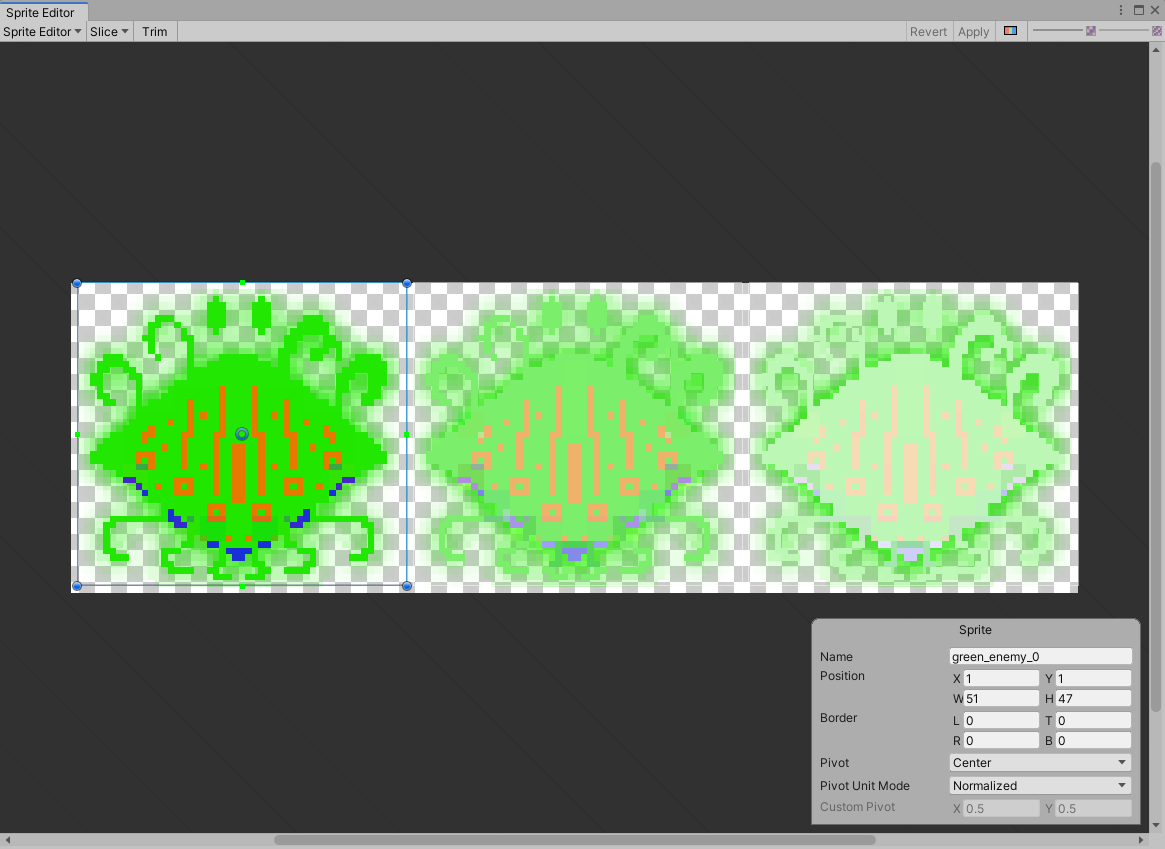
However, some of those sprites are in spritesheets, such as the enemies spritesheets, and they need to be sliced. In order to do that, we need to set the Sprite Mode as Multiple and open the Sprite Editor.
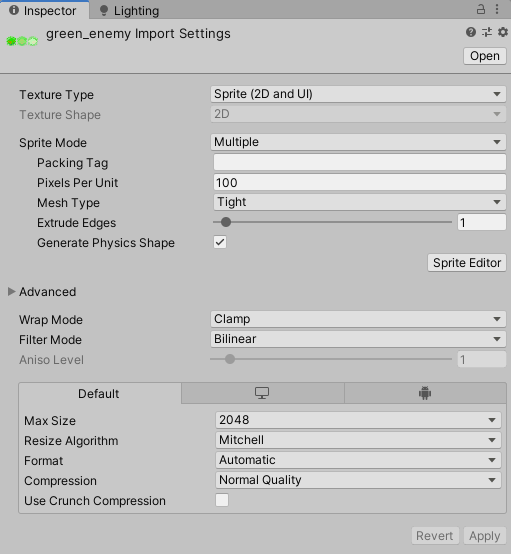
In the Sprite Editor (shown below), you need to open the slice menu and click in the Slice button, with the slice type as automatic. Finally, hit apply before closing.
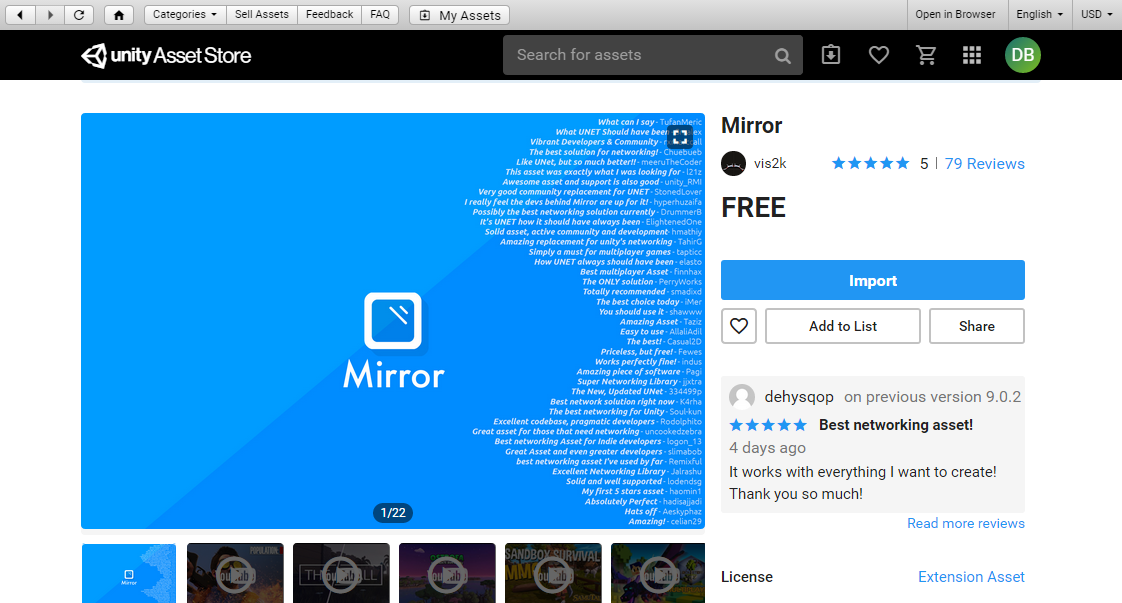
We also need to import the Mirror asset. Go to the Asset Store (Window > Asset Store) and download “Mirror”.
Source Code Files
You can download the tutorial source code files here.
Background canvas
The first thing we are going to do is creating a background canvas to show a background image.
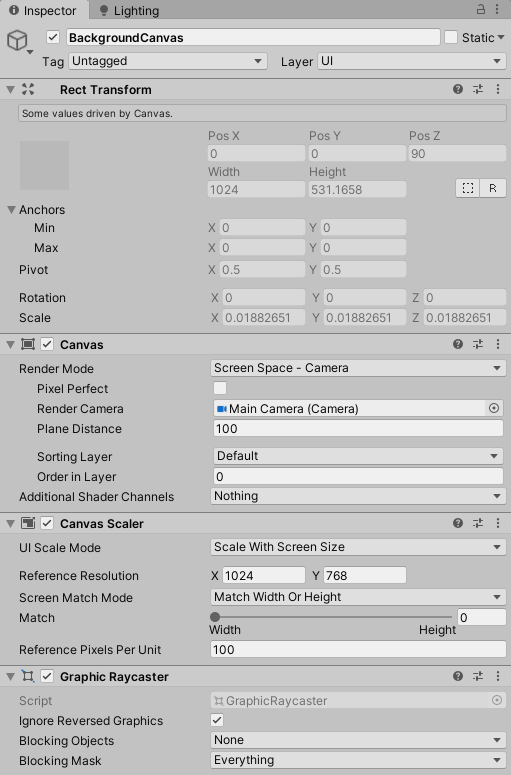
We can do that by creating a new Image in the Hierarchy, and it will automatically create a new Canvas (rename it to BackgroundCanvas).
In the BackgroundCanvas, we need to set its Render Mode to be Screen Space – Camera (remember to attach your Main Camera to it). Then, we are going to set its UI Scale Mode to Scale With Screen Size. This way the Canvas will appear in the background, and not in front of the other objects.
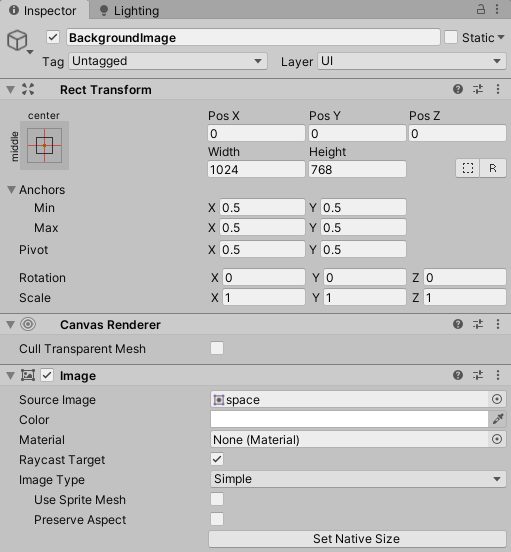
In the BackgroundImage we only need to set the Source Image, which will be the space one.
Try running the game now and you should see the space background in the game.

Network Manager
In order to have a multiplayer game, we need a GameObject with the NetworkManager and NetworkManagerHUD components, so let’s create one.
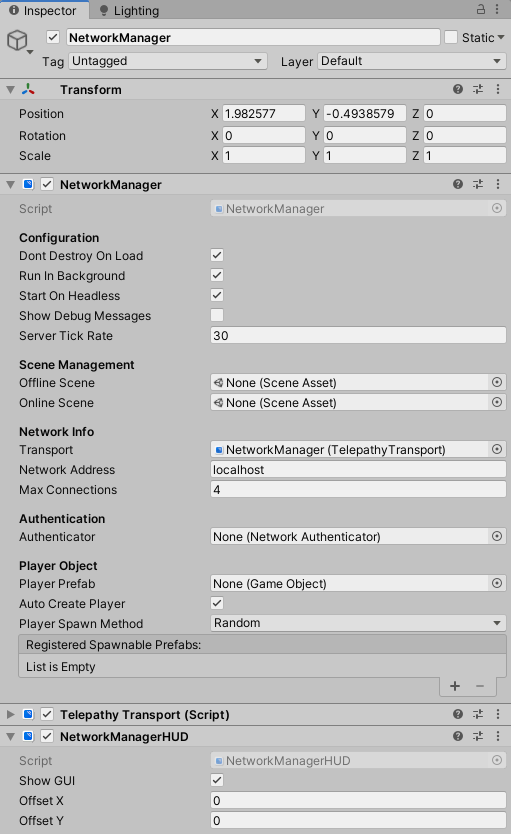
This object will be responsible for managing for connecting different clients in a game and synchronizing the game objects among all clients. The Network Manager HUD shows a simple HUD for the players to connect to a game.
For example, if you play the game now, you should see the following screen:
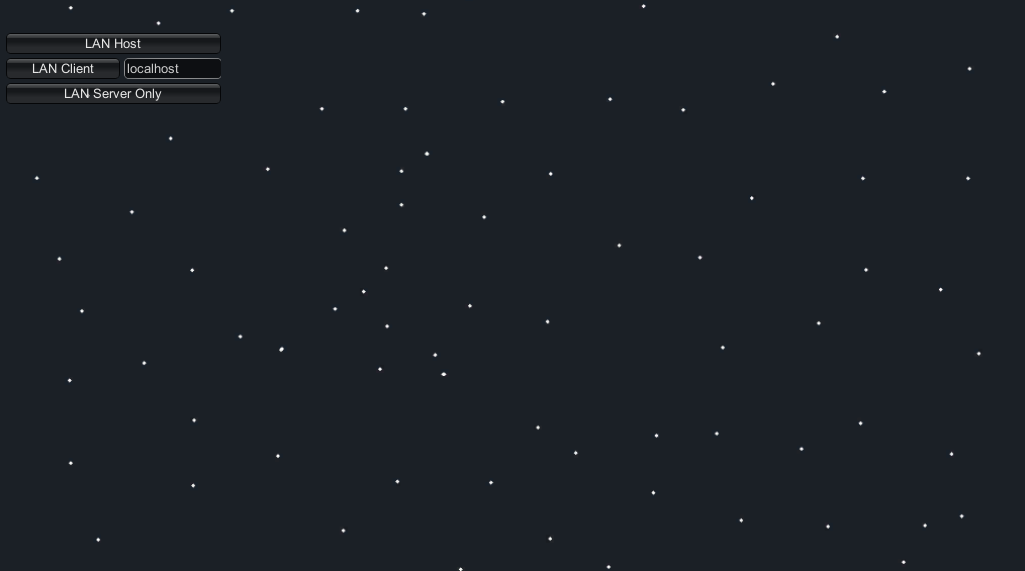
In this tutorial we are going to use the LAN Host and LAN Client options. Unity multiplayer games work in the following way: first, a player starts a game as host (by selecting LAN Host). A host works as a client and a server at the same time. Then, other players can connect to this host by as clients (by selecting LAN Client). The client communicates with the server, but do not execute any server only code. So, in order to test our game we are going to open two instances of it, one as the Host and another as the Client.
However, you can not open two instances of the game in the Unity Editor. In order to do so, you need to build your game and run the first instance from the generated executable file. The second instance can be run from the Unity Editor (in the Play Mode).
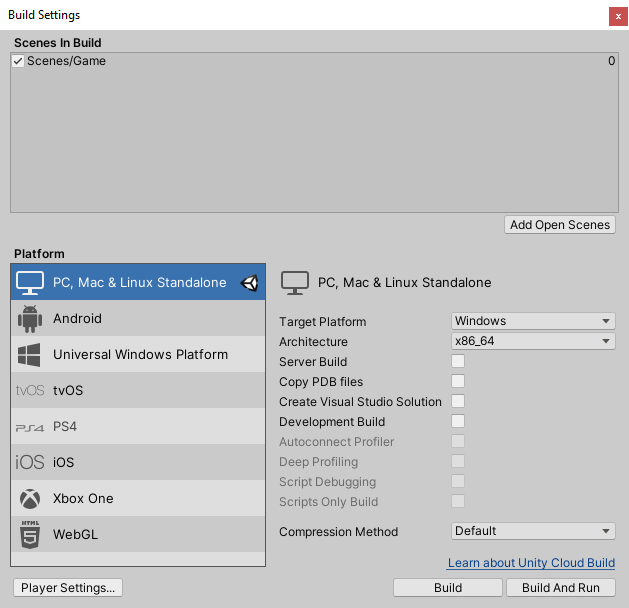
In order to build your game you need to add the Game scene to the build. So, go to File -> Build Settings and add the Game scene to build. Then, you can generate and executable file and run it by clicking on File -> Build & Run. This will open a new window with the game. After doing that, you can enter Play Mode in the Unity Editor to run the second instance of the game. This is what we are going to do every time we need to test a multiplayer game.
Ship Movement
Now that we have the NetworkManager, we can start creating the game objects which will be managed by it. The first one we are going to create is the player ship.
For now, the ship will only move horizontally in the screen, with its position being updated by the NetworkManager. Later on, we are going to add to it the ability to shoot bullets and receive damage.
So, first of all, create a new GameObject called Ship and make it a prefab. The figure below shows the Ship prefab components, which I will explain now.
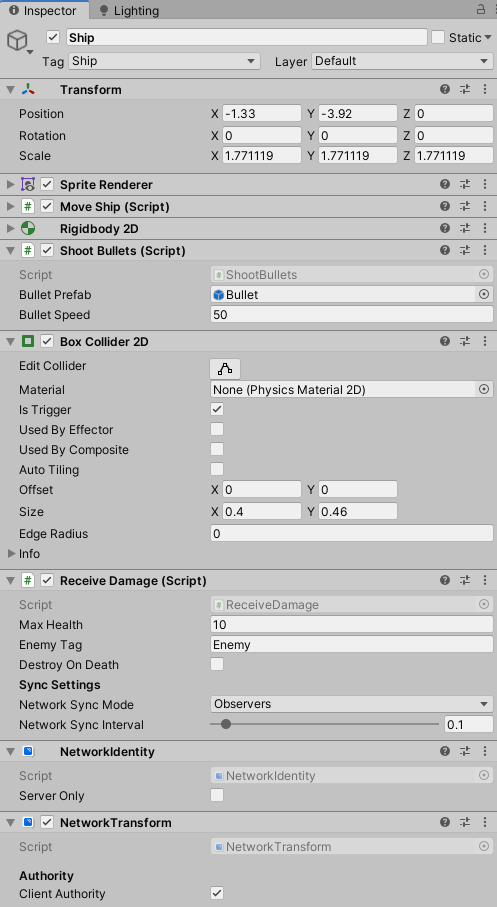
In order to a game object to be managed by the NetworkManager, we need to add the NetworkIdentity component to it. In addition, since the ship will be controlled by the player, we are going to set the Local Player Authority check box for it.
The NetworkTransform component, by its turn, is responsible for updating the Ship position throughout the server and all the clients. Otherwise, if we’ve moved the ship in one screen, its position wouldn’t be updated in the other screens. NetworkIdentity and NetworkTransform are the two components necessary for multiplayer features. Enable Client Authority on the NetworkTransform component.
Now, to handle movement and collisions, we need to add a RigidBody2D and a BoxCollider2D. In addition, the BoxCollider2D will be a trigger (Is Trigger set to true), since we don’t want collisions to affect the ship physics.
Finally, we are going to add a MoveShip script, which will have a Speed parameter. Other scripts will be added later, but that’s it for now.
The MoveShip script is very simple, in the FixedUpdate method we get the movement from the Horizontal Axis and set the ship velocity accordingly. However, there are two very important network-related things that must be explained.
First, typically all Scripts in a Unity game inherits MonoBehaviour to use its API. However, in order to use the Network API the script must inherit NetworkBehaviour instead of MonoBehaviour. You need to inlcude the Networking namespace (using UnityEngine.Networking) in order to do that.
Also, in a Unity multiplayer game, the same code is executed in all instances of the game (host and clients). To let the players to control only their ships, and not all ships in the game, we need to add an If condition in the beginning of the FixedUpdate method checking if this is the local player (if you’re curious on how the game would work without this If condition, try removing it. When moving a ship in a screen, all ships should move together).
using System.Collections;
using System.Collections.Generic;
using UnityEngine;
using Mirror;

public class MoveShip : NetworkBehaviour
{
    [SerializeField]
    private float speed;

    void FixedUpdate ()
    {
        if(this.isLocalPlayer)
        {
            float movement = Input.GetAxis("Horizontal");
            GetComponent<Rigidbody2D>().velocity = new Vector2(movement * speed, 0.0f);
        }
    }
}
Before playing the game, we still need to tell the NetworkManager that the Ship prefab is the Player Prefab. We do that by selecting it in the Player Prefab attribute in the NetworkManager component. By doing so, everytime that a player starts a new instance of the game, the NetworkManager will instantiate a Ship.
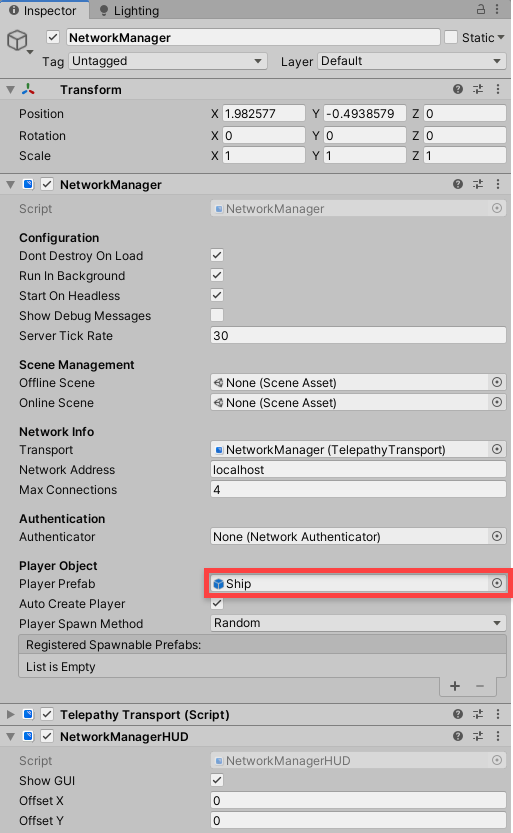
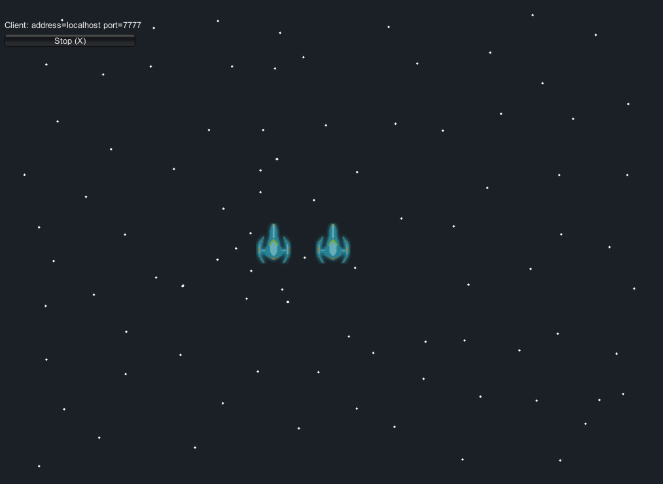
Now you can try playing the game. The ship movement should be synchronized between the two instances of the game.
Spawn Positions
Until now all ships are being spawned in the middle of the screen. However, it would be more interesting to set some predefined spawn positions, which is actually easy to do with Unity multiplayer API.
First, we need to create a new Game Object to be our spawn position and place it in the desired spawn position. Then, we add the NetworkStartPosition component to it. I’m going to create two spawn positions, one in the coordinate (-4, -4) and the other one in the coordinate (4, -4).
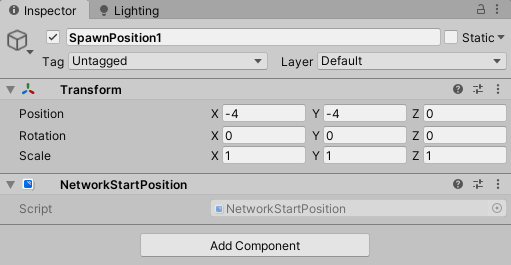
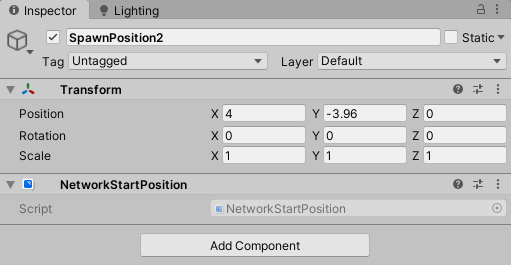
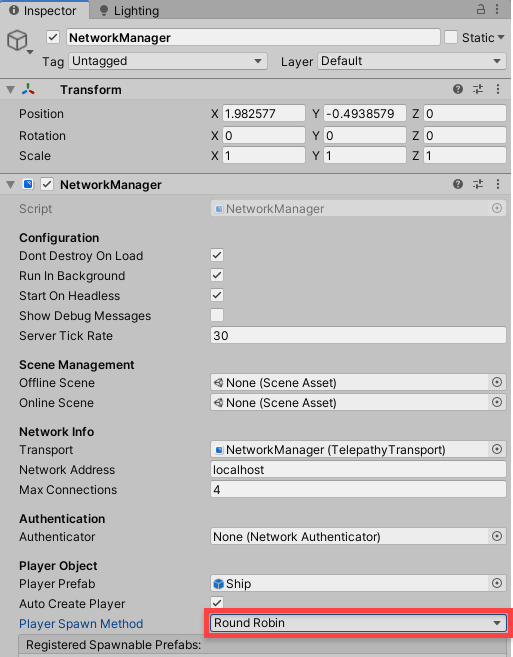
Now we need to define how the NetworkManager will use those positions. We do that by configuring the Player Spawn Method attribute. There are two options there: Random and Round Robin. Random means that, for each game instance, the manager will choose the player start position at random among the spawn positions. Round Robin means it will go sequentially through all spawn positions until all of them have been used (for example, first SpawnPosition1 then SpawnPosition2). Then, it starts again from the beginning of the list. We are going to pick Round Robin.
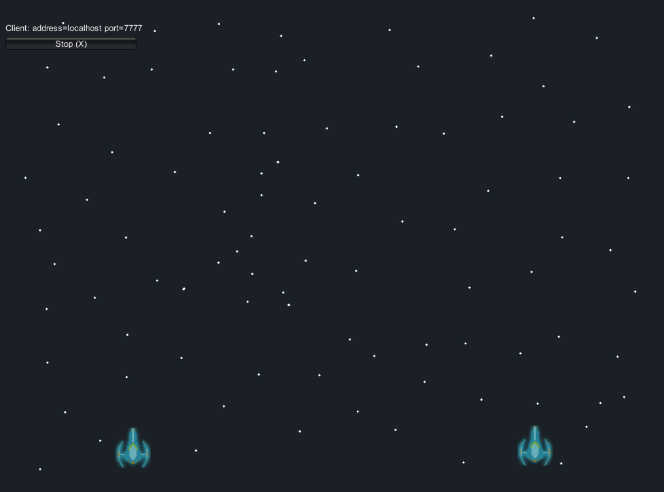
By now you can try playing the game again and see if the ships are being spawned in the correct positions.
Shooting Bullets
The next thing we are going to add in our game is giving ships the ability fo shooting bullets. Also, those bullets must be synchronized among all instances of the game.
First of all, we need to create the Bullet prefab. So, create a new GameObject called Bullet and make it a prefab. In order to manage it in the network, it needs the NetworkIdentiy and NetworkTransform components, as in the ship prefab. However, once a bullet is created, the game does not need to propagate its position through the network, since the position is updated by the physics engine. So, we are going to change the Network Send Rate in the Network Transform to 0, to avoid overloading the network.
Also, bullets will have a speed and should collide with enemies later. So, we are going to add a RigidBody2D and a CircleCollider2D to the prefab. Again, notice that the CircleCollider2D is a trigger.
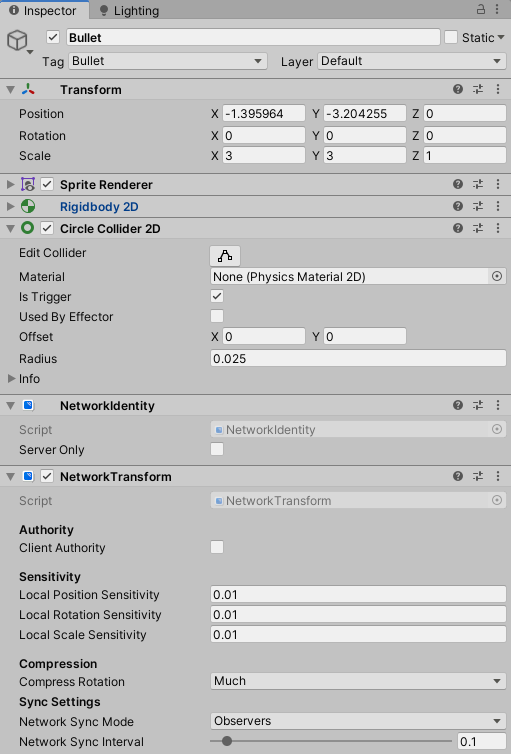
Now that we have the bullet prefab, we can add a ShootBullets script to the Ship. This script will have as parameters the Bullet Prefab and the Bullet Speed.
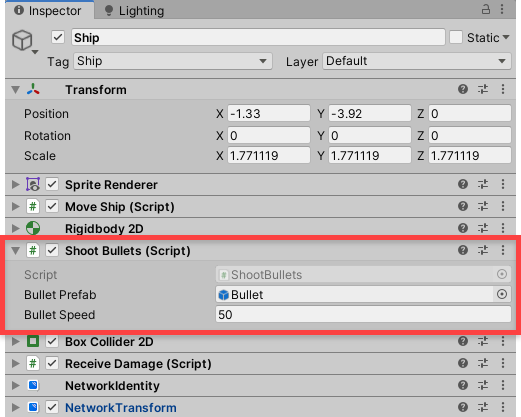
The ShootBullets script is also a NetworkBehaviour, and it is shown below. In the update method, it is going to check if the local player has pressed the Space key and, if so, it will call a method to shoot bullets. This method will instantiate a new bullet, set its velocity and destroy it after one second (when the bullet has already left the screen).
Again, there are some important network concepts that must be explained here. First, there is a [Command] tag above the CmdShoot method. This tag and the “Cmd” in the beginning of the method name make it a special method called a Command. In unity, a command is a method that is executed in the server, although it has been called in the client. In this case, when the local player shoots a bullet, instead of calling the method in the client, the game will send a command request to the server, and the server will execute the method.
Also, there is call to NetworkServer.Spawn in the CmdShoot method. The Spawn method is responsible for creating the bullet in all instances of the game. So, what CmdShoot does is creating a bullet in the server, and then the server replicates this bullet among all clients. Notice that this is possible only because CmdShoot is a Command, and not a regular method.
using System.Collections;
using System.Collections.Generic;
using UnityEngine;
using Mirror;

public class ShootBullets : NetworkBehaviour
{
    [SerializeField]
    private GameObject bulletPrefab;

    [SerializeField]
    private float bulletSpeed;

    void Update ()
    {
        if(this.isLocalPlayer && Input.GetKeyDown(KeyCode.Space))
        {
            this.CmdShoot();
        }
    }

    [Command]
    void CmdShoot ()
    {
        GameObject bullet = Instantiate(bulletPrefab, this.transform.position, Quaternion.identity);
        bullet.GetComponent<Rigidbody2D>().velocity = Vector2.up * bulletSpeed;
        NetworkServer.Spawn(bullet);
        Destroy(bullet, 1.0f);
    }
}
Finally, we need to tell the network manager that it can spawn bullets. We do that by adding the bullet prefab in the Registered Spawnable Prefabs list.
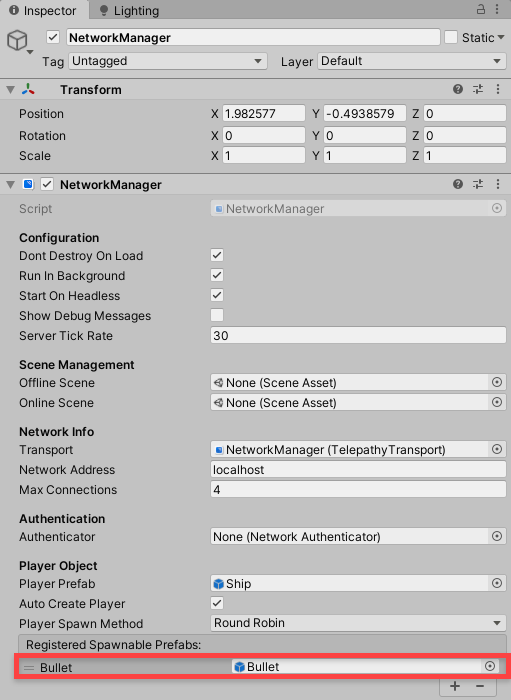
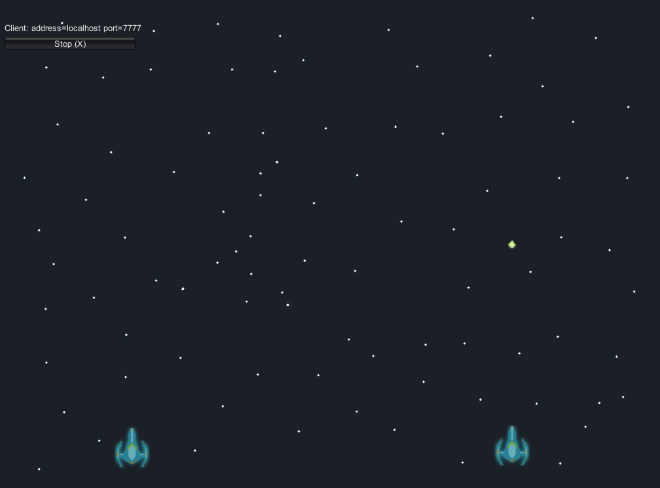
Now, you can try playing the game and shoot bullets. Bullets must be synchronized among all instances of the game.
Spawning Enemies
The next step in our game is adding enemies.
First, we need an Enemy prefab. So, create a new GameObject called Enemy and make it a prefab. Like ships, enemies will have a Rigidbody2D and BoxCollider2D to handle movements and collisions. Also, it will need a NetworkIdentity and NetworkTransform, to be handled by the NetworkManager. Later on we are going to add a script to it as well, but that’s it for now.
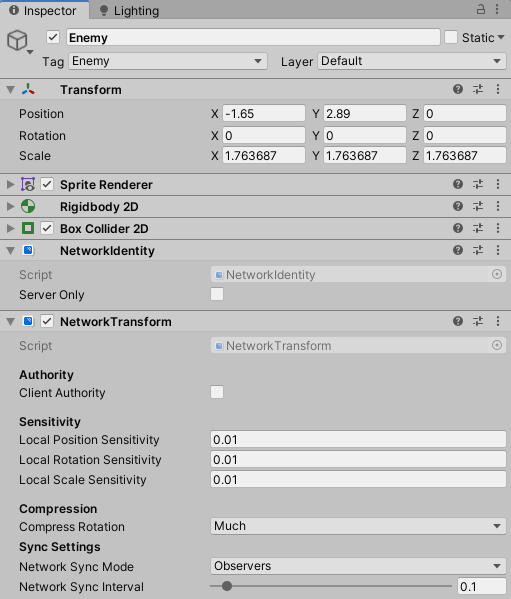
Now, let’s create a GameObject called EnemySpawner. The EnemySpawner will also have a NetworkIdentity, but now we are going to select the Server Only field in the component. This way, the spawner will exist only in the server, since we don’t want enemies to be created in each client. Also, it will have a SpawnEnemies script, which will spawn enemies in a regular interval (the parameters are the enemy prefab, the spawn interval and the enemy speed).
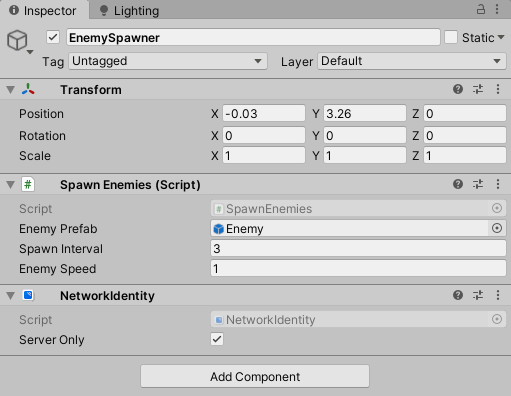
The SpawnEnemies script is shown below. Notice that we are using a new Unity method here: OnStartServer. This method is very similar to OnStart, the only difference is that it is called only for the server. When this happens, we are going to call InovkeRepeating to call the SpawnEnemy method every 1 second (according to spawnInterval).
The SpawnEnemy method will instantiate a new enemy in a random position, and use NetworkServer.Spawn to replicate it among all instances of the game. Finally, the enemy will be destroyed after 10 seconds.
using System.Collections;
using System.Collections.Generic;
using UnityEngine;
using Mirror;

public class SpawnEnemies : NetworkBehaviour
{
    [SerializeField]
    private GameObject enemyPrefab;

    [SerializeField]
    private float spawnInterval = 1.0f;

    [SerializeField]
    private float enemySpeed = 1.0f;

    public override void OnStartServer ()
    {
        InvokeRepeating("SpawnEnemy", this.spawnInterval, this.spawnInterval);
    }

    void SpawnEnemy ()
    {
        Vector2 spawnPosition = new Vector2(Random.Range(-4.0f, 4.0f), this.transform.position.y);
        GameObject enemy = Instantiate(enemyPrefab, spawnPosition, Quaternion.identity) as GameObject;
        enemy.GetComponent<Rigidbody2D>().velocity = new Vector2(0.0f, -this.enemySpeed);
        NetworkServer.Spawn(enemy);
        Destroy(enemy, 10);
    }
}
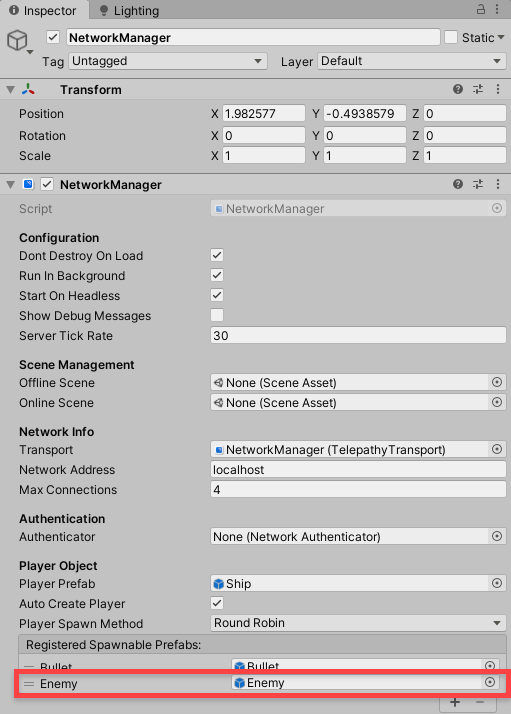
Before playing the game, we need to add the Enemy prefab to the Registered Spawnable Prefabs list.
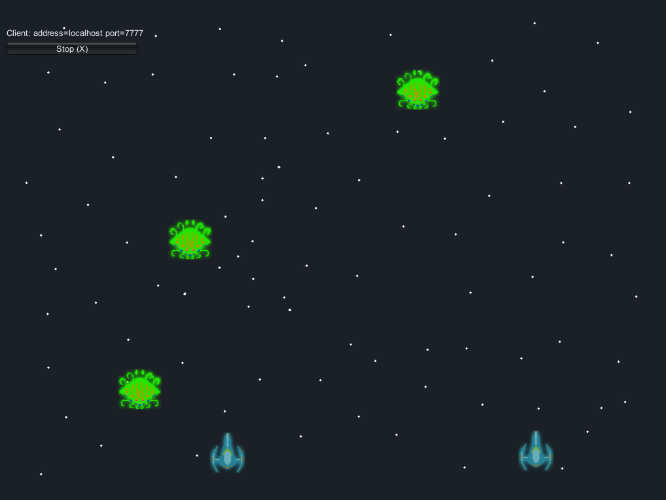
Now you can try playing the game now with enemies. Notice that the game still doesn’t have any collision handling yet. So you won’t be able to shoot enemies. This will be our next step.
Taking Damage
The last thing we are going to add to our game is the ability to hit enemies and, unfortunately, to die to them. In order to keep this tutorial simple, I’m going to use the same script for both enemies and ships.
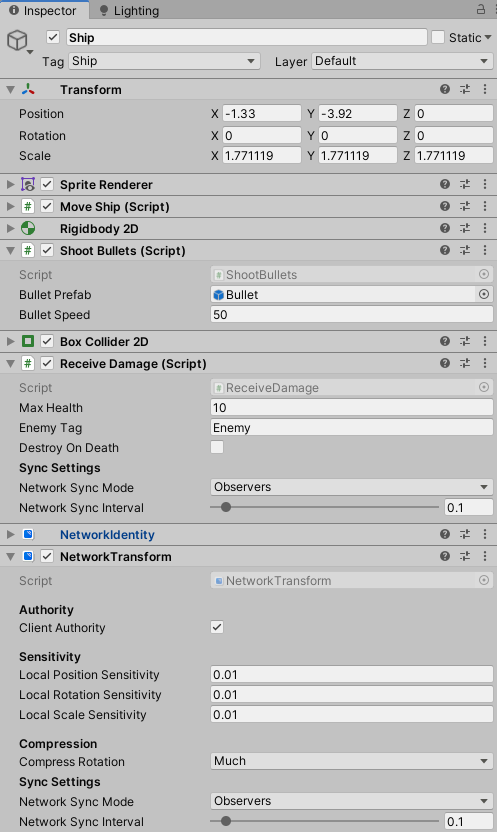
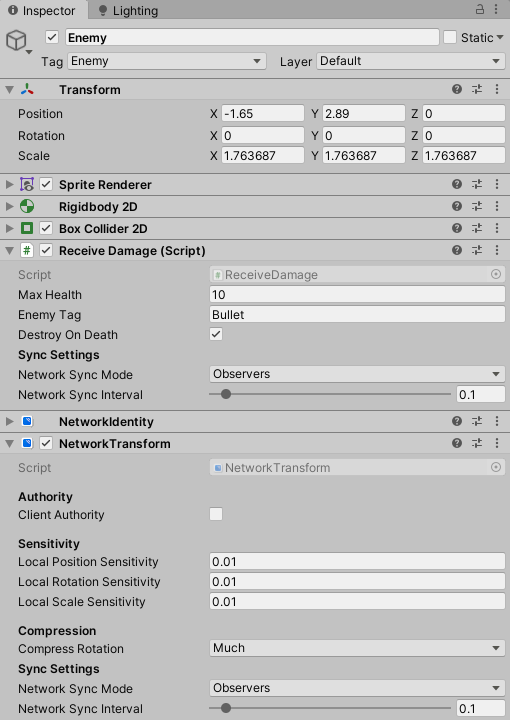
The script we are going to use is called ReceiveDamage, and it is shown below. It will have as configurable parameters maxHealth, enemyTag and destroyOnDeath. The first one is used to define the initial health of the object. The second one is used to detect collisions. For example, the enemyTag for ships will be “Enemy”, while the enemyTag for enemies will be “Bullet”. This way, we can make ships colliding only with enemies, and enemies colliding only with bullets. The last parameter (destroyOnDeath) will be used to determine if an object will be respawned or destroyed after dying.
using System.Collections;
using System.Collections.Generic;
using UnityEngine;
using Mirror;

public class ReceiveDamage : NetworkBehaviour
{
    [SerializeField]
    private int maxHealth = 10;

    [SyncVar]
    private int currentHealth;

    [SerializeField]
    private string enemyTag;

    [SerializeField]
    private bool destroyOnDeath;

    private Vector2 initialPosition;

    // Use this for initialization
    void Start ()
    {
        this.currentHealth = this.maxHealth;
        this.initialPosition = this.transform.position;
    }

    void OnTriggerEnter2D (Collider2D collider)
    {
        if(collider.tag == this.enemyTag)
        {
            this.TakeDamage(1);
            Destroy(collider.gameObject);
        }
    }

    void TakeDamage (int amount)
    {
        if(this.isServer)
        {
            this.currentHealth -= amount;

            if(this.currentHealth <= 0)
            {
                if(this.destroyOnDeath)
                {
                    Destroy(this.gameObject);
                }
                else
                {
                    this.currentHealth = this.maxHealth;
                    RpcRespawn();
                }
            }
        }
    }

    [ClientRpc]
    void RpcRespawn ()
    {
        this.transform.position = this.initialPosition;
    }
}
Now, let’s analyze the methods. In the Start method, the script sets the currentHealth to be the maximum, and saves the initial position (the initial position will be used to respawn ships later). Also, notices that there is a [SyncVar] tag above the currentHealth attribute definition. This means that this attribute value must be synchronized among game instances. So, if an object receives damage in one instance, it will be propagated to all of them.
The OnTriggerEnter2D method is the one responsible for handling collisions (since the colliders we added were configured as triggers). First, we check if the collider tag is the enemyTag we are looking for, to handle collisions only against objects we are looking for (enemies against ships and bullets against enemies). If so, we call the TakeDamage method and destroy the other collider.
The TakeDamage method, by its turn, will be called only in the server. This is because the currentHealth is already a SyncVar, so we only need to update it in the server, and it will be synchronized among the clients. Besides that, the TakeDamage method is simple, it decreases the currentHealth and checks if it is less than or equal to 0. If so, the object will be destroyed, if destroyOnDeath is true, or it the currentHealth will be reset and the object will be respawned. In practice, we will make enemies to be destroyed on death, while ships will be respawned.
The last method is the respawn one. Here we are using another multiplayer feature called ClientRpc (observe the [ClientRpc] tag above the method definition). This is like the opposite of the [Command] tag. While commands are sent from clients to the server, a ClientRpc is executed in the client, even though the method was called from the server. So, when an object needs to be respawned, the server will send a request to the client to execute the RpcRespawn method (the method name must start with Rpc), which will simply reset the position to the initial one. This method must be executed in the client because we want it to be called for ships, and ships are controlled only by players (we set the Local Player Authority attribute as true in the NetworkIdentity component).
Finally, we need to add this script to both the Ship and Enemy prefabs. Notice that, for the ship we need to define the Enemy Tag as “Enemy”, while for the Enemy this attribute value is “Bullet” (you also need to properly define the prefabs tags). Also, in the enemy prefab we are going to check the Destroy On Death attribute.
Now, you can try playing the game shooting enemies. Let some enemies hit your ships to see if they’re being correctly respawned as well.
Conclusion
And this concludes this tutorial! While small, we now have a nifty multiplayer game to work with. However, you don’t have to stop here! You consider improving this project by adding sounds, or maybe even making a procedurally generated map for more endless amounts of fun. Either way, this project is sure to make a great addition to any coding portfolio!
You can also choose to expand your Unity knowledge with online courses on other topics such as making RPGs, FPS games, and much more. For classrooms, Zenva Schools also offers a great selection of Unity courses suitable to classrooms and with expansive topics on other genres – including VR.
We hope you’ve learned a lot here, and we wish you the best of luck with your future game projects!


