Structures
We’ve discussed classes in Swift and how they are the foundation of object-oriented programming. In addition to classes, we also have structures that provide similar functionality. A structure is similar to a class since it can also have methods, properties, and initializers, but a structure is a value type where classes are reference types.
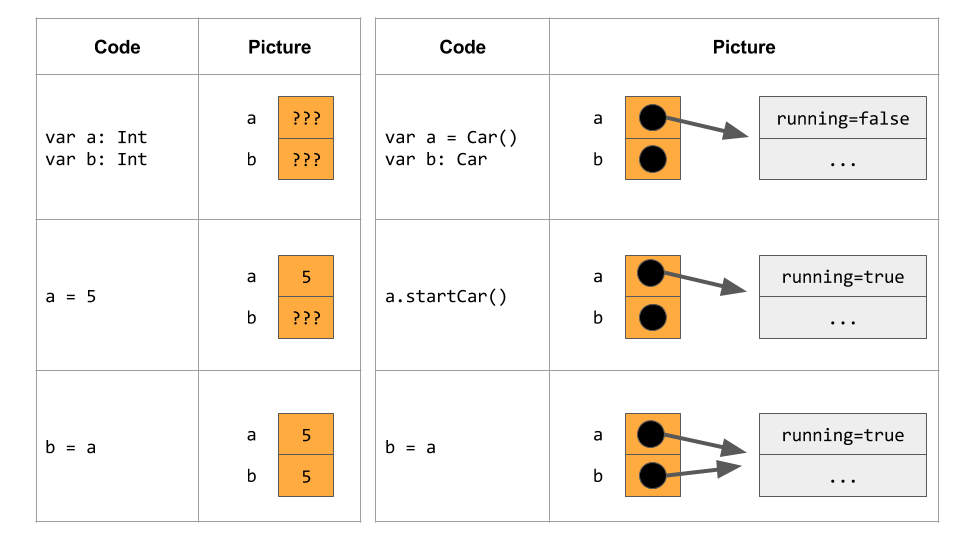
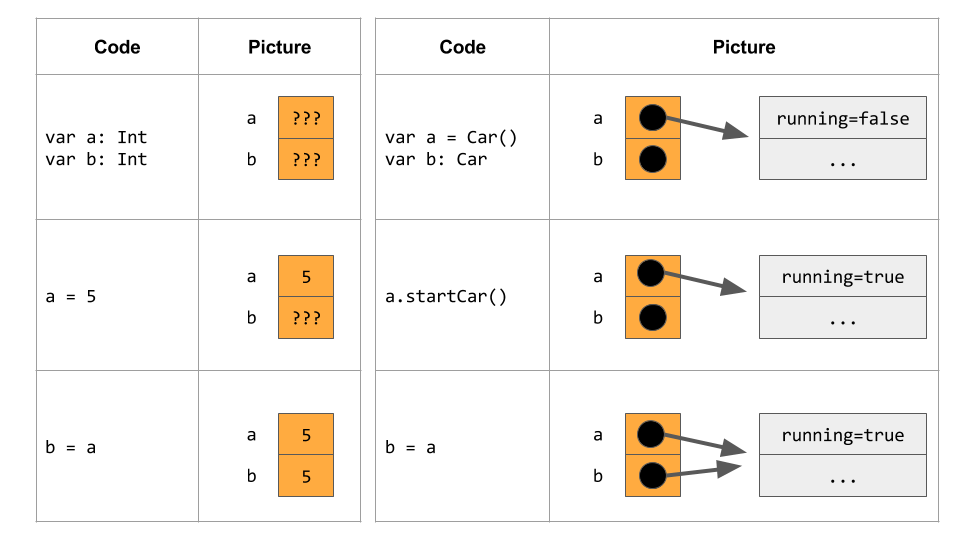
Every type in Swift is either a value type or reference type. A value type, such as Int or Bool, is a type whose value is copied when it is assigned to another variable or literal, or passed through a function/method. On the other hand, a reference type is a type whose value is aliased instead of copied. Let’s take a look at the difference visually.
Since Int is a value type, when we assign b to a, we simply copy the value of a. If we change b, we do not affect a in any way. In the case with the reference type, b is now an alias to a. This means that when we change b, we also change a because they are aliases of each other. They are different names for the same instance!
It is very important to remember that structures are value types! When we set a variable equal to a struct, we’re actually making a copy of that structure! This behavior also exists for function parameters that are value types.
If we have value type parameters, we are passing by value; if we have reference type parameters, we are passing by reference. It is important to note this distinction because it can have drastic effects on the behavior of our code! Consider a method to swap two Ints.
func swapInts(a: Int, b: Int) {
    let temp = b
    b = a
    a = temp
}
We get errors! Swift knows that an Int is a value type and tells us that we cannot assign to a method parameter! To make Swift treat a value type as a reference type, we use the inout modifier on the parameters.
func swapInts(a: inout Int, b: inout Int) {
    let temp = b
    b = a
    a = temp
}
Now this function will do exactly what we expect it to do! Swift doesn’t provide us a way to treat a reference type as a value type; instead, we usually create a new instance and copy over property values.
If we were to implement the same swapping function with a reference type, we wouldn’t need the inout modifier since the parameters become aliases to the instance we pass in! This means that parameters of a reference type can affect the instance itself, not a copy!
One small difference between structs and classes is that we cannot implicitly change the properties of a struct within an instance method because structs are value types. We need to explicitly state that an instance method alters one our struct’s properties using the mutating keyword. Consider a struct that represents a circle. We define a circle by its center and radius.
struct Circle {
    var centerX = 0.0, centerY = 0.0, radius = 1.0
}
Suppose we wanted to add a function to double the radius of the circle. Since structs are value types, we need to add the explicit mutating modifier on our method like this.
struct Circle {
    var centerX = 0.0, centerY = 0.0, radius = 1.0
    mutating func doubleRadius() {
        radius = radius * 2
    }
}
Now we can modify our property! When we use this method, we change the value of the property for that original instance of the structure; we do not have to create a copy!
If we had a constant structure defined using the let keyword, we would not be able to change any of its properties! With classes, constants are different. If we declare a constant to an instance of a class, we are not allowed to reassign the constant to another instance. However, we are permitted to change the properties on that constant! So the properties of the instance of the class are not constant, but the instance it refers to is! In other words, we cannot change which instance the constant points to, but we can change the properties on that instance.
To recap, let’s list the differences between classes and structures.
- Classes are reference types!
- Classes can use inheritance
- Deinitializers are only valid in classes since they are reference types!
- Classes can change their properties without the mutating modifier
- Class properties can be modified if it is declared as a constant with the let keyword
In other cases, structures have the same functionality as classes.
Enums
In addition to structs and classes, we also have enumerations! An enum is way we can group related values and use them in a type-safe way. Like struts, enums are also value types! For example, let’s suppose we want to represent the planets of our solar system. We could do this by using a number of constants like this.
let mercury = 1
let venus = 2
let earth = 3
...
But someone could assign an invalid value in our code!
var currentPlanet = -1 // not a valid planet!
We would need to introduce many lines of code for type checking to make sure we’re only assigning valid values! But there is a much easier way using enums!
Let’s declare an enum that represents the planets!
enum Planet {
    case mercury, venus, earth, mars, jupiter, saturn, uranus, neptune
}
An enum declaration is similar to a class or struct. Inside of the body, we use the case keyword and supply the comma-separated list of values. Now when we use an enum type, we can only select values that are defined in the enum.
var currentPlanet = Planet.mercury
currentPlanet = -1 // error!
A shortcut that we can use when reassigning enums is to omit the enum name entirely. This is because we have already established that the given variable is of an enum type; we can only assign it values within that enum.
var currentPlanet = Planet.mercury
currentPlanet = .earth
currentPlanet = .neptune
Notice that we don’t have to reuse the name of the enum!
This same type-checking safety works with switch statements as well! We can also omit the enum name and use the value since Swift will know that the variable we’re switching on is of an enum type.
switch currentPlanet {
case .earth:
    print("Home Sweet Home!")
default:
    print("Not home!")
}
We can also give each enum value any number of other values as well. These are called associated values. For example, consider colors. We can represent a particular color in many different ways! We can use the usual red, green, and blue (RGB) colorspace. We could add an alpha level: ARGB. We could use the cyan, magenta, yellow, and key (CMYK) colorspace. There are many different options we could use to represent a single color! Each option has a different number of values, and we can use associated values to make this distinction.
Let’s create our color enum and add a few colorspaces.
enum Color {
    case rgb(Int, Int, Int)
    case argb(Int, Int, Int, Int)
    case cmyk(Int, Int, Int, Int)
    case name(String)
}
When we define an enum like this, we’re telling Swift that each case can have its own associated values. We can set these associated when we create an instance of an enum.
var blue = Color.rgb(0, 0, 255)
When we declare this variable, we’re saying that its type is the Color enum type with value rgb and it has an associated tuple value of (0, 0, 255). This adds more power to enums because we can attach extra values that we can use.
We can also re-assign using the same shorthand syntax.
var blue = Color.rgb(0, 0, 255)
blue = .argb(100, 0, 0, 255)
blue = .name("blue")
This associated value becomes very useful when we add switch-case statements. We can decompose the associated tuple value inside of the particular switch case corresponding to the enum value and its associated values.
switch blue {
case .rgb(let red, let green, let blue):
    print("R: \(red) G: \(green) B: \(blue)")
case .argb(let alpha, let red, let green, let blue):
    print("A: \(alpha) R: \(red) G: \(green) B: \(blue)")
default:
    print("Not RGB or ARGB!")
}
Now we have access to each tuple value in the case block of the switch statement! Note that these are constants so we cannot modify them in the switch case. We would have to change the variable blue itself.
Notice that we’re using the let keyword three or four times: one for each value in the tuple. Swift gives us a shortcut that we can use to simply this: just one let at the beginning!
switch blue {
case let .rgb(red, green, blue):
    print("R: \(red) G: \(green) B: \(blue)")
case let .argb(alpha, red, green, blue):
    print("A: \(alpha) R: \(red) G: \(green) B: \(blue)")
default:
    print("Not RGB!")
}
This looks much cleaner!
In addition to associated values, we can also have raw values. We can assign a raw value, each of the same type, to each case in the enum. Let’s revisit our planet example and give raw values to the planets. We can have implicitly assigned raw values when we just assign the first case a value; Swift will imply the rest as a linear sequence.
enum Planet: Int {
    case mercury = 1, venus, earth, mars, jupiter, saturn, uranus, neptune
}

print("Mercury's position in the solar system: \(Planet.mercury.rawValue)")
The type of the raw value must be denoted in the enum declaration, in this case Int. Notice that we only have to assign mercury a value of 1, and Swift will imply the rest will be one plus the previous. So venus will have a raw value of 2; earth will have a raw value of 3; and so on.
One good use of this is initializing from a raw value. We can select the enum case depending on the raw value that we pass in like this.
let thirdPlanetFromSun = Planet(rawValue: 3)
Notice that this returns an optional since we could have supplied a bad value! We have to safely unwrap it before we use it!
To recap, enums are a type-safe way we can group related values. Enum cases can store data in the form of associated values or raw values. The types of the associated values can be different for each enum case, but the raw value type has to be the same for all cases in an enum.


