You can access the full course here: Unreal Engine Game Development for Beginners
Building Unreal Engine Games
Building Our Game
Now that you’ve got your game, you’ll want to share it with people or post it online. Building a game basically means packaging it up in a format that doesn’t require the game engine to run.
Project Settings
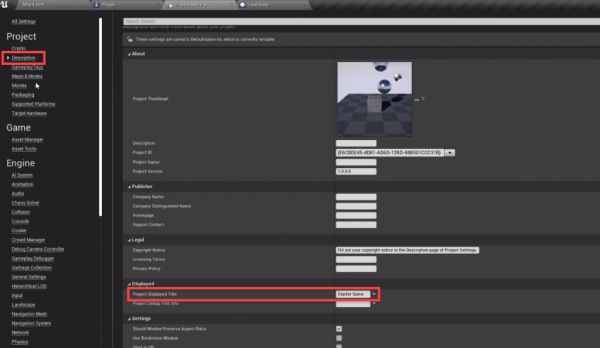
First, we should go to the Project Settings window (Edit > Project Settings…) and click on the Description tab. Here, we can enter in a Project Displayed Title. This is the name of the game.
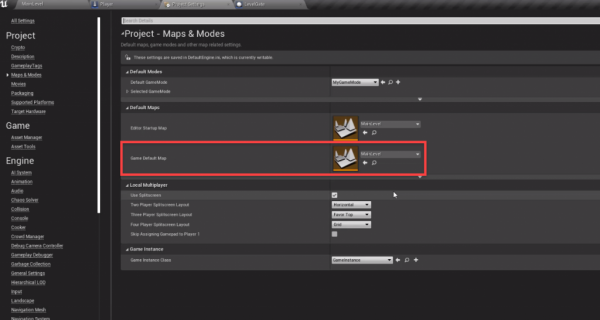
Let’s then go to the Maps & Modes tab. Here, we want to tell the game what the starting level will be. Set the Game Default Map to MainLevel.
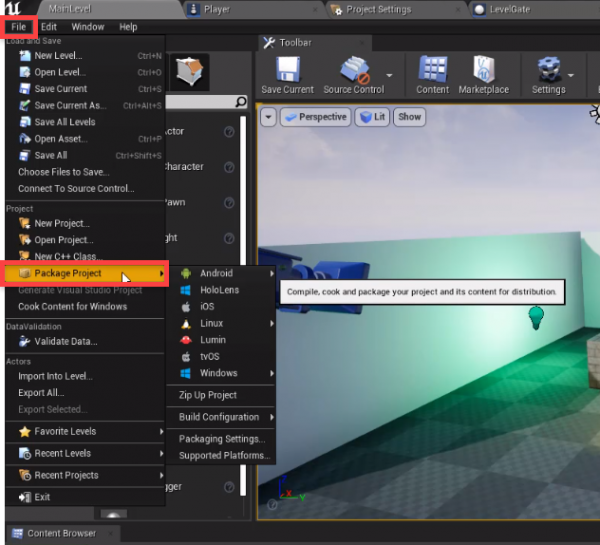
Back in the MainLevel, let’s go File > Package Project. Here, we can select our platform.
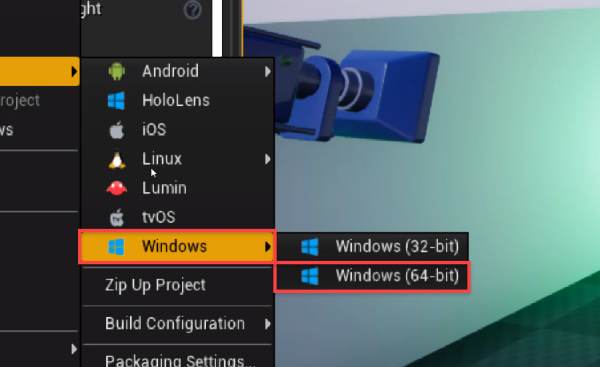
For me, i’m going to select Windows > Windows (64-bit).
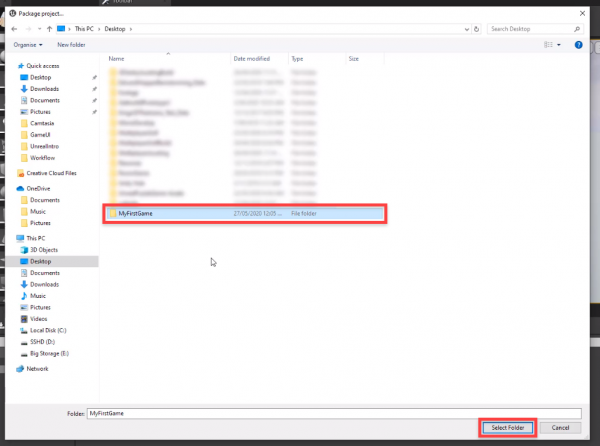
A window will pop up and we can create a new folder to build our game to. Click Select Folder and the game will begin to build.
When everything is done, you can open up the folder and view the game files. In order to open the game, we just need to double-click the StarterProject.exe executable. This will open up the game, allowing us to play.

Transcript
So we’ve created our game, we’ve set up the lighting we’ve of set up the very some blueprints and everything. Now we want to build our game to an executable so that we can play it outside of the Editor and maybe even share it to other people, put it online, really whatever you want to do with it, okay?
So, first of all, what we need to do is actually change a few settings because right now, it’s all on the default stuff, which might not be what you want. So what we’re gonna do is we’re gonna go to edit, project settings. Now, filling in this information isn’t necessary, although if you are thinking of publishing a full game, then you might want to go through and fill some of this in. All we really want to look at here is the Project Displayed Title. And this here is just going to be what is gonna be the name of the game pretty much.
So for this, I am just going to call this game here, Starter Game. You can, of course, call us whatever you want., I’m just going to call it Starter Game there. And then down here in the settings, there are some other options that you can change.
Now, along with this, we also need to go to the Maps and Modes up here in the top left. Maps and Modes basically mean which game mode are we gonna set as a default and which map do we want, or which level do we actually want to start as the default when we open up the game? So with Default GameMode here, we don’t necessarily have to change this since we are manually overriding that for each level but if you do, you can come here and select the MyGameMode for this and this will apply to every level in the game that hasn’t been specified. So again, this isn’t necessary but we could do it this way.
Then down here, we have the Default Maps. The Editor Startup Map is the level that appears when we open up the Editor for the first time. Right now that’s on Minimal_Default, which is one of the levels that actually come with the Static content. So if you want, we can change that to our MainLevel. And Game Default Map is a level that opens up when we launch the game. Now we don’t want Minimal_Default openning up since that’s not really a game level and that’s not really the level that we’re working on.
So let’s change this to our MainLevel as well. So when we open up the game, when we double click on the executable, it is going to appear with our MainLevel, okay? Apart from that, that is really all we need to change or to keep an eye on.
Back in our MainLevel here, what we can do now is go to file and we want to click on Package Project. And this here is gonna build our project, put into a package and allow us to basically have as an executable on our computer. So you can see that there are a number of different options that we can choose. We can choose Android, HoloLens, iOS, Linux, Lumin, tvOS and Windows.
Now I’m running this on a Windows device, so I’m gonna a choose Windows. But if you are looking to build on another device, especially one of the mobile devices, you will need to look up some important things because there are a few things that do need to be changed when you are building for a mobile platform. But I’m building for Windows, so I’m gonna select Windows, choose a 32 bit or 64 bit, depending on your system. I’m gonna choose 64 bit here.
And it is now going to ask us to choose a folder to put the game in. So I’m gonna navigate to my desktop here and on my desktop, I’m gonna create a brand new folder here. And this folder here is just gonna be called MyFirstGame, there we go. Create that folder, select it and then we can hit the Select Folder button down here. And that is all we need to do. It’s very quick, it may take time depending on how large the game is but, of course, if you are creating a very large game then it can take quite some time.
So, you probably don’t want to do this all the time, you probably only want to do this whenever there is a release for your game or there is something you have to test on different computers. Otherwise, I recommend just playing the game inside of the Editor since it is pretty much almost instant, and there we go. The game has now finished building.
So what we can do now is go to our desktop here. I’m gonna go to my desktop and we should see that there is the, MyFirstGame folder. Inside of that we have a WindowsNoEditor folder, and inside of that is where we have our game files. So, pretty much to start the game you’ll see that there is a StartaProject application right here in EXE, we can just double click on that and it will open up. And here we go, we have our game just as it was inside of the Editor. We can move around with the WASD keys, the printing still appears at the top left.
If you do want to you can take that away inside of the blueprints. The Gates work as well, the Physics work, everything works as it should and as it was designed for inside of the engine. So there we go, we’ve got a game built. To exit out, we actually haven’t implemented that yet so we’ll probably just have to go Alt + F4 on that, like so.
Now in order to actually send this up to people, normally you probably aren’t able to necessarily just send off a folder, you actually have to bundle that. And on Windows, what we can do and on other operating systems is we can put it inside of a zip folder. And a zip folder basically just compresses it so we can upload to the internet even this way we can even upload “itch.io” and many other websites as well.
So, back on my desktop, I’ve got the MyFirstGame folder right here, I’m gonna right click on it and I’m gonna go to the Send to, and I’m gonna go compressed zip folder here. Select that it’s going to compress this into a zip right now. It may take some time again, depending on the size of your game and there we go. We have a zip file right here with our game in it. And as you can see, game is actually quite large, it’s around 400 megabytes in size.
And the reason why is because when we created our project, we imported the Static content. And the Static content is quite a large file size, I believe it’s around, I’d say around half a gigabyte in size. So if you are creating a game and you have the Static content, make sure that before you are released your game that you delete those files delete all the assets that you don’t necessarily need as they can quite clog up your game as they have done here. But just like before we’ve got an executable here we can then upload this to the internet and share it with people.
So there we go, thanks for watching.
Interested in continuing? Check out the full Unreal Engine Game Development for Beginners course, which is part of our Unreal Game Development Mini-Degree.
