You can access the full course here: Kotlin for Beginners
In this lesson, we’re going to create a new project in Android Studio.
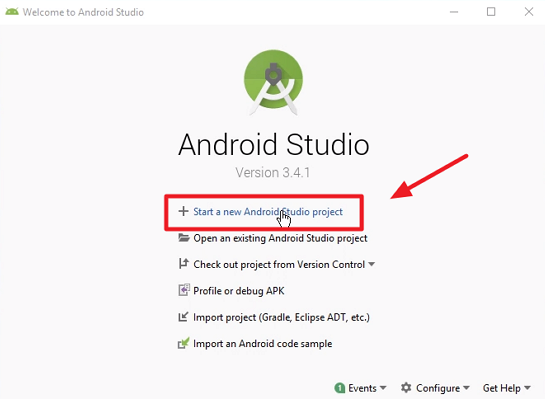
Launch Android Studio and select the “Start a new Android Studio project” option:

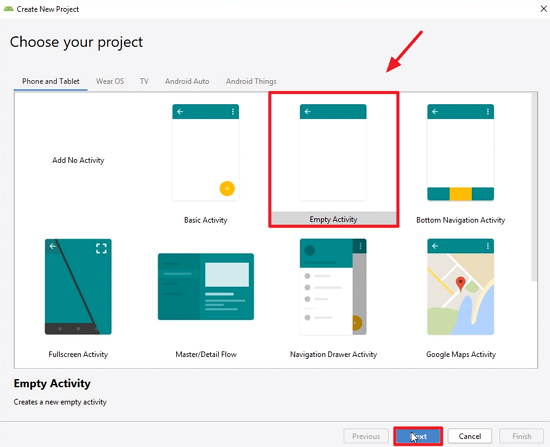
Here we see several available designs that we can use for our project and their brief descriptions at the bottom of the window. We’re going to start with the empty activity for this lesson:

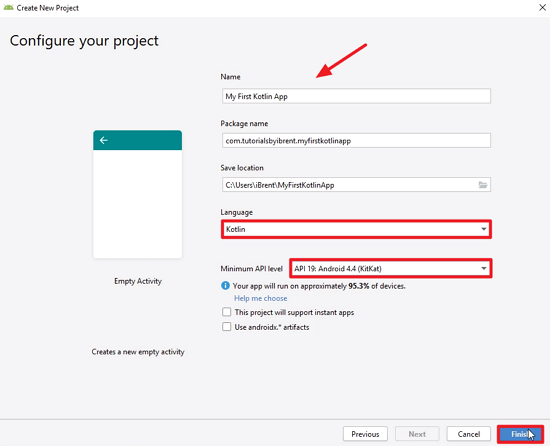
Now, we give a name for our project (My First Kotlin App, for instance). It generates a package name from the project name, which ensures that if you publish this app in the Google Play Store it would have a unique identity. Select Kotlin as language and set the minimum API level to “Android 4.4 (KitKat)”:

The minimum API level indicates the percentage out of all Android devices (which have Google Play Store installed) that are capable of running your app. We do want to target older versions of Android in order to have our app available in multiple devices, otherwise only a handful of people will be able to download and install it from Google Play. Kitkat runs on about 95% of devices and thus it is good enough for our course project.
By choosing a minimum API level, we’re also dealing with compatibility as some of the newer APIs do not run on older devices and so we need to add some extra code that targets specifically those older versions.
After Android Studio resolves dependencies and compiles our code, we should be able to visualize our empty activity project. Note that the load time gets faster the more you work on the same project.
Transcript
Let’s begin by choosing start a new Android Studio project. Here we’re presented with a number of templates that you can choose from. If you take a look here, we have phone and tablet templates. Each one of these is a starting point for creating different types of apps. And as you click through, you can take a look at kind of the description and get a sense for what they would do. It basically gives you a headstart into the project. You also have templates for Wear OS, for Watches, for TV, Android Audio and Android Things.
Let’s go to Phone and Tablet and choose Empty Activity, choose Next. Here we’re going to give this a name and the name we’re gonna call this is My First Kotlin App. Note that it generates a package name and the package name is based on what we call the reverse domain.
If you own a website, you have the ability to have a custom package name that’s tied to a unique value that no one else has. So, when you have a company name or some other domain that you own, you would use the reverse value of it to say com dot whatever the business name is dot and the name of the app. This makes sure that when you publish your app in the App Store, the Google Play Store, it’s going to – this ensures that when you publish your app into the Google Play Store, it will be unique across the ecosystem and others can install it on their device.
Next you have the save location, and you can keep track of this wherever you like, on your hard drive and for language, let’s go ahead and select Kotlin. Next, we choose what is called the minimum API level. If I select this, note that we have quite a few choices and they go back to quite old devices and then they go all the way up to kind of the newest device, things that are out there. You would choose an API level in order to have your app available to multiple devices. If you choose an older version, you can target more devices.
For example, if I select API 19, which is Android 4.4 or KitKat, it says your app will run on approximately 95% of devices. What that’s saying is of all the Android devices that have access to Google Play, 95% of all of these devices would be able to run this app if you targeted this minimum API level. If I select a minimum level that’s higher, that’s more recent, let’s say Android 9, then note that it says your app will run on less than 1% of devices. So, it’s telling us that there are more devices out there that are using older versions, so you can kind of experiment with this.
If I say Marshmallow, then it says 62% and go back to Lollipop, 85%, if I go back to KitKat, 95%, that’s a lot. You consider that there are hundreds of thousands of devices, millions of devices really and of those, you’re going to hit the majority of them across the entire world. This value only applies to Android devices that support Google Play.
There are hundreds and thousands of other devices that are not – there are hundreds of thousands of devices that are built much cheaper and they run a version of Android but they’re not certified to run Google Play. Google Play has minimum requirements for memory and performance. So, this value doesn’t necessarily target all these other devices that are not supported. Just keep that in mind if you’re targeting specific devices. You’ll have an opportunity to run this on everything that’s out there.
When you select a minimum API level, you’re dealing with backwards capability, meaning some of the newer APIs will work and you have to use what’s called App Compatibility. And there’s different ways that Android provides for us to do that but keep in mind that you do occasionally have to write code that targets older devices specifically by saying if this device is an older version, run this code, if it’s a newer version, run that code. And so, you do have to be aware of that.
But for the most part, Google makes it possible for you if you target an Android device from 4.4 or higher, the chances are that you’re gonna be able to run on all these devices with one set of code that you’re not gonna have to make that many customizations.
So, I’m gonna go with Android 19 and from here. We’re not going to worry about supporting Instant Apps or using AndroidX artifacts. Go ahead and choose Finish. This will then run through a few steps where it will compile and create this empty activity project for us and if you have dependencies. If you target older device APIs, it’s going to download, it may download for the first time a number of support libraries.
Once you’ve installed Android Studio, there’s a lot of things that can be downloaded to support a variety of Android versions and so, the first time you run Android Studio or the first time you may run a new project, it may take some time, so just be aware of that. As you work with Android Studio and as you work with the same project, the load time will get faster.
Interested in continuing? Check out the full Kotlin for Beginners course, which is part of our Android Development Mini-Degree.


