You can access the full course here: Build an Action RPG in Unreal Engine
Player Setup
Creating the Player Blueprint
In the Blueprints folder, create a new blueprint of type Character called Player.
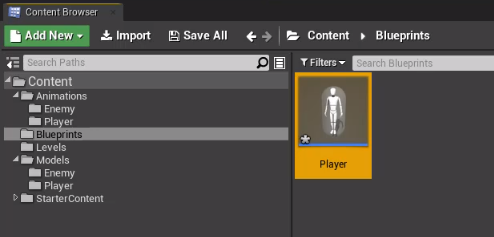
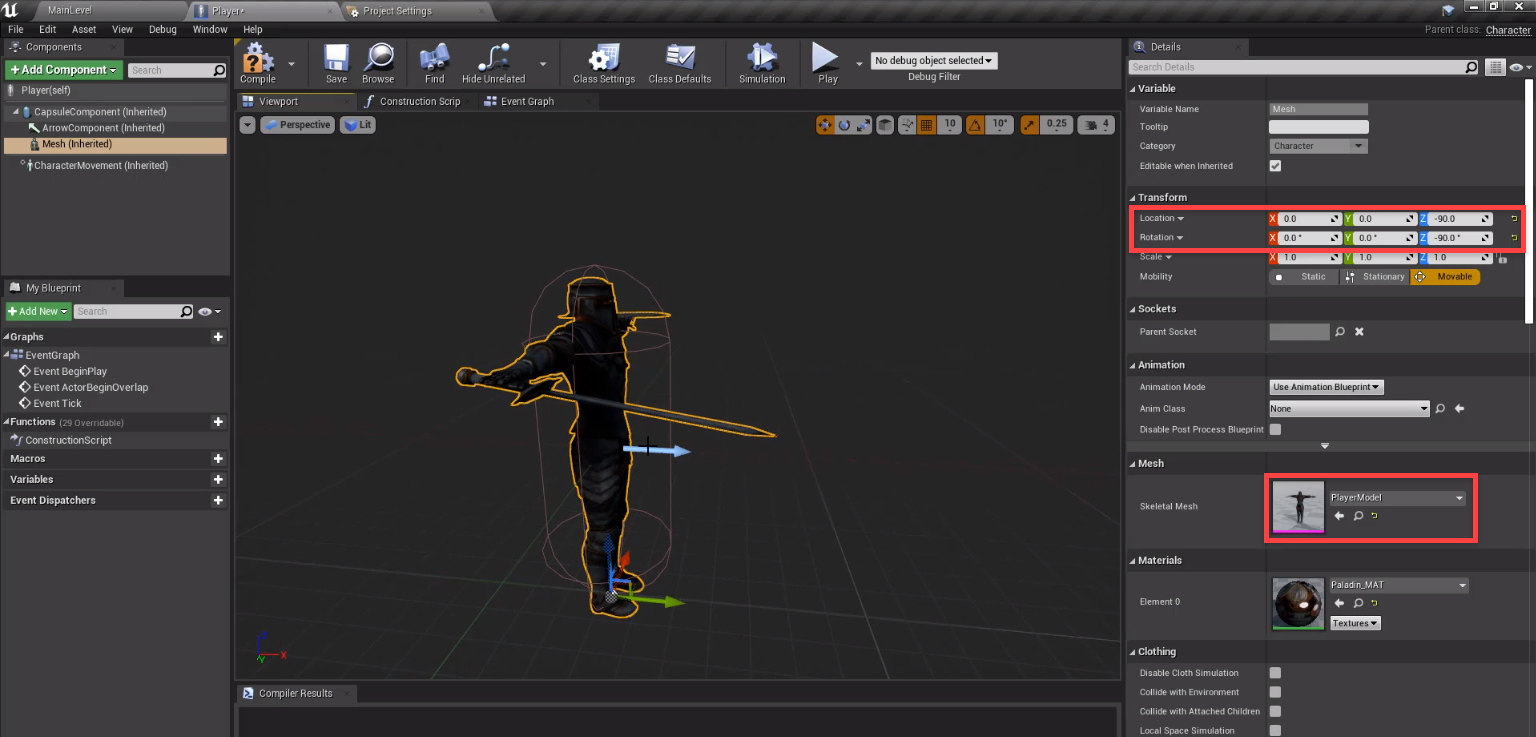
Double-click to open it up inside of the blueprint editor. You’ll see that we have a number of default components. These help us out with creating our player. To begin, select the Mesh component.
- Set the Skeletal Mesh to PlayerModel
- Set the Location to 0, 0, -90
- Set the Rotation to 0, 0, -90
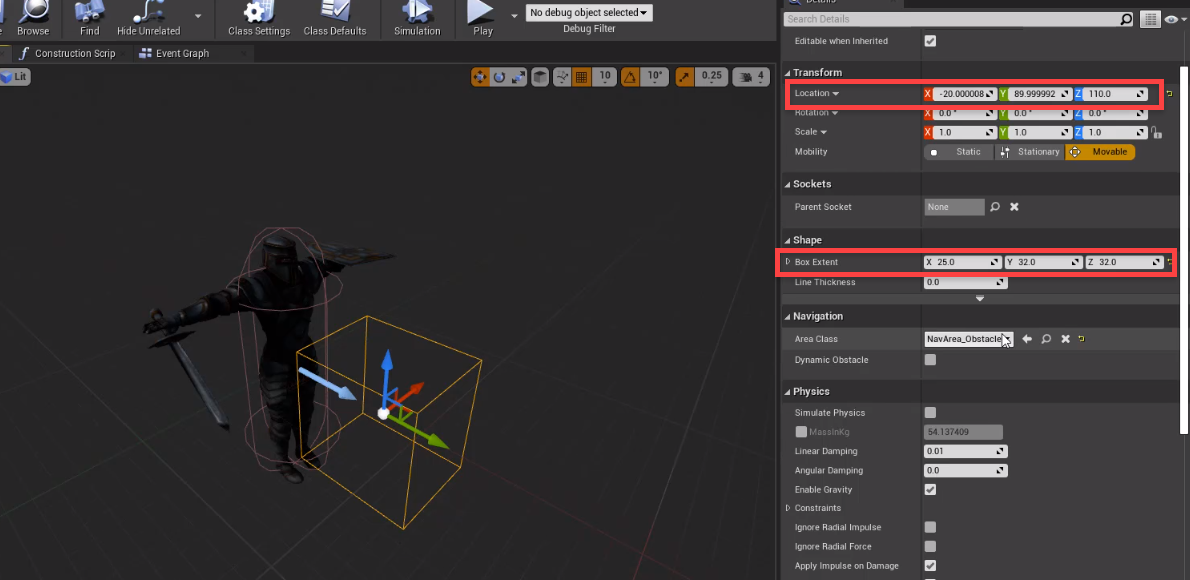
Next we’ll create the damage collider. Create a new Box Collision component as a child of the mesh component. Rename it to DamageCollider.
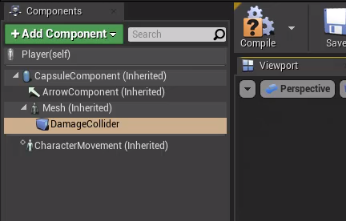
- Set the Location to -20, 90, 110
- Set the Box Extents to 25, 32, 32
- Set the Collision Presets to Trigger (not pictured)
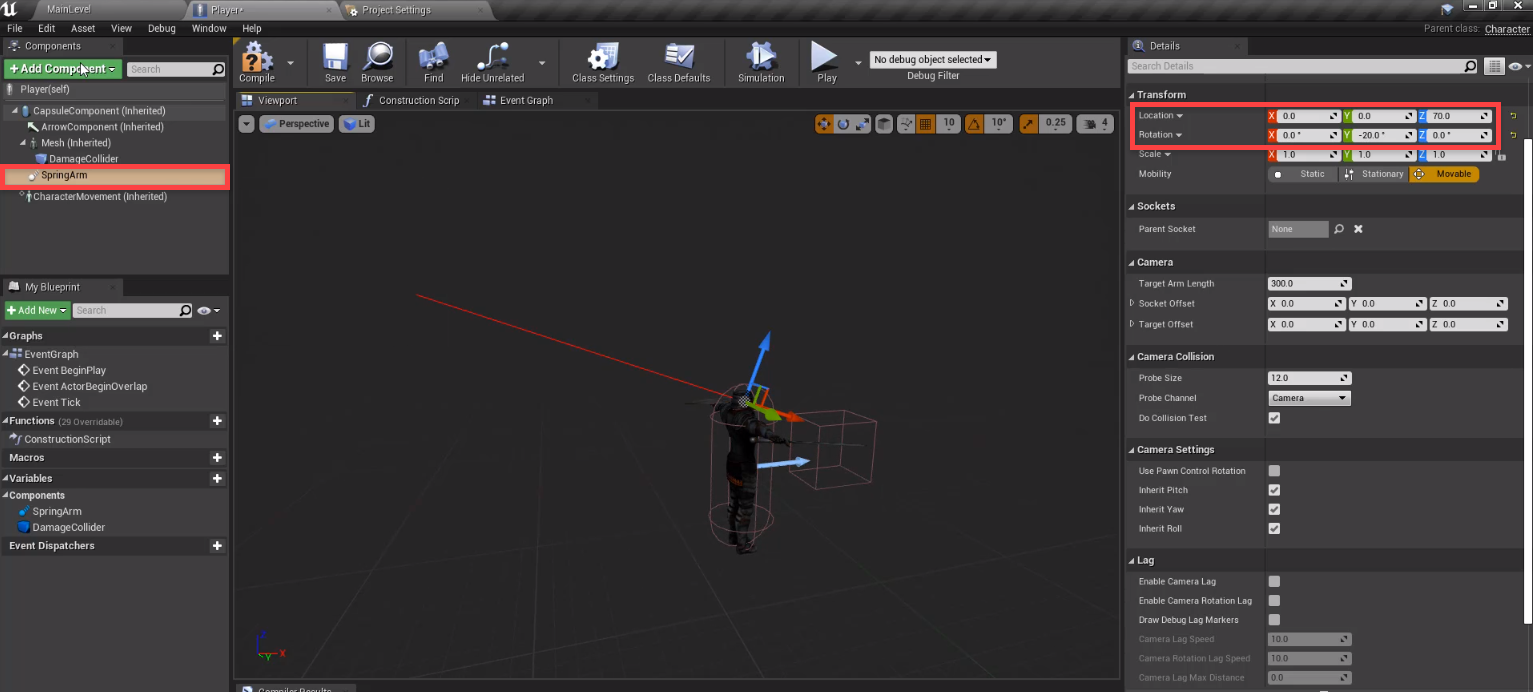
Now we need to create our camera which will follow the player. This will be done by using a spring arm. This is a component which connects the camera to the player and also allows for collision detection. Create a new Spring Arm component.
- Set the Location to 0, 0, 70
- Set the Rotation to 0, -20, 0
As a child of the SpringArm component, create a new Camera component.
- Set the Location to 0, 0, 70
- Set the Rotation to 0, -20, 0
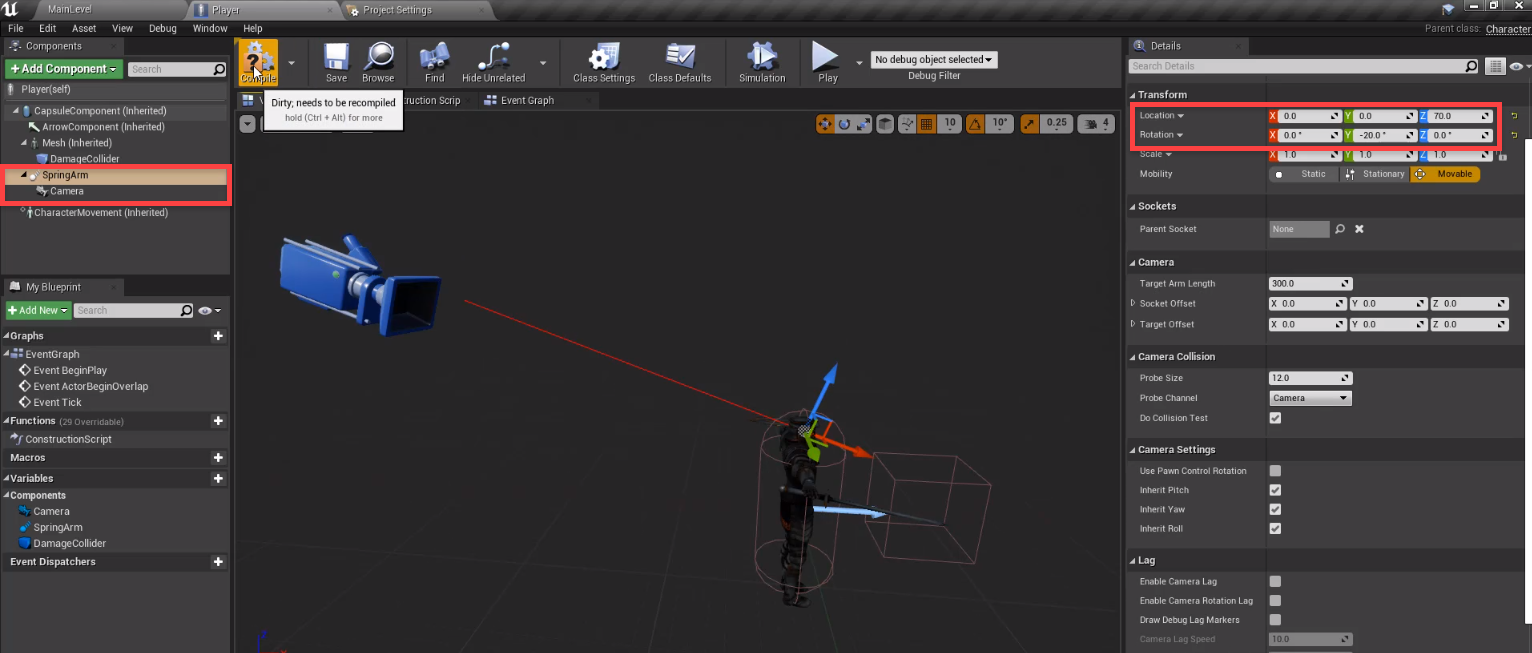
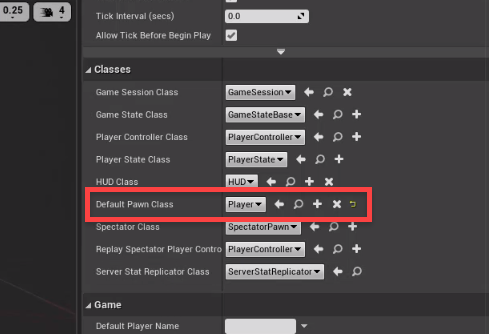
We can then click compile, save then return to the level editor. In order for the game to know what our player is, we’ll need to create a new blueprint of type GameMode Base called MyGameMode. Open it up and inside, set the Default Pawn Class to Player. Save, compile, then return to the level editor.
To assign this game mode, go to the Details panel and click on the World Settings tab. Here, set the GameMode Override to MyGameMode.
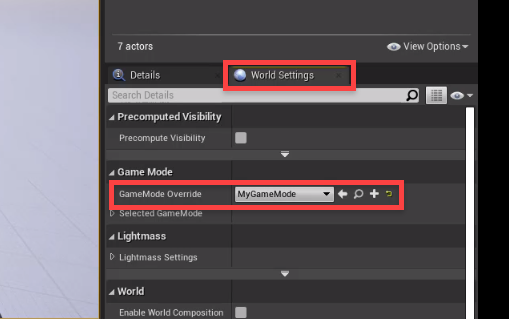
Now when you press play, you should see the player spawn in, with us looking through the camera.
Camera Setup
Orbiting the Camera
In this lesson, we’re going to set it up so that we can rotate the camera around the player with our mouse. Inside of the Player blueprint, let’s go over to the Event Graph. First, we want to create a new event node called Mouse X. This gets triggered when we move our mouse and it outputs the horizontal axis value.
Plug this into an AddControllerYawInput node like below.
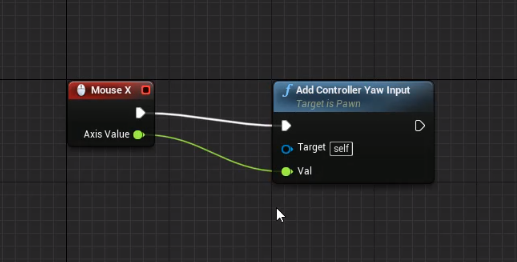
Compile, save and press play. You’ll see that we can move the mouse horizontally to rotate the player.
Now let’s rotate the camera up and down. We can’t do it like before since this will rotate the player sideways. Instead, we want to set it up like this:
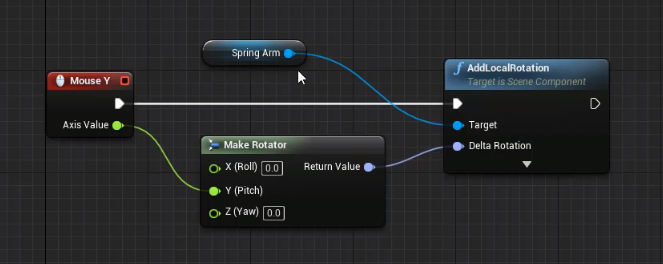
One problem with this, is that the camera can rotate all the way around the player. To fix this, we need to clamp the vertical rotation. To begin, we want to set the spring arm rotation after we add to it.

To clamp, let’s start by getting the target rotation of the spring arm and breaking it.

Connect this to a Clamp Angle node.
- Set the Min Angle Degrees to 45
- Set the Max Angle Degrees to 20

Then we can plug that result into the Y of a make rotator node, and plug that into the set rotation node.
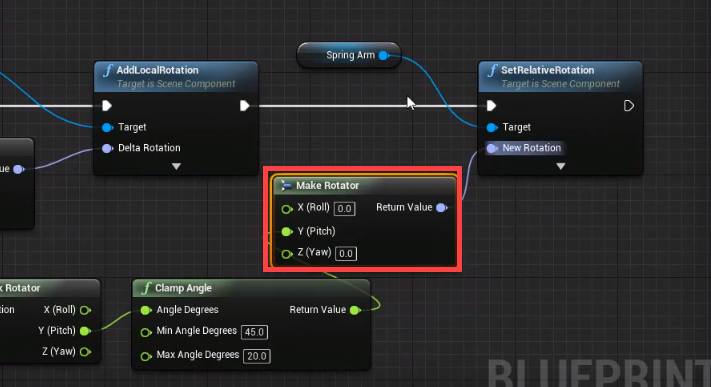
Now you should see the camera rotation is clamped vertically.
Transcript
Player Setup
Welcome back everyone. In this lesson we are going to begin to create our Player Blueprint. This is gonna be featuring our Player model, it’s gonna to be featuring the colliders, the camera, everything we need in order to have our Player set up and ready to go.
So inside of our blueprints folder here, I’m gonna right click and create a new blueprint class. This is gonna be of type character, which basically gives us some preset things such as a Capsule Collider, a Mesh, a forward Direction, and also includes a Character movement Component which allows us to easily set up the player movement, the camera rotating, jumping, ground detection, and many other movement related things.
So it will create a character right here and we are gonna call this one player. We can then double click to open this up inside of the Blueprint Editor. I’m gonna dock it to the main window here. And as you can see here, we have a few things set up already for us. We have a capsule component here, which is collider, we have an arrow component, this is this blue arrow right here. And this just defines the forward direction. We have a mesh, which is going to be our Player mesh which we can then animate later on. And the character movement component, which as you can see here in the details panel includes a lot of different options we can tweak in order to find sharing our movement, okay?
So the first thing we’re gonna be doing is setting up a mesh. So I’m gonna select our mesh here, and I’m gonna select the skeletal mesh, and I’m gonna change this to our Player model right here. So there we go. We’ve got our Player model now in here, but it doesn’t really match the bounds or the direction of this capsule, we need to rotate it and move it down a bit. So I’m gonna set the Z location to be negative 90, so it is down in the correct position.
And now we just need to rotate it negative 90 on the Z as well, so it is facing in the correct forward direction it’s facing in its positive X direction luxor, okay? So we’ve got our player mesh there. Now what we need is the damage collider and the damage collider is basically going to be a collider that’s gonna check to see if there are any enemies inside of it when we are attacking.
So as a child of mesh, we can just select mesh here to arrow component and I’m gonna type box collision. And I’ll just call this one our damage collider luxor. And in terms of positioning it, we can just lift it up here, move it forward a bit and have it about there. So over here where we have the box extents, I’m gonna change this to be 25. And let’s also position it to the left a bit since that’s where the weapon is. Make sure it’s around in line like so and there we go.
Okay, so along with this, we also want to make sure that it is not a solid collider it needs to be a trigger that objects can move through. So down the details panel, let’s make sure generate overlap events is enabled. And let’s change the collision presets from overlap all dynamic to trigger okay, there we go.
Now what we can do is set up the camera. And the way we’re gonna do the camera is by attaching it to something known as a spring arm. And a spring arm is a very handy component which basically sets its child object or its child component a fixed direction and distance away from it. So what we can do then, is just rotate the spring arm and the camera is gonna rotate around our player.
So I’m gonna go add component, I’m gonna look for a spring arm. Make sure it is a child of the capsule component and not the mesh. So with this spring arm now, all we need to do is go to the details panel and change a few things.
First of all, we are on the point of orbit not to be around the waist of our player but probably up oops, probably up over near the players head right here. So to drag that up to the head there, we’ll set the wire rotation to be 20. Oh, negative 20 I mean, so we do have a bit of a downwards facing camera when we start off. And apart from this, we can leave everything as it is.
So what we’re gonna do now is as a child of spring arm, we’re gonna add component, we’re gonna look for camera, there we go. So now we got our camera in here, it is going to be right at the end of the spring arm as you can see here.
Now for our camera, what we want to do is move it over just a little bit to the right because since this is gonna be a third person controller, we probably don’t want the camera directly behind the play as that might sort of obstruct the view a bit. So normally what other games do, is they move the camera over to one of the sides a bit. So I’m gonna move this camera to be 60 on the Y location so it’s a bit to the right of the player.
And that is pretty much it. So if you select the spring arm on here, and we press E to get the rotation gizmo, you’ll see that if I rotate it, the camera follows along as well. Okay, so now what we can do is click save, click compile, we can go back to our main level here.
And we can set it up so that when we press play, our Player spawns in because right now if we press play, the play is not there, we just have controlled the default camera anchor, which just allows us to fly around similar to the main viewport.
So what we need to do is create a game mode so that it knows the default things such as the default player to spawn at the started level. So let’s right click here in the blueprint class, we’re gonna create a new blueprint. This one is gonna be a game mode base. And a game mode base basically defines some of the defaults, again such as the player, the default UI, the default multiplayer aspects, okay?
So we’ll go game mode base, I’m gonna call this one my game of mode. We can double click to open this up, this is also a blueprint. So we don’t actually have to add anything here if you do want some sort of global logic for your level, then you can probably add it to the event graph here, but we’re just gonna leave it as it is. And over in the details panel, we want to make sure that we have the default pawn class here. We want to change that our Player right here, okay? That’s all we need to do.
So we can click compile, we can click save, we can close out of the game mode here, I’m also gonna close out our project settings. And in our main level here, let’s go over to the world settings tab, which is inside of the details panel here, and world settings basically, global settings for the current level. So we can change things such as air game mode override. Right now it’s on none which means there’s no game mode active. So let’s select that and choose my game mode.
So now when we press play, the game is gonna look at the game mode and go okay, what is the default player class to spawn? It’s gonna see it is our Player blueprint. So it is gonna spawn the player blueprint in on this player start position right here. So we can press play and there we go.
This is our player blueprint setup, it’s spawning in. Now all we need to do is implement the functionality to actually look around with the mouse rotate the camera and move around with the keyboard. So we are gonna be beginning on setting up the camera orbiting in the next lesson. So I’ll see you all then.
Camera Setup
Welcome back everyone. In this lesson, we are gonna be setting up the camera orbiting system, for app play blueprint here. In the previous lesson, we set up the play blueprint, so it has all the components set up ready to go. We also have this spring arm component, which if we go to the rotation tool, we can rotate it around, which has the camera then orbiting around the player. Okay?
So in this lesson, we’re gonna make it so that whenever we move our mouse, the camera rotates around a player.
So, let’s go to the event graph here, and what we’re gonna do is start off by deleting these three nodes that are here by default, so that we have a blank canvas here, and to begin, we’re gonna set up the horizontal movement. So, when we move the mouse left or right, the camera is gonna rotate left to right around the player.
And to do this, I’m gonna right click, and I’m gonna go mouse X, and you’ll see that we can get mouse events. We want to get the mouse X input event. And what this means, is pretty much whenever the mouse moves, this gets triggered and it sends over an axis value of the current map of the current horizontal mouse movement. Okay? So, this value ranges from negative one to one, negative one, meaning the mouse is moving left, one, meaning the mouse is moving right, and zero, meaning the mouse isn’t moving at all.
But with this, we aren’t actually gonna be rotating the spring arm or the camera, instead we’re going to be moving the entire player, left or right. We’re gonna be rotating them around, because, when we move around, we want the player to always be facing in the forward direction that the camera is.
So, we’re gonna drag off from here, and, we are gonna go to the add controller, your input node right here. And what this does is, this adds a certain value to our control is your input, which is the vertical rotation. So if we plug access value into the value input, that is all we need to do. And this is a node here, that is set up for us by this character movement component. This involves all of the movement, variables and properties that we can modify.
So if we save this compile press play, you should see that when we moved the mouse left and right, the character rotates to face the forward direction. So no matter where we look the player’s always rotating with us as we move the mouse. Okay?
So, we got the left and right movement, but, what about the up and down? Well, that’s a bit different because with this, we are gonna be rotating the spring arm. We don’t want to rotate the entire player, because that will look a bit weird so, we can be irritating the camera up and down. Okay? So, what we’re gonna do for that, is just like getting mouse X.
We now need to get mouse Y, so, mouse events, mouse Y here. And this trick is when we moved the mouse up and down, axis value again ranging from, a one being moving the mouse up, and negative one being moving the mouse down. And, we want to plug this into an add local rotation. Add local rotation. On the spring arm component here. Okay? There we go, creates that.
So, what we’re doing here is, we are gonna add a rotation to the spring arm, and that rotation is going to be along the Y axis. And the Y axis, if we go to the viewpoint here, select the spring on. The Y axis, is this green one here. So we can move this up and down, so the camera goes like so.
Okay. So, in event graph, to do that, what we’re gonna do is right click, and create a new node called make rotator. This basically creates a rotation for us, which we can then plug into, this add local rotation node like so, and X value, we are gonna be plugging into the Y axis here, on the micro data node. So, basically it was sending over a delta rotation, which is gonna be added on to the existing spring arm rotation.
So, if we press play, you’ll see that we can move left and right, but we can also move up and down. Like so. But something you may notice, is that if we keep moving down, our camera just keeps going around, and we can actually go 360 degrees, which isn’t probably what you want.
And something else you may also notice, is that when the camera goes down, and it hits the ground, it sort of moves towards the player. This is really cool, as the spring arm already has included with it, basically detecting if there’s anything between, the start of the spring arm and the camera. So if there’s anything between it, it pretty much snaps the camera, so, it is always looking at the plan. Nothing can ever get in the way between the camera, and the player. Which is really good. Okay?
But we still need to fix the issue of actually being able to rotate all the way around like this, as it may be very disorientating, to use as the player. So, what we need to do for this is clamp the rotation. And clamping the rotation basically means, we get the Y axis here, the Y rotation, and, we want to make sure that it never goes below a certain number, and never goes above a certain number.
So to do this, I’m gonna plug this add local rotation node, into a set relative rotation for the spring arm. So after we add the rotation to this spring arm, we then want to set it, so that is, make sure it’s in between two certain values. So over here, what we’re then gonna do, is create the get targets rotation node on the spring arm. And this year basically just returns to us the rotation of the spring arm currently.
So, we wanna get that. And then we want to plug this rotation here into a break rotator node. And what this does, is pretty much the exact opposite of make rotator. Instead of creating a rotation, it gets a rotation and breaks it up into each of the individual axis, which we can use. Now, since a vertical rotations are only dependent on the Y axis, we’re gonna get this, and we are gonna plug this into a clamp angle node here.
Okay. And this clamp angle node, has a few things. First of all, it has the actual angle that we are inputting into it, which is our Y axis. And then we have a min angle degrees, and a max angle degrees. And these are basically the min and max values that these angle can possibly be. So, the minimum rotation, we’re gonna have it at about 45 degrees, and the max rotation, we are gonna have it at 20. Okay. You might wanna tweak these numbers a bit, as we continue on, as you may want it a bit higher, you may want it a bit lower. Okay. So we got this value here.
Now we need to make it into a rotator again, so we can plug it into this set relative rotation node, so we’re gonna put this into make rotator, we actually wanna delete this connection, and make sure it was connected to the Y axis here. And, then we can just plug that into the new rotation input, on the set relative rotation node. And there we go. So this is pretty much it, in order to set it up so that it clamps the rotation. So it can’t get too high, or too low, let’s now press play and see if it works.
So here we go, we can rotate left and right. And if I moved down, you’ll see that it stops, when I reach here. I can no longer move the camera down anymore. I can move it up and it stops here. So I can’t move it up anymore either. So there we go. We’ve got our camera rotation set up. We can rotate left or right, we can rotate up and down, and, that is all good.
So, in the next lesson, we are going to be looking at actually setting up app play movement. So that we can actually start moving around, jumping, and then later on, setting up the abilities to actually attack.
Okay. Now before we go real quick, I’m gonna probably put these in some comments, so that they’re a bit neater. So, I’m gonna get these here, select these two nodes, right click, go create comment from selection, and I’m gonna call this one our camera, rotate, (keyboard clicking) camera rotates, horizontal. (keyboard clicking) Okay. We can then readjust these, like so, shrink this down a bit. It’s really good practice to actually, comment your nodes as later on, once you have many, many new nodes in your project. It may be quite hard to understand what you shouldn’t do, especially if they’re all messy, like this right here. So I’m just gonna tidy them up a bit.
We can then select them again, and, I’m gonna right click, create comment from selection, and this one is going to be called, our camera rotate vertical. All right. We can always select these again, readjust them to a position where we want them, and, there we go.
Okay. So yeah, overall, make sure you do comment your nodes, we’ll be doing this again in the future, for a movement for our jumping. Just so you can see what each of the different segments here are, at a quick glance. Okay. So, thank you for watching. And, I’ll see you all in the next lesson.
Interested in continuing? Check out the full Build an Action RPG in Unreal Engine course, which is part of our Unreal Game Development Mini-Degree.

