You can access the full course here: Build a Mobile Road Crossing Game
Player Setup
In this lesson, we’re going to be setting up a Player GameObject*; this is going to be the object which is going to act as our player.
*(A GameObject is the base class for all entities in Unity that you can attach various different components onto.)
Creating A GameObject
Let’s open up the Assets > Sprites folder,

… and drag our player sprite into the Hierarchy.
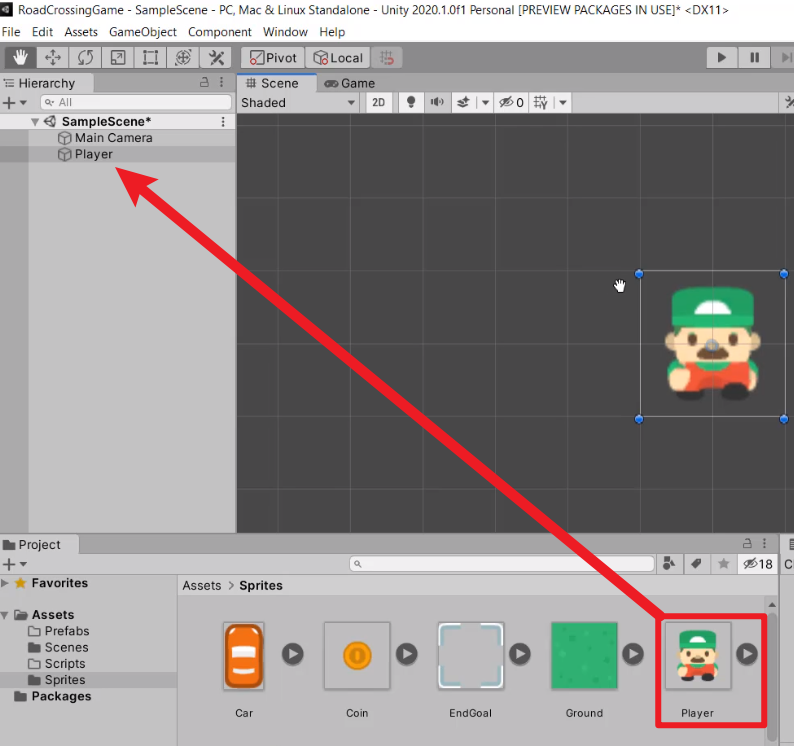
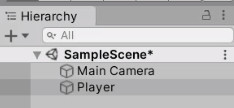
This is going to create a brand new GameObject called Player.
Adding Components
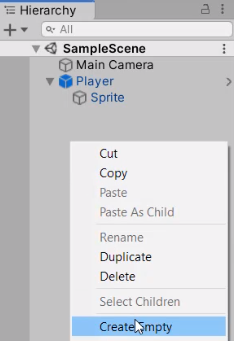
We’re going to create a new empty GameObject (Right-click > Create Empty)
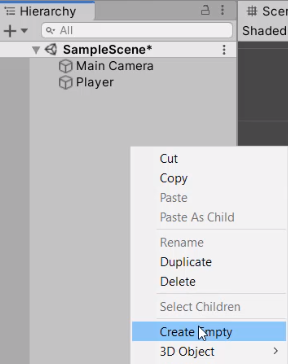
(It’s generally good practice to have the most parent object to be empty as it allows you to finely adjust the child sprite position and pivot.)
We’re going to rename this GameObject as “Player”, and reset its position to 0, 0, 0.
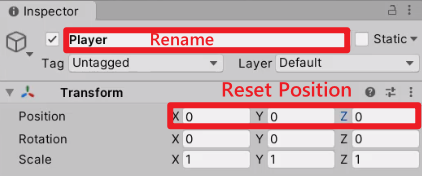
And then, we’re going to rename our player sprite to “Sprite”
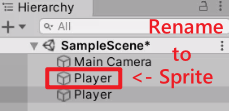
and drag it in as a child of “Player”.
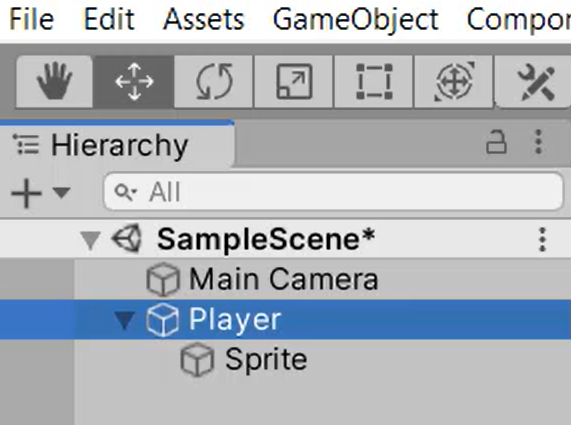
Make sure that the Sprite position is at 0,0,0 as well.
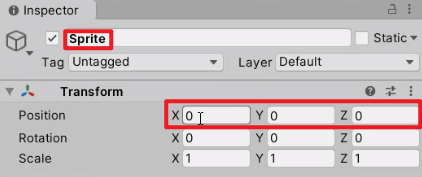
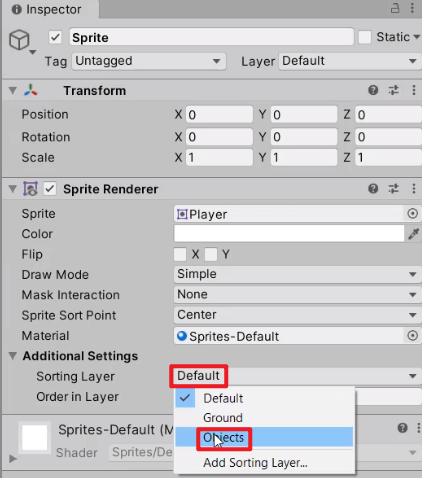
To render this object on top of the Ground sprite, we’re going to change the sorting layer from “Default” over to “Objects“.
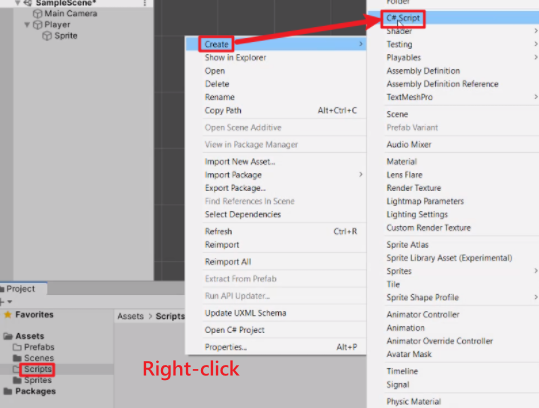
Now we’re going to create a new C# script called “Player”. In our Scripts (Assets > Scripts) folder, Right-click > Create > C# Script:
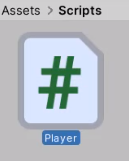
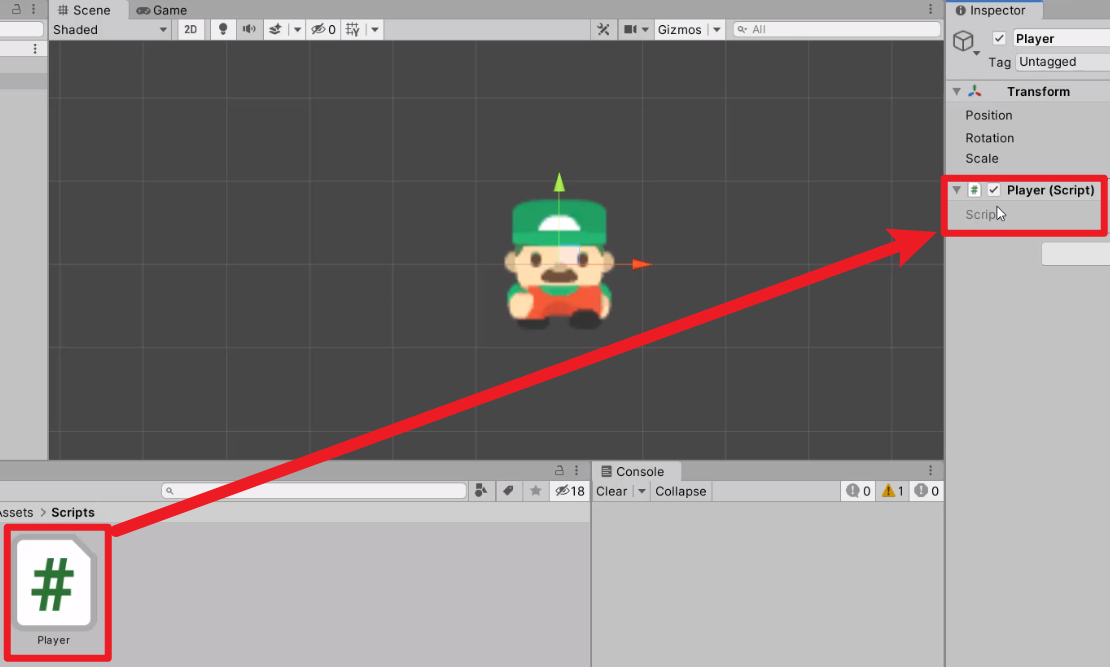
Select the Player script, and drag that into the Player Inspector.
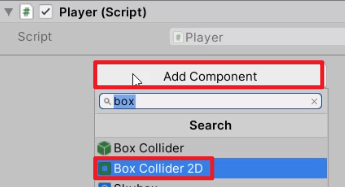
To add in a Box 2D Collider, click “Add Component” > type “Box” > select “Box Collider 2D“.
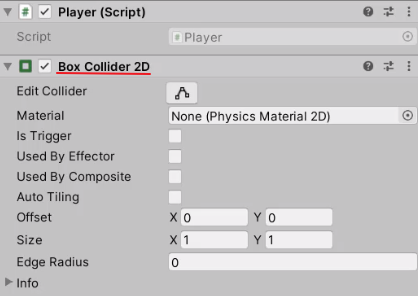
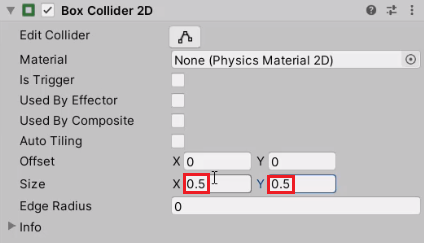
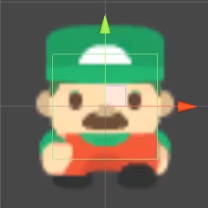
And then, bring the size on X and Y down to 0.5 in order to make the object a bit smaller than the actual sprite.
We’re now going to add a Rigidbody2D. To do that, click on Add Component > type “Rigid” > select “Rigidbody 2D”
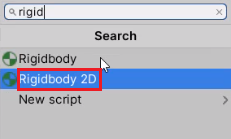
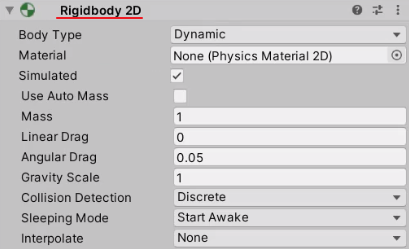
Let’s also make a Box Collider 2D a Trigger, so that we can actually go through other colliders.

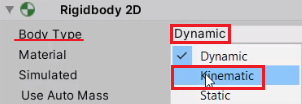
And down in our Rigidbody 2D, change Body Type from “Dynamic” to “Kinematic”. Kinematic behavior basically prevents the Rigidbody2D from reacting to gravity or applied forces.
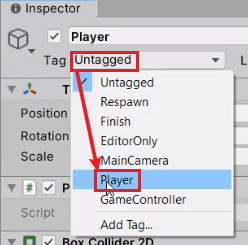
Finally, let’s go ahead up in the Inspector and change the Tag of the player over to “Player“.
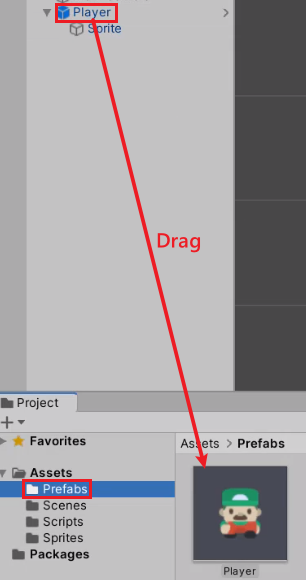
Save the settings, and then go over to the Prefabs folder, drag Player in as a Prefab so you can use it in the future levels.
Swipe Detection – Part 1
In this lesson, we’re going to begin setting up the ability for our game to detect touches for moving the player.
Creating A GameManager
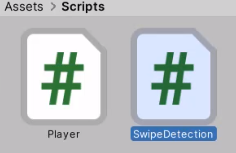
Let’s create a new C# script called SwipeDetection in the Scripts folder.
We’re going to create a new empty gameObject, and rename it to _GameManager.
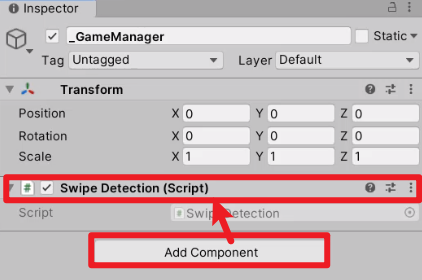
We will then attach the SwipeDetection script to _GameManager.
Adding Swipe Detection Functionality
Inside of the SwipeDetection script, we’re going to check if we have swiped the finger left/right/up, and move towards the direction of the swipe.
First of all, we need to create a variable to store our Player so that we can, later on, tell it to move:
public Player player;
Next, we need to create a Vector2 that tells us the first touchpoint of your finger on the screen, and we’ll check to see if it’s left, up, or right.
public Player player;
private Vector2 startPos;
Then we need to create another variable to set how many pixels do we have to swipe in order for it to be detected. We’re going to set this a public integer with a default value of 20.
public Player player;
private Vector2 startPos;
public int pixelDistToDetect = 20;
And lastly, we need to create a boolean to check if we have a finger down.
public Player player;
private Vector2 startPos;
public int pixelDistToDetect = 20;
private bool fingerDown;
Using these variables, we’re going to check to see if we have pressed a finger down in the Update function.
void Update()
{
    if(fingerDown == false && Input.touchCount > 0 && Input.touches[0].phase == TouchPhase.Began)
}
To detect if a finger is down for the first time correctly, we put three different conditions:
- Is the fingerDown currently set to false?
- Is Input.touchCount* greater than 0? (*Input.touchCount will increase as more touches are detected on the screen at a time.)
- Has the first touch (touches[0]) just Began? (= Is this the first frame the finger is down?)
void Update()
{
    if(fingerDown == false && Input.touchCount > 0 && Input.touches[0].phase == TouchPhase.Began)
    {
        // If so, we're going to set the startPos to the first touch's position,
        startPos = Input.touches[0].position;
        // ... and set fingerDown to true to start checking the direction of the swipe.
        fingerDown = true;
    }
}
If the finger is down, then we can start checking which direction the finger moves into. For example, if the finger ends up moving away from the start position along the y-axis, it means it just swiped upwards.
//Is our finger touching the screen?
if (fingerDown)
{
    //Did we swipe up?
    if(Input.touches[0].position.y >= startPos.y + pixelDistToDetect)
    {
         fingerDown = false;
         Debug.Log("Swipe up");
    }
}
Now for testing purposes, we’re going to duplicate this code and use it in terms of the mouse. So instead of Input.touches[], we’re going to use Input.GetMouseButtonDown to detect mouse clicks.
//Testing for PC
if (fingerDown && Input.GetMouseButtonDown(0))
{
    startPos = Input.mousePosition;
    fingerDown = true;
}
if (fingerDown)
{
    //Is the current mouse position 'pixelDistToDetect' away from 'startPos' on y-axis?
    if(Input.mousePosition.y >= startPos.y + pixelDistToDetect)
    {
         fingerDown = false;
         Debug.Log("Swipe up");
    }
}
Let’s save it and press Play.
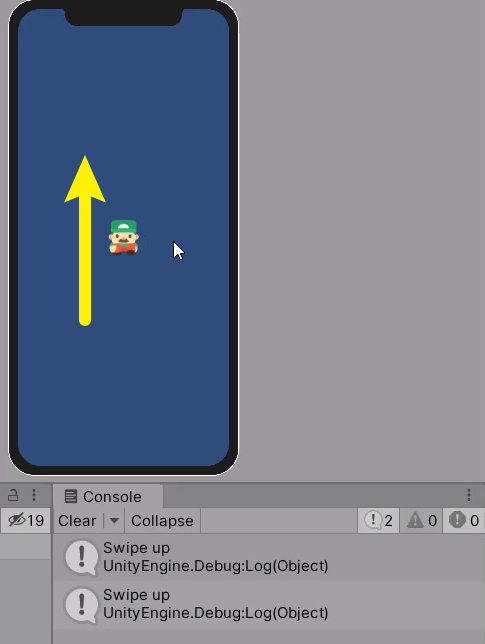
You can see that the Debug.Log works as intended as you click and drag upwards.
However, if your mouse moves off the screen, the script will not be able to calculate the next touch position correctly and return these errors.
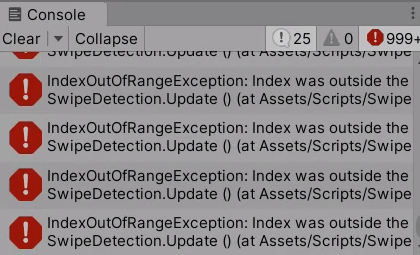
To prevent this, we need to reset the startPos by setting fingerDown to false whenever our mouse button is up.
//If the mouse button is up,
if(fingerDown && Input.GetMouseButtonUp(0))
{
    //startPos will be reset
    fingerDown = false;
}
We can also add the same functionality for touch inputs. Note that we need to check if the first finger is released from the screen, i.e. if the TouchPhase is set as ‘Ended‘.
//If the finger is released from the screen,
if(fingerDown && Input.touchCount > 0 && Input.touches[0].phase == TouchPhase.Ended)
{
    //startPos will be reset
    fingerDown = false;
}
Swipe Detection – Part 2
In this lesson, we’re going to be adding in left and right swipe detections.
Inside of SwipeDetection.cs, we’re going to add else if statements below where we detect if our finger swiped upwards:
//Is our finger touching the screen?
if (fingerDown)
{
    //Did we swipe up?
    if(Input.touches[0].position.y >= startPos.y + pixelDistToDetect)
    {
         fingerDown = false;
         Debug.Log("Swipe up");
    }
}
So to detect left and right swipes, we can detect the change in x-position of Input.touches:
//Is our finger touching the screen?
if (fingerDown)
{
    //Did we swipe up?
    if(Input.touches[0].position.y >= startPos.y + pixelDistToDetect)
    {
         fingerDown = false;
         Debug.Log("Swipe up");
    }
    //Did we swipe left?
    else if(Input.touches[0].position.x <= startPos.x - pixelDistToDetect)
    {
         fingerDown = false;
         Debug.Log("Swipe left");
    }
    //Did we swipe right?
    else if(Input.touches[0].position.x >= startPos.x + pixelDistToDetect)
    {
         fingerDown = false;
         Debug.Log("Swipe right");
    }

}
If you save and hit Play, you’ll see that Debug.Log works as intended:
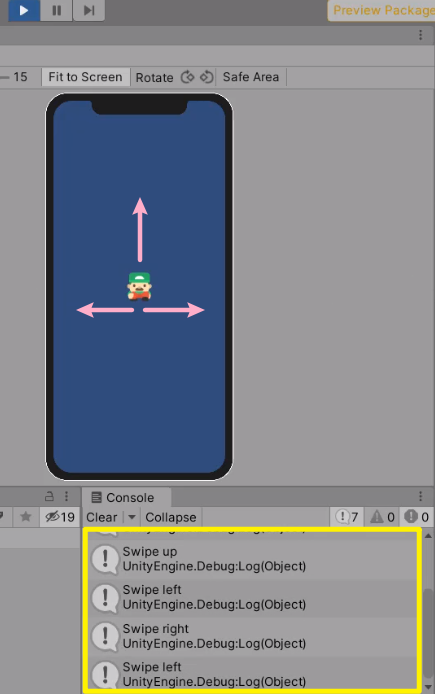
Moving Player
We’re going to replace Debug.Log and start actually moving our player. To do that, let’s first open up Player.cs and declare these variables.
public class Player : MonoBehaviour
{
     //Stores how long it takes to get from one tile to the other
     public float moveSpeed;
     //Where is this player trying to get to
     private Vector3 targetPos;
}
Inside the Start function, we’re going to set the target position to be the current position, i.e. transform.position:
public class Player : MonoBehaviour
{
     //Stores how long it takes to get from one tile to the other
     public float moveSpeed;
     //Where is this player trying to get to
     private Vector3 targetPos;

     void Start ()
     {
          targetPos = transform.position;
     }
}
Next, we’re going to create a new public void function called Move, which is going to carry over a Vector3 (move direction) as a parameter.
Then we can update our target position by this given move direction.
public void Move (Vector3 moveDirection)
{
     targetPos += moveDirection;
}
Now, inside the Update function, we need to actually move our player towards the target position using Vector3.MoveTowards.
private void Update ()
{
     //Move towards the target
     transform.position = Vector3.MoveTowards(transform.position, targetPos, moveSpeed * Time.deltaTime);
}
Note that moveSpeed is multiplied by Time.deltaTime to convert the speed unit from per frame to per second. Let’s save the Player script and go back to SwipeDetection.cs.
We’re now going to replace all the Debug.Log with the player script’s Move function, passing in a direction to move towards.
//Is our finger touching the screen?
if (fingerDown)
{
    //Did we swipe up?
    if(Input.touches[0].position.y >= startPos.y + pixelDistToDetect)
    {
         fingerDown = false;
         //Move upwards
         player.Move(Vector3.up);
    }
    //Did we swipe left?
    else if(Input.touches[0].position.x <= startPos.x - pixelDistToDetect)
    {
         fingerDown = false;
         //Move left
         player.Move(Vector3.left);
    }
    //Did we swipe right?
    else if(Input.touches[0].position.x >= startPos.x + pixelDistToDetect)
    {
         fingerDown = false;
         //Move right
         player.Move(Vector3.right);
    }

}
Lastly, we’re going to assign a value for PixelDistToDetect, and link our Player gameObject into the player property.
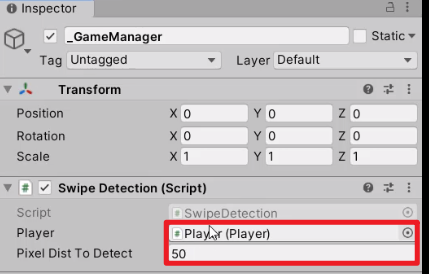
If we hit Play, we can now swipe up, left, right to move our player.
Transcript
Player Setup
Welcome back everyone, in this lesson, we are going to be working on setting up a Player GameObject. This is going to be the object, which is going to act as our player. We’ll be moving it for our level, and it will be able to interact with various different things.
So, first of all our scene view here, let’s go down to sprites photo, and I’m gonna drag in our player’s sprite right here. Okay, drag then into the hierarchy, and it has been created here in a scene. Now we’re not going to be actually having our sprite as the main parent object, instead we’re gonna be using an empty game object as the parent.
So here in the hierarchy, I’m gonna right click create empty, I’m gonna call this one player, and I’m gonna set the position to be zero, zero, zero, so is nice and centered in the middle of the screen here. We can then select our player sprite, I’m gonna rename this to be sprite, and I’m gonna drag that in as a child of player, making sure that the position is at zero, zero, zero as well.
Now on our player sprite here, let’s also change the sorting layer from default over to objects, since we do want this to be rendered on top of the ground sprites. And on our play a main object now, what we can do is start attaching all of our components that we need. So, first of all, we need a player script, and this is going to manage moving the player and interacting with various different things.
So over in our scripts folder, what I’m gonna do is a right click and create a brand new C-sharp script called player. We can then go to our player object and attach that script as a component, okay? So, wait for that script to compile, select our player, and drag that player script on, there we go. Next we want to add in a Collider, and we’re gonna add component, and for our character here, let’s add in a Box Collider 2D.
Now by default, it’s gonna be a bit larger than the actual sprite, because the sprite bands do have quite a bit of padding on the side. So what we’re gonna do, is we’re gonna bring the size on the X down to probably around, let’s just say 0.5, and we could also maybe go a 0.5 on the Y as well, because really, we are only going to be detecting hits and all that with the coins, with the flag, with the cars, when the player is on the tile where it’s gonna be hit pretty much, so the clod doesn’t really matter too much. I just recommend making it a bit smaller than the actual sprite, to allow for some leeway.
And in order for us to be able to actually detect collisions, one of the objects that are colliding or triggering need to have a rigid body component, need to have that physics component attached. So we’re gonna go add components, and we gonna go Rigidbody 2D, and while we’re at it, let’s also make a Box Collide 2D a trigger, so that we can actually go through things and bounce off objects.
And down in our Rigidbody 2D, we don’t want to give the player any sort of mass, or any sort of velocity or gravity, we want our player to pretty much be how it is right now, but with a Rigidbody 2D component. And what we can do of that, is go up to where it says body type, and change that from dynamic to kinematic. And kinematic basically means that it’s got the Rigidbody 2D attached, we have access to the properties, but it’s not going to be affected by physics. Objects can push our player, gravity is not gonna be affecting it, so we have total control over where it goes, and how it interacts with everything. So, those are the components that we are going be attaching to our player.
Finally, let’s go ahead up in the Inspector here and change the tag of the player over to play here. You should have a player tag by default, and this is gonna be used for the coin, the car, and go to detect when they are hitting the player, okay? So they know that the object they’re colliding with, is the player. Okay, we can save that.
Now let’s go over to our prefabs folder and just drag that player in as a prefab so we can use it in future levels, and that is it. If we look in the game view now, you can see we have our player on screen, and of course, when we are actually creating our game, in the future lessons, we’re going to be having a sort of portrait mode aspect ratio, because this game is going to be targeted towards mobile phones, and you’re going to play it with your phone upright.
So, right now the resolution or not the resolution, but the aspect ratio is 16 by nine, meaning that, it is your default monitor size, so we’re gonna be resizing that later on with the device simulator. And in fact, we’re gonna be working on the devicing later in the next lesson, so we can actually get those mobile aspect ratios set up and ready to go.
So, thanks for watching and I’ll see you all in the next lesson.
Swipe Detection – Part 1
Welcome back everyone. In this lesson we are going to begin setting up the ability for our game to detect touches, thus moving the player forwards, left or right, okay.
So let’s begin by going to the scripts folder and creating a brand new C# script here. And this one is gonna be called Swipe Detection, okay. We can go ahead and create a new game object here in the hierarchy. We’re gonna create an empty object and this one is gonna be called _GameManager. Okay. It’s just where I like to store all my scripts on a game manager object here, such as Swipe Detection, you have any sort of overall management scripts.
And what we’re gonna do then is we are just gonna double click on this script to open it up inside of Visual Studio. Okay, and here we are, so first of all, what I’m gonna do is just delete these standard if functions since we can add those in later on when we need them.
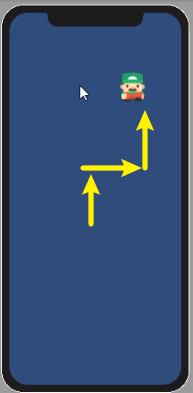
And inside of this script, what were you going to be doing is detecting when we have put our finger down on the screen. And once that happens, we are gonna check to see if we have swiped the finger left, right or up. If we have swiped it up, we’re gonna move forward. If we swipe it left, we’re gonna move left. And if we swipe it right, we’re gonna move right. Okay. And this is gonna basically allow you to select anywhere on the screen to swipe. Okay. You don’t have to go in the center of the screen and swipe left or right. You can go to the bottom left of the screen and swipe right, and it’s gonna move you right.
So what we’re gonna do, first of all, is create a few variables. First of all, we’re gonna create a public player variable here. So make sure it is of type class player, which is the name of the script that we created a few lessons ago. And this is gonna basically store our player so that we can later on tell it to move once we have detected a certain swipe.
Next, we need to create a private vector2. And this is going to be for the startPos. Okay. And by start position, this basically means where is your finger touchdown on the screen for the first time, okay. And then from there, we’ll check to see if it’s left, up or right.
Then we need to create another public variable, public float. Actually, we may say public integer, and this is going to basically be how many pixels do we have to swipe in order for this to be detected? So this is gonna be called pixelDistToDetect. And by default, let’s make this equal to around, we’ll make it 20, okay, so you don’t have to swipe far. You only have to move your finger a little bit in a certain direction in order to have it detected.
And one more variable we need to create is going to be a private boolean. And this is going to basically be true or false for if we have a finger down. Okay. So I’m gonna hold this one fingerDown. And if we touch that finger down, that’s gonna be set the true. So once that is true, we can then detect if we’re swiping left, right or up.
Okay, so now what we need to do is create the update function. So void update, and inside here, we want to, first of all, check to see if we have pressed that finger down. So what we want to do is go if the finger down equals equals false. So if our finger is currently not down, and input .touchCount is greater than zero, so do we now have a finger on the screen? And is that finger, which is touching the screen, is that the first frame that it is down on the screen?
So for this, we can go input, Oops, not that big line of text, we just want to go and input.touches, and touches is an array. So we want to get the first touch out of that array, .phase equals equals TouchPhase.Began. Okay. So this is quite a big enough statement. We have three different conditions.
First of all, we’re checking to see if fingerDown is equal to false. Then we’re checking to see if we have more than zero touches on the screen. And then we’re checking to see if the first touch on the screen, if this is the first frame it is down. And if so, we are gonna go startPos equals Input.touches[0].position, okay. So the position on the screen where you’re touching down, and then we also want to go fingerDown equals true. And there we go. That’s how we detect basically if a finger is down for the first time. We set fingerDown to true and we set the start position to be where we put our finger down.
So, let’s save that, go down to the next line here. And the rest of this code is gonna be, if a finger is down on the screen, so, if fingerDown in this begin of statement right here, we then want to see, first of all, have we swiped upwards? Have we swiped our finger up, and to check that, we can go if the input.touches[0].position.Y, if this Y position is greater than or equals to our startPos.Y plus the pixel distance to detect, then this is gonna register as a swipe up.
So what we can do here is go fingerDown equals false, and then go Debug.log. And this is gonna be “Swipe up”. Okay, so, we have detected a swipe up, and as a matter of fact, we should be able to test this out inside of the editor, because right now we are checking for touch inputs, and since we are making this on a computer, we need a way of actually testing this out with our mouse. And what we’re gonna do is at the bottom here, at the bottom of the if statement oh, I mean the update function, I’m gonna go // and this is gonna be for TESTING, okay.
And in here, we’re gonna go if fingerDown equals equals false. So basically we’re doing the same code we have right here.
And as a bit of a challenge, I want you to go ahead and see if you can sort of duplicate this code we have right here, but use it in terms of the mouse, okay? You might need to look up some stuff online if you’re not too sure on certain things on how to get the mouse position, but I want you to have a go at this and then we’ll be right back to see how you done.
Okay, welcome back. I hope you had a go at that. So let’s have a look at how we can do this. So for detecting, first of all, if our finger or our mouse is down, we want to go if fingerDown equals equals false, and the Input.GetMouseButtonDown(0), so this is gonna be true on the frame. The left mouse button down, the left mouse button is down. And then if our finger is down, we just want to see if the Input.mousePosition.Y is greater than or equals to startPos.Y plus the pixel distance to detect.
Okay. So we’re just using Input.GetMouseButtonDown and Input.mousePosition for the different values. Okay? So we can save this, return to the Unity editor, and let’s go to our game manager object right here. We don’t have to give it a player. So let’s just go ahead and press play, and let’s try and swipe upwards. Okay. So it done that by default, don’t know why, but if we click and drag swipe up, if I swipe left.
Now you’ll see you might get a lot of errors like this. And the reason why is because there is some problems when it comes to actually checking to see if the finger is down. Maybe if you don’t move it in the correct position, or you move it in different direction, it doesn’t calculate things right.
What we need to do is make it so that if our finger is all of a sudden up or if our mouse button is up and off the screen, set finger down to false and reset the start position. So here we are going to create a new if statement called if fingerDown and Input.GetMouseButtonUp(0) for the left mouse button, then what we want to do is just go, oops, here, what we want to do is just set fingerDown, equals false, okay, that’s what we want to do there.
So if we go back to the editor and press play again, you should see that these errors are no longer appearing. So if we swipe up, there we go. Swipe down, nothing happens. We can swipe left, nothing happens, swipe right, nothing happens. Sometimes you may get a swipe up if you swipe right, so what we can do in that sense is change the pixels distance to detect, let’s change this to maybe 50. And now if we swipe up, we have to swipe a bit further in order for it to detect.
But if we swipe left and right, you should see that you’re not really getting any swipe ups, unless it’s on a bit of an angle. Okay? So, we’ve got swiping up. I’m gonna keep our pixel distance to detect at 50 here. And let’s also add in this little bit of code for the finger down in terms of touch.
So here, we’re just gonna go: If fingerDown and Input.touchCount is greater than zero and Inputs.touches, the first touch… So touches array with zero here for the first one, .phase equals equals TouchPhase.ended. Okay? So when the finger is released from the screen, here what we want to do is just go, like before, fingerDown equals false. And remember that we are creating two sets of code here, one for our touch inputs on a mobile device, and one for using the mouse for testing it out here inside of Unity. Okay. So we’ve got swiping up done.
Now in the next lesson, we are gonna be working on getting swiping left and swiping right. As well as having a player actually move around when they have been swiped. So see you all then in the next lesson.
Swipe Detection – Part 2
Welcome back everyone. In this lesson, we are going to be continuing on with our swipe detection script right here detecting when we have pressed our mouse or finger down on the screen and swiped up, left, or right. So in this lesson, we are gonna be adding in left and right swipe detections.
So to do this, we can go down to where we check and see if our finger is down and here is where we detect if we are touching and swiping upwards, now to detect the left, we can just go here, else if and then we can go input.touches[0].position.x is less than or equal to startPos.y minus the pixelDistToDetect. Okay, and if this is the case, we can go fingerDown = false and then go Debug.Log and in here, we want to go Swipe left and for swiping right.
We can go else if Input.touches[0].pos.x is greater than or equals to StartPos.y, oh, .x; actually, and in fact, let’s go here and change this StartPos.y to StartPos.x since we do wanna go along the horizontal axis, not the vertical for left and right back here, we can go, so if our touch position.x is greater than or equal to StartPos x plus the pixelDistanceToDetect. Then we want to go finger down equals false and then, not finger, finger down, so fingerDown equals false and Debug.log swipe right.
Okay, so that is how we can set it up for touch input, now, as bit of a challenge, go ahead and try, go down here where we have our input for our mouse and set it up for that. Okay, go ahead and I’ll be right back to see how you done.
Okay, I hope you had a go at that, pretty much it is the exact same as we done previously where all we had to do was change originally where it says Input.touches[0].position to be Input.mousePosition. Whatever in order to get the position of the mouse rather than the position of the touch.
So, we can save that, return to the Unity Editor and if we press play- in fact, let’s clear this first, press play, you should that we can swipe up in order to get the swipe up detections, we can swipe left, we can swipe right, and there we go.
So, left, right, up, and nothing for down, but we’ll get a right for down and since we are going on a bit of an angle, so there you go, we can swipe up to move forward, swipe left to move right, or swipe left to move left I mean, and swipe right to move right.
Now, how do we actually set it up so our player moves in that way, well, what we can do, is open up our player script by double-clicking on it, I’m gonna remove these start an update functions here and what we’re gonna do first of all is create some variables.
So, first of all, let’s get a public float moveSpeed, now a moveSpeed is going to define how long it takes to get from one tile to the other, so if we swipe left, it moves left one tile and how fast is it gonna get from that tile to the left one then we need a private Vector3 for the target position, so targetPos is basically going to be where is this player trying to get to and inside of the Start function. We can just set the targetPos to be whatever our existing position is right now since we don’t want the player moving anywhere at the start.
And then what we want to do is create a new function called public void Move and inside of the Move function here, it is going to carry over a parameter of a Vector3 called moveDirection, okay, and this is just going to be either up, left, or right, and inside of here. What we’re going to do is basically just go targetPos plus equals moveDirection, okay, and that’s all we want to do for this and we’ve set our target position but how do we actually move toward that target position?
Well, over inside of the update function we can go ahead and create that now so we can just go void Update and inside of here, we just want to over time, move towards our target position, so here we’ll go transform.position equals vector3.MoveTwards our current position is gonna be transform.position and our target is going to be the target position and we want to move at a move rate of moveSpeed multiplied by Time.deltaTime.
We are multiplying by Time.deltaTime in order to convert it from whatever our move speed is per frame to per second, so, if you do have varying frame rates, you’ll still be moving at the same speed.
Okay, so back over in our swipe detection script now, what we can do is go up to where we’re debug logging all of these swipe up, swipe left, and swipe right. And I’m gonna delete the swipe up here and I’m gonna replace this with player.Move and inside here. We need to give it a move direction, so I’m gonna go vector3.up and vector3.up is just a vector that is zero on the x, one on the y and zero on the zed.
Okay, so, it’s just one on the y up, for swipe left, we can just go player.Move and then give that a vector3.left to swipe left, in order to move left I mean, and then for right, we can go player.Move and give that one there a vector3.right.
Okay, and we wanna go down here and do the exact same for our mouse detection and there we go, okay, so now what we can do is save that and return to the Unity Editor and all we need to do here is select our player, we need to go to where our move speed is and change this to something, so, what do we want to set this to, well.
We wanna move tiles pretty fast, so I’m going to set this to maybe something around five, we can then select our Game Manager and drag our player in to the player property here, so it is now linked to the player.
Press play and let’s just see how it goes. We can swipe up, there we go, player moves up, swipe left, player moves left, swipe right, player moves right and we can keep swiping up, left, right as much as we wish.
But as you can see, the camera is not following the player, so in the next lesson, we are gonna work on it so that our camera can actually follow our player. And we’ll make it as well so that our player cannot go off-screen because watch this, I can go right again and I can keep swiping right and if you look at our player game object, look at the x position. You’ll see that our player keeps on moving to the right, we don’t want that, we want the player to only be able to move within a certain bound on the left and right axis.
Okay, so, in the next lesson, we’ll set up our camera and we’ll set up clamping our player position, so, thanks for watching and I’ll see you all in the next lesson.
Interested in continuing? Check out the full Build a Mobile Road Crossing Game course, which is part of our Mobile Game Development Mini-Degree.

