Did you know that Unity is capable of pulling data from the web?
In this tutorial, we’re going to be building an app in Unity that will connect to an API, send a query, and return a JSON file of results to display on the screen. For this case, we’re going to be making an app that will display upcoming fireworks displays.
If you’re ready to learn a new skill for making apps in Unity, let’s dive in.
Project Files & Requirements
This project will feature a prefab that is already pre-made. Along with that, you can download the included project files here.
Note that this tutorial does assume you have a solid understanding of working with Unity. If you’re just starting out on your Unity journey, we recommend first finding some beginner tutorials or courses to help you along with the fundamentals.
Alternatively, if you’re a teacher, you can also try out the Zenva Schools platform to find great resources on not only using Unity, but incorporating it into classroom environments.

BUILD YOUR OWN GAMES
Get 250+ coding courses for
$1
AVAILABLE FOR A LIMITED TIME ONLY
The API
With our app, we’re going to be displaying data on our screen. This data is going to be a list of upcoming firework displays. The Queensland Government has a good website with a lot of different data sets to connect to.
Upcoming fireworks displays dataset.
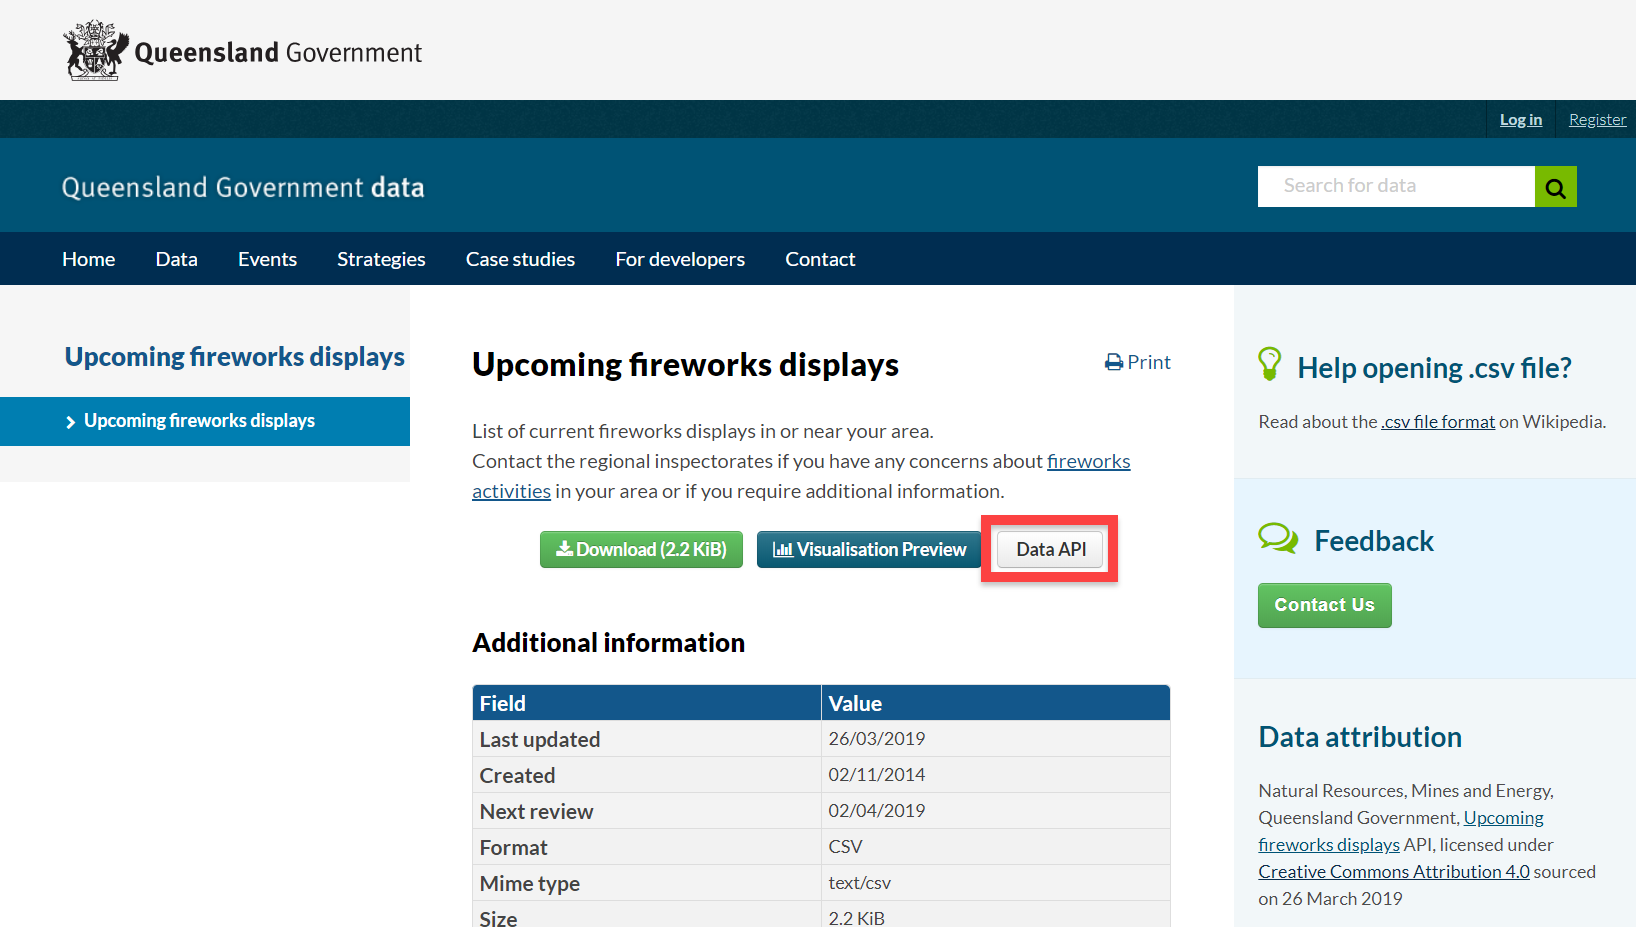
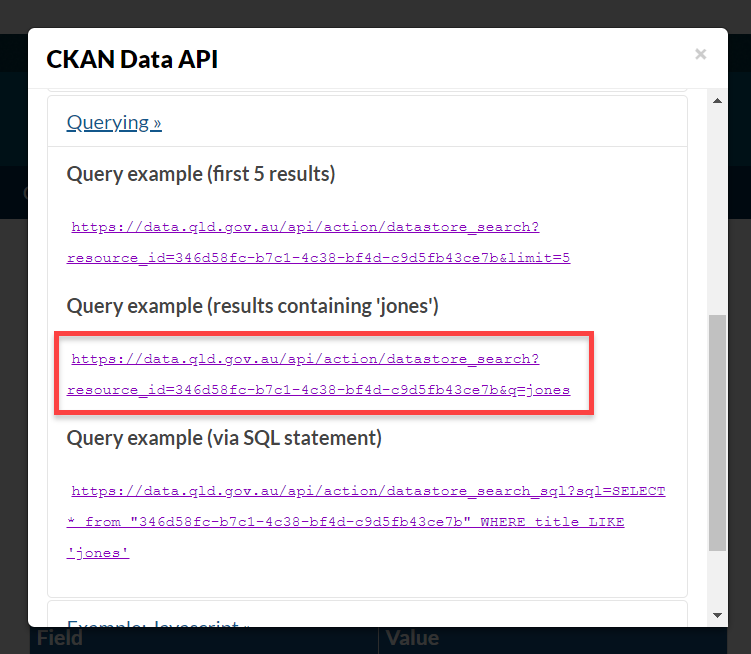
When on the website, click on the Data API button. This is a list of example queries. What we want is the query which returns results containing a certain string.
https://data.qld.gov.au/api/action/datastore_search?resource_id=346d58fc-b7c1-4c38-bf4d-c9d5fb43ce7b&q=
Setting up the Project
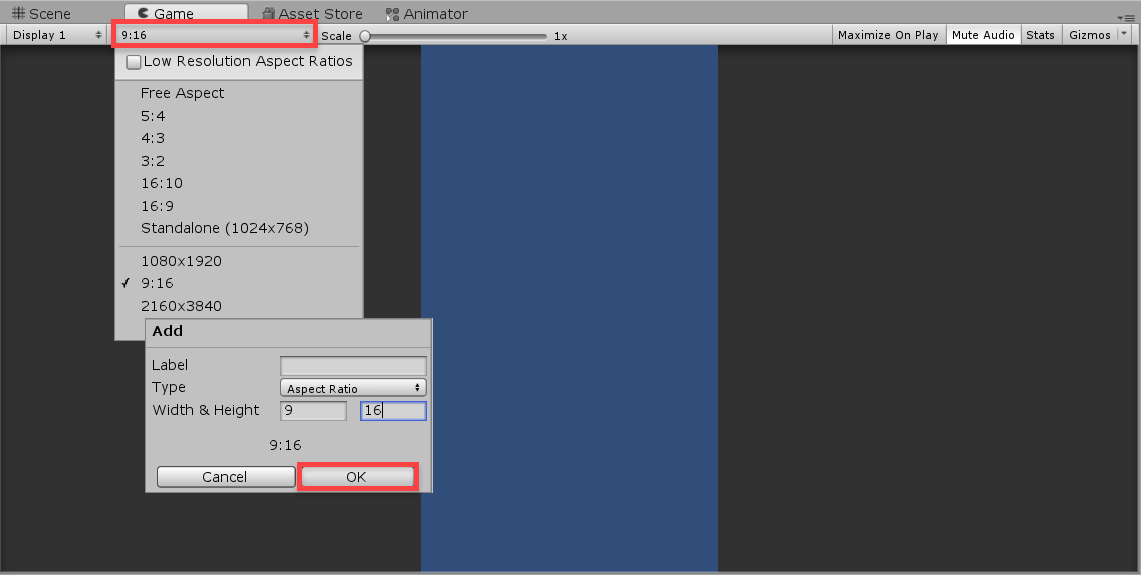
Create a new 2D Unity project. The first thing we need to do is change our aspect ratio. Since we’re designing a mobile app, let’s go to the Game tab and add a new aspect ratio of 9:16. It will be scalable for any aspect ratio, we’re just going to design is for portrait displays.
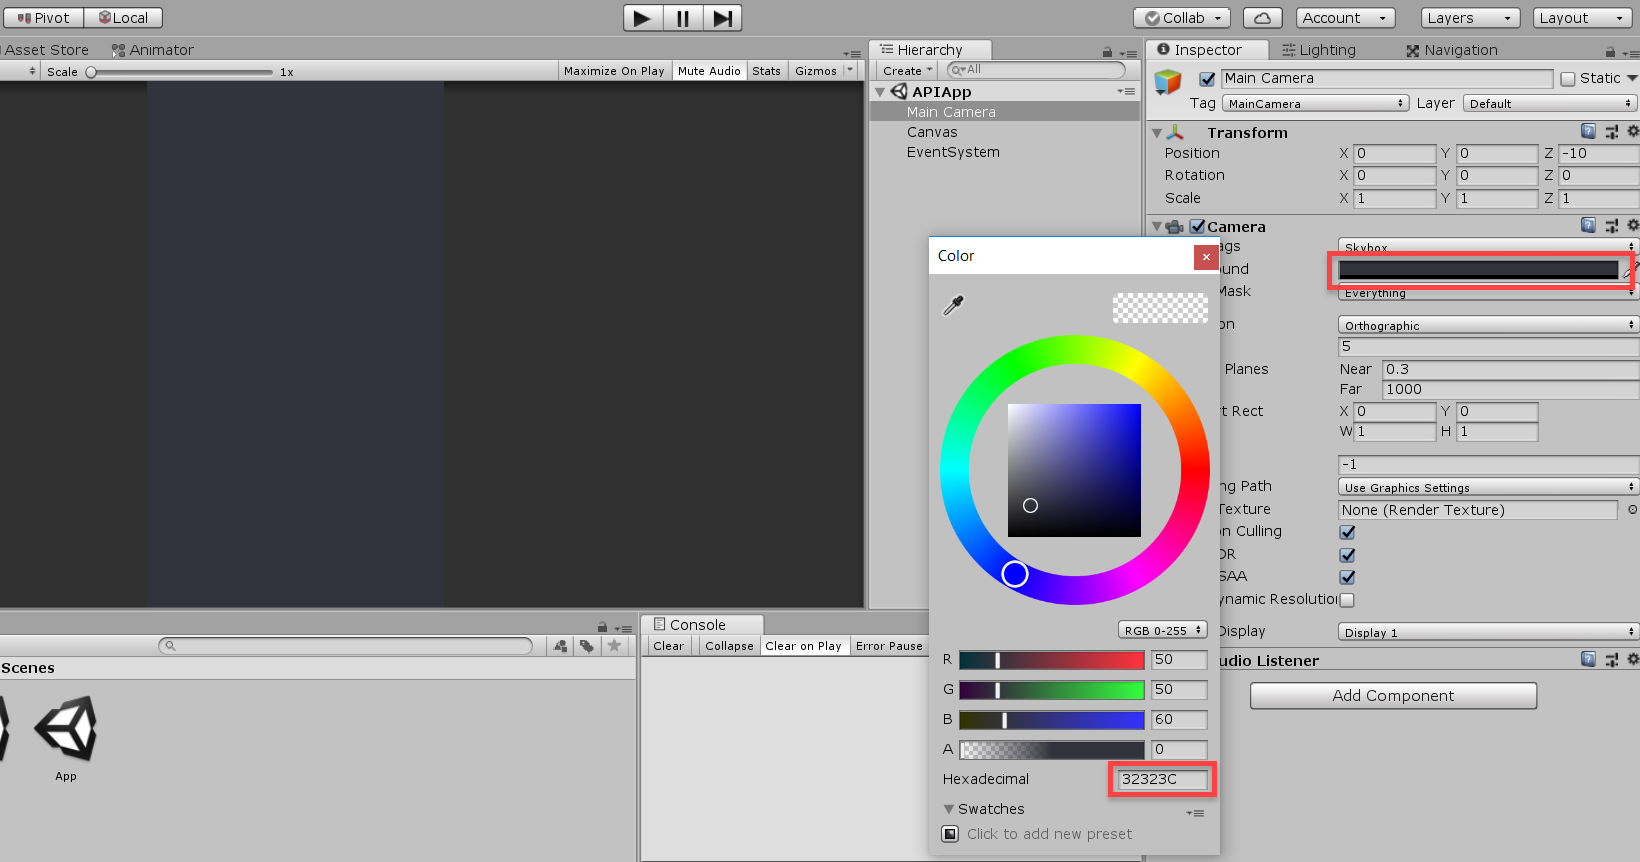
Let’s also change the background color. Select the camera and set the Background to a dark blue – I used the color 32323C.
For accessing and converting the data, we’re going to be using an asset called SimpleJSON. You can download it from GitHub here.
Creating the UI
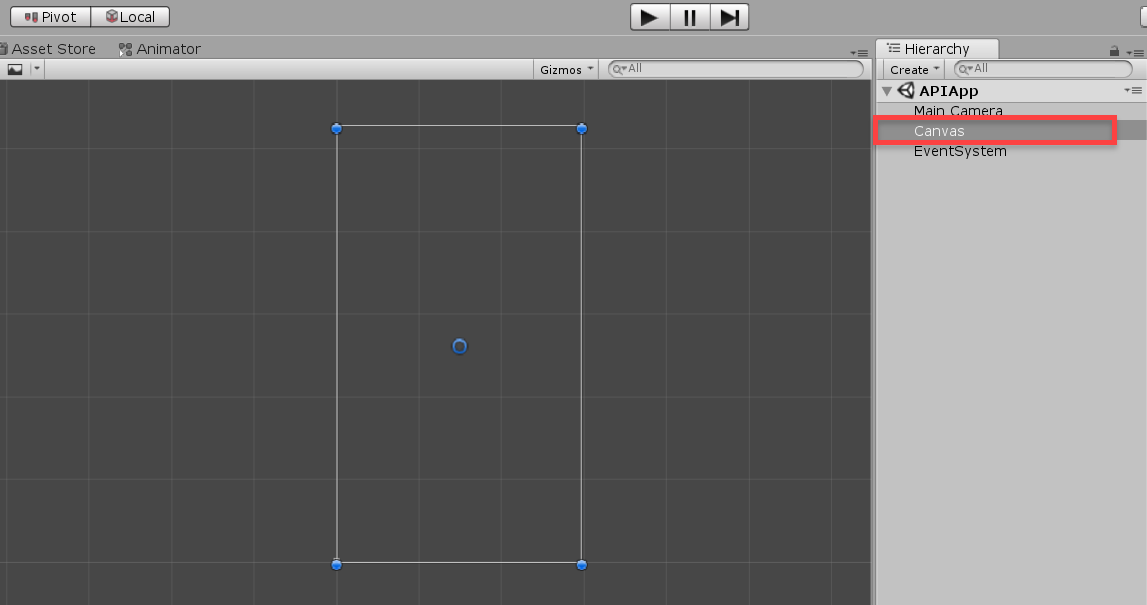
Right click the Hierarchy and select UI > Canvas. Now we can begin with our UI!
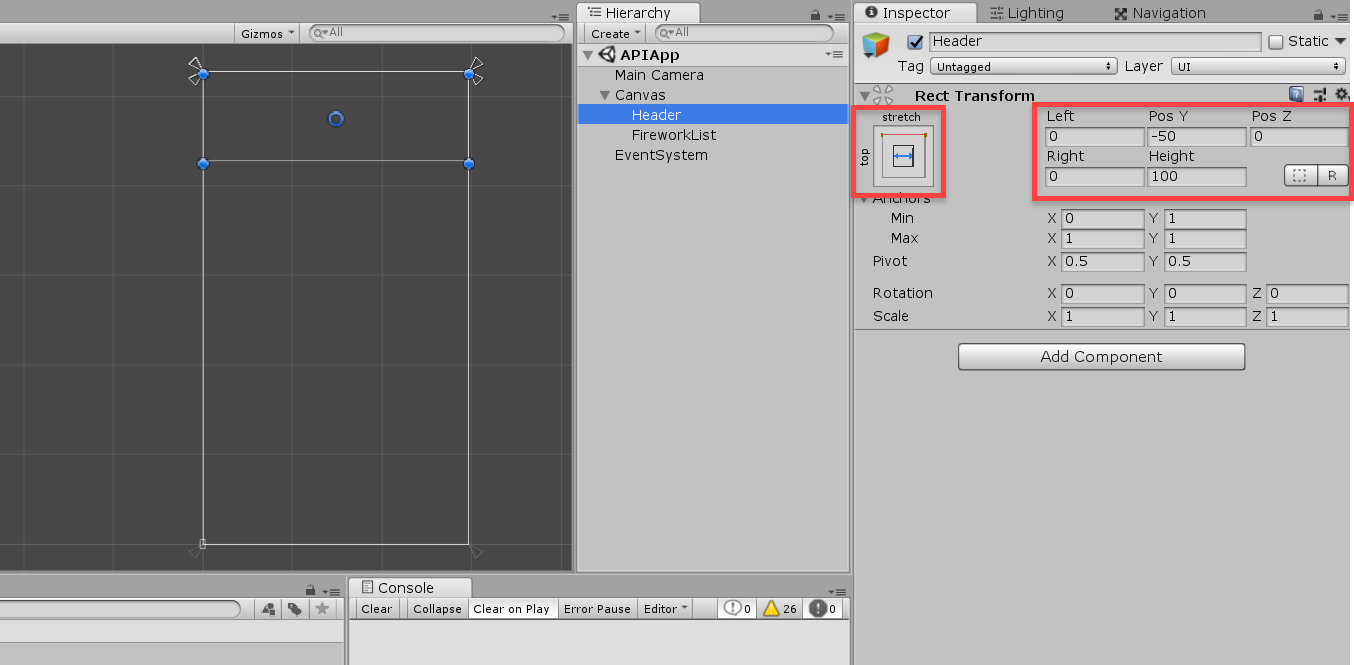
Create two empty GameObjects (right click Canvas > Empty GameObject) and call them Header and FireworkList. The header will hold our search bar and filter buttons.
- Set the Height to 100
- Set the Anchor to top-stretch
- Position this on the top of the canvas like below
For the firework list, just make that fill in the rest of the space and anchor to stretch-stretch. This is where we’ll be listing out our data.
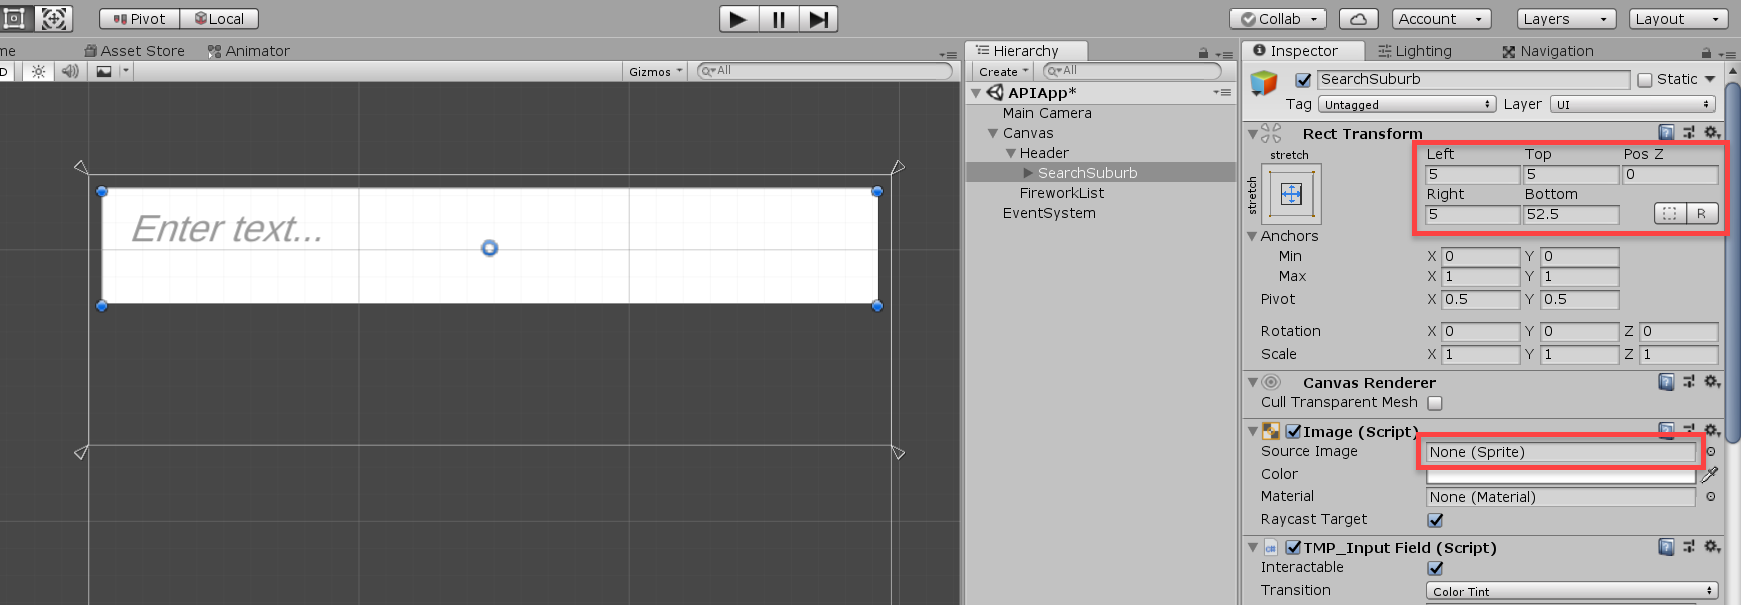
For the search bar, create a new TextMeshPro – Input Field as a child of the header (you might need to import a few assets). Call it SearchSuburb.
- Set the Sprite to none (makes it a colored rectangle)
- Set the Anchor to stretch-stretch
- Set the Offsets to 5, 5, 5, 52.5
- We’ll be giving everything a padding of 5
- Set the search bar’s color to black with the opacity at half
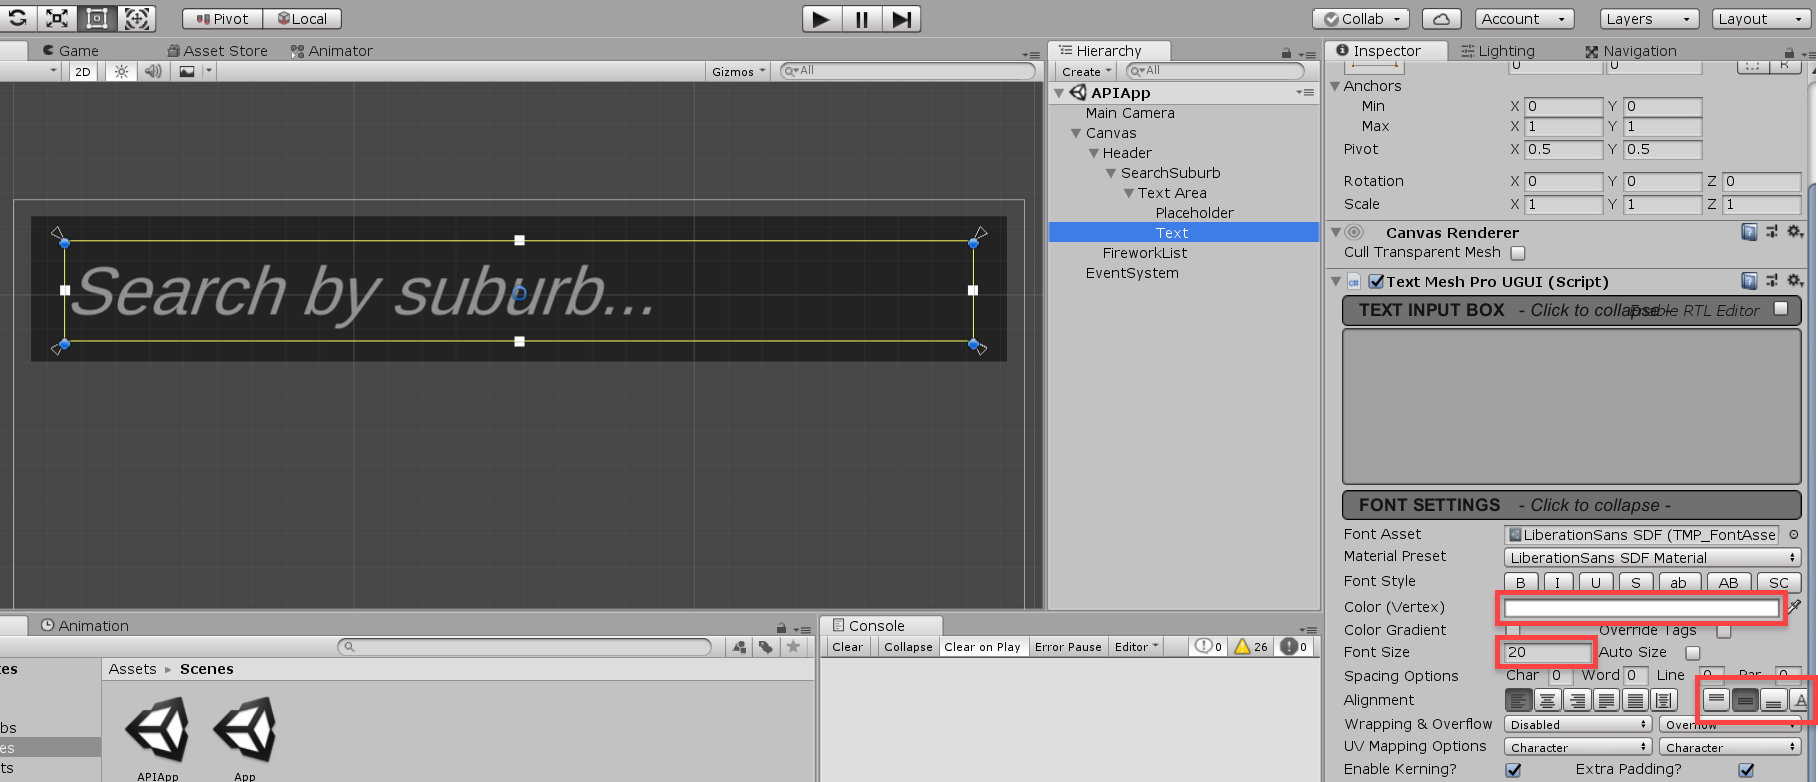
- For the placeholder and text…
- Set the Color to white (half opacity for the placeholder)
- Set the Font Size to 20
- Set the Alignment to Middle
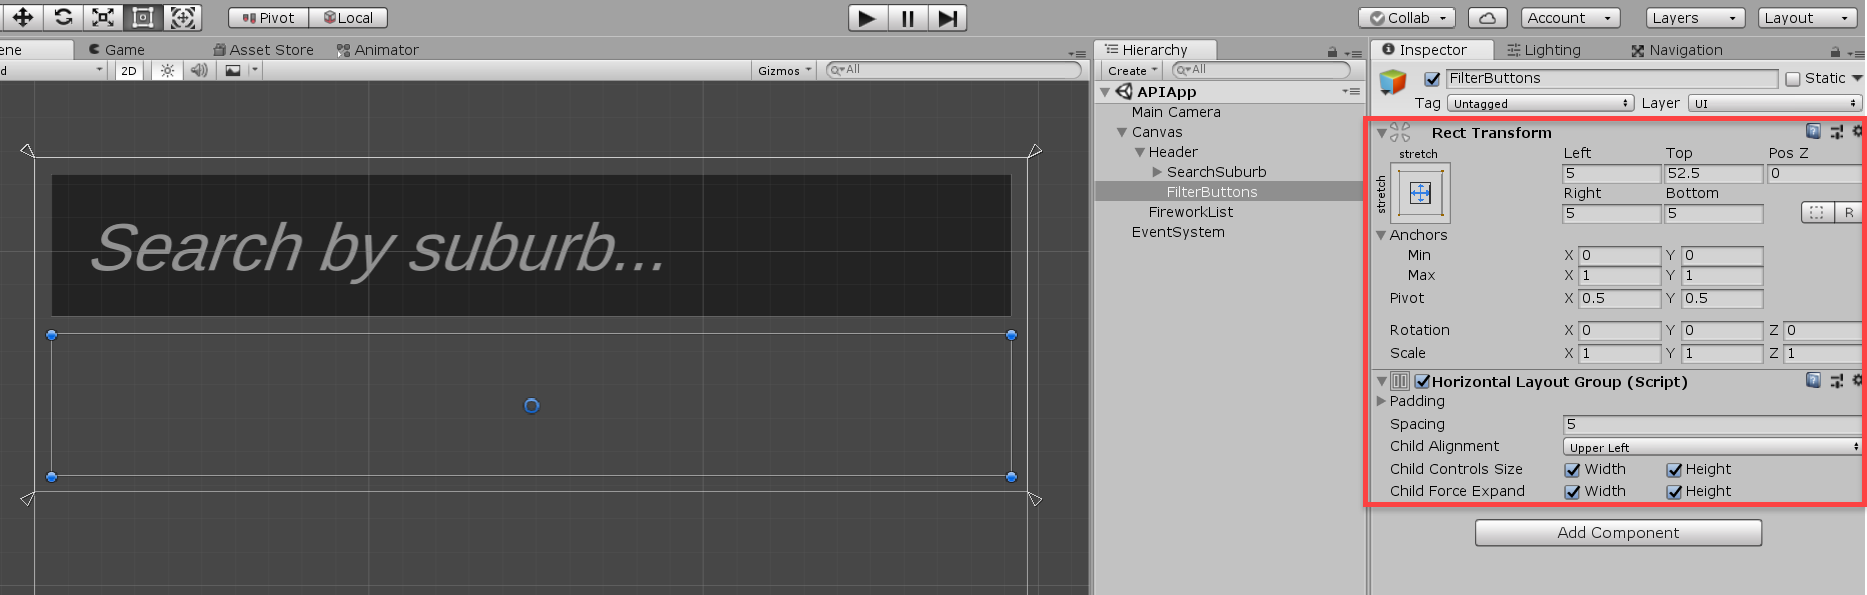
Let’s now work on our filter buttons. Create an empty GameObject and call it FilterButtons. Set the anchor and positions to the same as the search bar but below it.
Then add a Horizontal Layout Group component. Enable all of the tick boxes and set the Spacing to 5. This is used to evenly position and scale our buttons automatically.
As a child of the FilterButtons, create a new button, remove the text child and set the color to the same as the search bar.
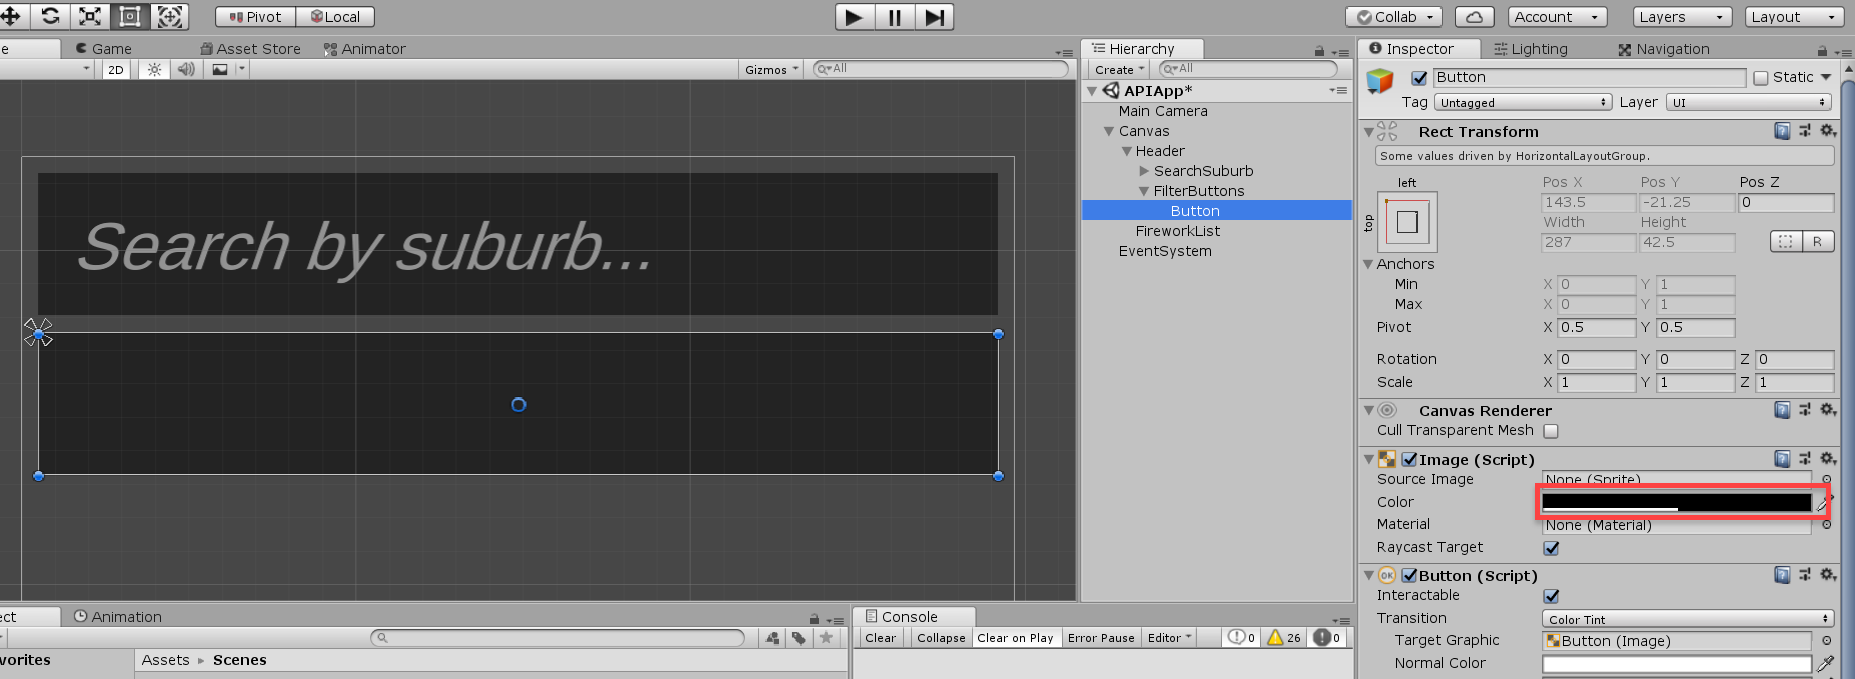
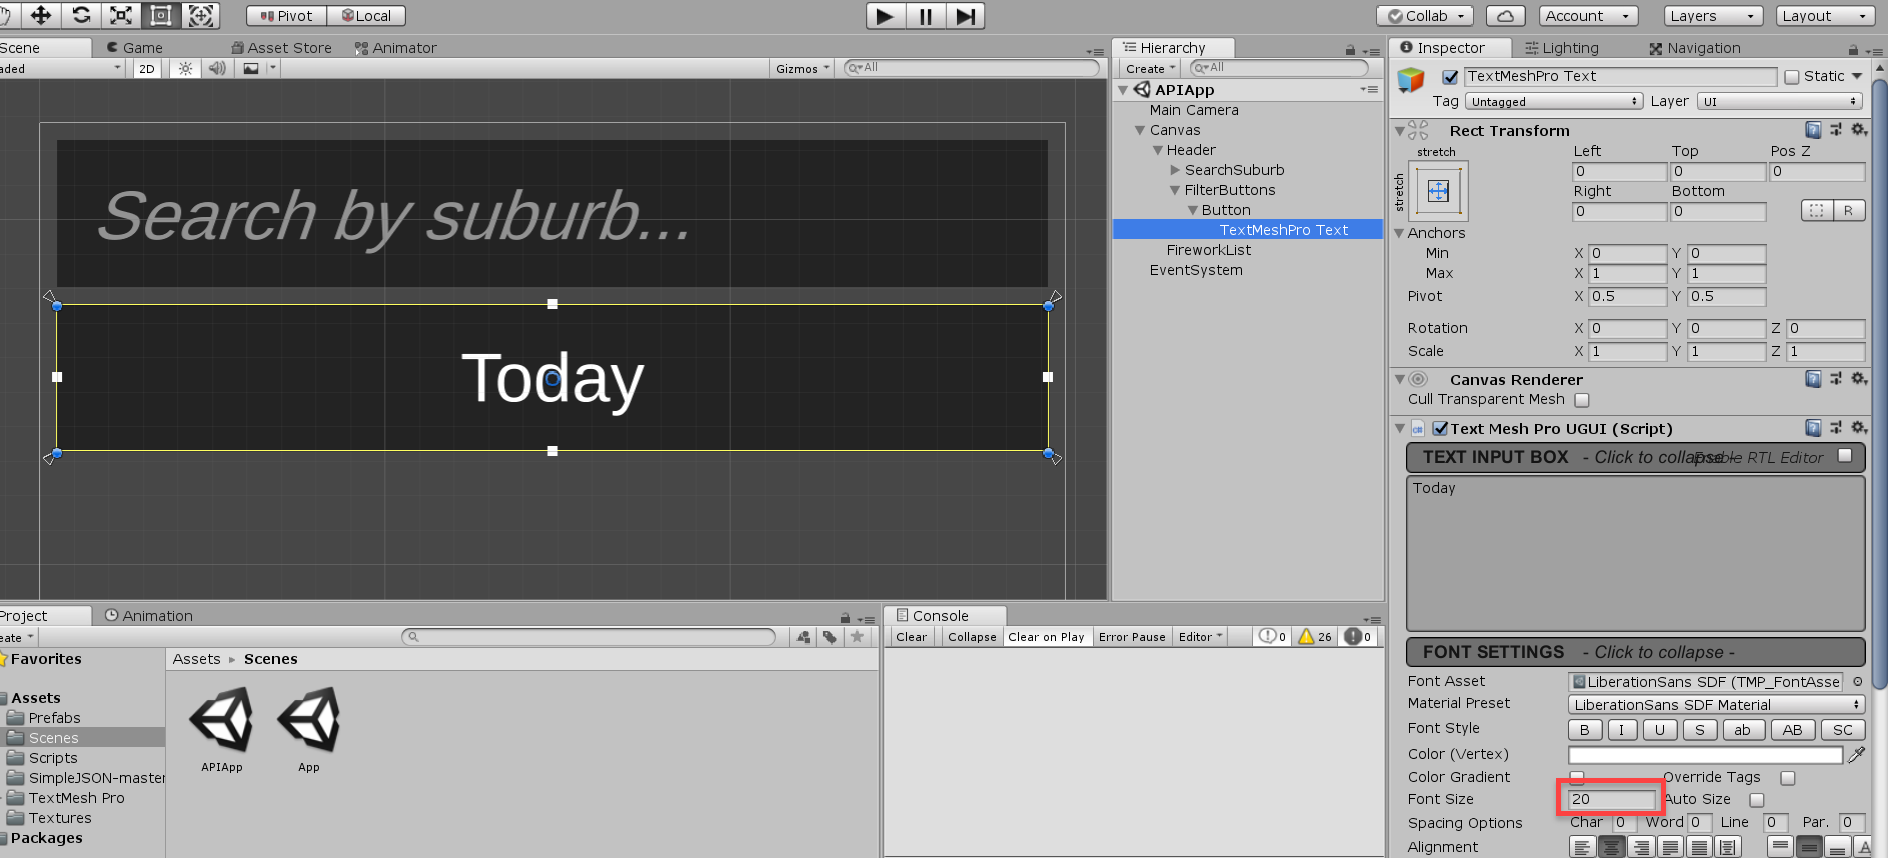
Now, create a new TextMeshPro – Text object as a child of the button.
- Set the anchor to be the bounds of the button
- Set the Font Size to 20
- For our first button, let’s set the text to Today
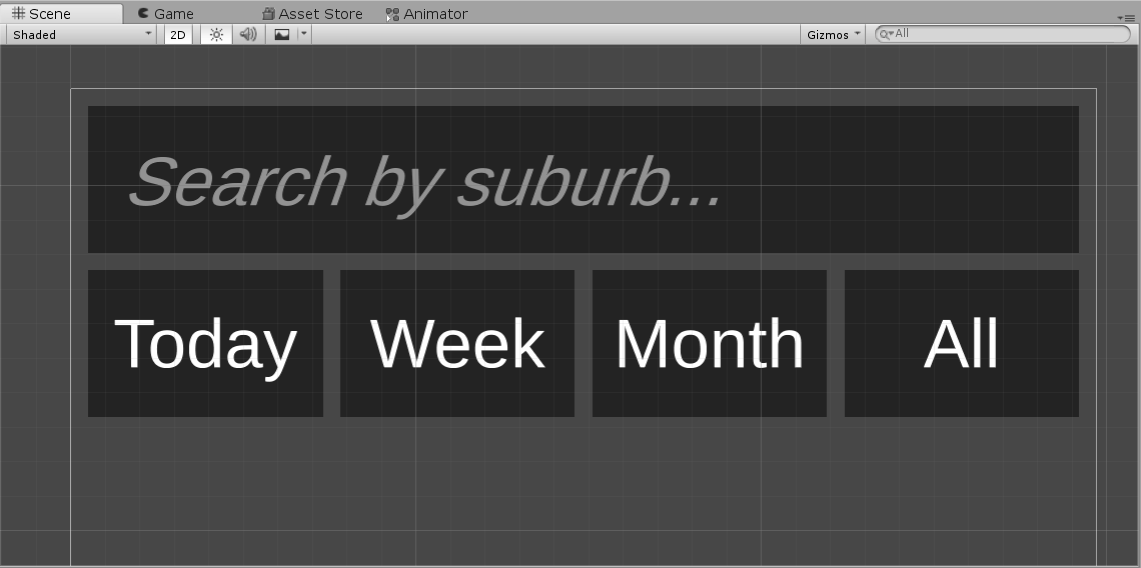
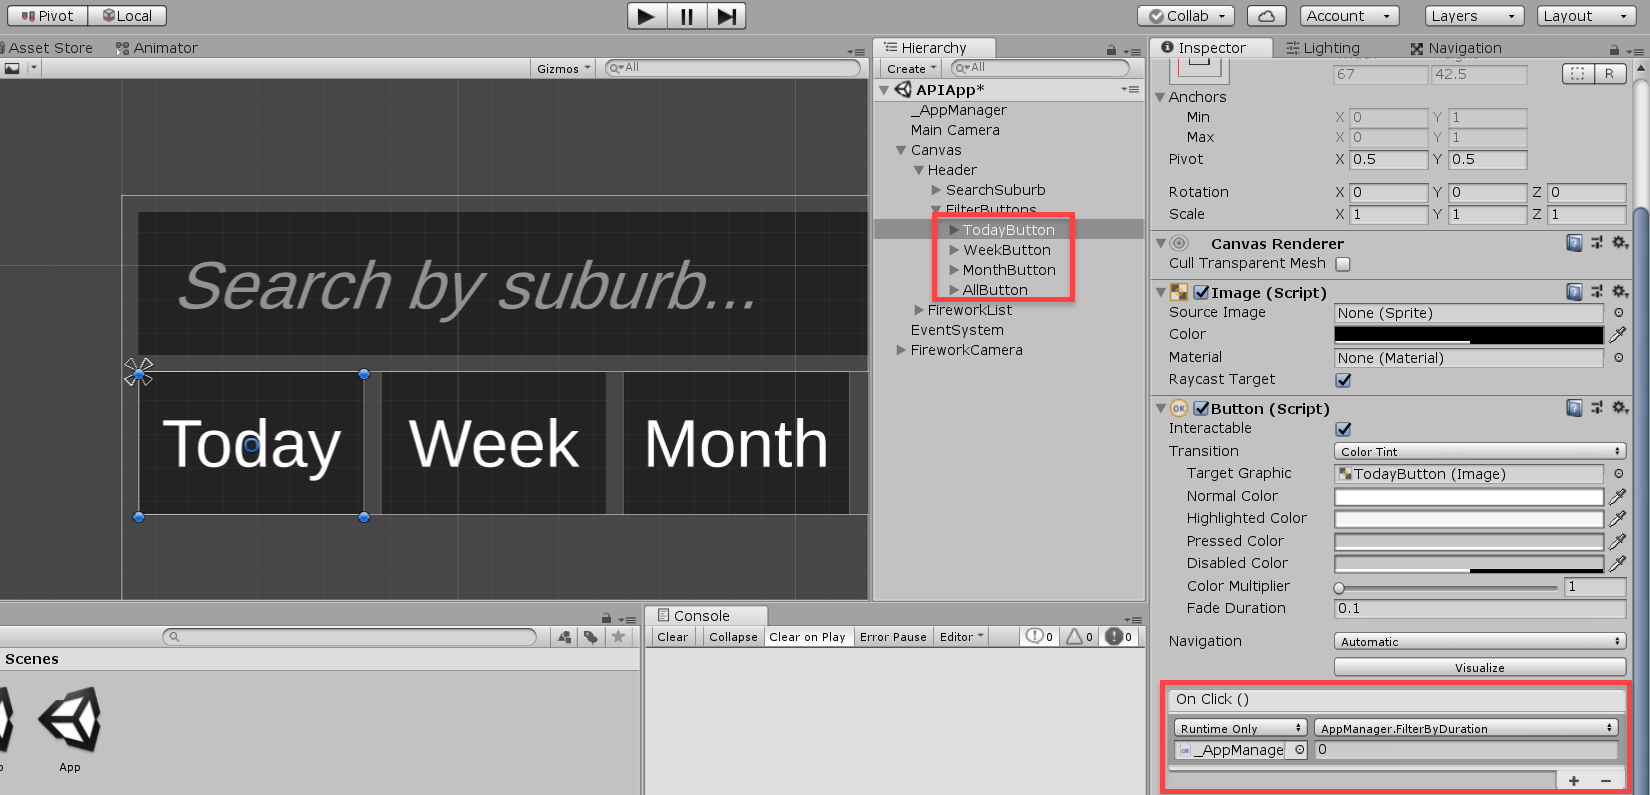
Duplicate the button 3 times for a total of 4 buttons: Today, Week, Month and All.
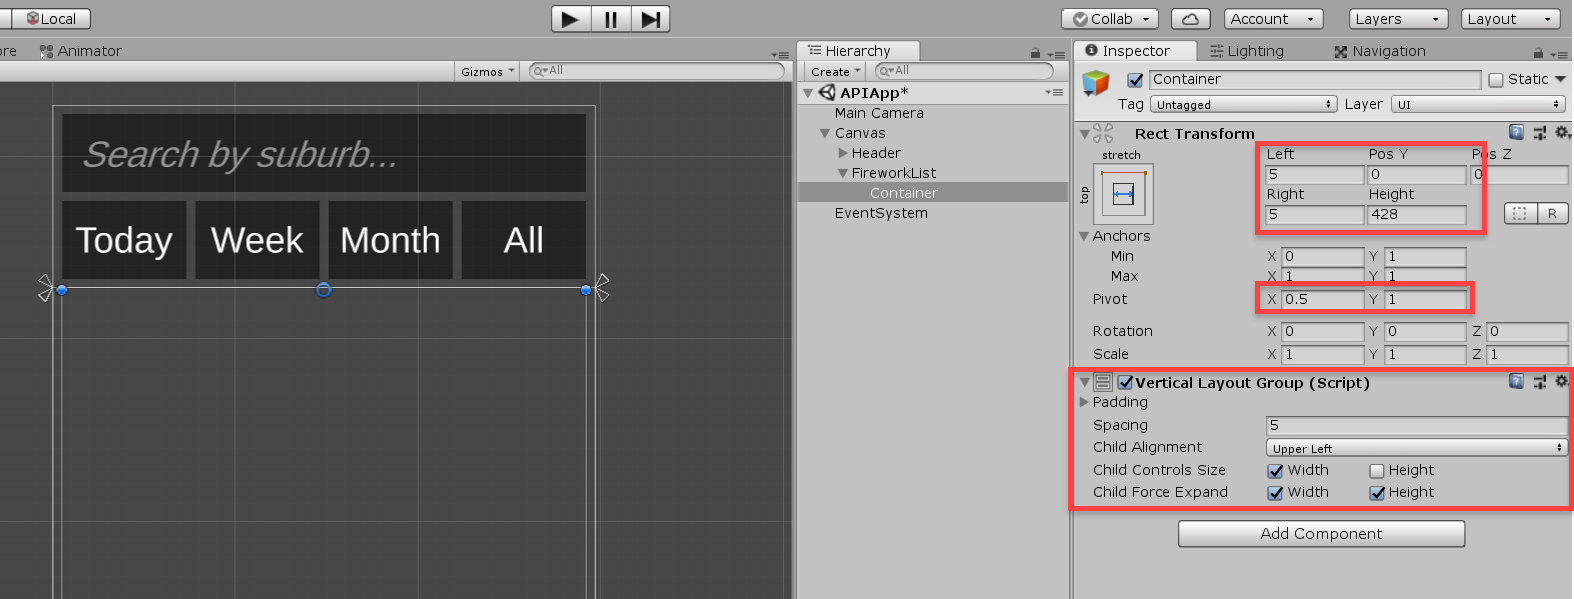
Let’s now work on the list of fireworks. First, create an empty GameObject as the child of FireworkList and call it Container.
- Set the Anchor to top-stretch
- Set the Offsets to 5, 0, 5, anything
- Set the Pivot to 0.5, 1
- This will allow us to increase the height of the container to clamp to the data easily
- Finally, add a Vertical Layout Group component
- Set the Spacing to 5
- Enable Child Controls Size – Width
- * Disable Child Force Expand – Height (not seen in image)
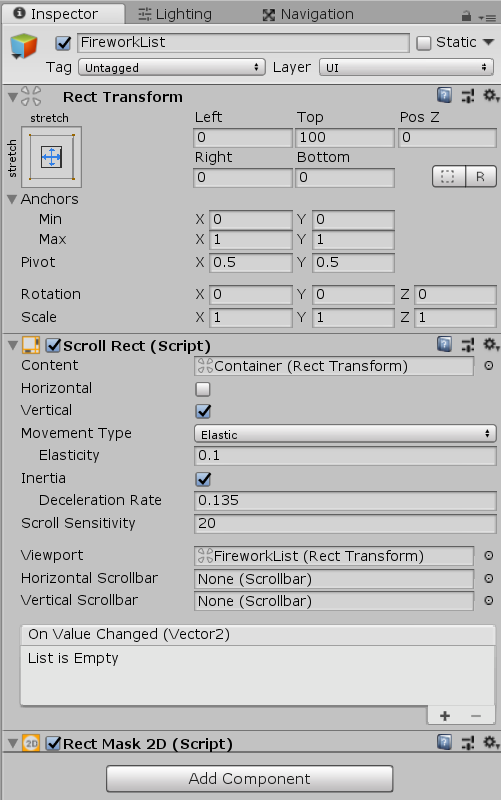
On the FireworkList object, add Scroll Rect and Rect Mask 2D components. This will allow us to scroll up and down the list. Make sure you copy the properties as seen below:
Create a new button (call it FireworkSegment), like with the others – remove the text child and add a TextMeshPro one (two in this case).
- Set the Height of the segment to 50

To finish this off, create a folder called Prefabs and drag the firework segment into it. Delete the one in the scene as we’ll be spawning them in later.

Firework Visuals
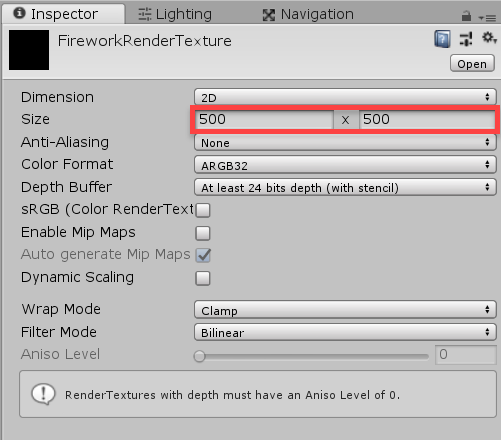
To make the app a little more interesting, we’re going to add in some firework visuals to the UI. Create a new Render Texture right click Project window > Create > Render Texture and call it FireworkRenderTexture. All we need to do here, is set the Size to 500 x 500.
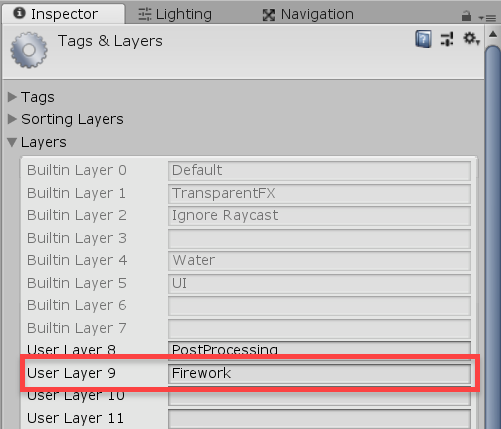
Then go to the Tags & Layers screen (Edit > Project Settings > Tags & Layers) and add a new layer called Firework. This is for the camera to render only the fireworks.
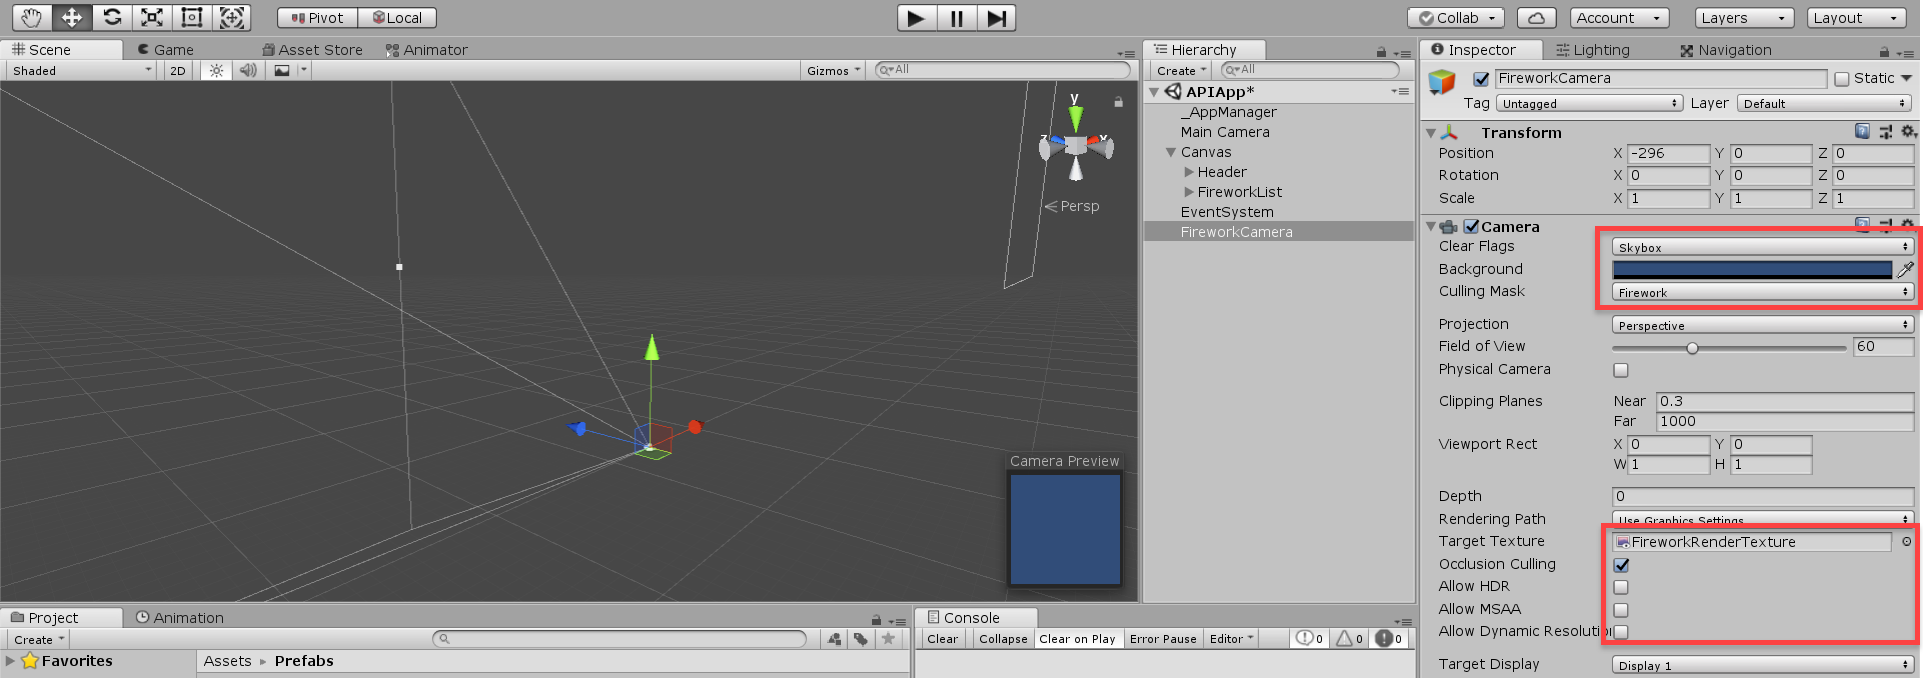
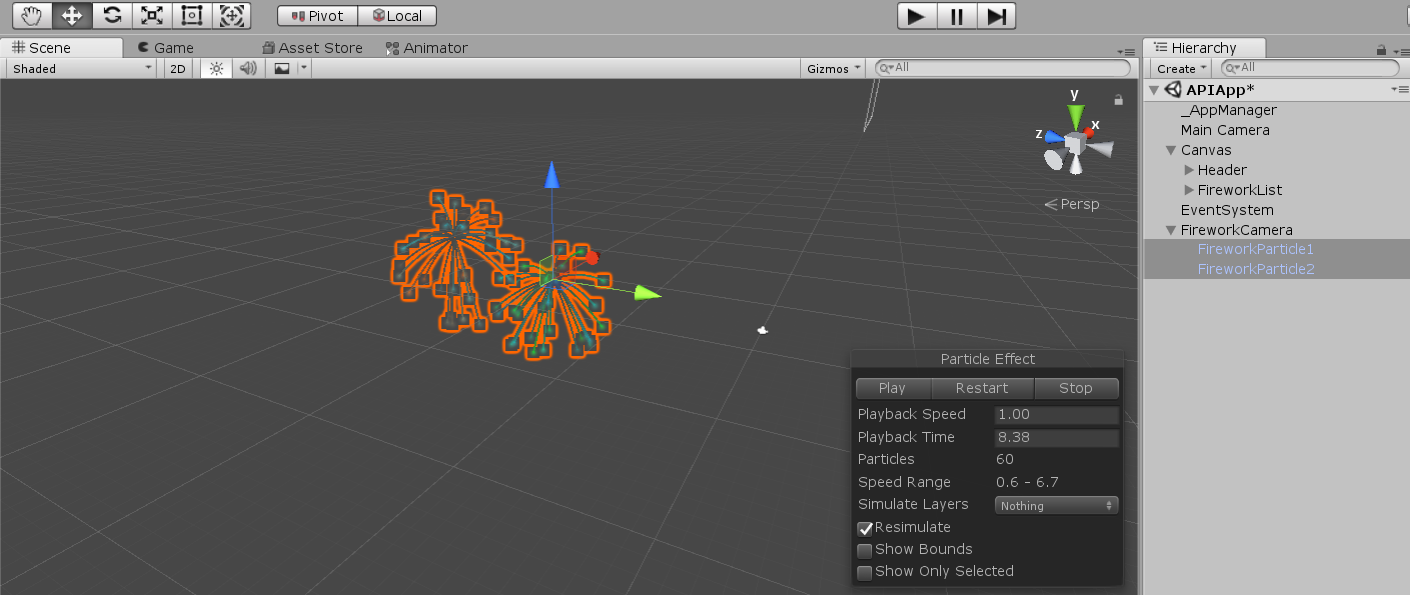
Next, create a new camera and drag it away from the other. Attach the render texture to it and the other properties as seen below:
Now in the Prefabs folder, there should be two particle prefabs. Drag those in and position them in-front of the camera. We’ll be adjusting these later.
Last Part of the UI
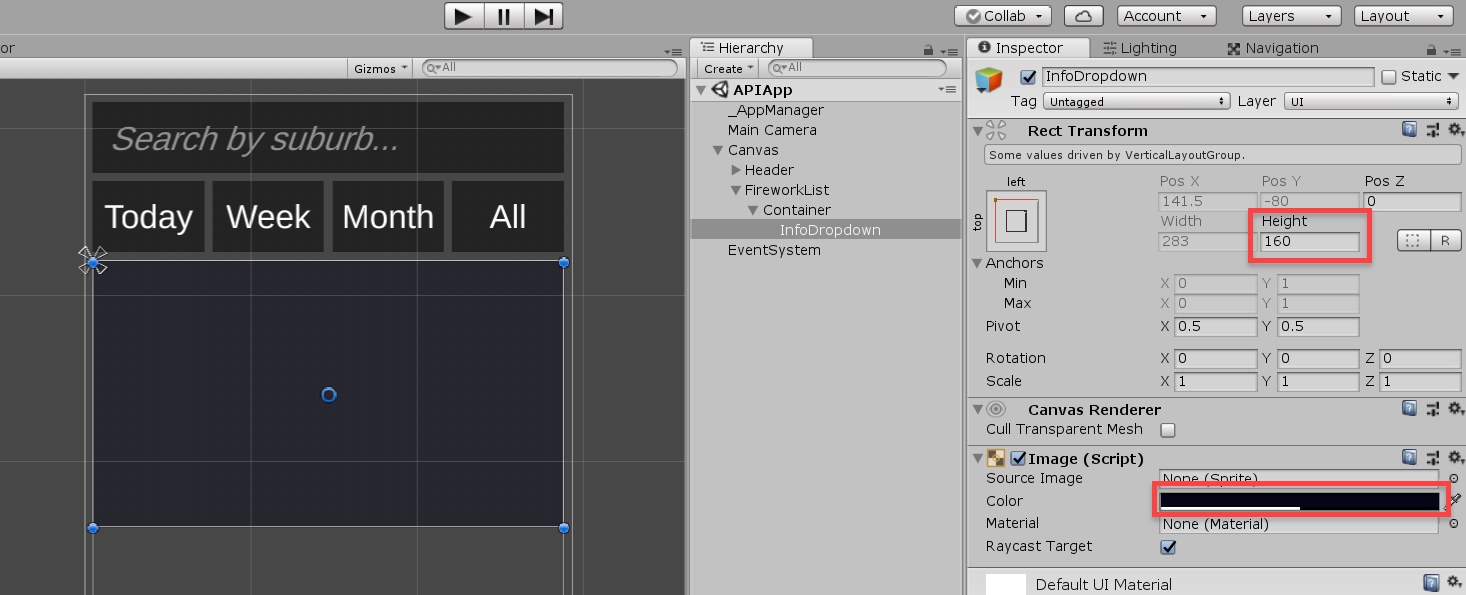
The last part of the UI is the drop down info box. This will display more information about an event when you select it. Create a new Image object as the child of the container (call it InfoDropdown).
- Set the Height to 160
- Set the Color to a dark blue with half opacity
Then add two TextMeshPro texts for the info and address, and a Raw Image for the render texture of the fireworks.
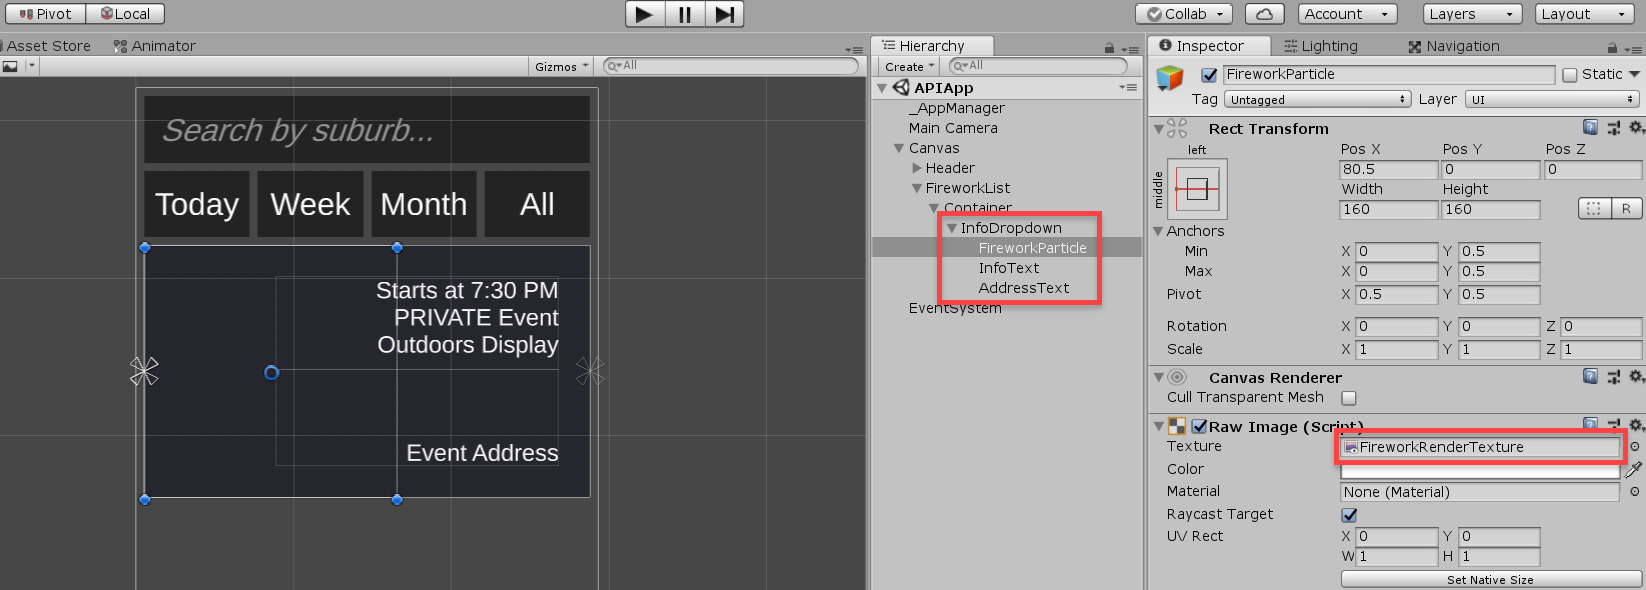
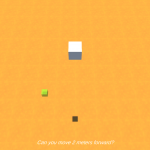
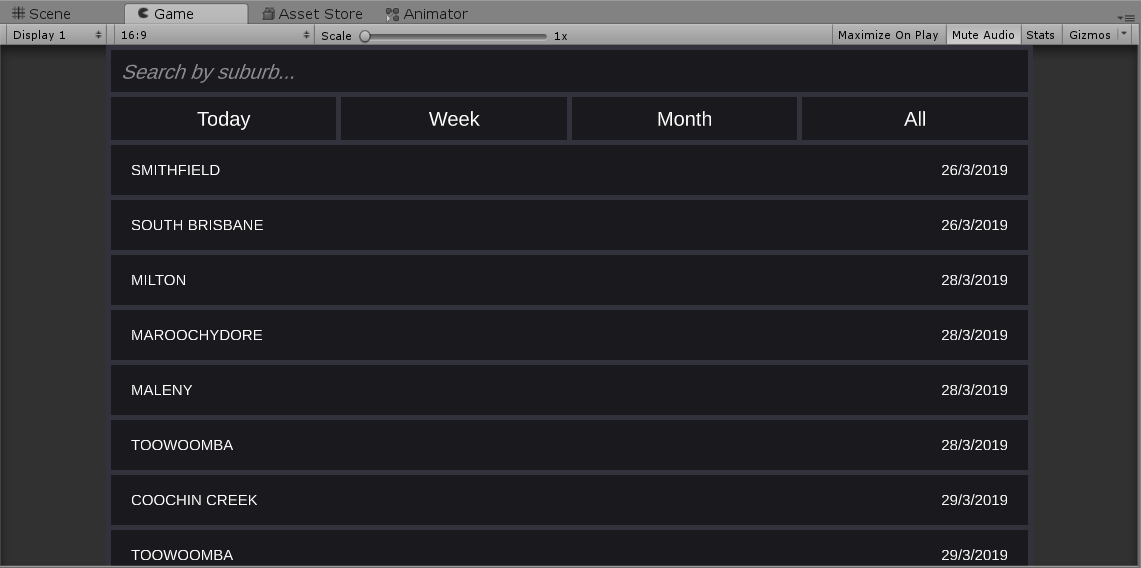
In the Game view, you should be able to see the fireworks on the UI!
App Manager Script
Now it’s time to start scripting. Create a new folder called Scripts and create a new C# script called AppManager. To hold this script, create a new GameObject called _AppManager and attach the script to it.

Inside of our script, we’ll first add the namespaces we’re going to use.
using UnityEngine.Networking;
using System.Text;
using System;
using System.Linq;
using SimpleJSON;
Inside of our class, let’s first define the Duration enumerator. This is a list of all the types of duration filters we can use.
public enum Duration
{
    Today = 0,
    Week = 1,
    Month = 2,
    All = 3
}
Our first two variables are the url, which is what’s going to connect to the API, and the jsonResult which will be a list of the data.
// API url
public string url;

// resulting JSON from an API request
public JSONNode jsonResult;
Finally, let’s create a singleton / instance for the script. This will allow us to easily access it whenever we want.
// instance
public static AppManager instance;

void Awake ()
{
    // set the instance to be this script
    instance = this;
}
So how are we going to get the data? Let’s create a co-routine called GetData. This will take in a string for the location and add that to the query. If the location string is empty, it will request for all the data. We’re using a co-routine because we need to pause the function midway to send/receive the data.
// sends an API request - returns a JSON file
IEnumerator GetData (string location)
{

}
First up, let’s create the web request and download handler, building the url also, including the query.
// create the web request and download handler
UnityWebRequest webReq = new UnityWebRequest();
webReq.downloadHandler = new DownloadHandlerBuffer();

// build the url and query
webReq.url = string.Format("{0}&q={1}", url, location);
Next, we’ll send the web request. This will pause the function and wait for a result before continuing.
// send the web request and wait for a returning result
yield return webReq.SendWebRequest();
With our result, let’s convert it from a byte array to a string, then parse that into a JSONNode object.
// convert the byte array and wait for a returning result
string rawJson = Encoding.Default.GetString(webReq.downloadHandler.data);

// parse the raw string into a json result we can easily read
jsonResult = JSON.Parse(rawJson);
We haven’t made the UI script yet, but this is what we’re going to call. We’re sending over the records of the JSON file to make them appear on-screen.
// display the results on screen
UI.instance.SetSegments(jsonResult["result"]["records"]);
Now let’s work on the FilterByDuration function. This gets called when one of the filter buttons gets pressed.
// called when a duration button is pressed
// filters the list based on the max time length given
public void FilterByDuration (int durIndex)
{

}
First, let’s convert the durIndex to a selection of the Duration enumerator. Then we’ll get an array of the records so we can sort through them.
// get the duration enum from the index
Duration dur = (Duration)durIndex;

// get an array of the records
JSONArray records = jsonResult["result"]["records"].AsArray;
Next, we’ll get the max date depending on the filter duration.
// create the max date
DateTime maxDate = new DateTime();

// set the max date depending on the duration
switch(dur)
{
    case Duration.Today:
        maxDate = DateTime.Now.AddDays(1);
        break;
    case Duration.Week:
        maxDate = DateTime.Now.AddDays(7);
        break;
    case Duration.Month:
        maxDate = DateTime.Now.AddMonths(1);
        break;
    case Duration.All:
        maxDate = DateTime.MaxValue;
        break;
}
Then we’ll loop through all the records and add the ones before the max date to filteredRecords.
// create a new JSONArray to hold all the filtered records
JSONArray filteredRecords = new JSONArray();

// loop through all the records and add the ones within the duration, to the filtered records
for(int x = 0; x < records.Count; ++x)
{
    // get the record's display date
    DateTime recordDate = DateTime.Parse(records[x]["Display Date"]);

    // if the record's display date is before the max date, add it to the filtered records
    if(recordDate.Ticks < maxDate.Ticks)
        filteredRecords.Add(records[x]);
}
Finally, like in the last function, we’ll call the UI function.
// display the results on screen
UI.instance.SetSegments(filteredRecords);
UI Script
Create a new C# script called UI and attach it to the _AppManager object.
We’re going to need these namespaces.
using UnityEngine.UI;
using TMPro;
using SimpleJSON;
using System;
First, we have our variables to hold our container, segment prefab and list of all segments.
// holds all the segments in a vertical layout
public RectTransform container;

// segment prefab to instantiate
public GameObject segmentPrefab;

// list of all available segments
private List<GameObject> segments = new List<GameObject>();
Then we have the variables for the drop down.
[Header("Info Dropdown")]

// info dropdown object
public RectTransform infoDropdown;

// text showing time, event type, etc
public TextMeshProUGUI infoDropdownText;

// text showing the event address
public TextMeshProUGUI infoDropdownAddressText;
And finally an instance for this script.
// instance
public static UI instance;

void Awake ()
{
    // set the instance to this script
    instance = this;
}
The CreateNewSegment function, creates a new segment and returns it.
// creates a new segment and returns it
GameObject CreateNewSegment ()
{
    // instantiate and setup the segment
    GameObject segment = Instantiate(segmentPrefab);
    segment.transform.parent = container.transform;
    segments.Add(segment);

    // add OnClick event listener to the button
    segment.GetComponent<Button>().onClick.AddListener(() => { OnShowMoreInfo(segment); });

    // deactivate it by default
    segment.SetActive(false);

    return segment;
}
The PreLoadSegments function pre-loads / spawns a set number of segments.
// instantiates a set number of segments to use later on
void PreLoadSegments (int amount)
{
    // instantiate 'amount' number of new segments
    for(int x = 0; x < amount; ++x)
        CreateNewSegment();
}
We’ll call this in the Start function.
void Start ()
{
// preload 10 segments
PreLoadSegments(10);
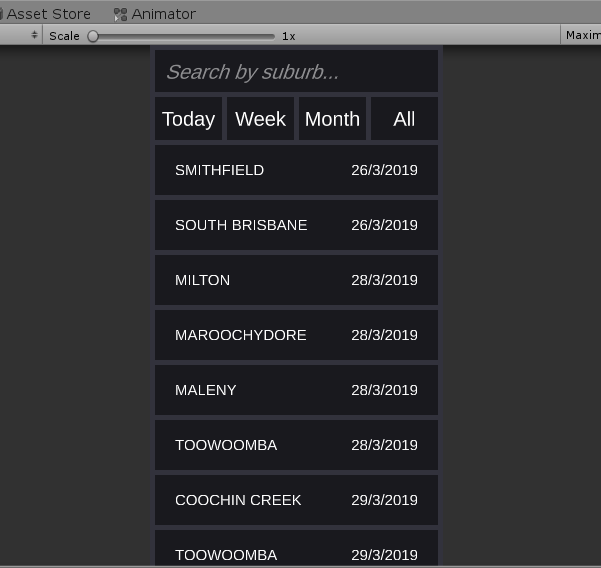
}The SetSegments function gets called when we either search for a suburb or filter the results. This takes in the records and displays them on screen.
// gets the JSON result and displays them on the screen with their respective segments
public void SetSegments (JSONNode records)
{
    DeactivateAllSegments();

    // loop through all records
    for(int x = 0; x < records.Count; ++x)
    {
        // create a new segment if we don't have enough
        GameObject segment = x < segments.Count ? segments[x] : CreateNewSegment();
        segment.SetActive(true);

        // get the location and date texts
        TextMeshProUGUI locationText = segment.transform.Find("LocationText").GetComponent<TextMeshProUGUI>();
        TextMeshProUGUI dateText = segment.transform.Find("DateText").GetComponent<TextMeshProUGUI>();

        // set them
        locationText.text = records[x]["Suburb"];
        dateText.text = GetFormattedDate(records[x]["Display Date"]);
    }

    // set the container size to clamp to the segments
    container.sizeDelta = new Vector2(container.sizeDelta.x, GetContainerHeight(records.Count));
}
DeactivateAllSegments deactivates all of the segments. This gets called at the start of SetSegments.
// deactivate all of the segment objects
void DeactivateAllSegments ()
{
    // loop through all segments and deactivate them
    foreach(GameObject segment in segments)
        segment.SetActive(false);
}
GetFormattedDate returns a date in the day / month / year format from a raw date.
// returns a date that is formatted from the raw json data
string GetFormattedDate (string rawDate)
{
    // convert the raw date to a DateTime object
    DateTime date = DateTime.Parse(rawDate);

    // build a "[day]/[month]/[year]" formatted date and return it
    return string.Format("{0}/{1}/{2}", date.Day, date.Month, date.Year);
}
GetContainerHeight returns a height to set the container to. This makes it so the container clamps to the active segments.
// returns a height to make the container so it clamps to the size of all segments
float GetContainerHeight (int count)
{
    float height = 0.0f;

    // include all segment heights
    height += count * (segmentPrefabs.GetComponent<RectTransform>().sizeDelta.y + 1);

    // include the spacing between segments
    height += count * container.GetComponent<VerticalLayoutGroup>().spacing;

    // include the info dropdown height
    height += infoDropdown.sizeDelta.y;

    return height;
}
OnShowMoreInfo gets called when the user clicks on a segment button. This opens up the drop down with more info about the event.
// called when the user selects a segment - toggles the dropdown
public void OnShowMoreInfo (GameObject segmentObject)
{
    // get the index of the segment
    int index = segments.IndexOf(segmentObject);

    // if we're pressing the segment that's already open, close the dropdown
    if(infoDropdown.transform.GetSiblingIndex() == index + 1 && infoDropdown.gameObject.activeInHierarchy)
    {
        infoDropdown.gameObject.SetActive(false);
        return;
    }

    infoDropdown.gameObject.SetActive(true);

    // get only the records
    JSONNode records = AppManager.instance.jsonResult["result"]["records"];

    // set the dropdown to appear below the selected segment
    infoDropdown.transform.SetSiblingIndex(index + 1);

    // set dropdown info text
    infoDropdownText.text += "Starts at " + GetFormattedTime(records[index]["Times(s)"]);
    infoDropdownText.text += "\n" + records[index]["Event Type"] + " Event";
    infoDropdownText.text += "\n" + records[index]["Display Type"];

    // set dropdown address text
    if(records[index]["Display Address"].ToString().Length > 2)
        infoDropdownAddressText.text = records[index]["Display Address"];
    else
        infoDropdownAddressText.text = "Address not specified";
}
GetFormattedTime returns a time as a string from a raw time.
// converts 24 hour time to 12 hour time
// e.g. 19:30 = 7:30 PM
string GetFormattedTime (string rawTime)
{
// get the hours and minutes from the raw time
string[] split = rawTime.Split(":"[0]);
int hours = int.Parse(split[0]);
// converts it to "[hours]:[mins] (AM / PM)"
return string.Format("{0}:{1} {2}", hours > 12 ? hours - 12 : hours, split[1], hours > 12 ? "PM" : "AM");
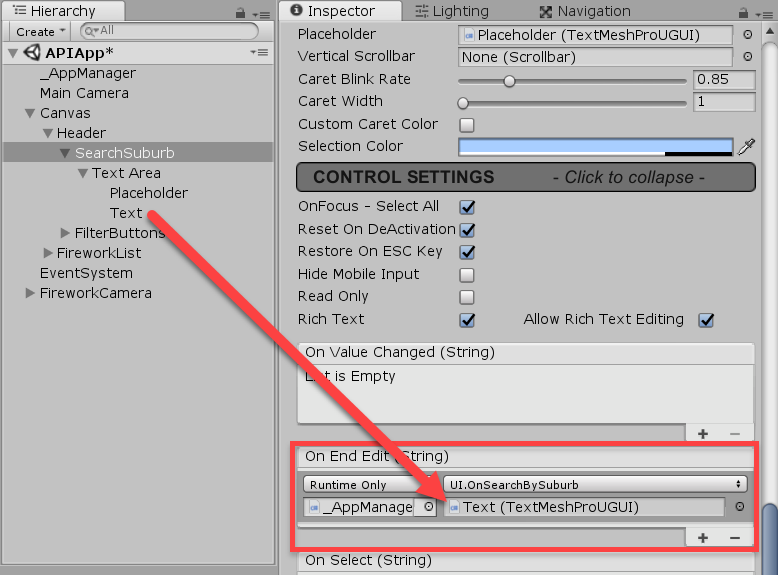
}OnSearchBySuburb gets called when the user finished typing in the suburb input field. This calls the GetData function in the AppManager script.
// called when the input field has been submitted
public void OnSearchBySuburb (TextMeshProUGUI input)
{
// get and set the data
AppManager.instance.StartCoroutine("GetData", input.text);
// disable the info dropdown
infoDropdown.gameObject.SetActive(false);
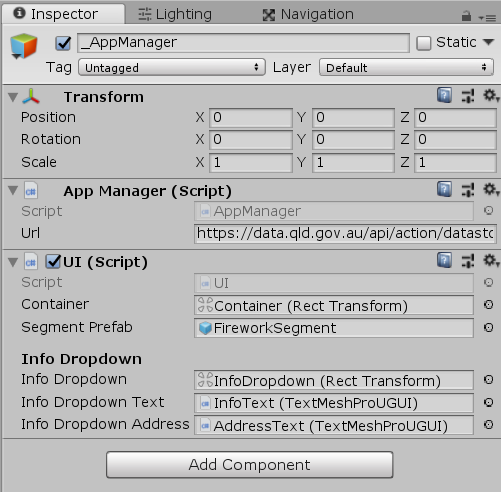
}Back in the editor, let’s fill in both scripts. The url is: https://data.qld.gov.au/api/action/datastore_search?resource_id=346d58fc-b7c1-4c38-bf4d-c9d5fb43ce7b
Let’s connect the filter buttons up to the AppManager script.
For the SearchSuburb input field, let’s add the OnSearchBySuburb event to On End Edit. This will get the data when we finish typing.
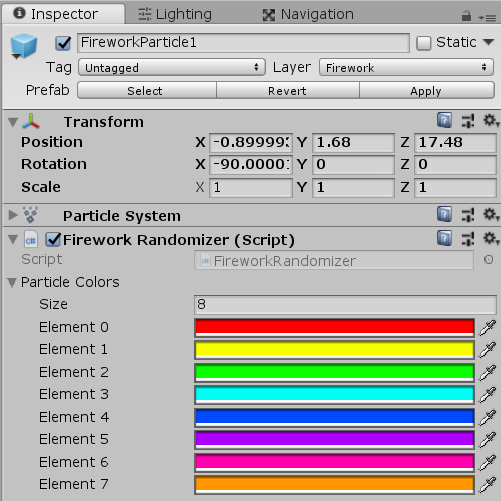
Firework Randomizer
Right now, our app works! Let’s add another script so the fireworks can change to a random color each time they emit. Create a new C# script called FireworkRandomizer and attach it to both firework particles.
We just need one namespace for this script.
using System.Linq;
Our variables are just an array of available colors and the particle system. We get that in the Start function and start invoke repeating the SetRandomColors function every time the particle emits.
// array of all available colors for the particles
public Color[] particleColors;

// particle system of the firework
private ParticleSystem particle;

void Start ()
{
    // get the particle system component
    particle = GetComponent<ParticleSystem>();

    // call the 'SetRandomColors' everytime the particle emits
    InvokeRepeating("SetRandomColors", 0.0f, particle.main.duration);
}
SetRandomColors sets the particle’s color gradient to 2 random colors.
// sets the particle to be a random color gradient
public void SetRandomColors ()
{
    // create a list to keep track of colors we've got left to use
    List<Color> availableColors = particleColors.ToList();
    Color[] colors = new Color[2];

    for(int x = 0; x < colors.Length; ++x)
    {
        // get a random color
        colors[x] = availableColors[Random.Range(0, availableColors.Count)];
        availableColors.Remove(colors[x]);
    }

    // get the particle's main module and set the start color
    ParticleSystem.MainModule main = particle.main;
    main.startColor = new ParticleSystem.MinMaxGradient(colors[0], colors[1]);
}
In the editor, let’s add some colors.
Conclusion
The app’s now finished! Give it a go and see if you can even more features. Try connecting to a different API or displaying the information in a different way.
Even though we designed it for a portrait display, it can easily work for landscape due to us setting up the right UI anchors.
Once again, you can download the project files here.
Conclusion
That’s it for this tutorial!
If you’re looking to expand your Unity skills further, the Unity Game Development Mini-Degree is a fantastic resource for building games and projects delivered in a completely beginner-friendly way. Educators can also try out the Zenva sister platform, Zenva Schools, for more school-oriented content with classroom management and reporting tools, pre-made course plans, and more.
Regardless of where you go next, we hope these new API skills help!
BUILD GAMES

FINAL DAYS: Unlock 250+ coding courses, guided learning paths, help from expert mentors, and more.