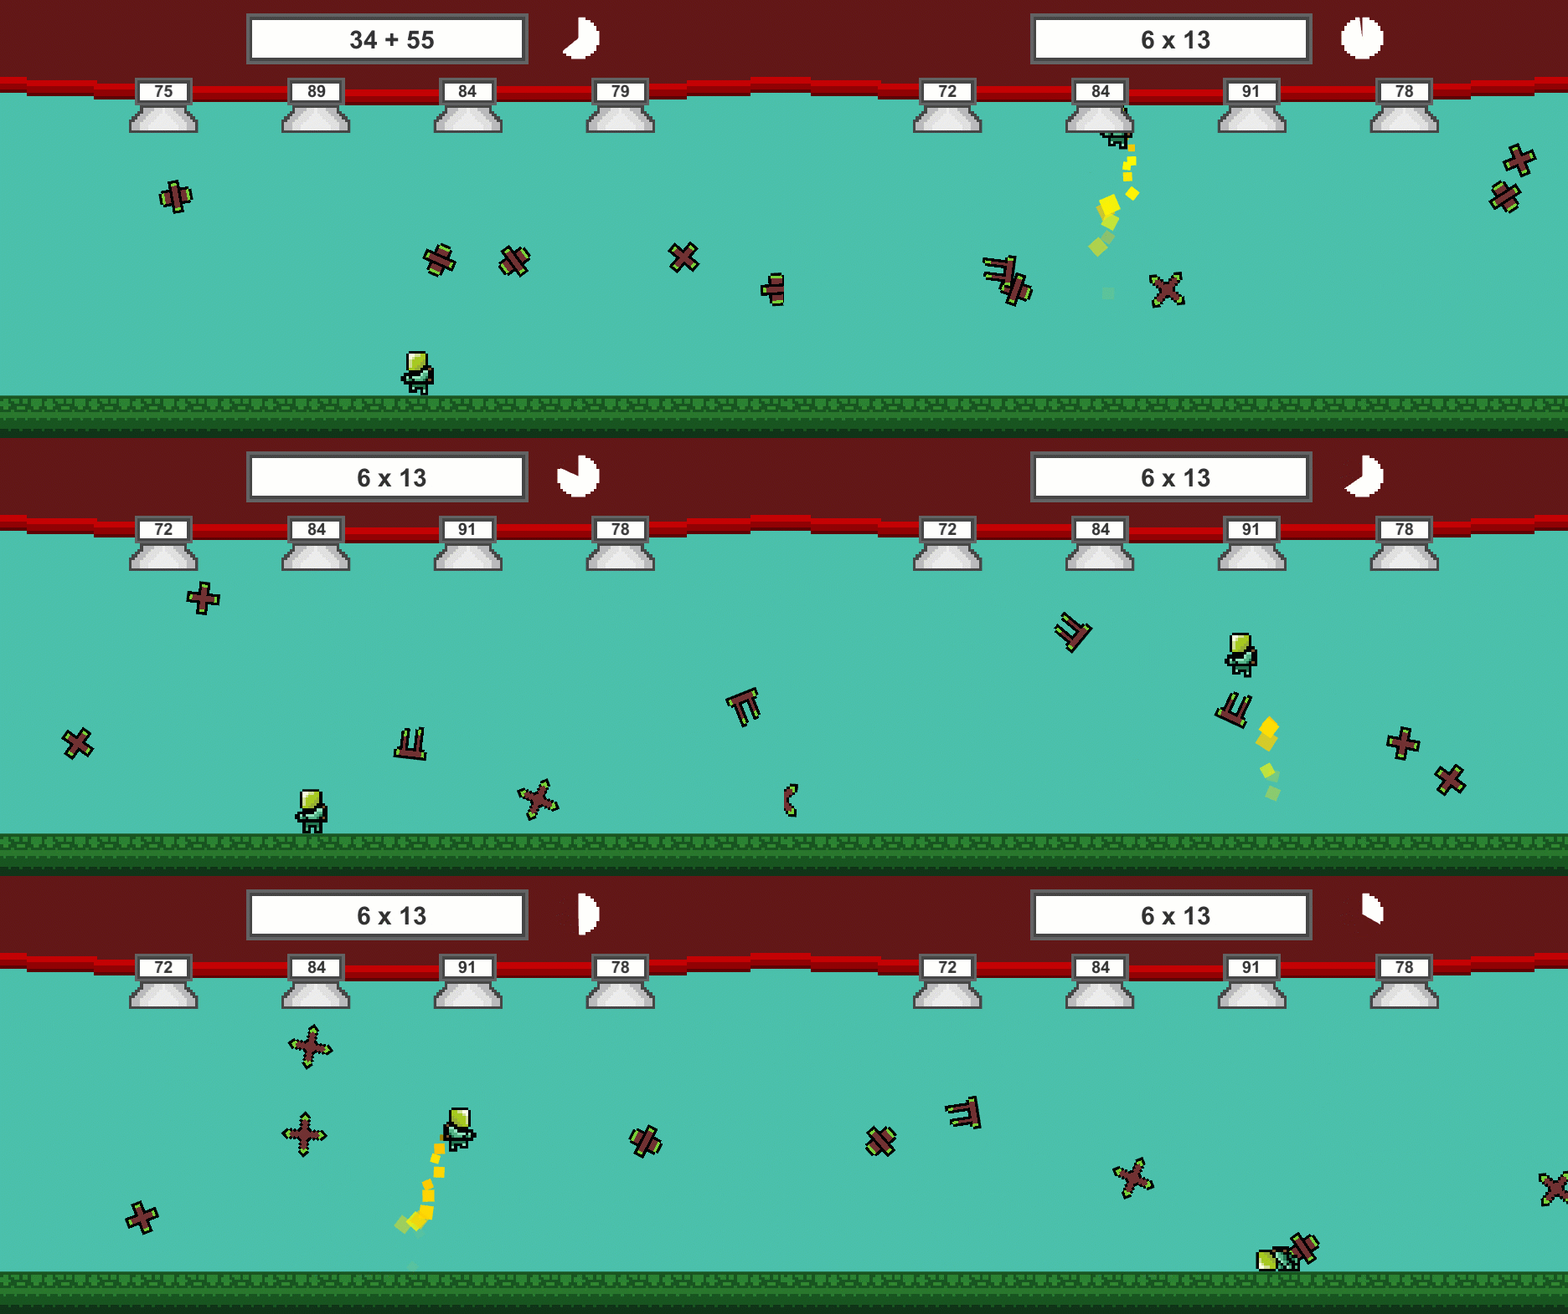
In this Unity game development tutorial, we’re going to show you how to make your first educational game using math as our basis (though you can expand this for other subjects).
Not only will this educational game tutorial give you the skills to make your own games, but also allow you to access a trillion-dollar industry in fantastic ways while improving the educational experiences for droves of children.
Let’s start learning how educational games are made!
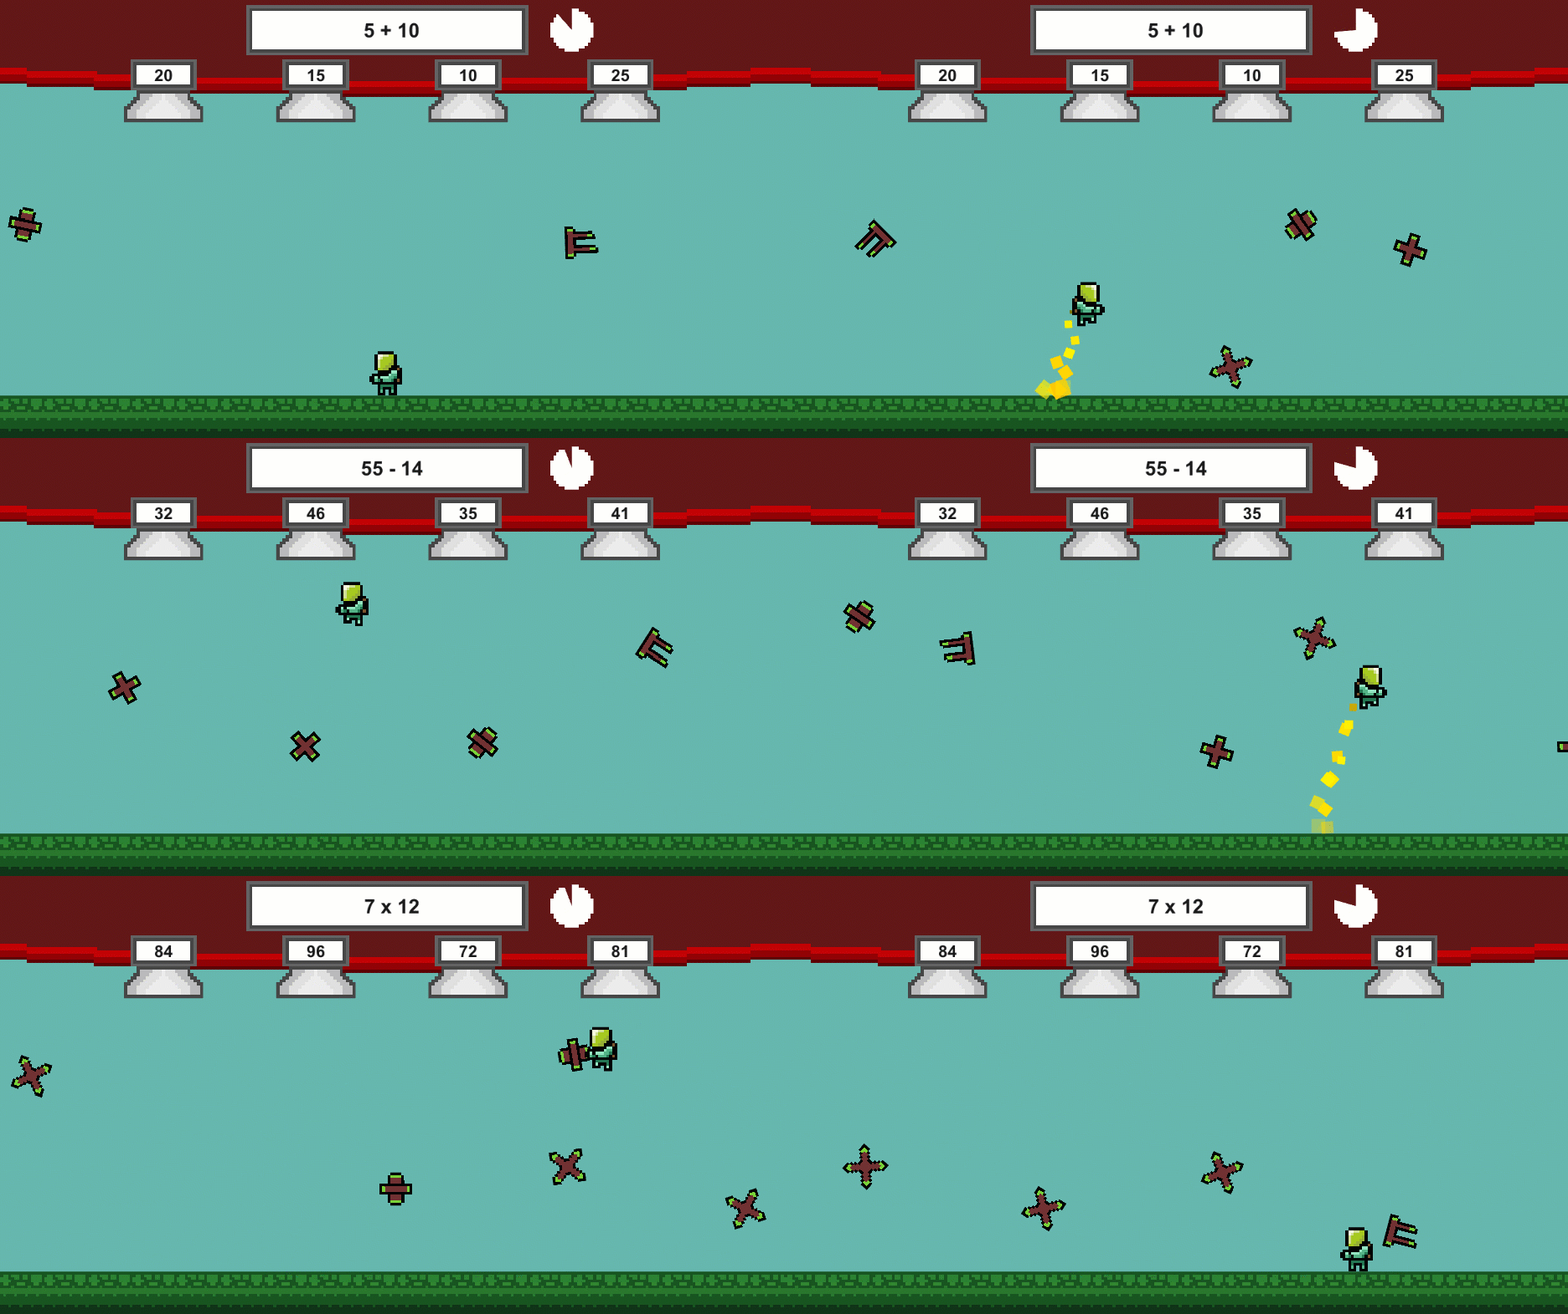
Project Files
This project will feature various sprites, animations, and a particle effect. You can download the project files here.
Project Setup
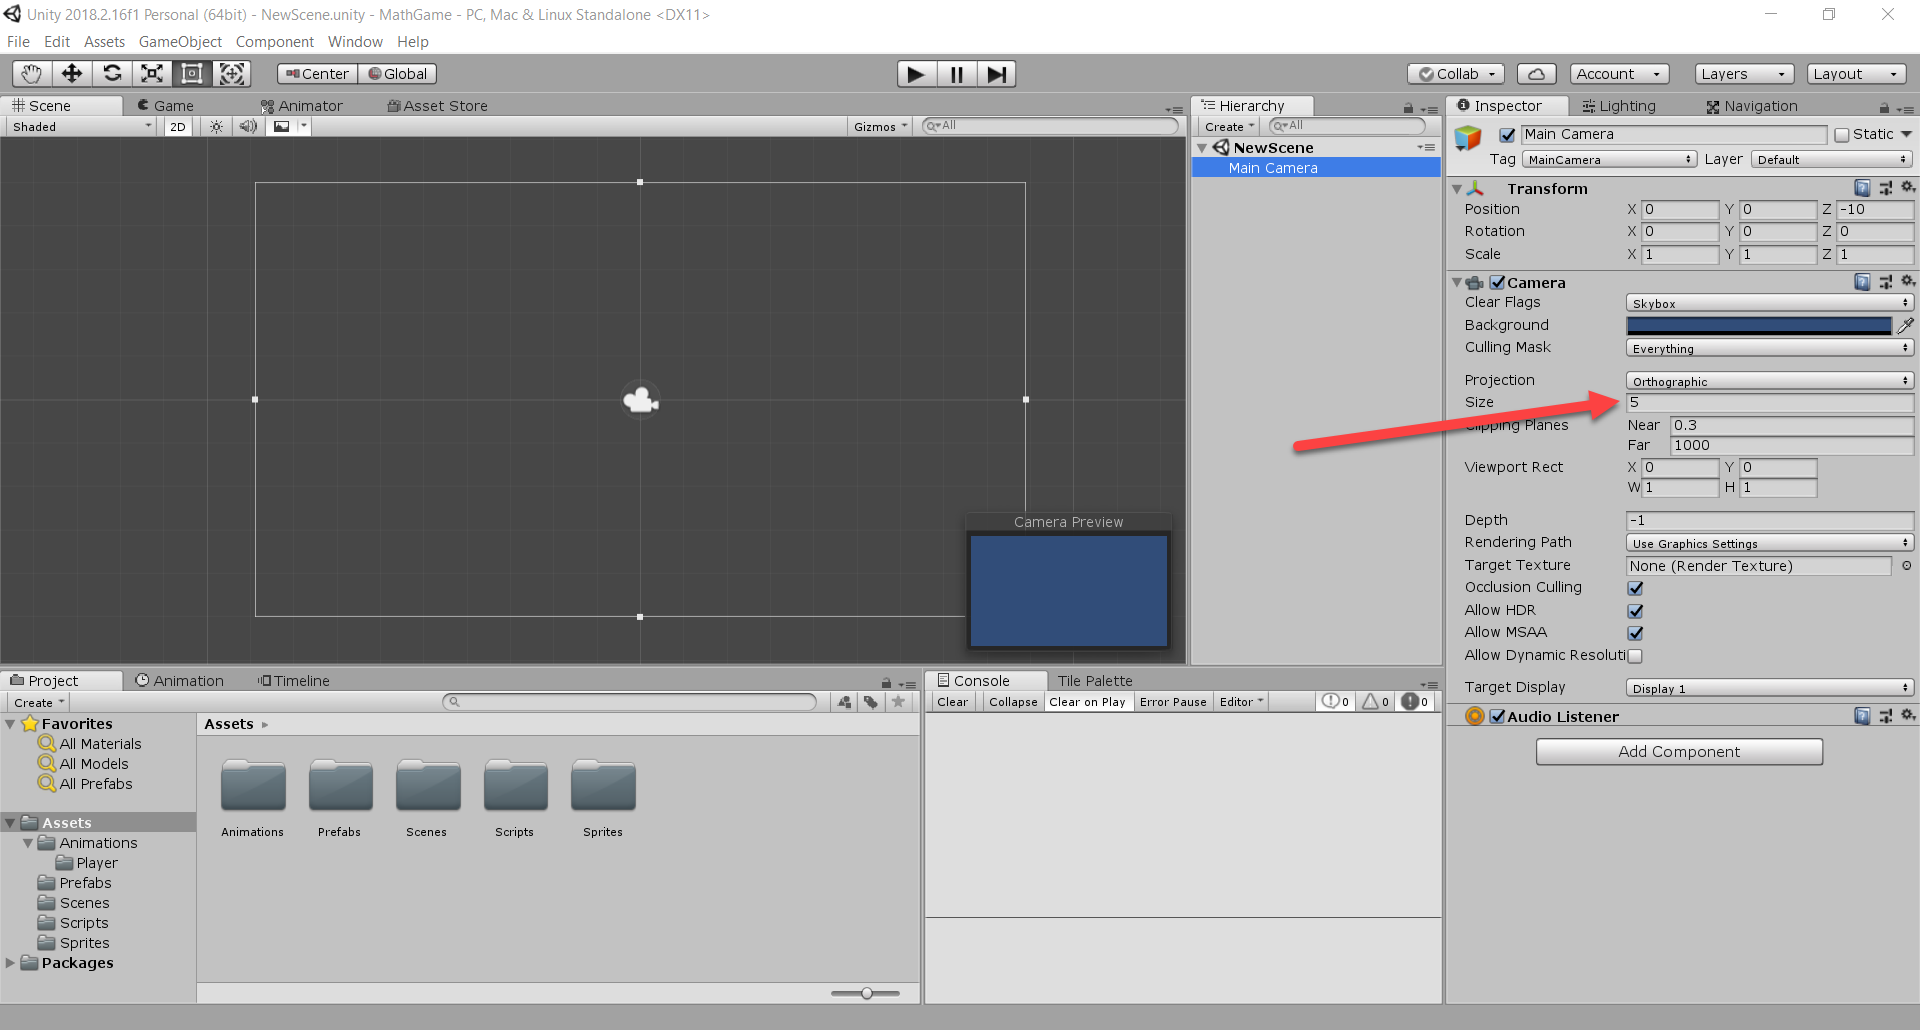
First of all, create a new 2D Unity project. Then we need to make sure that our “Main Camera” has an orthographic size of 5. This is due to the scale we’re working with.
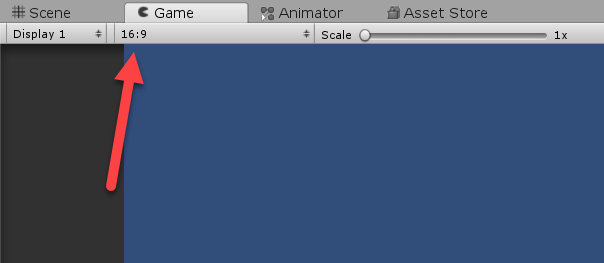
Since we’re working in 2D and the fact that we’re utilizing the whole height and width of the screen, it’s important that it’s consistent across most platforms. Go to the Game window and set the aspect ratio to 16:9.
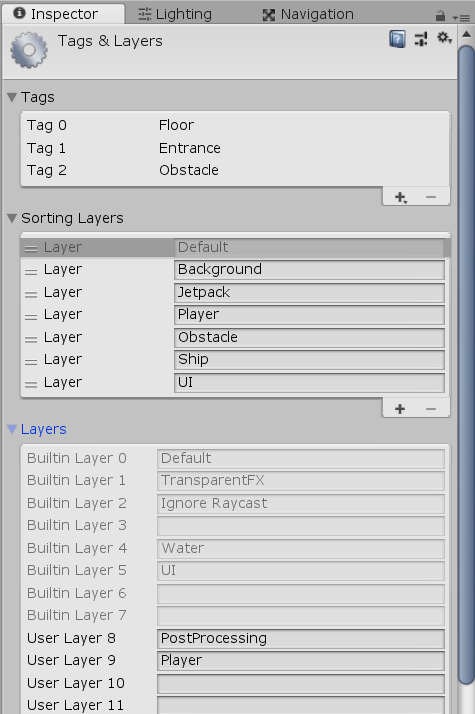
For this project, we’re going to need to add in some tags, sorting layers, and one layer. If you’ve downloaded the project files and are using that, then you can skip this step.
Tags: Floor, Entrance, Obstacle
Sorting Layers: Background, Jetpack, Player, Obstacle, Ship, UI
Note: Make sure that the sorting layers are in that specific order, as this determines what sprites render in front of others.
Layers: Player
Scene Setup
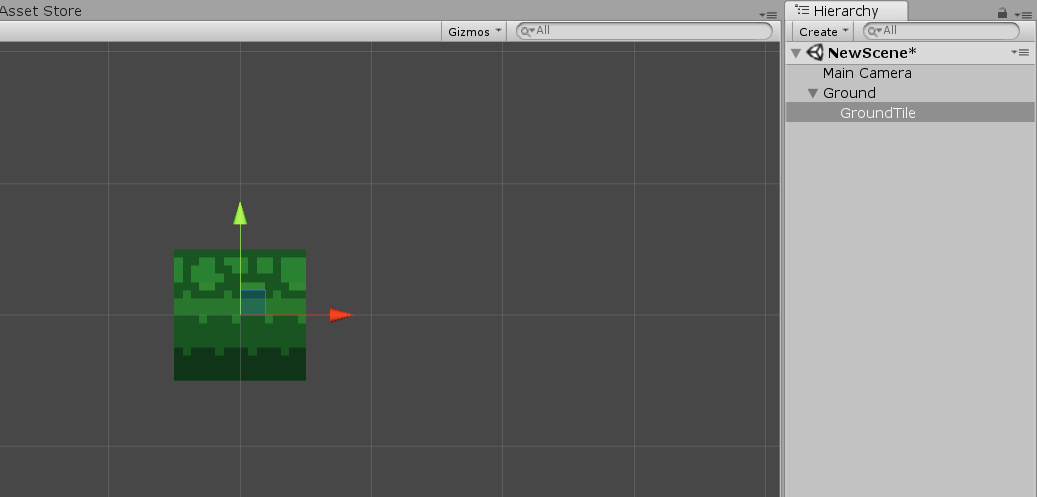
Now create an empty GameObject (right-click Hierarchy > Create Empty), and call it “Ground”. This is going to be where we store all of our ground tiles. Then, drag in the “GroundTile” sprite as a child of the object.
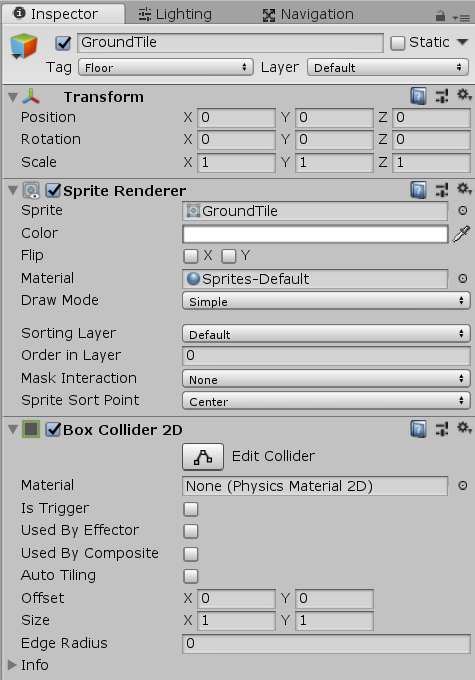
To make the floor usable, we need to add a BoxCollider2D component to the tile and set its tag to “Floor”. If you don’t have a “Floor” tag, just add one.
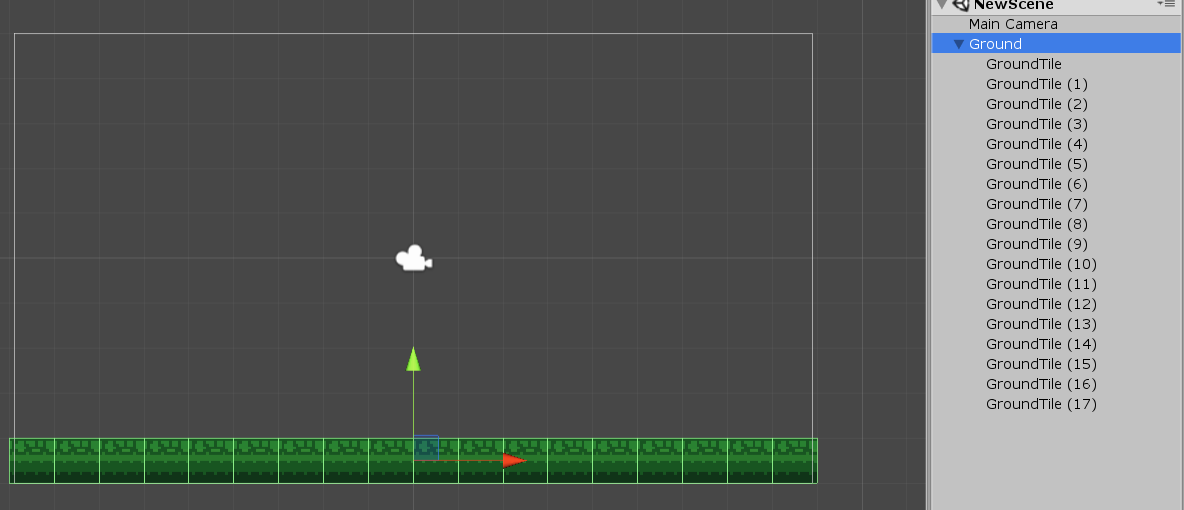
Now duplicate that tile and lay them out horizontally along the bottom border of the camera frame.
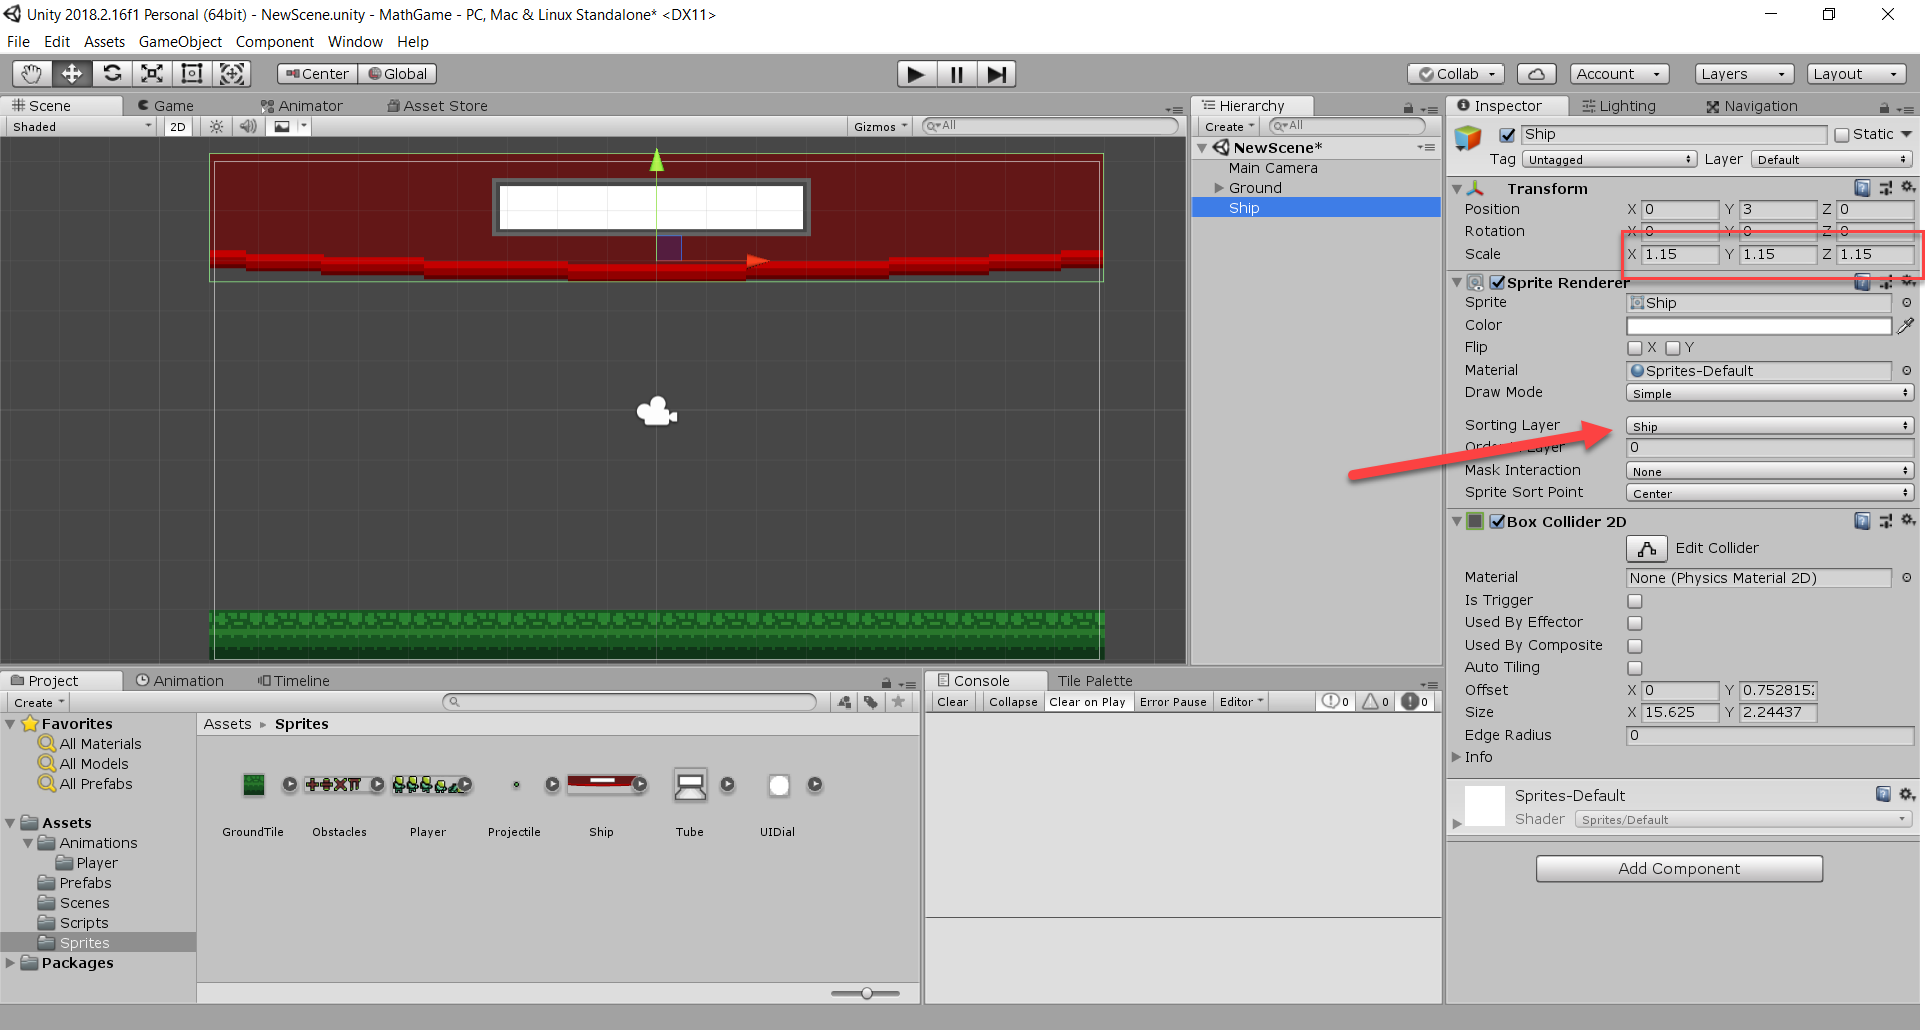
Next, drag in the “Ship” sprite to the top of the frame. You may see that it’s a bit too small, so just increase the scale to 1.15. Then, set the sorting layer to “Ship” and add a BoxCollider2D component, resizing it so it fits the ship.
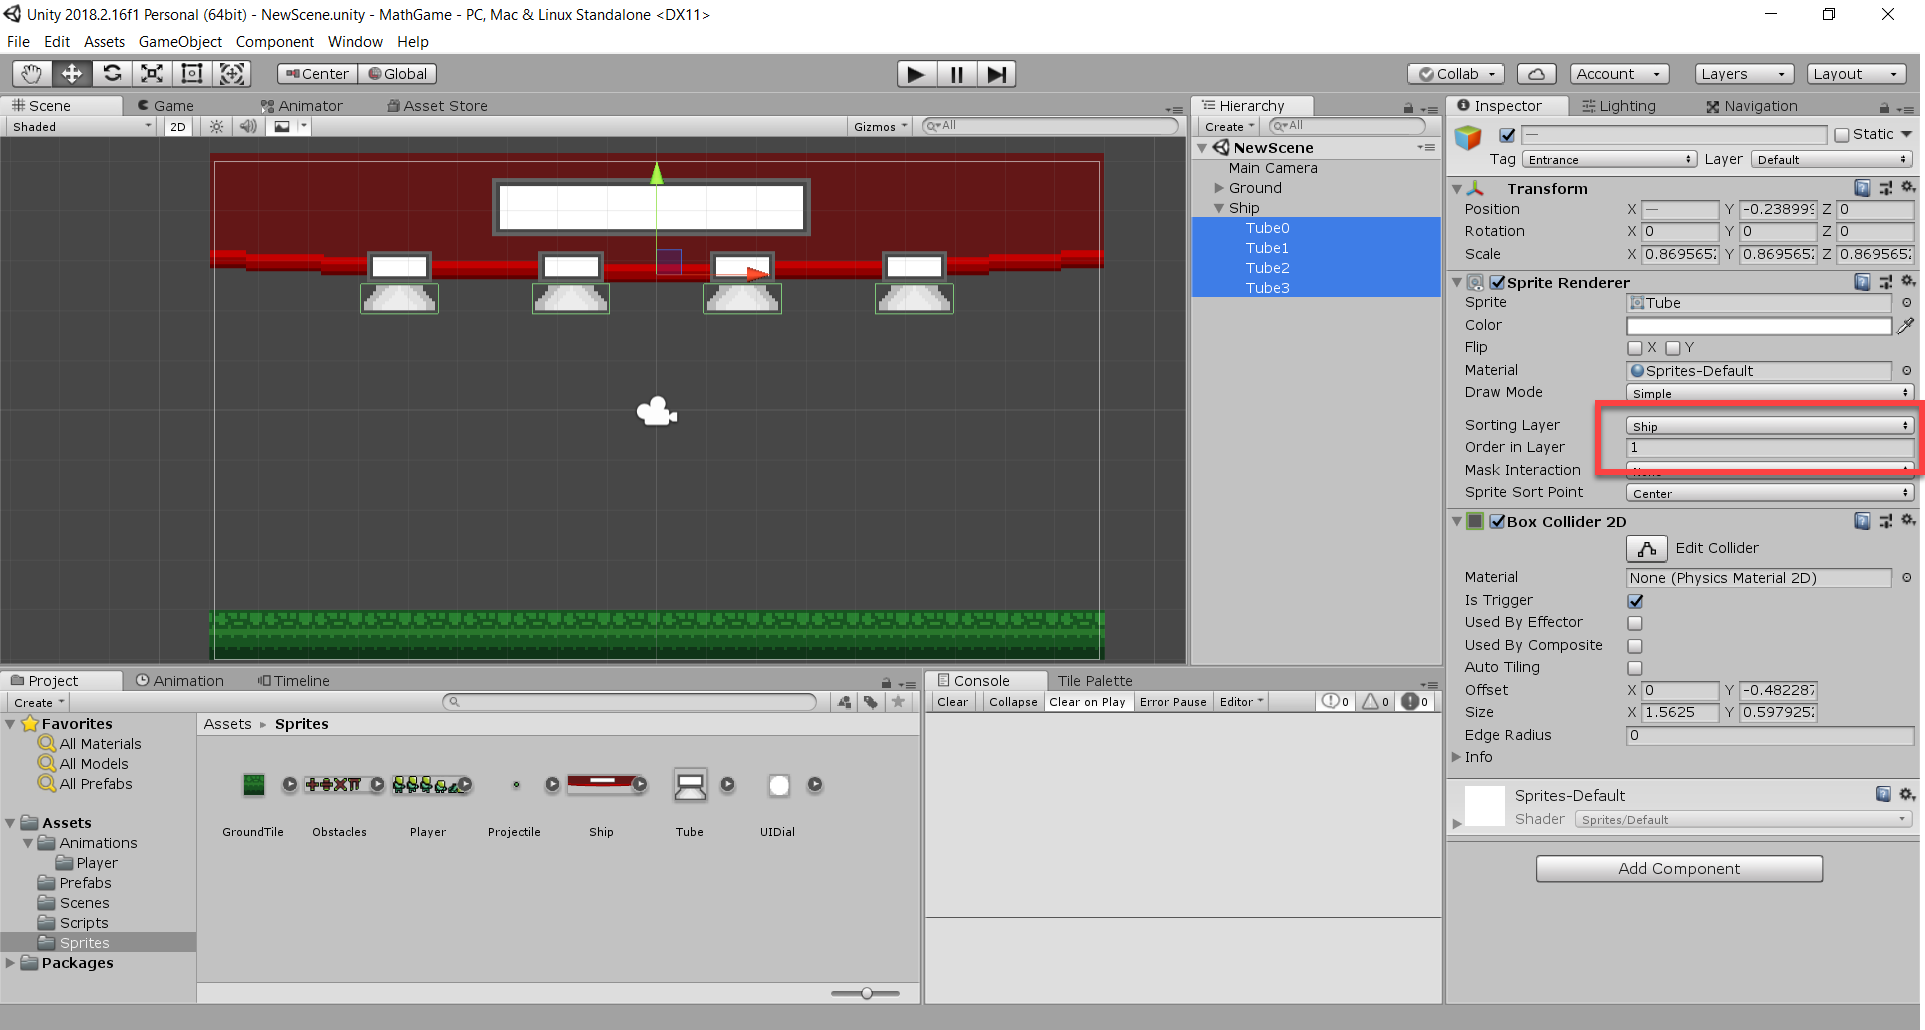
For our tubes, we’re going to drag in the “Tube” sprite, add a BoxCollider2D, set the tag to “Entrance” and sorting layer to “Ship” with an order in layer to 1. This basically means that it’s on the same layer as the ship but it will render in-front.
Then duplicate them. In our case we’re having 4 possible answers, but you can have as many as you want.
Now at the moment, our background is just the default blue. So what we’re going to do is change the color to something a bit more ‘alien’. Click on the camera and change the “Clear Flags” property to Solid Color. Then you can set the background color. For me I used a blue/green color (hexadecimal: 4BC1AC).

Setting up the Player
Now it’s time to move on to our player. Before jumping into scripting it, we need to set up a few things first.
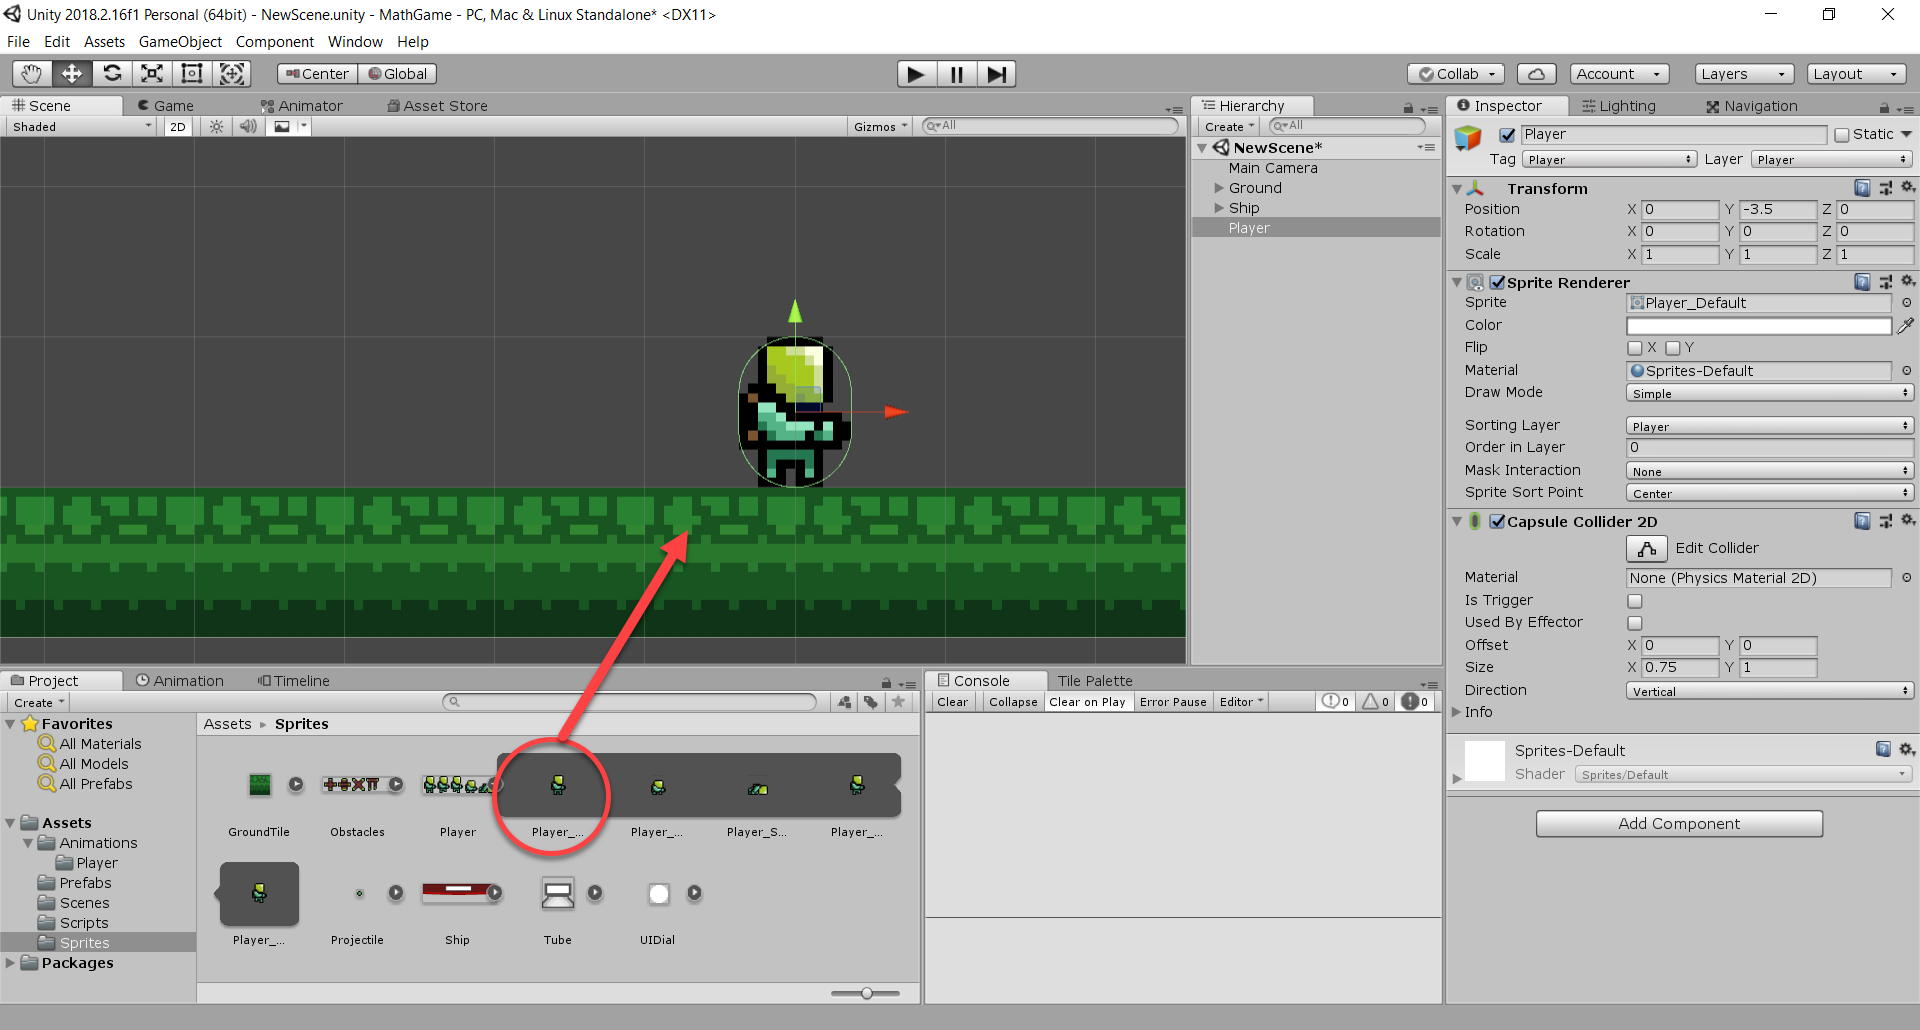
Drag the “Player_Default” sprite into the scene (part of the Player sprite sheet). Then set the tag, layer, and sorting layer to “Player”. Finally, add a CapsuleCollider2D. We’re not using a box collider because they can get stuck if moving along a surface with multiple other colliders. Capsule collider allows us to glide much smoother.
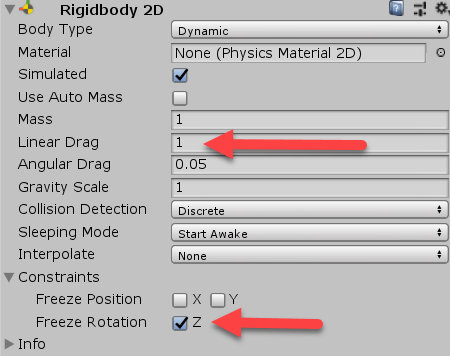
We also need to add a Rigidbody2D component. Set the “Linear Drag” to 1 and enable “Freeze Rotation”. This will prevent the player from falling over.
For the player, if you downloaded the project files you will have some animations. They’ve all been connected and setup inside of the “Player” animation controller. So to add it, just add an Animator component and set the controller to be the “Player” controller.
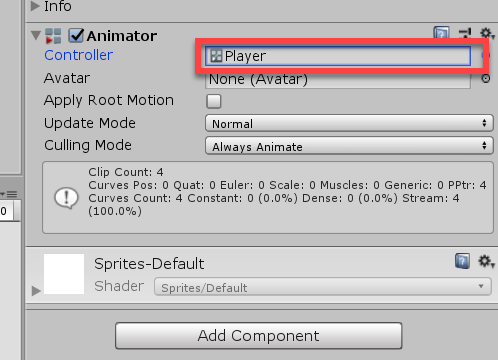
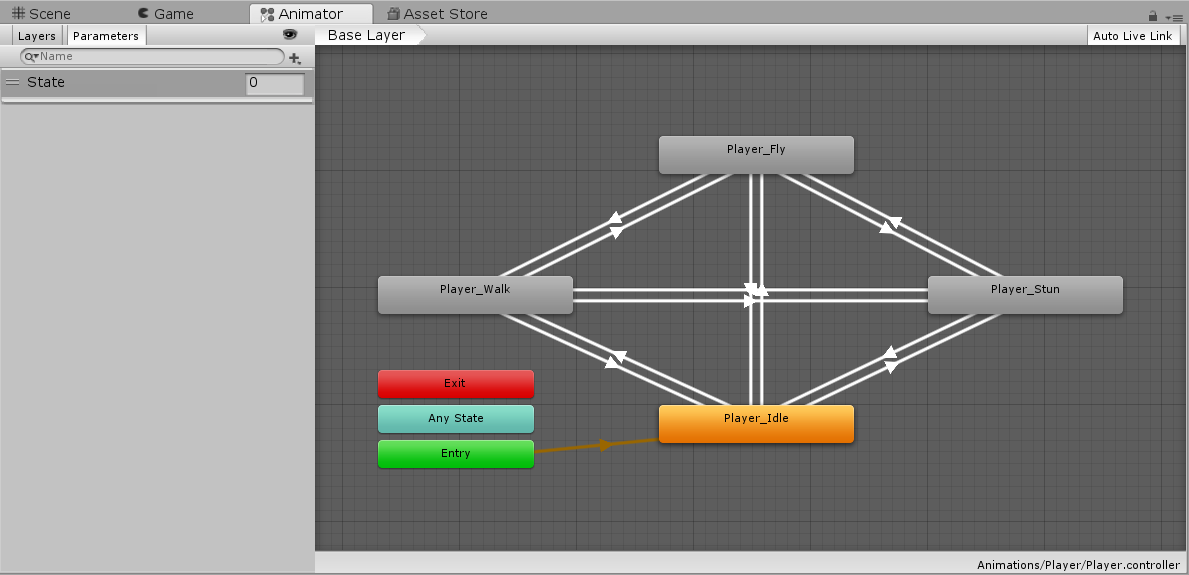
If you double click on the player controller, you will see in the Animator window what it’s made up of. Our various animations play determined based on the “State”. This is a number we’ll talk about more when we script the player.
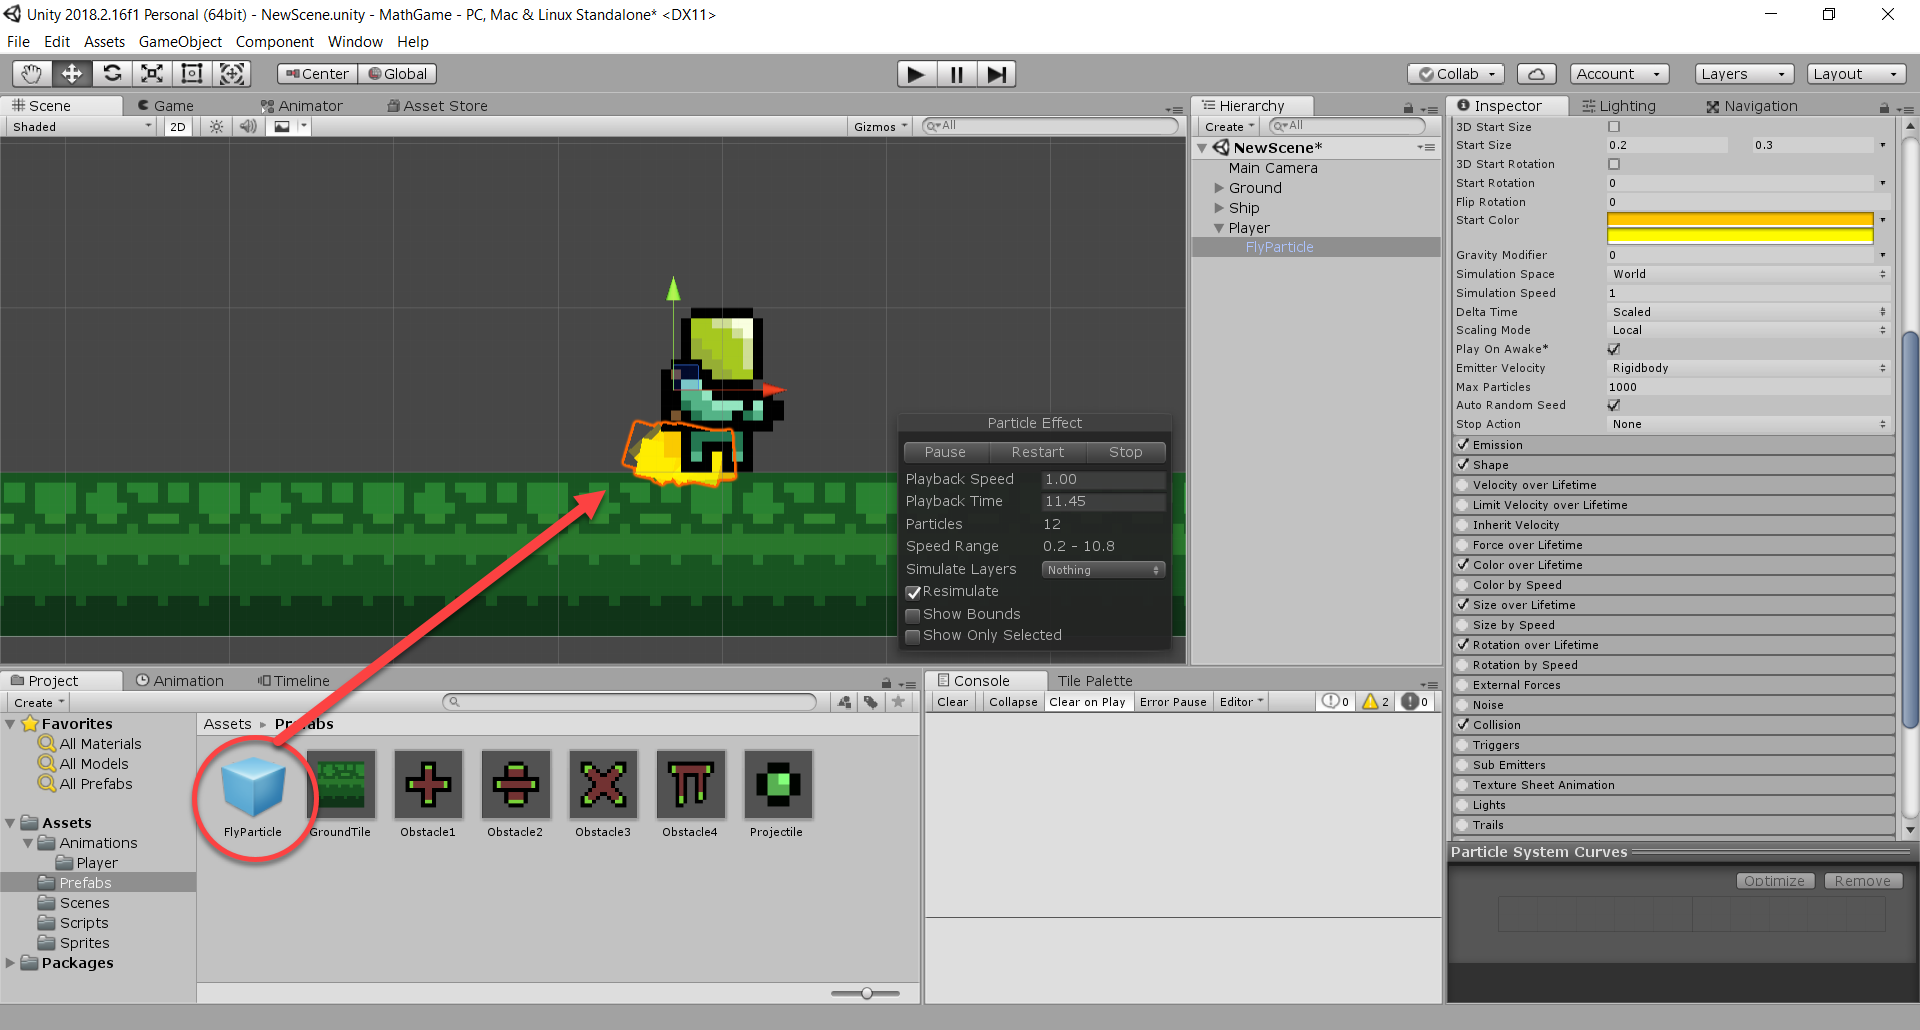
To add some interesting visual elements, we’ve got a jetpack particle that will blast particles when the player flies.
Drag in the “FlyParticle” prefab into the scene as a child of the player. Position it in a way so it comes out from the player’s jetpack.
Scripting the Player Controller
To begin, let’s create a new C# script called “PlayerController” and attach it to the player object we just made.
Opening it up, we can start by adding a new enumerator called “PlayerState” at the top of our class. This enum will contain the player’s current state. If you look back at the player animation controller, you will see that the “State” float value correlates to the id of each enum value.
public enum PlayerState
{
    Idle,       // 0
    Walking,    // 1
    Flying,     // 2
    Stunned     // 3
}
Now back in our class, let’s add the variables we’re going to be using. First, we have our state, some values for speeds and durations and finally a list of components that we can access.
public PlayerState curState;            // current player state

// values
public float moveSpeed;                 // force applied horizontally when moving
public float flyingSpeed;               // force applied upwards when flying
public bool grounded;                   // is the player currently standing on the ground?
public float stunDuration;              // duration of a stun
private float stunStartTime;            // time that the player was stunned

// components
public Rigidbody2D rig;                 // Rigidbody2D component
public Animator anim;                   // Animator component
public ParticleSystem jetpackParticle;  // ParticleSystem of jetpack
To begin with our functionality, let’s add a “Move” function. This is going to be called every frame. It gets the horizontal axis (-1 to 1) which maps to the left/right arrows and A/D keys. Then we check if the player is moving left or right and flip the X scale depending on that. This will make the player flip their facing direction. Finally, we set our horizontal velocity to be the direction with the move speed applied.
// moves the player horizontally
void Move ()
{
    // get horizontal axis (A & D, Left Arrow & Right Arrow)
    float dir = Input.GetAxis("Horizontal");

    // flip player to face the direction they're moving
    if (dir > 0)
        transform.localScale = new Vector3(1, 1, 1);
    else if (dir < 0)
        transform.localScale = new Vector3(-1, 1, 1);

    // set rigidbody horizontal velocity
    rig.velocity = new Vector2(dir * moveSpeed, rig.velocity.y);
}
Another function is “Fly”. This gets called whenever the player holds the up arrow key and adds force upwards to the player’s rigidbody. We also play the jetpack particle.
// adds force upwards to player
void Fly ()
{
    // add force upwards
    rig.AddForce(Vector2.up * flyingSpeed, ForceMode2D.Impulse);

    // play jetpack particle effect
    if (!jetpackParticle.isPlaying)
        jetpackParticle.Play();
}
Something we need to know for changing states is whether or not the player is standing on the ground. For this, we have the “IsGrounded” function which returns a bool value of true or false.
We shoot a short raycast downwards and check if it hit the floor. If so, return true; otherwise, return false.
// returns true if player is on ground, false otherwise
bool IsGrounded ()
{
    // shoot a raycast down underneath the player
    RaycastHit2D hit = Physics2D.Raycast(new Vector2(transform.position.x, transform.position.y - 0.85f), Vector2.down, 0.3f);

    // did we hit anything?
    if(hit.collider != null)
    {
        // was it the floor?
        if(hit.collider.CompareTag("Floor"))
        {
            return true;
        }
    }

    return false;
}
Speaking of states, we need a way to change it. So let’s make a function called “SetState” which will be called every frame. First up, we check if we’re not stunned, because if we are the state can’t change.
The Idle state is determined if the player’s velocity is 0 and they’re grounded. Walking is if the player’s horizontal velocity isn’t 0 and they’re grounded, and Flying is if the player’s velocity isn’t 0 and they’re not grounded. Fairly simple.
Then we tell the Animator we’ve set our state, which will change the currently playing animation.
// sets the player's state
void SetState ()
{
    // don't worry about changing states if the player's stunned
    if (curState != PlayerState.Stunned)
    {
        // idle
        if (rig.velocity.magnitude == 0 && grounded)
            curState = PlayerState.Idle;
        // walking
        if (rig.velocity.x != 0 && grounded)
            curState = PlayerState.Walking;
        // flying
        if (rig.velocity.magnitude != 0 && !grounded)
            curState = PlayerState.Flying;
    }

    // tell the animator we've changed states
    anim.SetInteger("State", (int)curState);
}
“Stun” is a function that will be called when the player gets stunned. We set the state and make their velocity shoot them downwards so they hit the ground. Also setting the stun time and stopping any jetpack particles.
// called when the player gets stunned
public void Stun ()
{
    curState = PlayerState.Stunned;
    rig.velocity = Vector2.down * 3;
    stunStartTime = Time.time;
    jetpackParticle.Stop();
}
So how does the player actually call these functions? With the “CheckInputs” script. This calls the “Move” function which has its own inputs. For flying, we check for up arrow inputs and at the end, we set the state as it may have changed.
// checks for user input to control player
void CheckInputs ()
{
    if (curState != PlayerState.Stunned)
    {
        // movement
        Move();

        // flying
        if (Input.GetKey(KeyCode.UpArrow))
            Fly();
        else
            jetpackParticle.Stop();
    }

    // update our current state
    SetState();
}
What calls “CheckInput” is the “FixedUpdate” function. This is a function that is similar to the “Update” function. The difference is that unlike being called every frame, this is called at a consistent rate (0.02 seconds). Why? Well because we are altering the physics of the rigidbody. This needs to be a consistent rate otherwise things can mess up.
In this function, we also update the “grounded” bool to be if the player is grounded or not. We also check if the player is stunned and if so, has the stun time ran out? If so, make them idle.
void FixedUpdate ()
{
    grounded = IsGrounded();
    CheckInputs();

    // is the player stunned?
    if(curState == PlayerState.Stunned)
    {
        // has the player been stunned for the duration?
        if(Time.time - stunStartTime >= stunDuration)
        {
            curState = PlayerState.Idle;
        }
    }
}
One last function is an OnTriggerEnter2D check. We’re checking if we’re entering an “Obstacle” object. If so, we get stunned.
// called when the player enters another object's collider
void OnTriggerEnter2D (Collider2D col)
{
    // if the player isn't already stunned, stun them if the object was an obstacle
    if(curState != PlayerState.Stunned)
    {
        if(col.GetComponent<Obstacle>())
        {
            Stun();
        }
    }
}
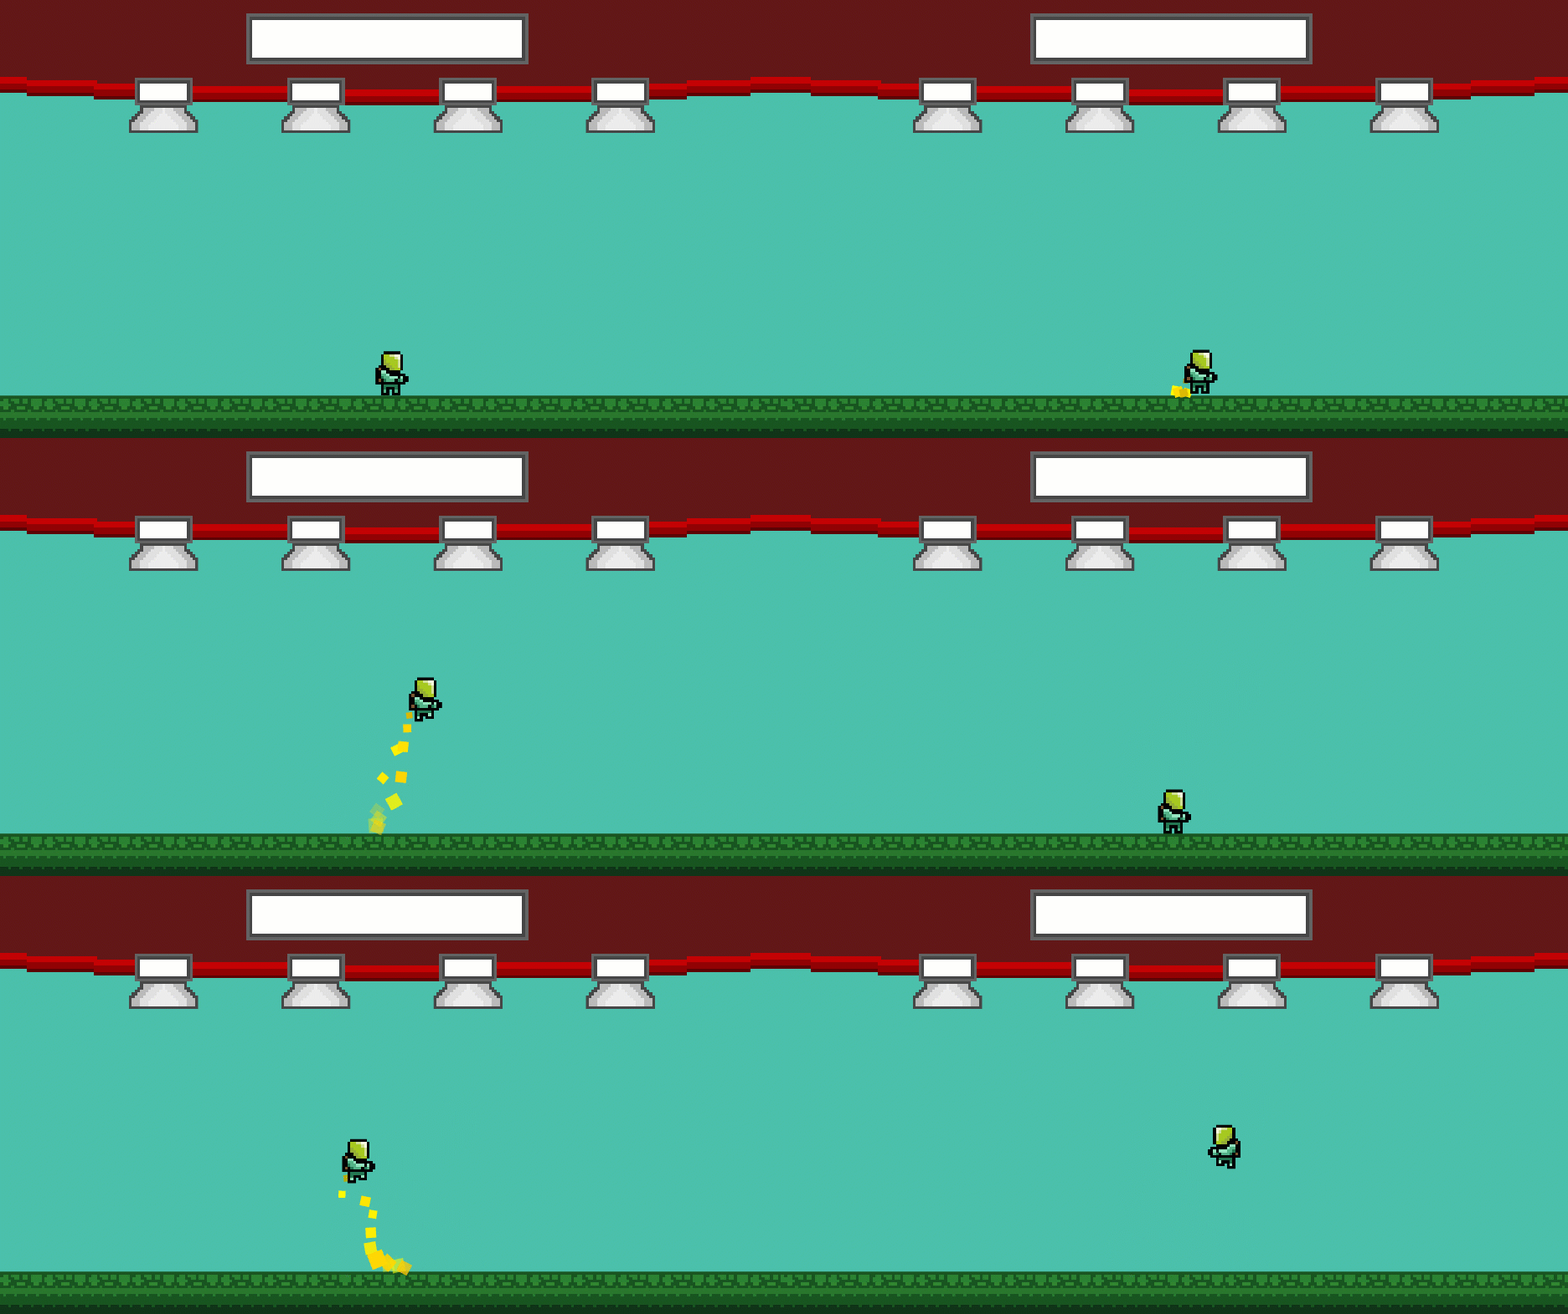
Going back to the editor now, we can enter in the values for our player and test it out. The best values that I found for the game are:
- Move speed = 4
- Flying speed = 0.28
- Stun duration = 4
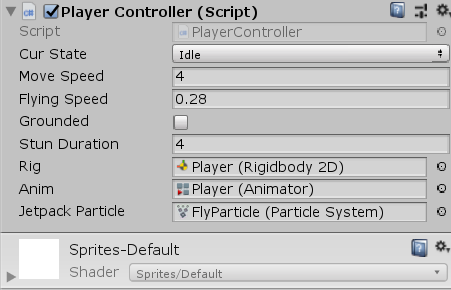
Make sure you also add in the components and press play!
Creating an Obstacle
Now, we’re going to begin to create the obstacles for the player to avoid.
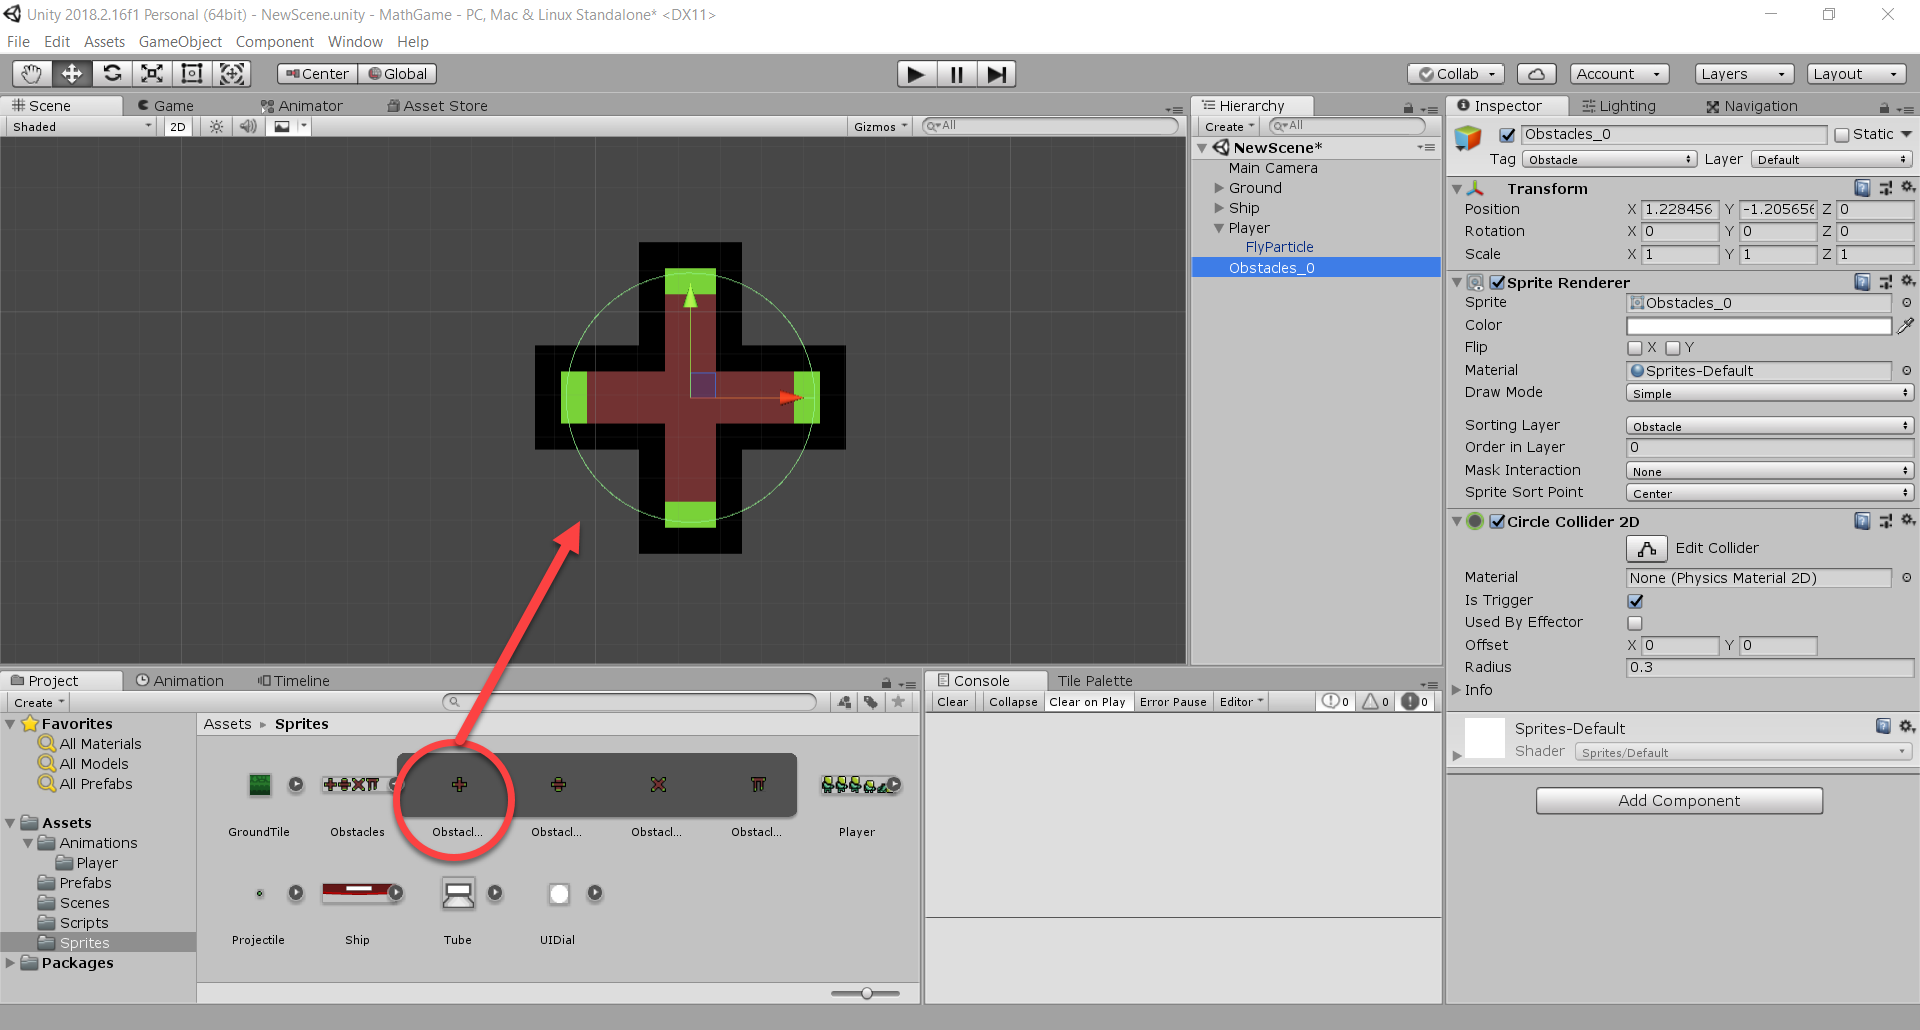
Drag in the “Obstacles_0” sprite (a part of the Obstacles sprite sheet) into the scene. Set the tag and sorting layer to “Obstacle” and add a CircleCollider2D. a good thing would be to make the collider a bit smaller than the actual sprite. This will make it so when the player gets stunned, they don’t think, “I didn’t even touch that!”. It allows for more near misses.
Now create a new C# script called “Obstacle”, attach it to the obstacle object and open it up.
Our variables are fairly simple. We have the direction that it’s going to move in which is determined by the spawner when it’s created. The move speed is how fast it moves and aliveTime is how long until it will be destroyed.
public Vector3 moveDir;         // direction to move in
public float moveSpeed;         // speed to move at along moveDir

private float aliveTime = 8.0f; // time before object is destroyed
In the “Start” function, we want to call the Destroy function. Now this won’t instantly destroy it, but we can set a time delay. This means the object will be destroyed after “aliveTime” seconds.
void Start ()
{
    Destroy(gameObject, aliveTime);
}
In the “Update” function, we want to move the object in the direction specified. As well, we want to rotate it over time in the direction that it’s moving. This just makes the movement look better and as if something ‘threw’ it.
void Update ()
{
    // move obstacle in certain direction over time
    transform.position += moveDir * moveSpeed * Time.deltaTime;

    // rotate obstacle
    transform.Rotate(Vector3.back * moveDir.x * (moveSpeed * 20) * Time.deltaTime);
}
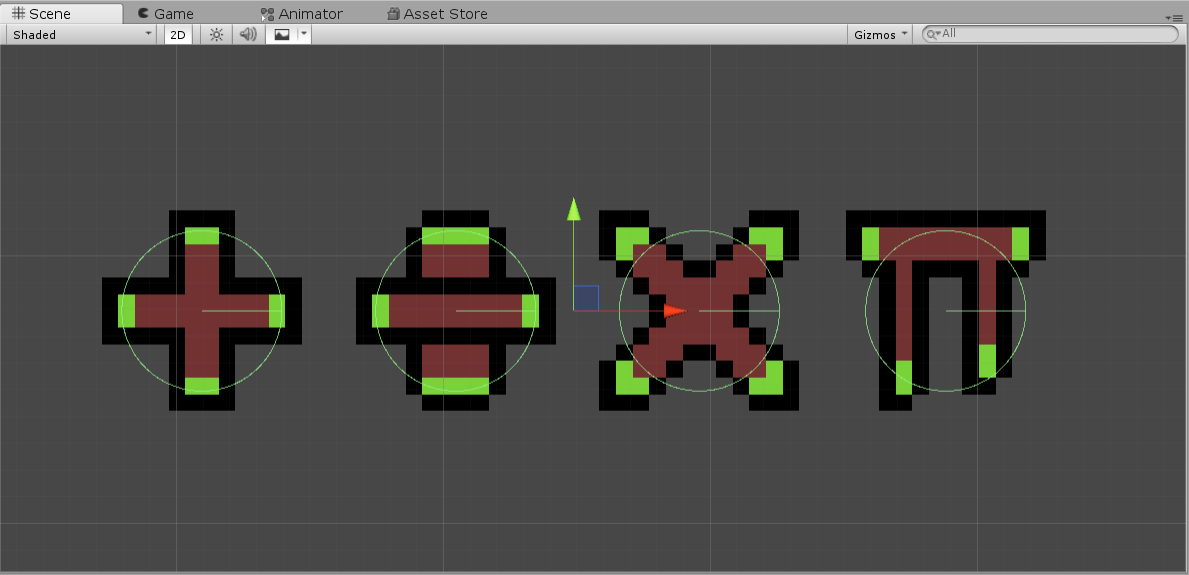
Now back in the editor, we can duplicate the obstacle for each of the 4 sprites. You can create your own, or use the ones included (math-related symbols). Then save them as prefabs and you’re done!
Spawning the Obstacles
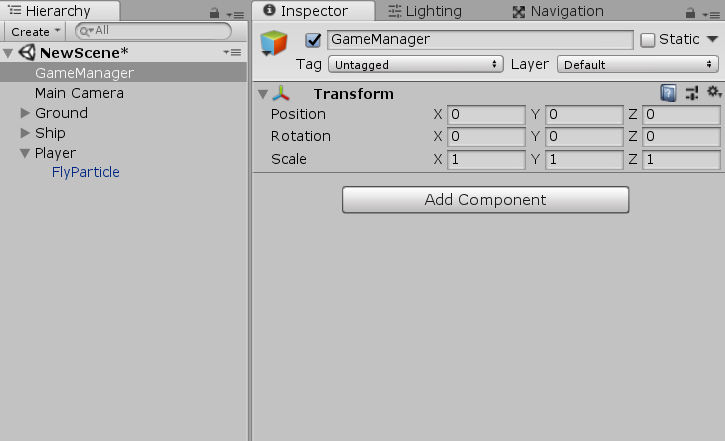
Now it’s time to spawn in our obstacles. First, create an empty GameObject called “GameManager”. This will hold our obstacle spawner as well as other scripts. Then, create a new C# script called “ObstacleSpawner” and attach it to the game manager.
This is how it’s going to work. When we spawn an obstacle, we’re first going to decide if it’s going to come from the left or right-hand side of the screen. Then with that side decided, we pick a random Y-axis value from a pre-defined min and max. The object is spawned and thrown across the screen.
The “obstacles” array will hold all of the obstacle prefabs. “minSpawnY” and “maxSpawnY” is the vertical range to spawn objects along. “leftSpawnX” and “rightSpawnX” are the X positions of the left/right side of the screen.
public GameObject[] obstacles;      // array of all the different types of obstacles

public float minSpawnY;             // minimum height objects can spawn at
public float maxSpawnY;             // maximum height objects can spawn at
private float leftSpawnX;           // left hand side of the screen
private float rightSpawnX;          // right hand side of the screen

public float spawnRate;             // time in seconds between each spawn
private float lastSpawn;            // Time.time of the last spawn
We’re also going to be pooling our obstacles. This helps with performance as we Instantiate all of them at the start of the game.
// pooling
    private List<GameObject> pooledObstacles = new List<GameObject>();  // list of objects in the pool
    private int initialPoolSize = 20;                                   // size of the pool
Now in the “Start” function, we need to calculate the left and right spawn X variables. To do this, we first need to get the width of the camera. Unfortunately, that’s not something we can just get, so we just need to do a bit of math. Since the middle of the camera is X=0, we can determine that left spawn X will be -camWidth / 2, with right spawn being the same but positive.
Let’s also call the function to create our pool, which we’ll be creating next.
void Start ()
{
    // setting left and right spawn borders
    // do this by getting camera horizontal borders
    Camera cam = Camera.main;
    float camWidth = (2.0f * cam.orthographicSize) * cam.aspect;

    leftSpawnX = -camWidth / 2;
    rightSpawnX = camWidth / 2;

    // create our initial pool
    CreateInitialPool();
}
“CreateInitialPool” instantiates a set number of obstacles, deactivates them, and adds them to the “pooledObstacles” list. We’ll then get objects from that list later on to ‘spawn’ them.
// instantiates the initial objects to add to the pool
void CreateInitialPool ()
{
    for(int index = 0; index < initialPoolSize; index++)
    {
        // determine which obstacle type we're going to create
        GameObject obstacleToSpawn = obstacles[index % 4];

        // instantiate it
        GameObject spawnedObject = Instantiate(obstacleToSpawn);

        // add it to the pool
        pooledObstacles.Add(spawnedObject);

        // deactivate it
        spawnedObject.SetActive(false);
    }
}
“GetPooledObstacle” returns an inactive object from the “pooledObstacles” list. We’ll be calling this function instead of “Instantiate”.
// returns a new pooled obstacle ready to be used
GameObject GetPooledObstacle ()
{
    GameObject pooledObj = null;

    // find a pooled object that is not active
    foreach(GameObject obj in pooledObstacles)
    {
        if (!obj.activeInHierarchy)
            pooledObj = obj;
    }

    // if we couldn't find one, log error
    if (!pooledObj)
        Debug.LogError("Pool size is not big enough!");

    // activate it
    pooledObj.SetActive(true);

    // then send it
    return pooledObj;
}
Now it’s time for the “SpawnObstacle” function, which will spawn a random obstacle.
First, we get an available obstacle from the “GetPooledObstacle” function and set a position for it from the “GetSpawnPosition” function. We’ll get to that soon. Then with the spawned object, we set the move direction to be horizontal across the screen.
// spawns a random obstacle at a random spawn point
void SpawnObstacle ()
{
    // get the obstacle
    GameObject obstacle = GetPooledObstacle();

    // set its position
    obstacle.transform.position = GetSpawnPosition();

    // set obstacle's direction to move in
    obstacle.GetComponent<Obstacle>().moveDir = new Vector3(obstacle.transform.position.x > 0 ? -1 : 1, 0, 0);
}
The “GetSpawnPosition” returns a Vector3, which is the random position for the object to spawn at. Inside the function, we first determine the X position. This is a 50/50 chance of being on the left or right. Then the Y position is a random value between the min and max Y spawn range.
// returns a random spawn position for an obstacle
Vector3 GetSpawnPosition ()
{
    float x = Random.Range(0, 2) == 1 ? leftSpawnX : rightSpawnX;
    float y = Random.Range(minSpawnY, maxSpawnY);

    return new Vector3(x, y, 0);
}
To spawn these over time, we check each frame in the “Update” function if the time between now and the last time we spawned is more than the spawn rate. If so, we reset the last spawn time and spawn an obstacle.
void Update ()
{
    // every 'spawnRate' seconds, spawn a new obstacle
    if(Time.time - spawnRate >= lastSpawn)
    {
        lastSpawn = Time.time;
        SpawnObstacle();
    }
}
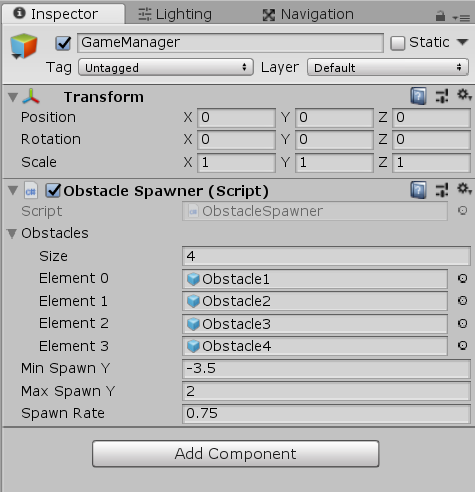
Now back in the editor, we can fill out the script variables. Add all of your obstacle prefabs into the obstacles array. I set the Min Spawn Y to be -3.5 and max to be 2. This spawns them just of the ground to just below the ship. For the spawn rate, I set it to 0.75, but you can test and tweak this value.
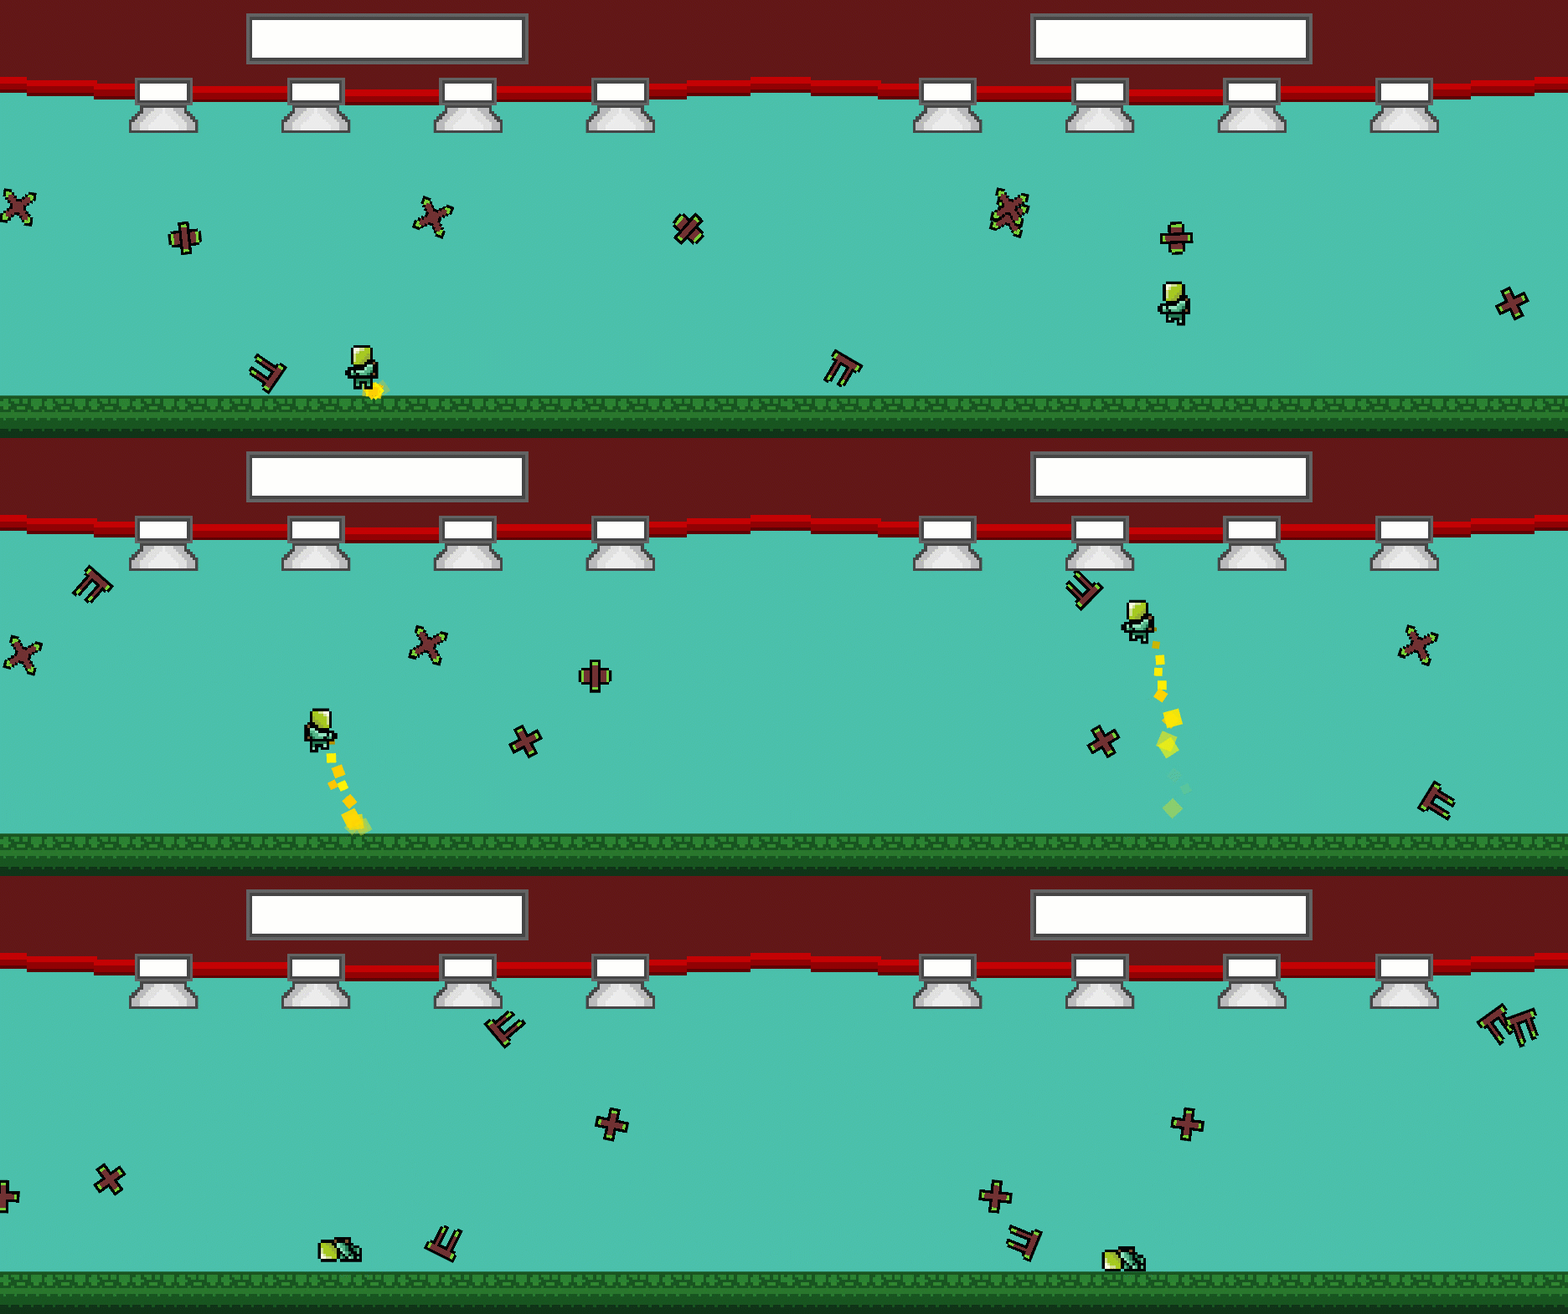
Here’s how it should look like when you play the game! Make sure that you get stunned when you collide with the obstacles.
Creating the Base Problem Class
The game manager is going to be a script that holds all of our math problems and runs the game’s loop.
So first up, create a new C# script called “Problem”. This is going to be the base class for our math problems.
Under the pre-made class, create a new enumerator called “MathsOperation”. For our game the format is going to be: [number] [operation] [number]. The way the two numbers are going to be calculated together is determined by the operator. Addition, subtraction, multiplication, and division are the ones we’re going to be using.
public enum MathsOperation
{
    Addition,
    Subtraction,
    Multiplication,
    Division
}
We then need to change the pre-made “Problem” class. First, remove the “MonoBehaviour” text at the end of the class definition and add “[System.Serializable]” just above.
We remove mono behavior because we don’t need any of Unity’s pre-made functions and for the fact that this script isn’t going to be attached to any script. The System.Serializable property makes it so that this class can be displayed in the Inspector with all its values laid out to edit.
With our variables, we have our two numbers and our operator. “answers” is a float array that will hold all the possible answers, including the correct one. “correctTube” is the index number of the correct answer in the “answers” array.
[System.Serializable]
public class Problem
{
    public float firstNumber;           // first number in the problem
    public float secondNumber;          // second number in the problem
    public MathsOperation operation;    // operator between the two numbers
    public float[] answers;             // array of all possible answers including the correct one

    [Range(0, 3)]
    public int correctTube;             // index of the correct tube
}
Scripting the Game Manager
Now that we have our problem class, let’s make the game manager. Create a new C# script called “GameManager” and attach it to the “GameManager” object.
Here are our variables. “problems” is an array holding all of our math problems. “curProblem” is the index number of the “problems” array, pointing to the current problem the player is on.
public Problem[] problems;      // list of all problems
public int curProblem;          // current problem the player needs to solve
public float timePerProblem;    // time allowed to answer each problem

public float remainingTime;     // time remaining for the current problem

public PlayerController player; // player object
We also want to create an instance of this script (or singleton). This means we can easily access the script by just going GameManager.instance.[…] without needing to reference it. The only downside, is that you can only have one instance of the script.
// instance
public static GameManager instance;

void Awake ()
{
    // set instance to this script.
    instance = this;
}
Let’s start with the “Win” and “Lose” functions. Right now they’ll just set the time scale to 0 (pausing the game). Later on, we’ll call a UI function to show text saying “You Win!” or “Game Over”.
 // called when the player answers all the problems
void Win ()
{
    Time.timeScale = 0.0f;
    // set UI text
}

// called if the remaining time on a problem reaches 0
void Lose ()
{
    Time.timeScale = 0.0f;
    // set UI text
}
Now we need a way to present and set a problem. The “SetProblem” function will carry over an index number for the problem array and set that as the current problem.
// sets the current problem
void SetProblem (int problem)
{
    curProblem = problem;
    remainingTime = timePerProblem;
    // set UI text to show problem and answers
}
When the player gets the correct answer, “CorrectAnswer” will be called. “IncorrectAnswer” will be called if it’s the wrong answer. If they get it wrong, we’ll just stun them.
// called when the player enters the correct tube
void CorrectAnswer()
{
    // is this the last problem?
    if(problems.Length - 1 == curProblem)
        Win();
    else
        SetProblem(curProblem + 1);
}

// called when the player enters the incorrect tube
void IncorrectAnswer ()
{
    player.Stun();
}
When the player enters a tube, the “OnPlayerEnterTube” function will be called, carrying over the id of the tube, which correlates back to the “answers” array in the “Problem” class.
// called when the player enters a tube
public void OnPlayerEnterTube (int tube)
{
    // did they enter the correct tube?
    if (tube == problems[curProblem].correctTube)
        CorrectAnswer();
    else
        IncorrectAnswer();
}
Since we’re having a timer for each problem, we need to check if it’s run out. If so, then the player will lose.
void Update ()
{
    remainingTime -= Time.deltaTime;

    // has the remaining time ran out?
    if(remainingTime <= 0.0f)
    {
        Lose();
    }
}
Finally, we need to set the initial problem when the game starts.
void Start ()
{
    // set the initial problem
    SetProblem(0);
}
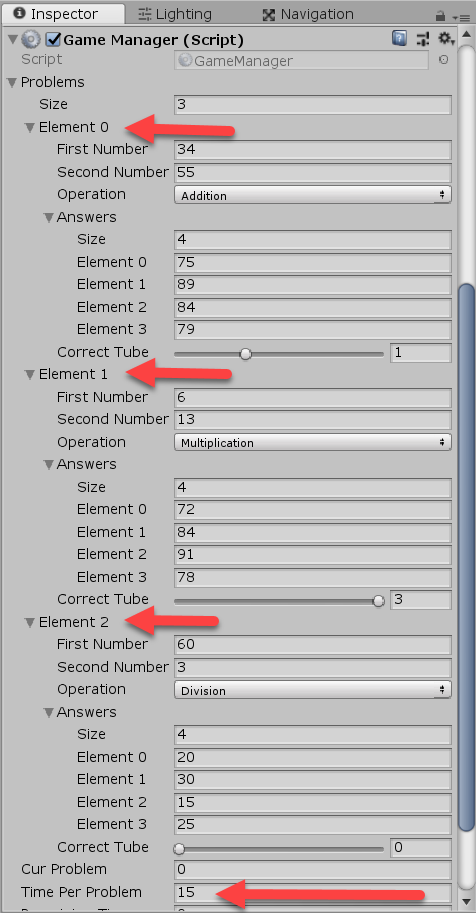
Back in the editor, we can begin to create our problems. Here, I have 3 problems, one addition, multiplication, and division. Make sure that your “answers” array is as many tubes as you have and set the “correctTube” slider to be the element number with the correct answer.
Creating the UI Elements
It’s going to be pretty hard to play the game at the moment without some UI, so let’s get into that.
What we want to do is have a world space canvas that can hold our text elements. Setting up a world space canvas can be a bit finicky though, so first, let’s create a Canvas.
Then change the “Render Mode” to Screen Space – Camera. Drag the main camera into the “Render Camera” property and you should see that the canvas becomes the same size as the camera.
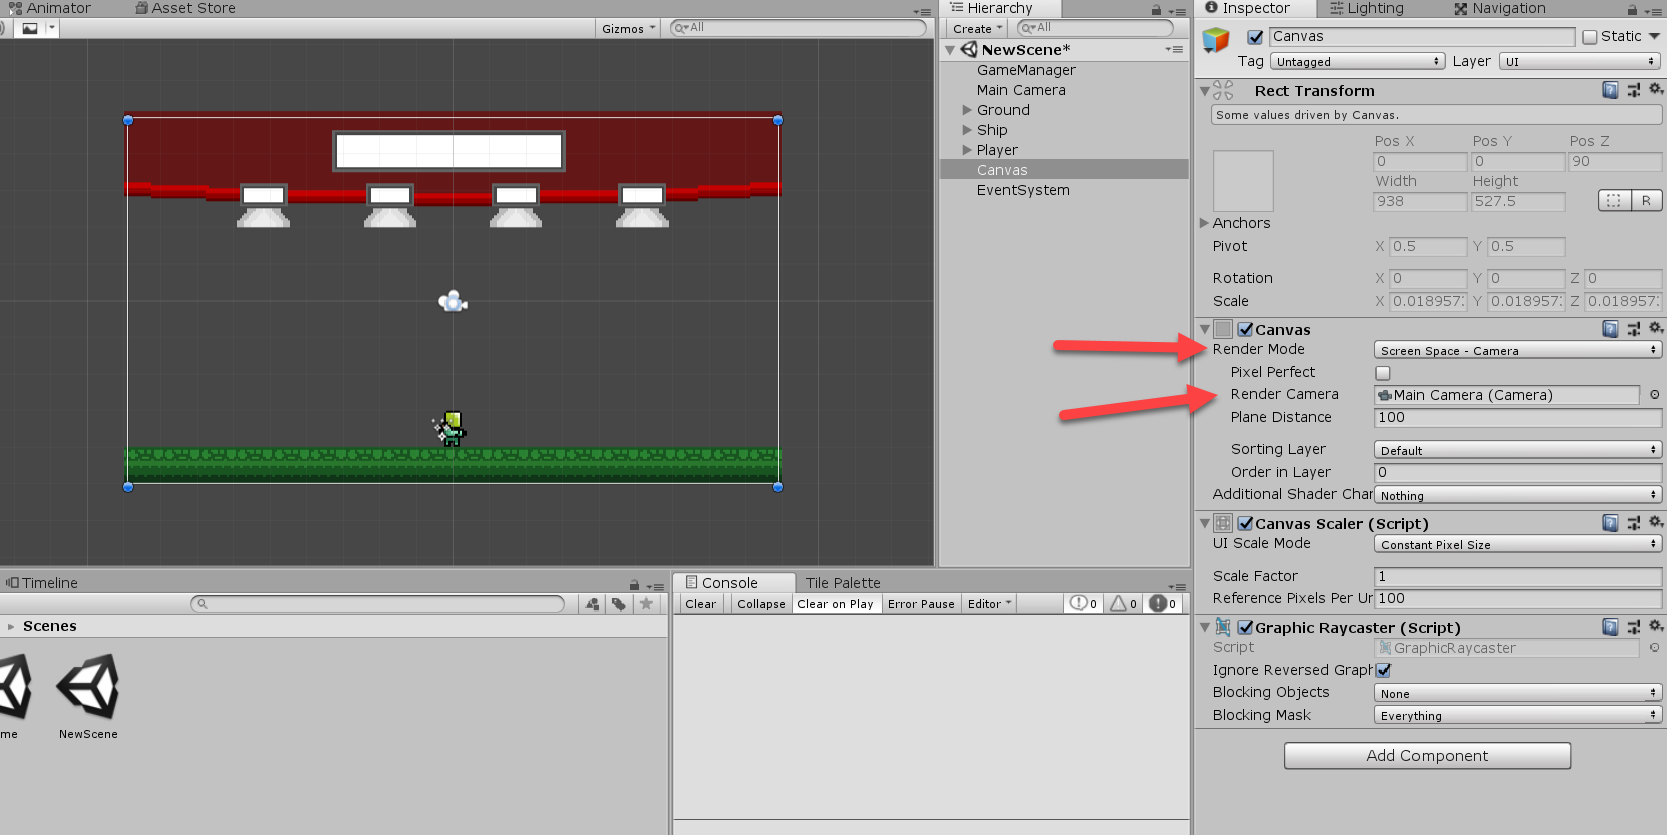
Now we can change the “Render Mode” to World Space and the sorting layer to “UI”. This prevents us from needing to manually scale the canvas down to the camera size.
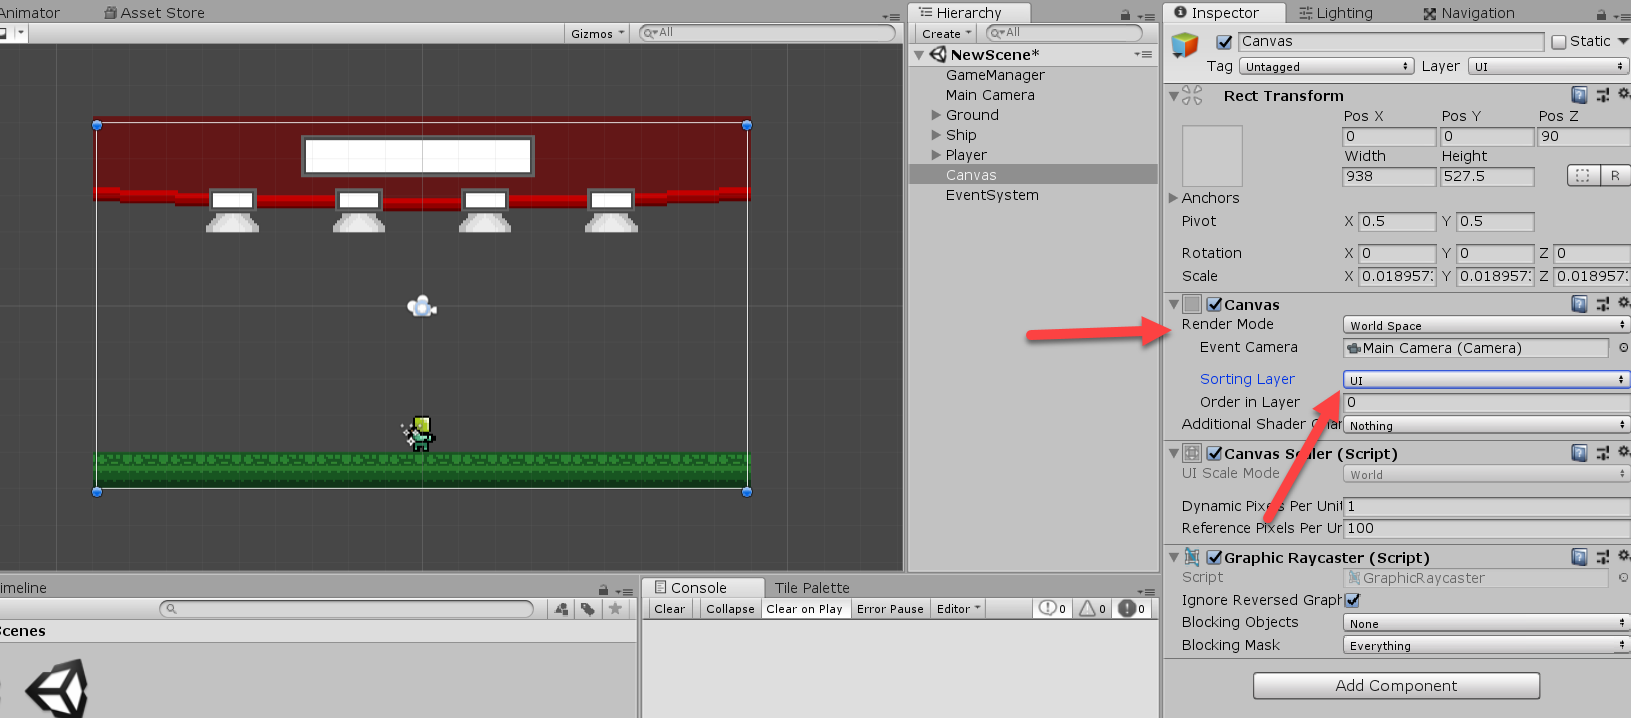
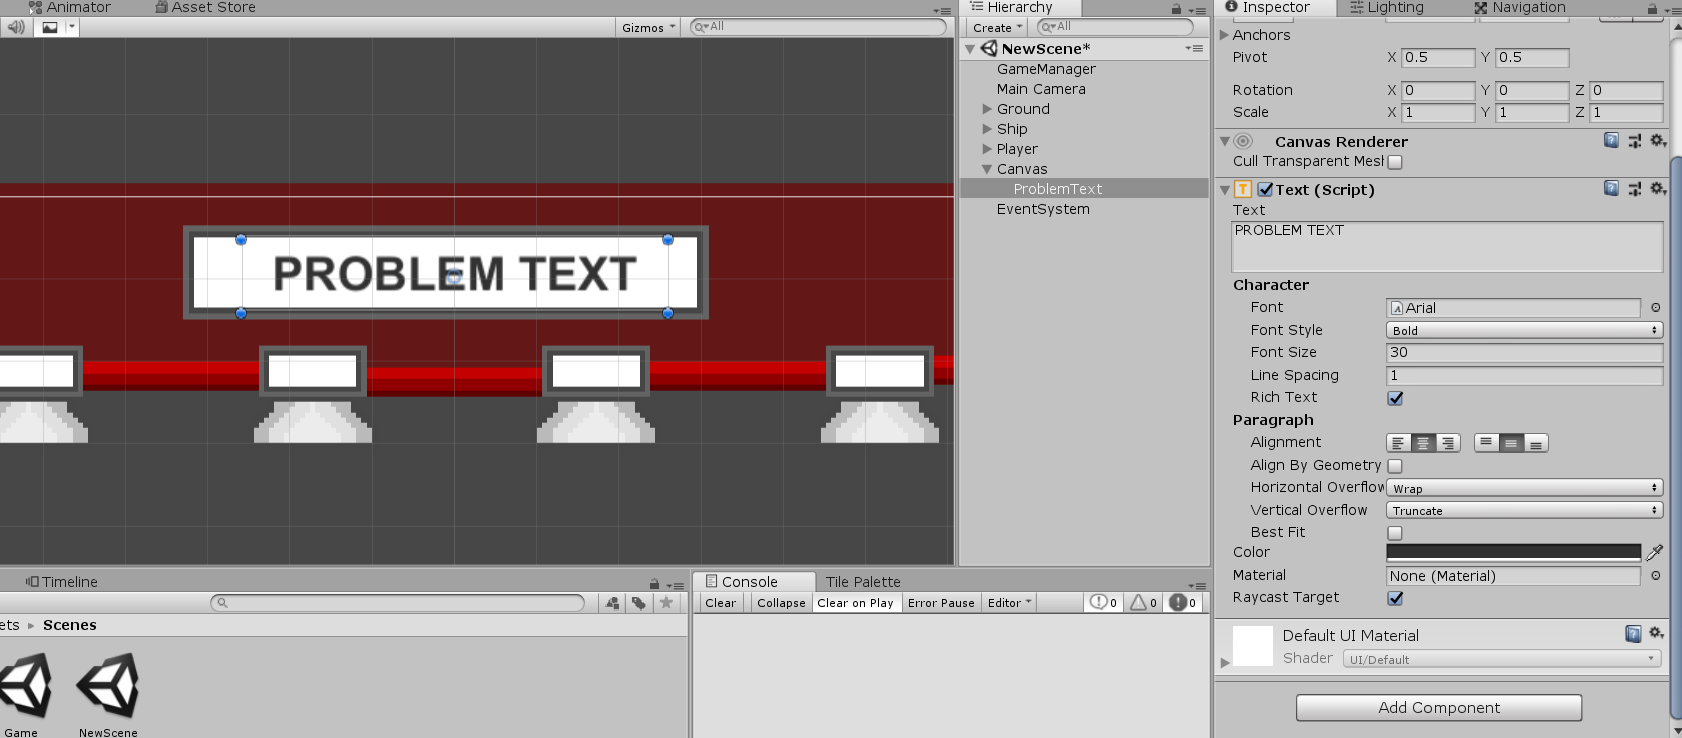
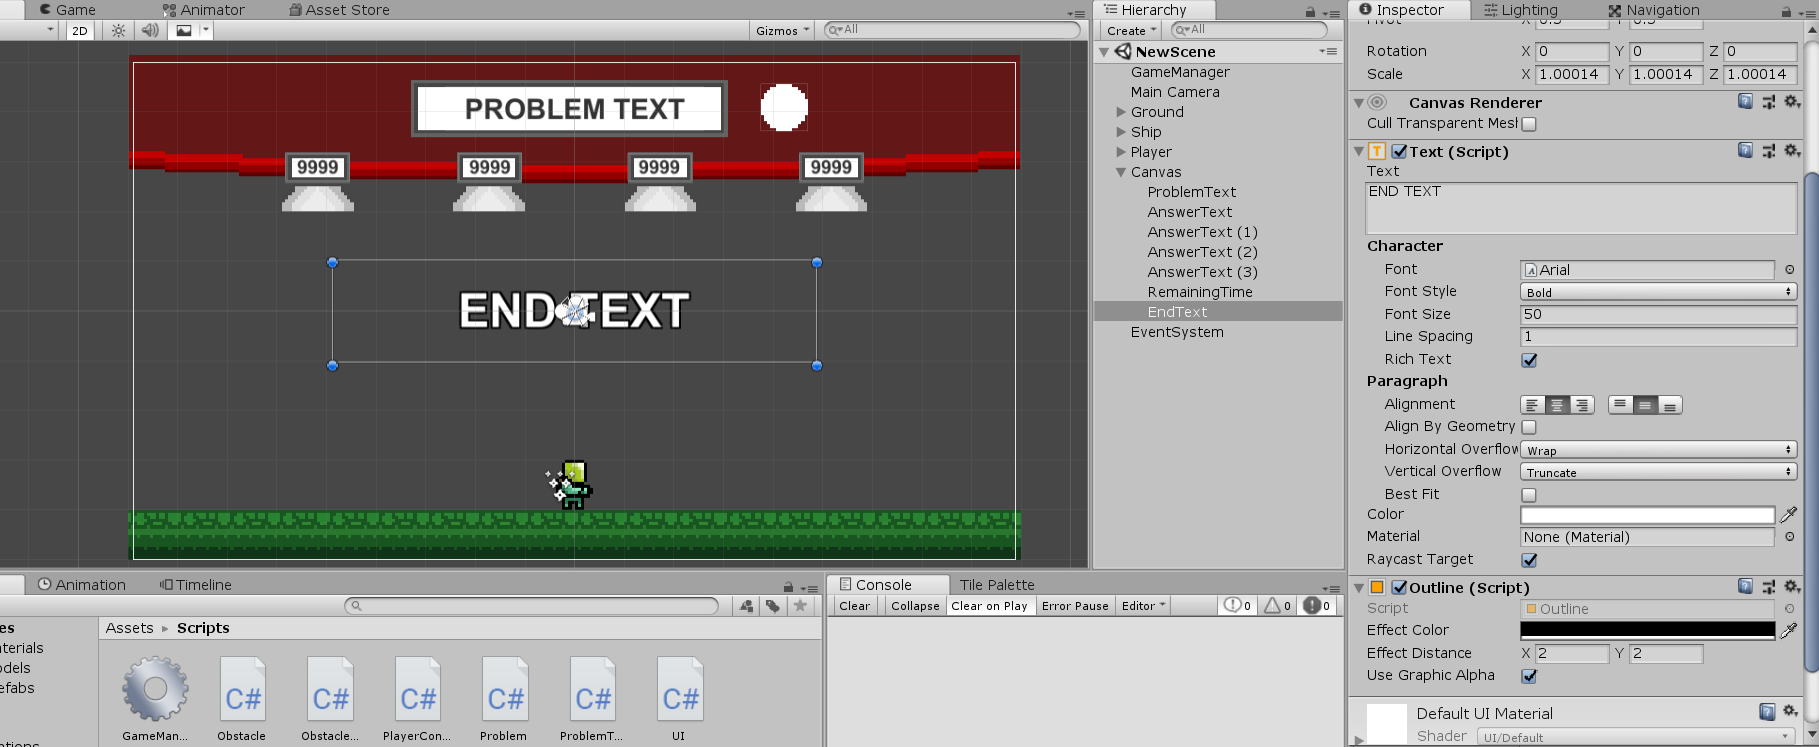
Create a new Text element as a child of the Canvas (right-click Canvas > UI > Text). Then position it in the middle of the large white rectangle and change the boundaries so it fits.
For the text properties, set it to bold, with a size of 30, and center it horizontally and vertically.
Then create another Text element for the answer. This is going to be similar to the problem one, but smaller of course.
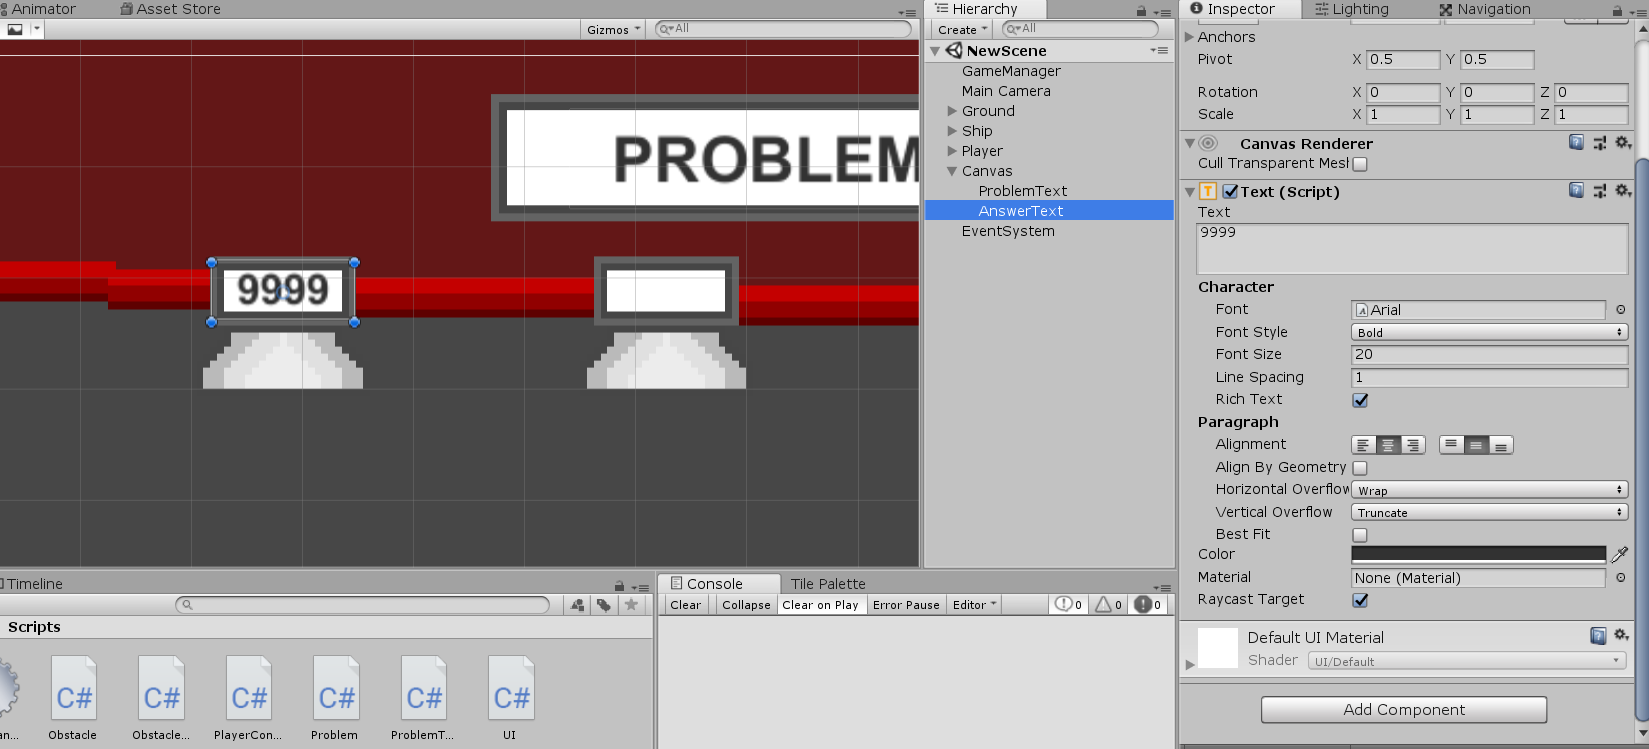
Now just duplicate it for each problem tube.

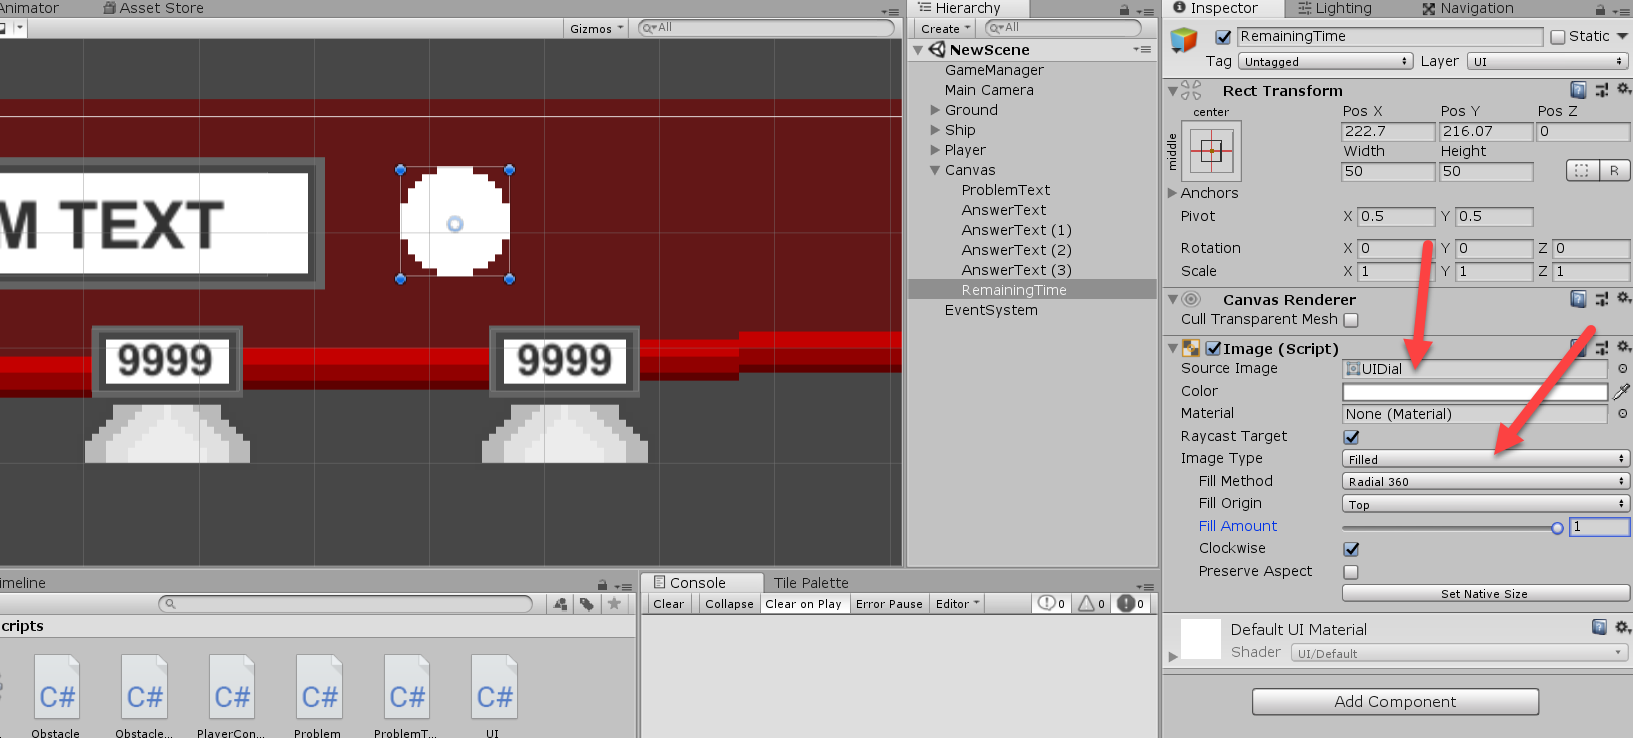
To show the player how much time they have left, we’ll add in a dial that will retract over time. Create a new Image element (right-click Canvas > UI > Image). Then set the “Source Image” to be the UIDial and resize the width and height to be 50. Now to make the image actually be able to reduce like a clock, we need to change the “Image Type” to Filled and then set the “Fill Origin” to Top. Now position it to the right of the problem text.
When the game ends, we need text to display if they won or not. Create a new Text and place it in the middle of the screen. I added an Outline component since we’ll be changing the text color later on in the script. Also, disable it, so it doesn’t appear when we start playing.
Scripting the UI
Create a new C# script called “UI” and attach it to the “GameManager” object.
We first need to reference the UnityEngine.UI library, since of course we’re going to be modifying UI elements.
using UnityEngine.UI;
For our variables, we have the problem text, answers text as an array. The remaining time dial, end text, and remaining time dial rate. I’ll explain that shortly.
public Text problemText;                // text that displays the maths problem
public Text[] answersTexts;             // array of the 4 answers texts

public Image remainingTimeDial;         // remaining time image with radial fill
private float remainingTimeDialRate;    // 1.0 / time per problem

public Text endText;                    // text displayed a the end of the game (win or game over)
We’re also going to create an instance with the UI script, like the GameManager.
// instance
public static UI instance;

void Awake ()
{
    // set instance to be this script
    instance = this;
}
With our time dial, we’re using an image that is “filled”. This means we can choose what percentage of the image is visible. In our case, we have it radial so it fills up like how a hand goes around a clock.
The “fill amount” is 0.0 to 1.0. Since our remaining time will be around 15 seconds, we need a way of converting 15 to 1 to use in the fill amount value.
void Start ()
{
    // set the remaining time dial rate
    // used to convert the time per problem (8 secs for example)
    // and converts that to be used on a 0.0 - 1.0 scale
    remainingTimeDialRate = 1.0f / GameManager.instance.timePerProblem;
}
In the “Update” function, we’re going to be constantly updating the time dial.
void Update ()
{
    // update the remaining time dial fill amount
    remainingTimeDial.fillAmount = remainingTimeDialRate * GameManager.instance.remainingTime;
}
Now we need to set up the function “SetProblemText” which gets a problem and displays it on the UI.
// sets the ship UI to display the new problem
public void SetProblemText (Problem problem)
{
    string operatorText = "";

    // convert the problem operator from an enum to an actual text symbol
    switch(problem.operation)
    {
        case MathsOperation.Addition: operatorText = " + "; break;
        case MathsOperation.Subtraction: operatorText = " - "; break;
        case MathsOperation.Multiplication: operatorText = " x "; break;
        case MathsOperation.Division: operatorText = " ÷ "; break;
    }

    // set the problem text to display the problem
    problemText.text = problem.firstNumber + operatorText + problem.secondNumber;

    // set the answers texts to display the correct and incorrect answers
    for(int index = 0; index < answersTexts.Length; ++index)
    {
        answersTexts[index].text = problem.answers[index].ToString();
    }
}
Also when the game ends (either win or lose) we need to set the on-screen text. “SetEndText” will send over a bool (win = true, lose = false). If it’s a win, the end text will be “You Win!” and the color will be green. If it’s a loss, the end text will be “Game Over!” and the color will be red.
// sets the end text to display if the player won or lost
public void SetEndText (bool win)
{
    // enable the end text object
    endText.gameObject.SetActive(true);

    // did the player win?
    if (win)
    {
        endText.text = "You Win!";
        endText.color = Color.green;
    }
    // did the player lose?
    else
    {
        endText.text = "Game Over!";
        endText.color = Color.red;
    }
}
Now we need to go back to the “GameManager” script and connect the two scripts. In the “SetProblem” function add…
UI.instance.SetProblemText(problems[curProblem]);
In the “Win” function add:
UI.instance.SetEndText(true);
In the “Lose” function add:
UI.instance.SetEndText(false);
Now that we’re done with that, go back to the editor and add the objects to the UI script.
Finishing off the Problem Tubes
The last thing we need to do is add functionality to the problem tubes. Create a new C# script called “ProblemTube” and attach it to all of the 4 problem tube objects we made.
This is all we need to code. We check for a trigger enter with the player and if that happens, call the “OnPlayerEnterTube” function in “GameManager” and send over the tube id.
public int tubeId;  // identifier number for this tube

// called when something enters the tube's collider
void OnTriggerEnter2D (Collider2D col)
{
    // was it the player?
    if(col.CompareTag("Player"))
    {
        // tell the game manager that the player entered this tube
        GameManager.instance.OnPlayerEnterTube(tubeId);
    }
}
Now go back to the editor and enter in the tube id for each tube. 0, 1, 2, and 3.
And that’s it! Test out your first educational game, which should now be fully functioning.
Conclusion
Congratulations! You’ve now finished your first educational game! Try it out for yourself, share it with your friends, and pat yourself on the back for a job well done.
Over the course of this definitive guide, you’ve gathered a lot of skills – including how to set up players, how to implement streams of enemies, and even how to create randomized math problems. That’s not even to mention the tricky UI components! While you’ve managed to create a math game with these abilities combined, don’t stop there. These foundations can be applied to a ton of different educational games, whether you want to teach phonetics, cover world of history, or teach kids about the wonders of space.
Keep practicing, and good luck with your future educational game projects!
