Introduction
In this tutorial, we’re going to create an app that allows you to analyze text through your phone camera and speak it out to you.

If you want to follow along with the tutorial, all you need is Unity and an internet connection.
You can download the complete project from here.
Setting up Computer Vision
For this tutorial, we’re going to be using Microsoft’s Azure Cognitive Services. These are machine learning services provided to us by Microsoft. The first one we’ll be getting is Computer Vision. This allows us to send images to the API and return a JSON file containing the text in the image.
I do want to inform you before we continue – using this service will require a credit/debit/bank card. The first 30 days are free and you can choose to cancel or continue afterwards.
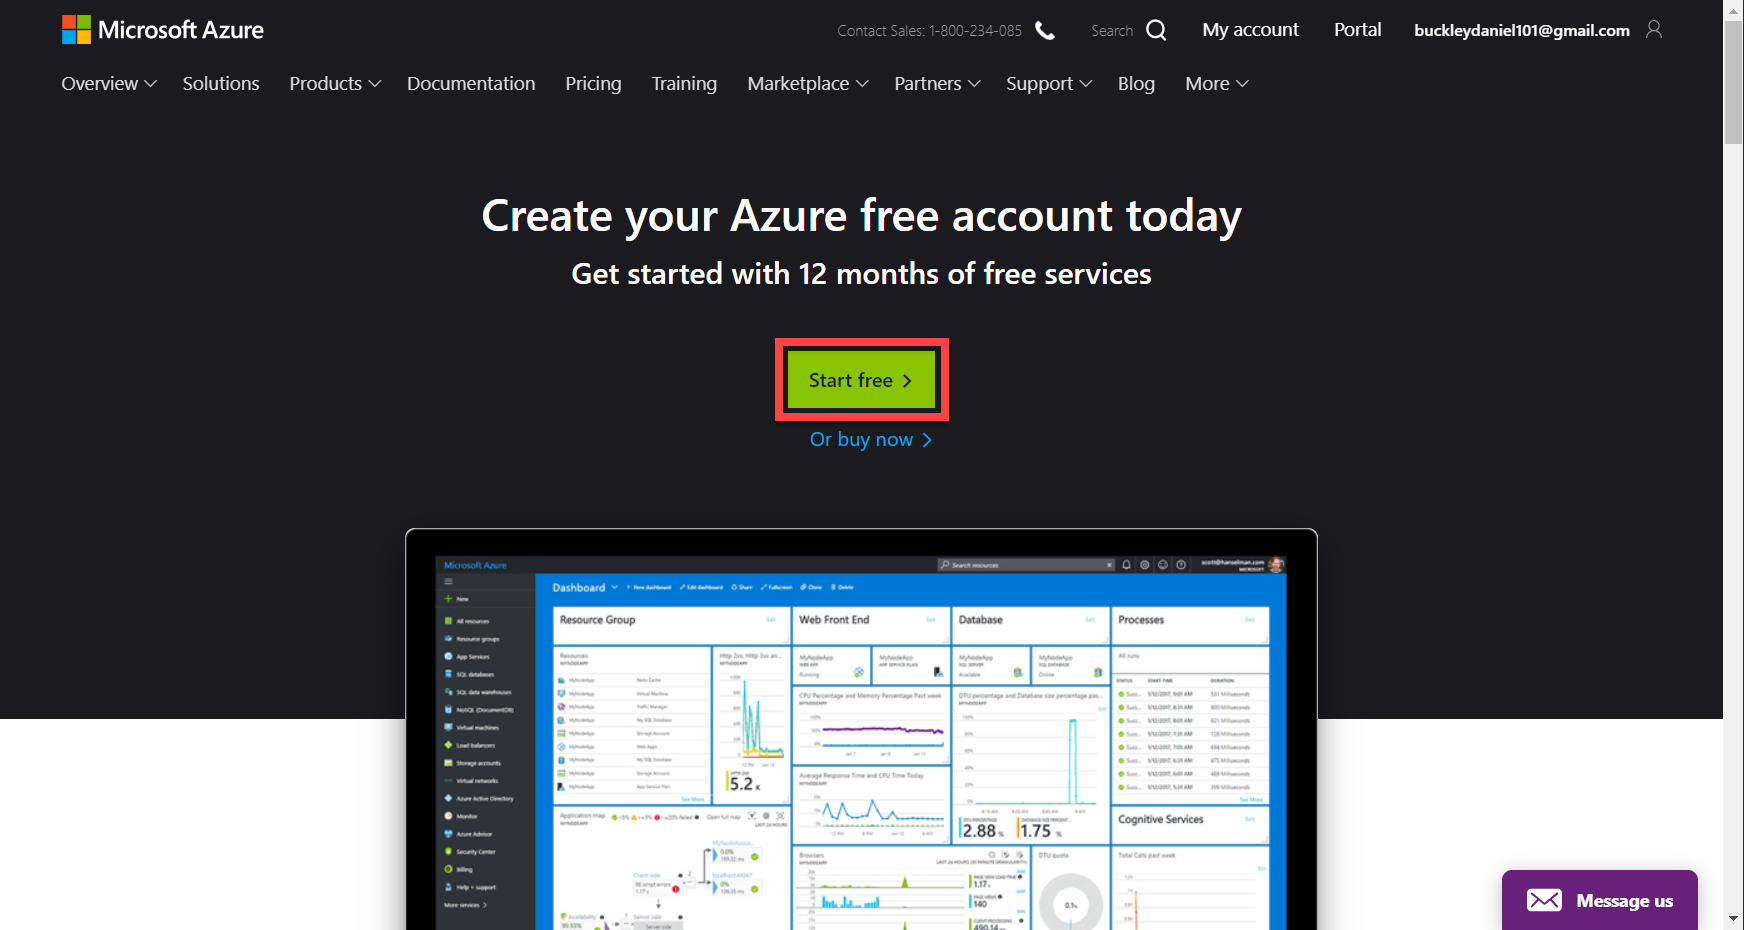
To begin, go to the Azure sign up page and click on Start free.
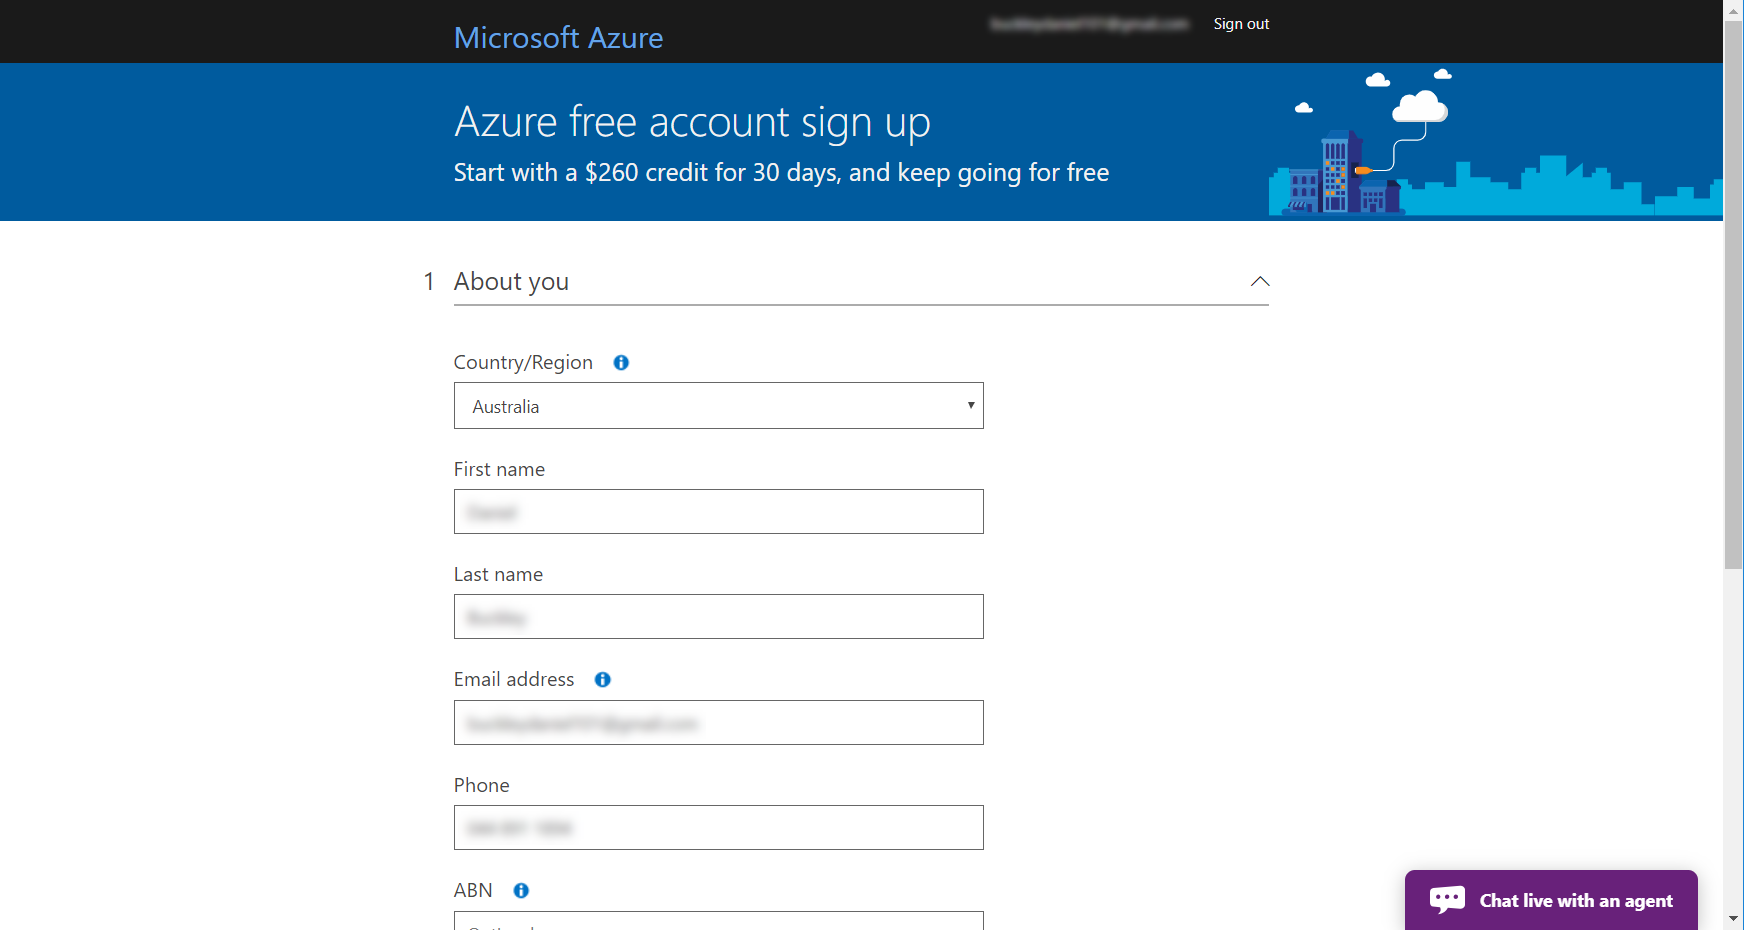
Fill in the sign up form. You’ll need to verify your account with a phone number and card information (you won’t be charged unless you upgrade your account).
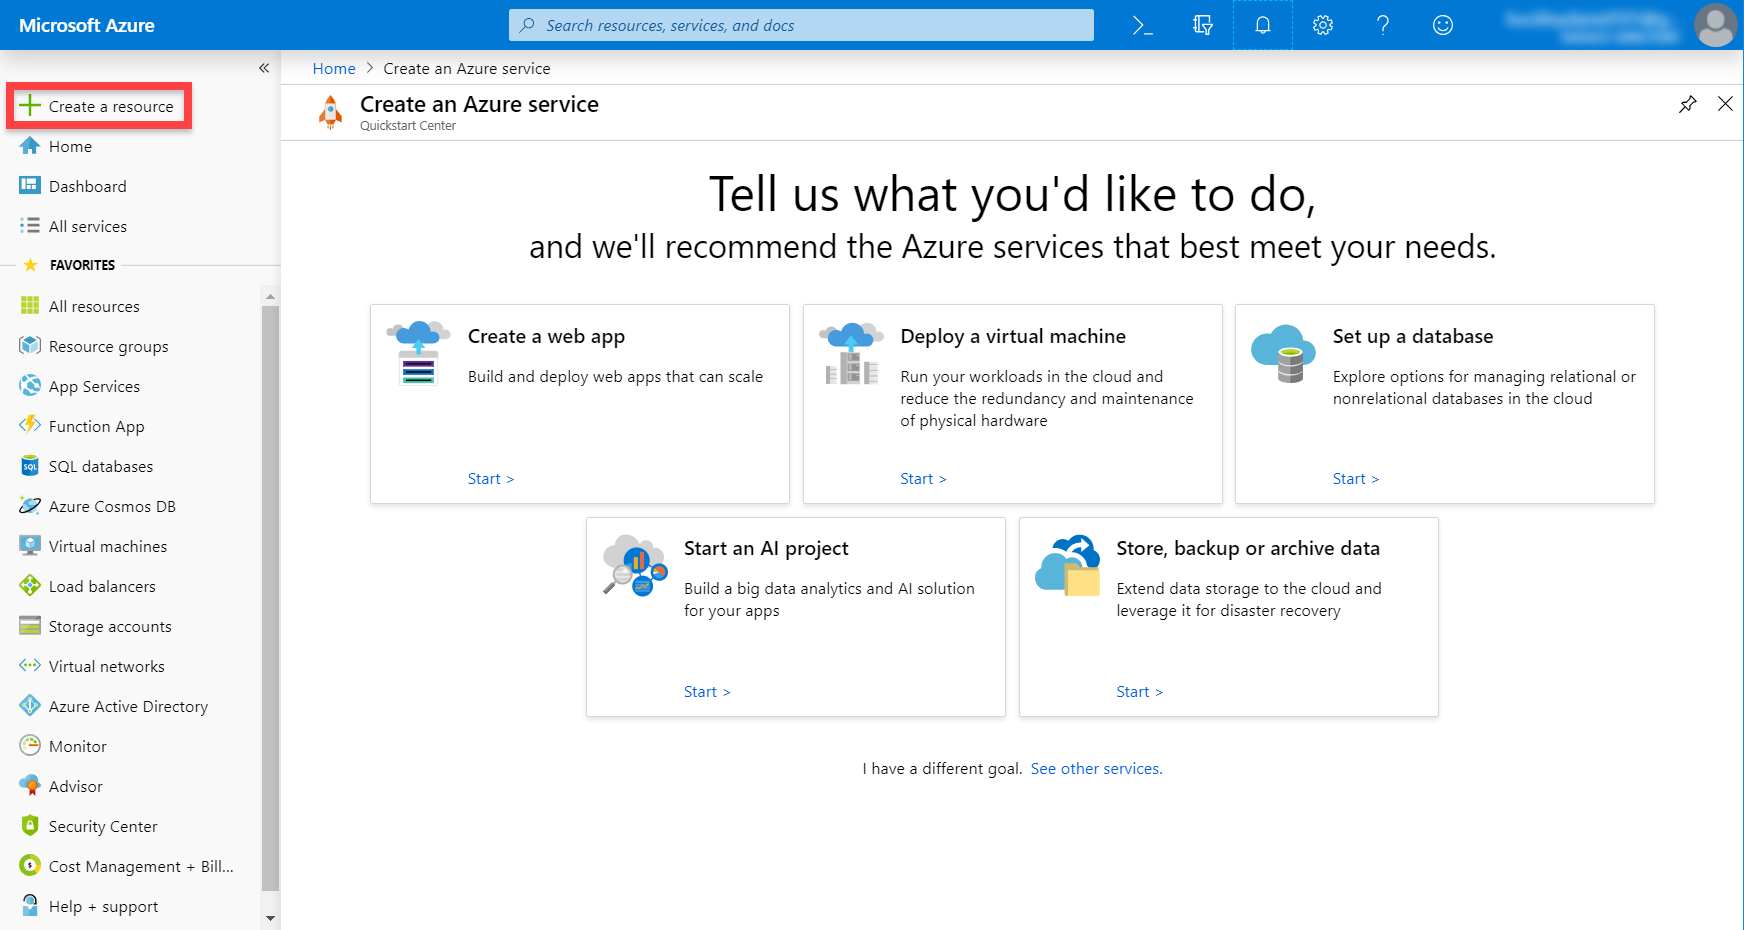
Once that’s done, you can navigate to the portal. Click on the Create a resource button.
Search for Computer Vision, then click Create.
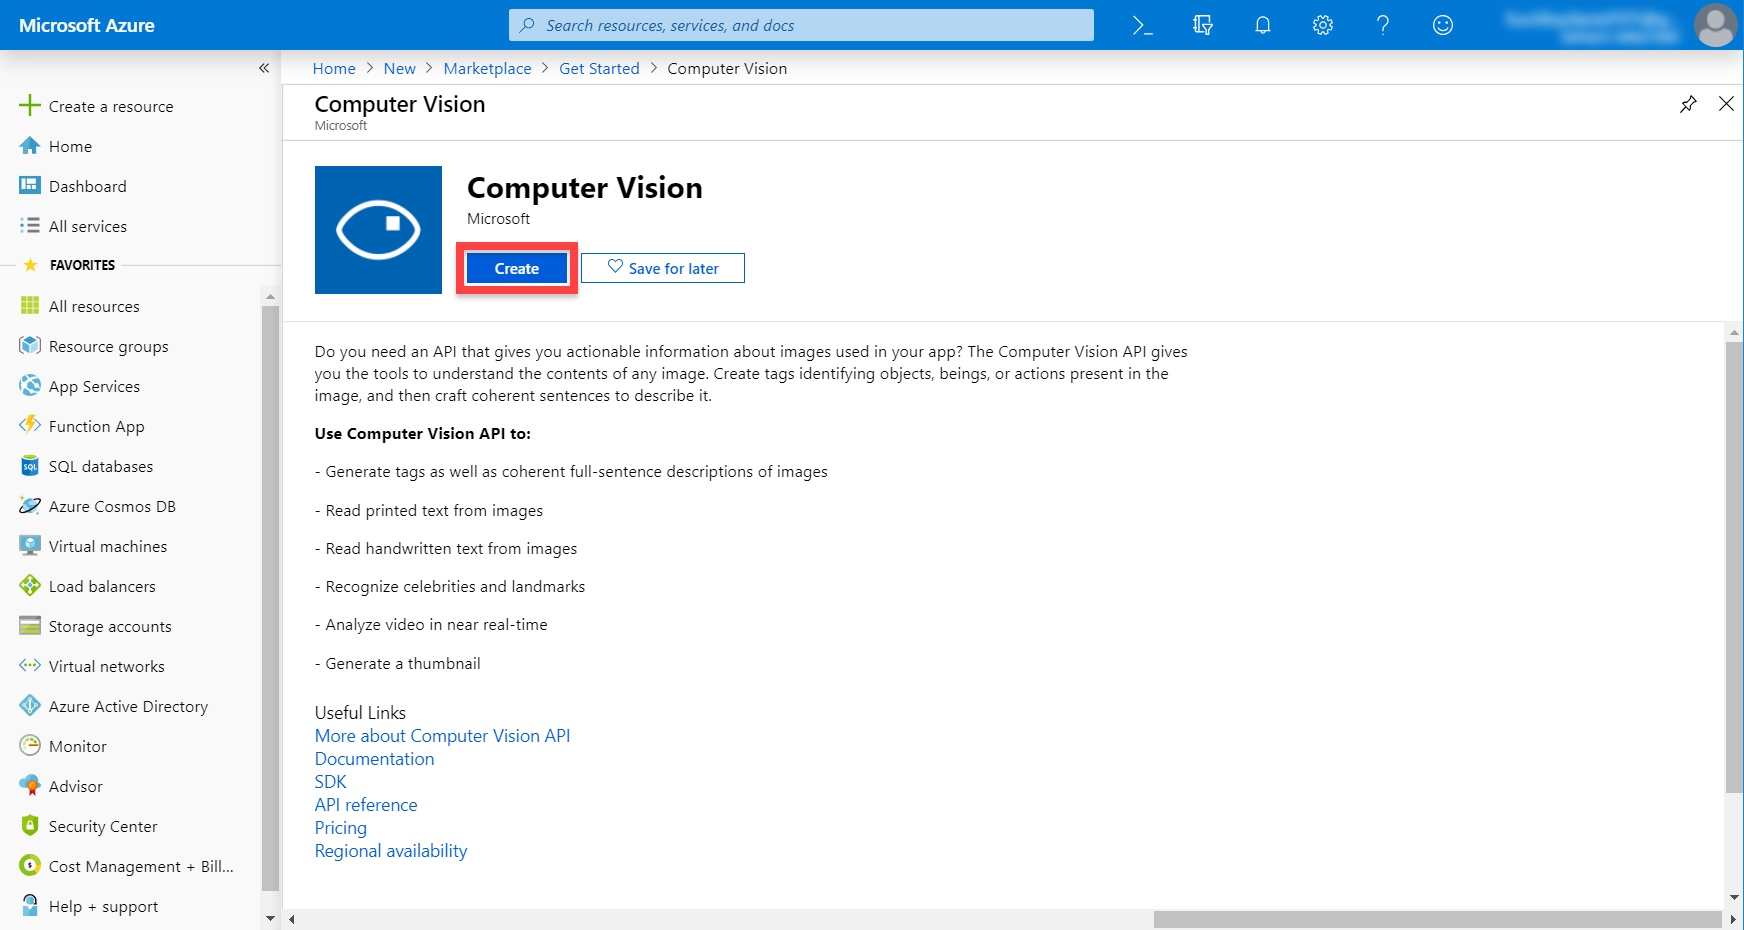
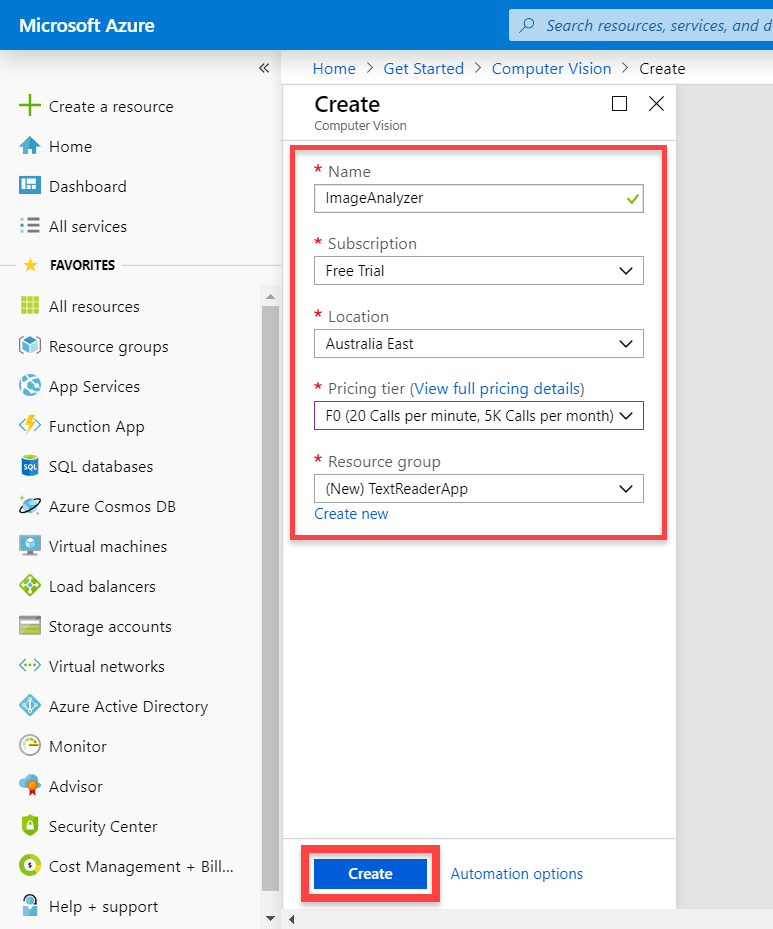
Here, we can fill in the info for our Computer Vision service.
- Set the Location where you want
- Set the Pricing tier to F0 (free)
- Create a new Resource group
Once that’s done, we can click the Create button.
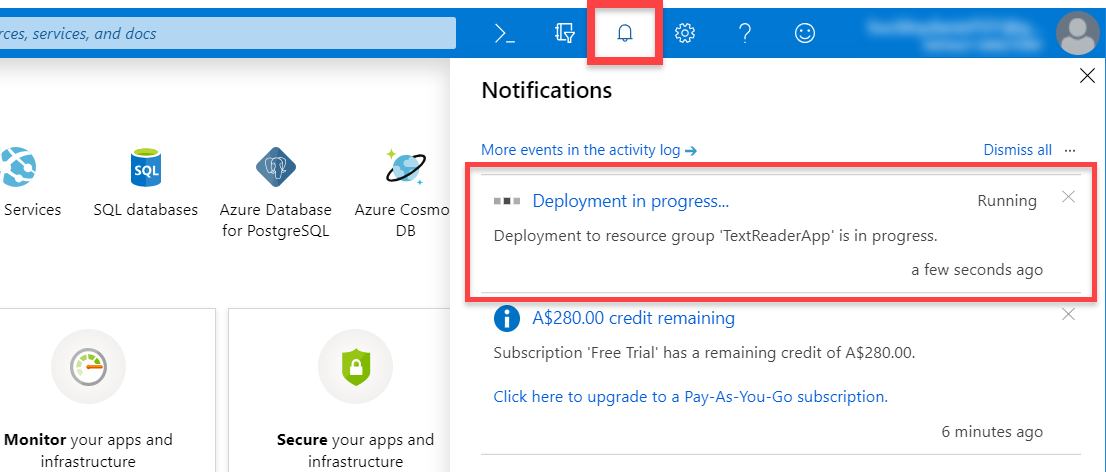
The resource will now begin to deploy. When it’s complete, you should be able to click on the Go to resource button.
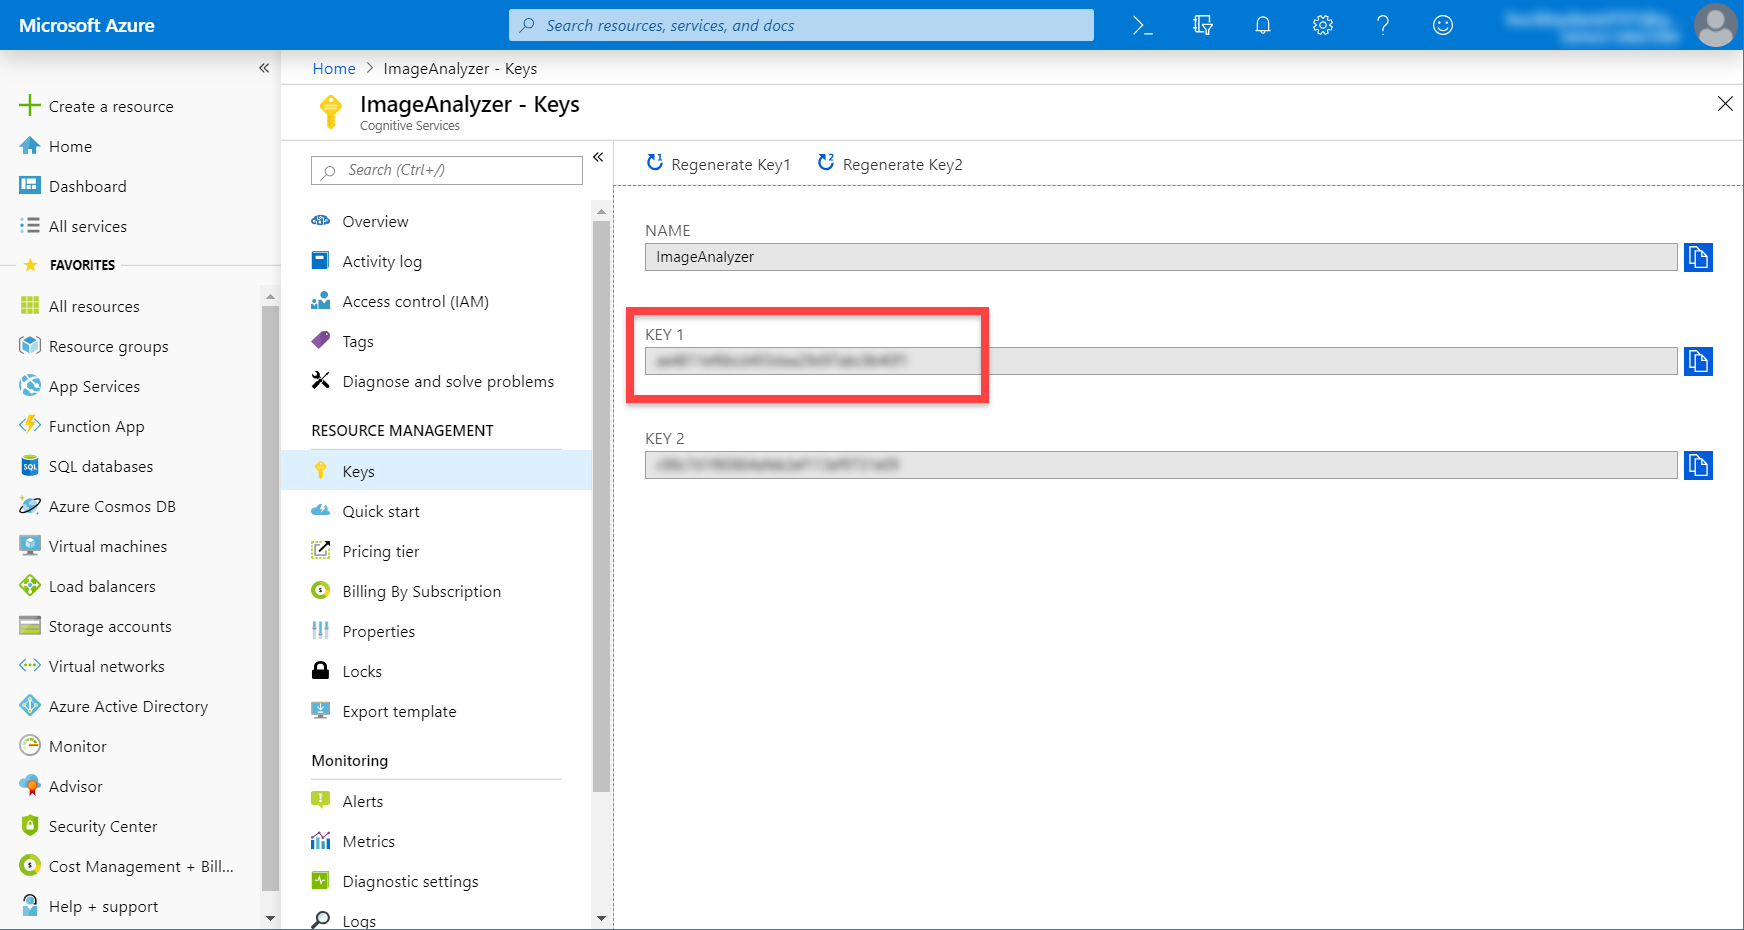
When you get to the resource, go to the Overview tab and copy the Endpoint. This is the URL we’ll use to connect to the API. Then click on the Show access keys… link to see our keys.
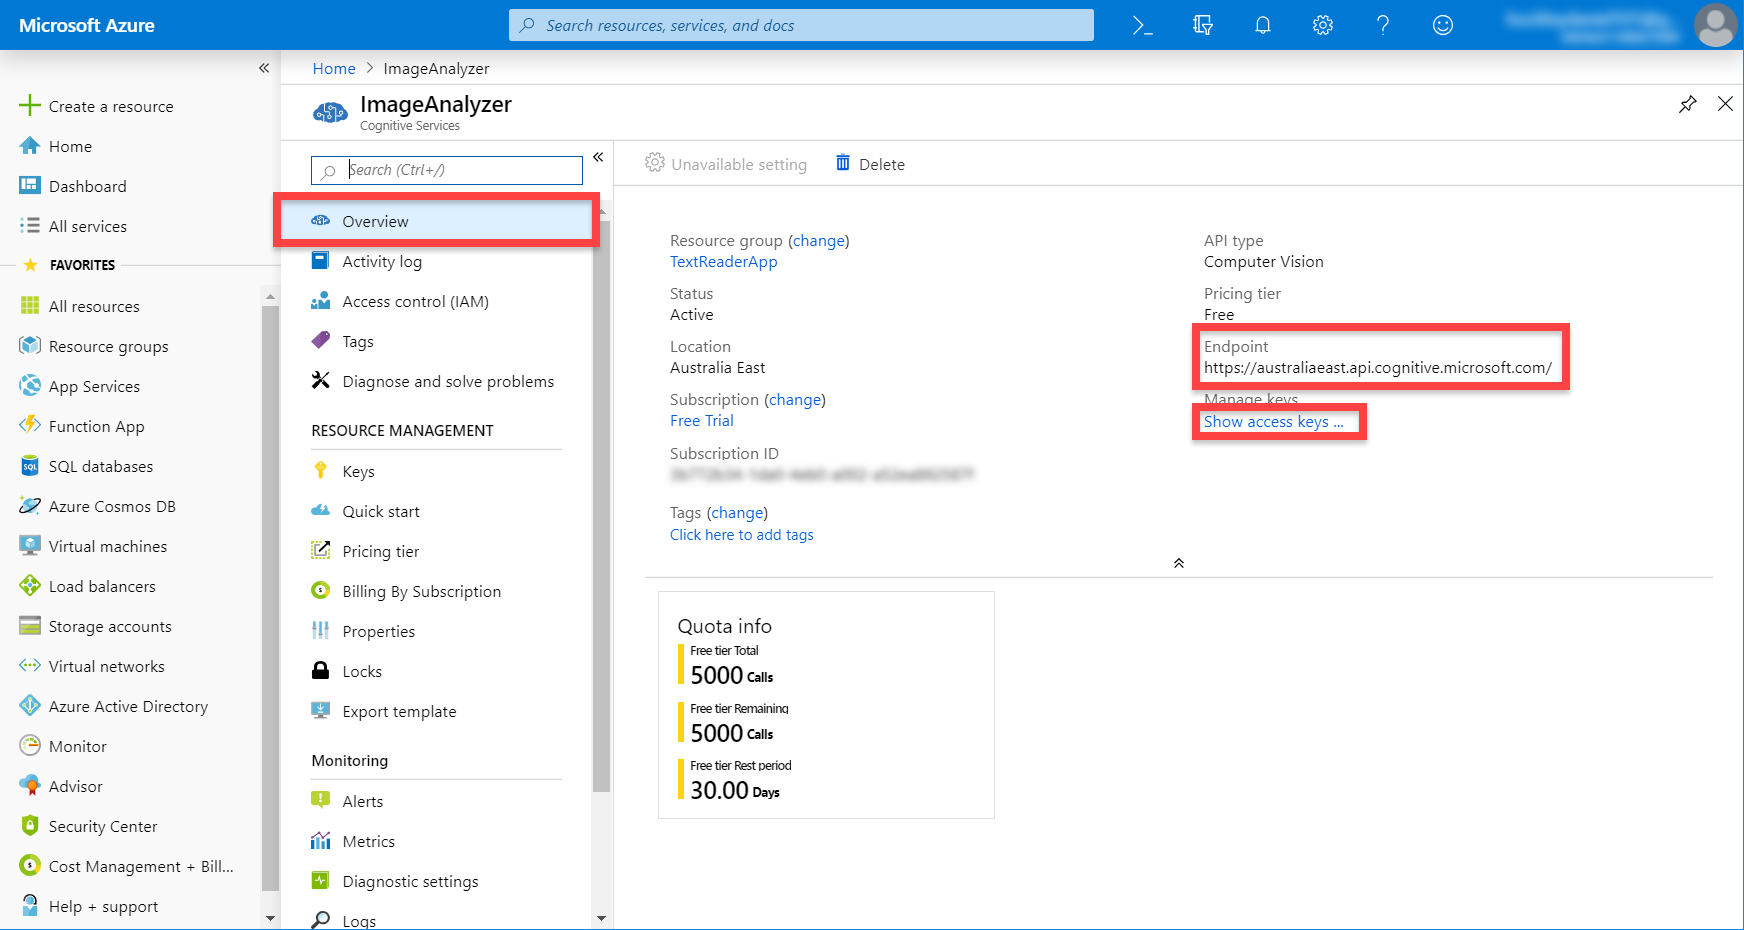
Here, we want to copy the Key 1 key. This will identify us when calling the API.
Setting up Text to Speech
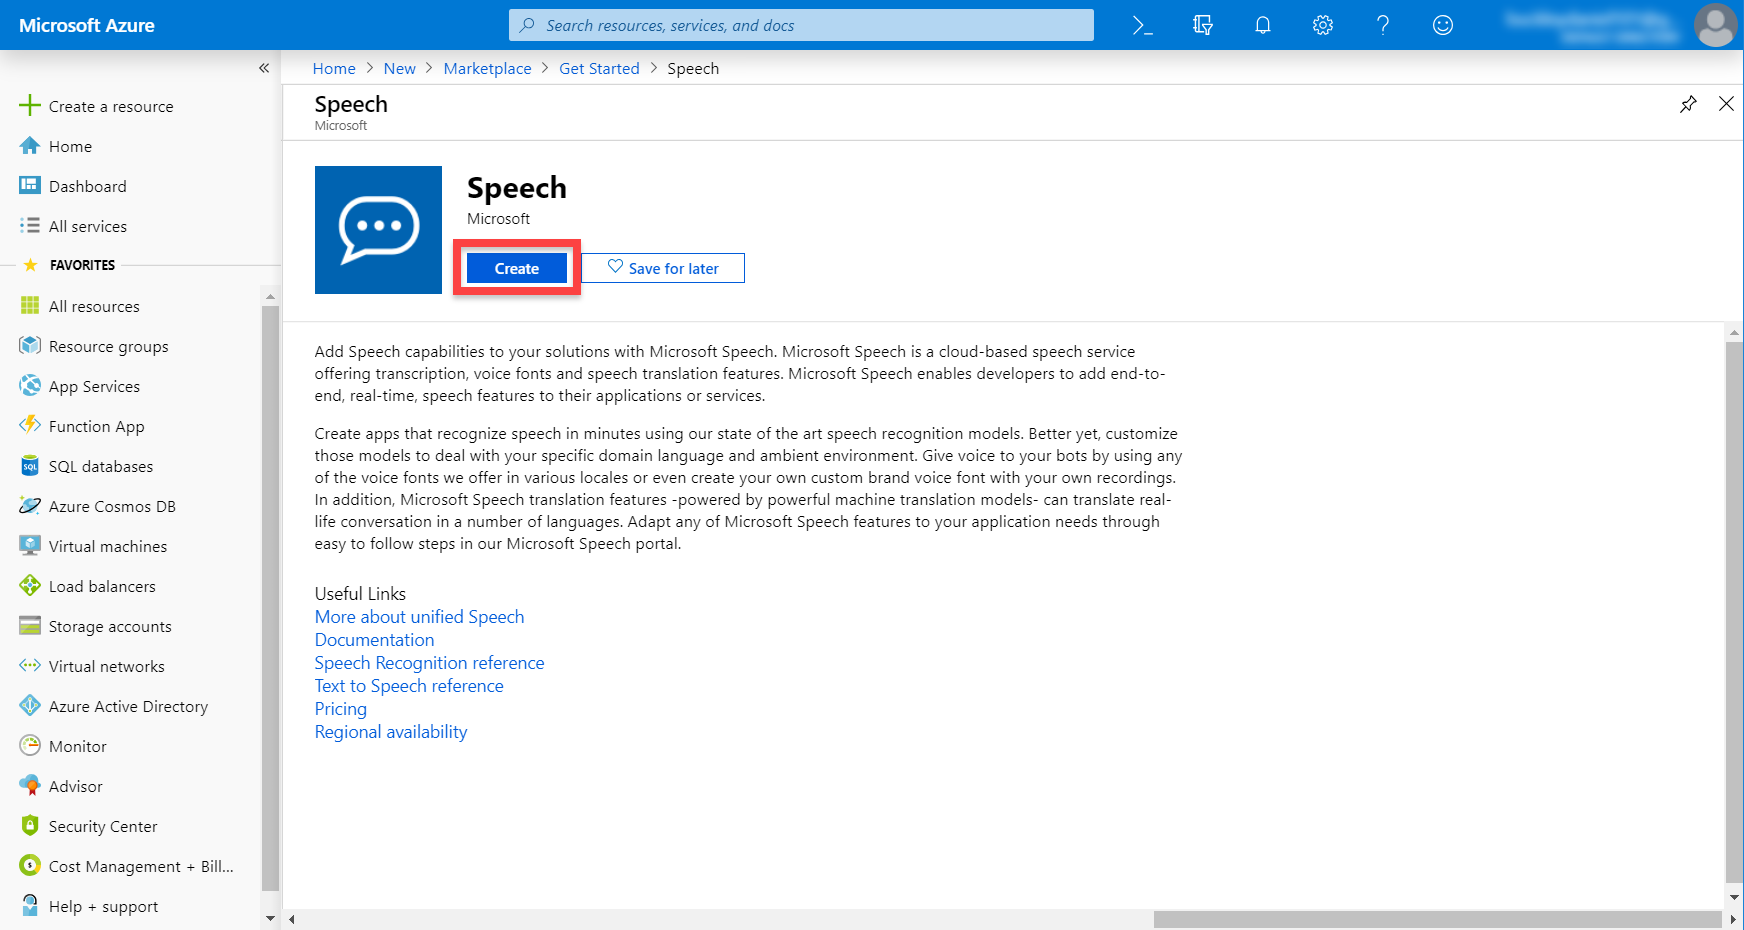
Still in the Azure portal, let’s setup our text to speech service. This is done through the Speech cognitive service.
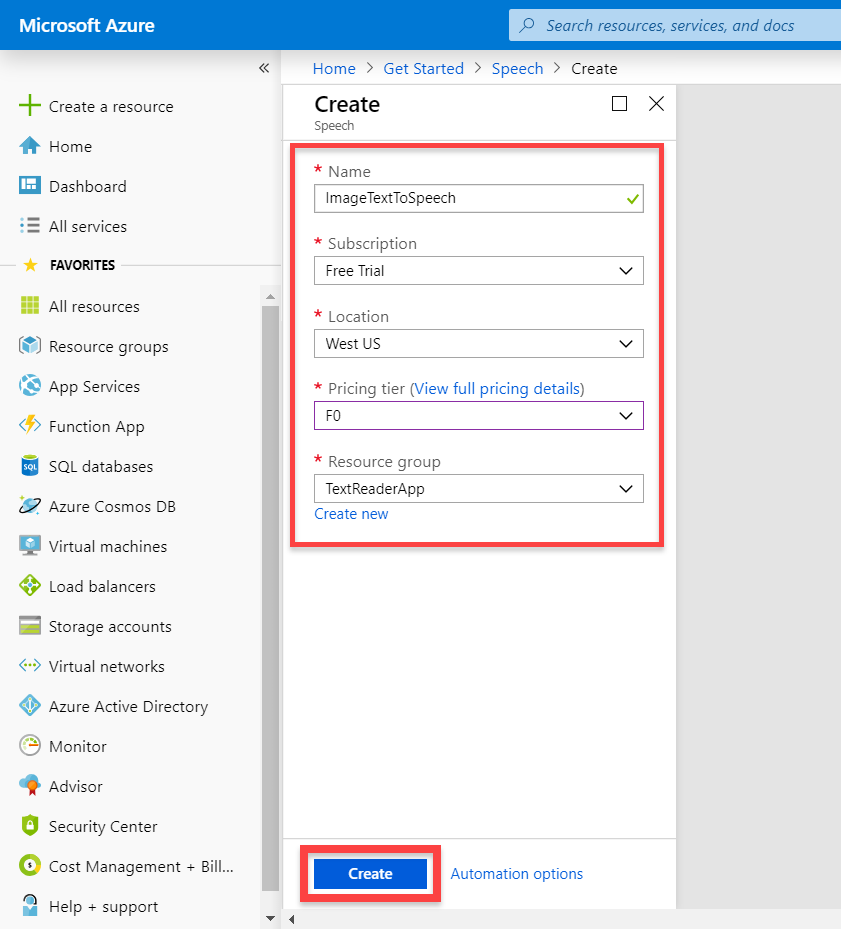
Since we’re using the free licence, we’re restricted on this resource to only use the West US location. With that selected though, choose the F0 pricing tier (the free one). Make sure also to set the Resource group to be the same as the Computer Vision one.
Like before, wait for the resource to deploy, then click on the Go to resource button. On this page, go to the Overview tab. Here, we want to copy the Endpoint, then click on the Show access keys… link.
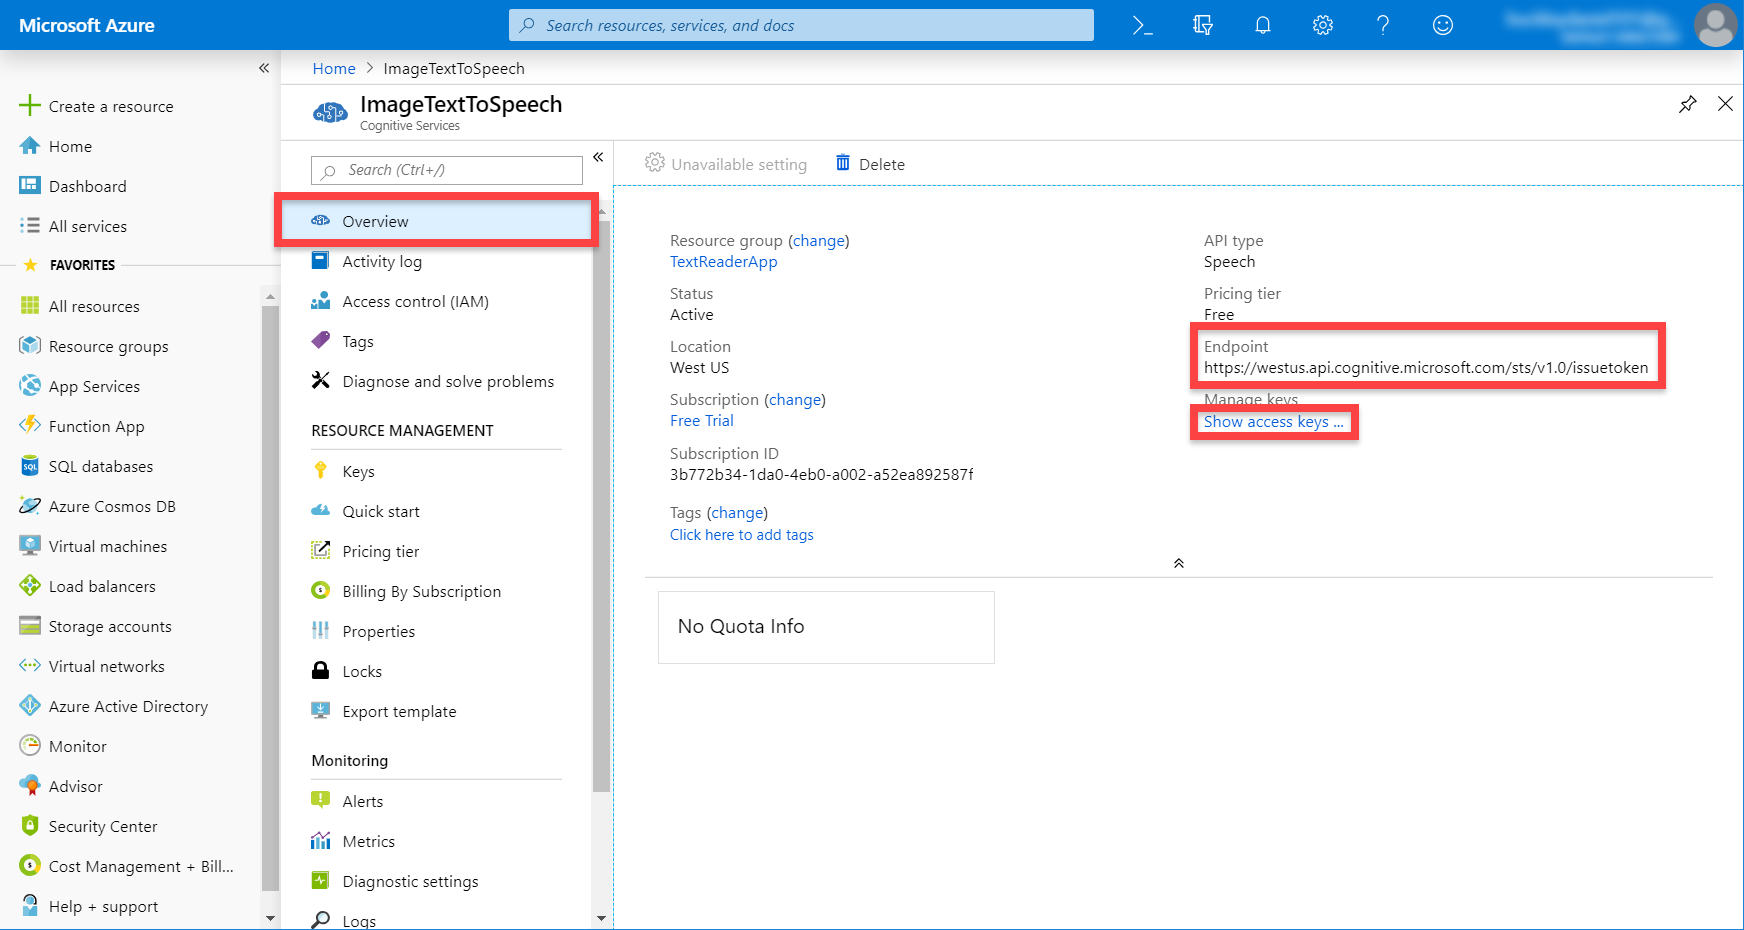
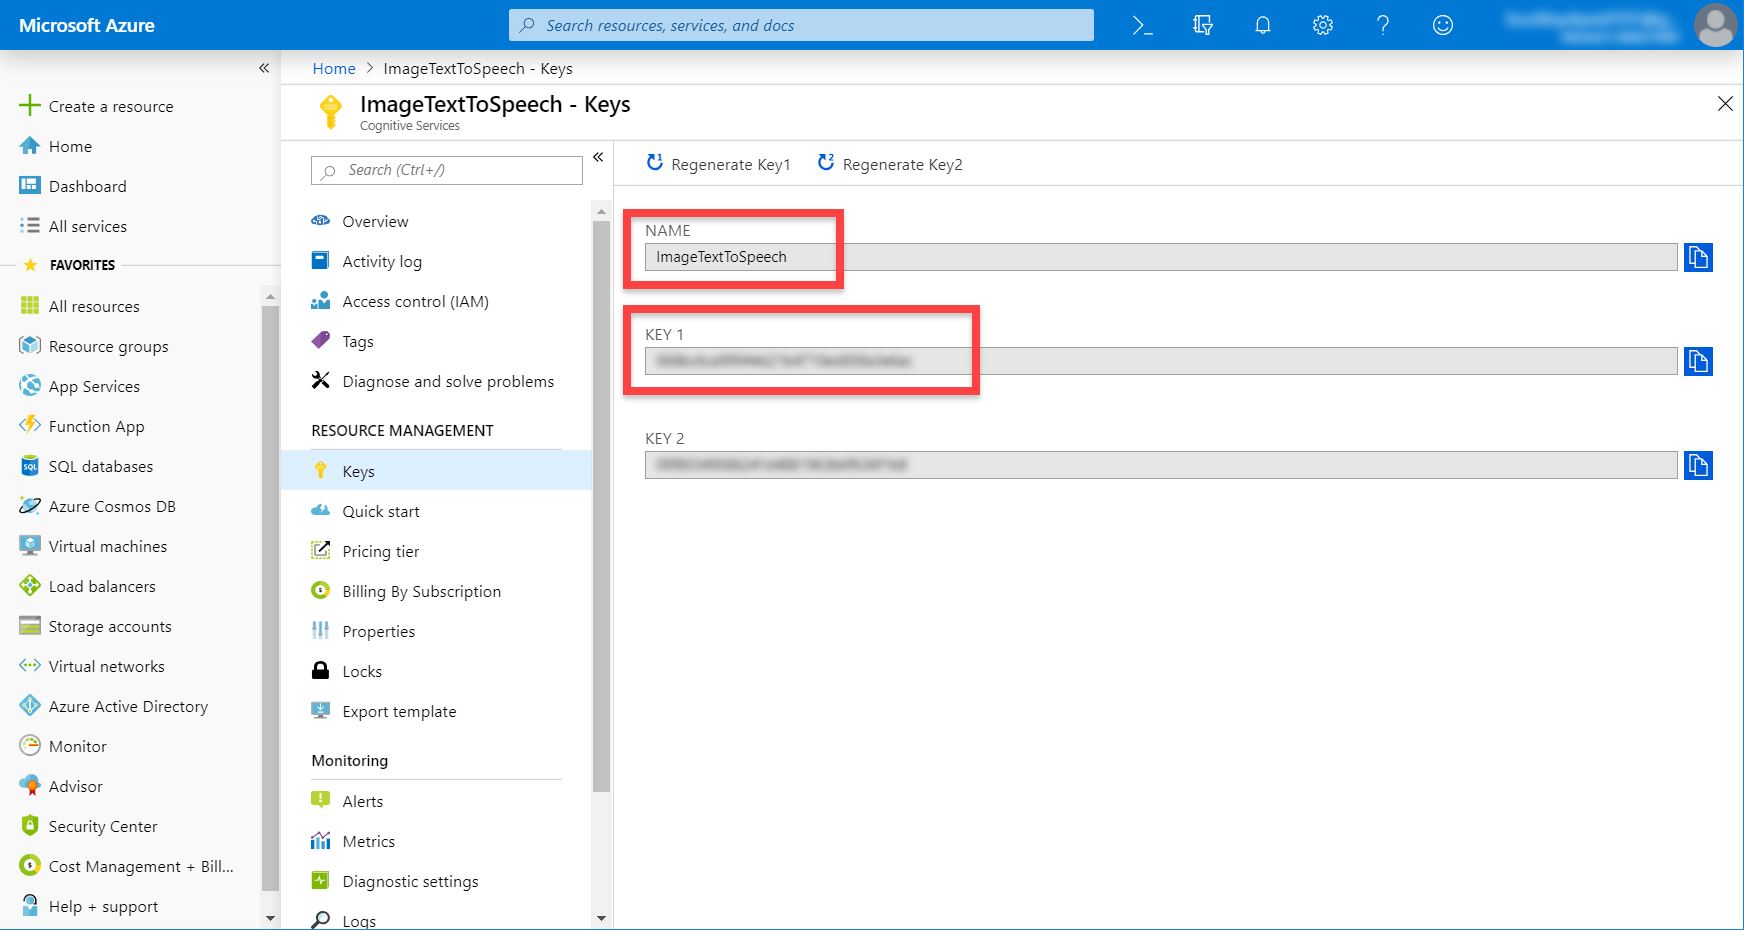
Here, we want to copy the Name (this is our resource name) and Key 1.
Project Setup
There’s one asset we need in order for this project to work, and that’s SimpleJSON. SimpleJSON allows us to easily convert a raw JSON file to an object structure we can easily use in a script.
Download SimpleJSON from GitHub.

In Unity, create a new 2D project and make sure the camera’s Projection is set to Orthographic. Since we’re using 3D, rendering depth is not required.
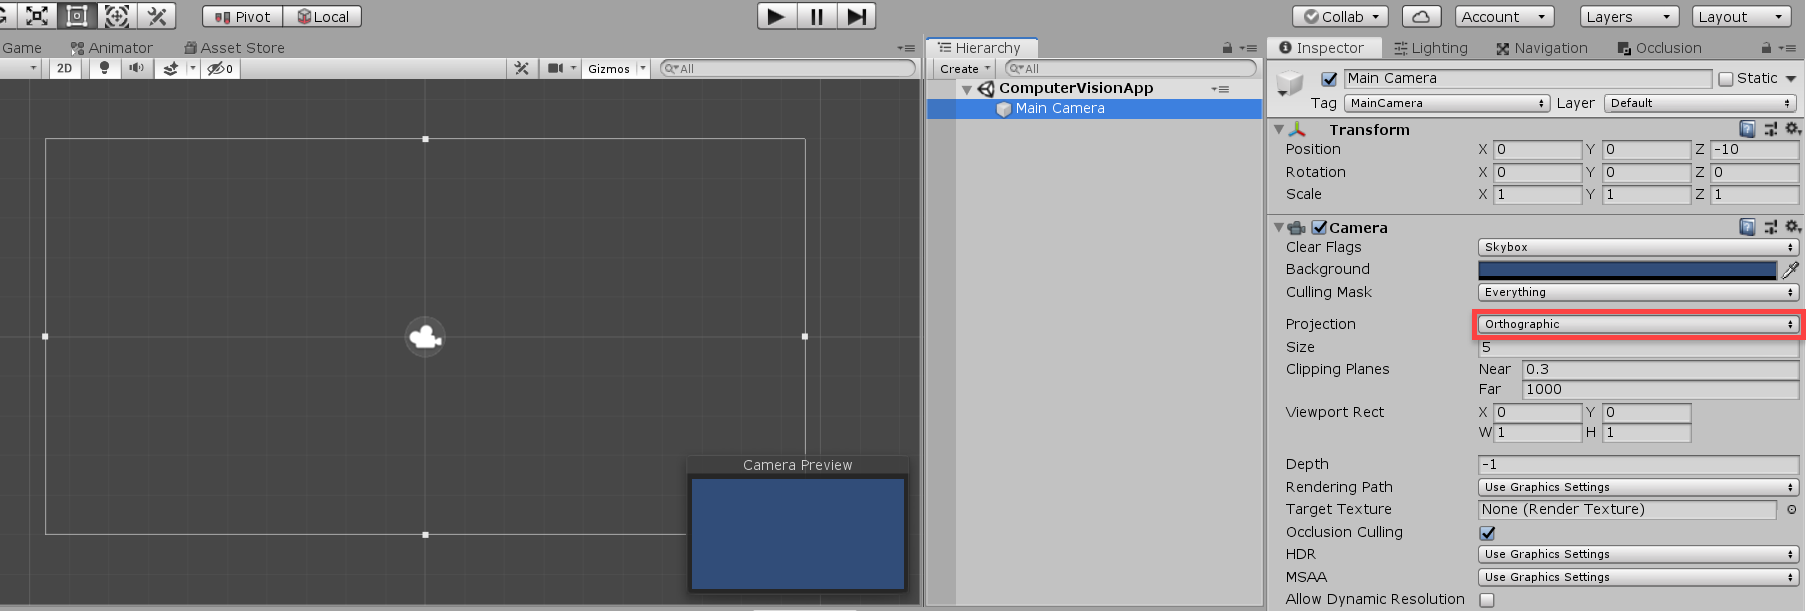
Let’s also make the camera’s Background color black so if there’s a problem with the device camera, we’ll just see black.

UI
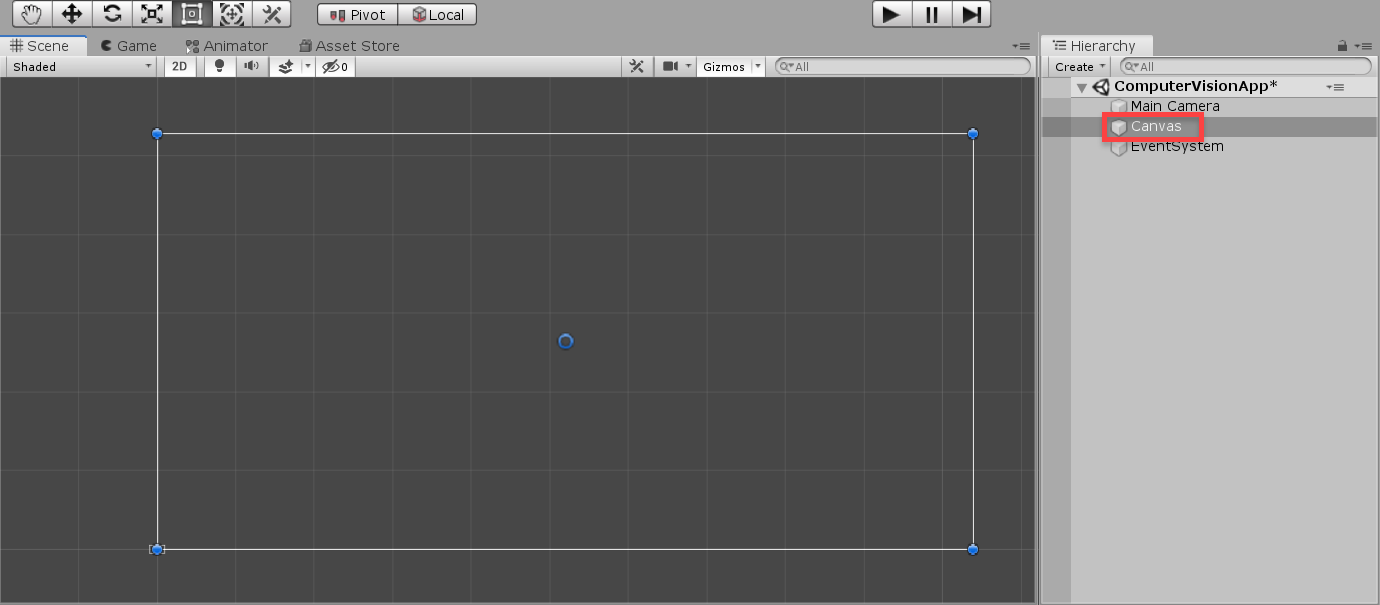
Now we can work on the UI. Let’s start by creating a canvas (right click Hierarchy > UI > Canvas).
As a child of the canvas, create a new TextMeshPro – Text object (you may need to import some TMP essentials). This is going to display the text we extract from the image.
- Set the Anchoring to bottom-stretch
- Set Height to 200

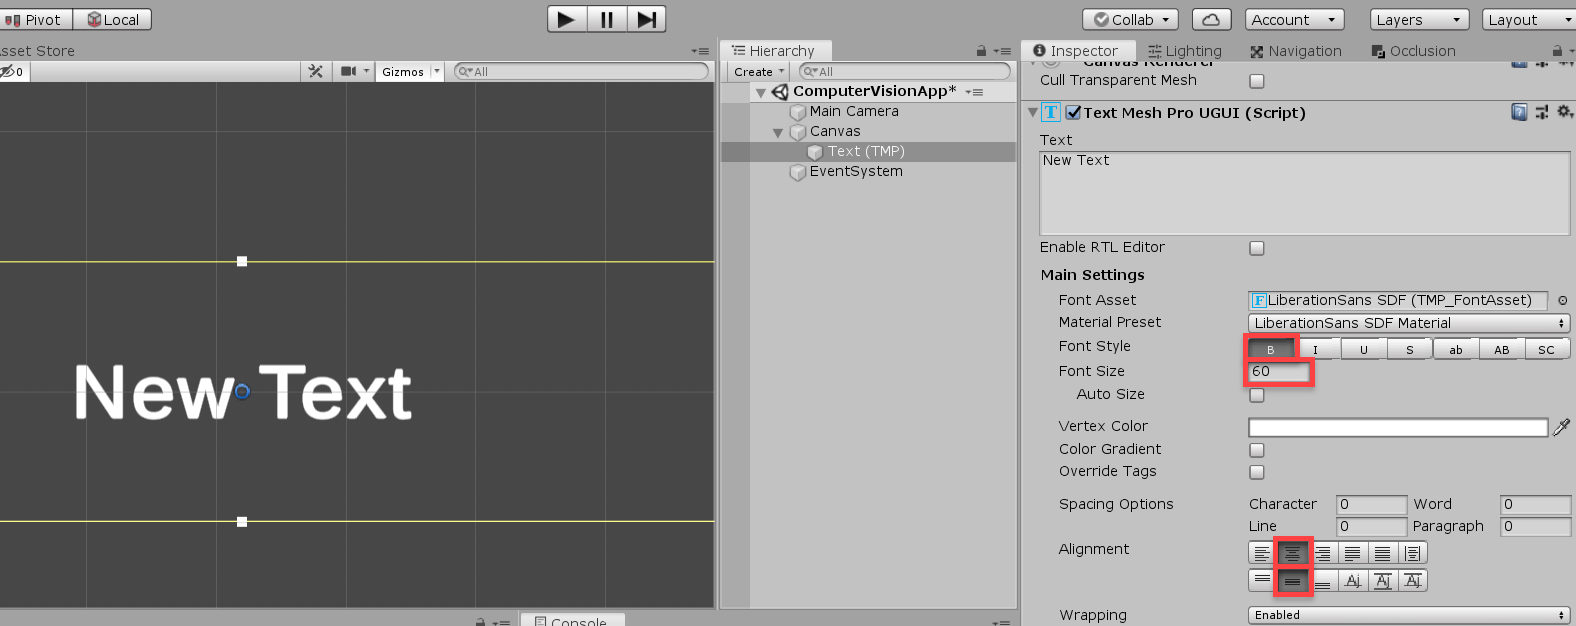
To make our text easily readable on a mobile display, let’s change some properties:
- Set Font Style to Bold
- Set Font Size to 60
- Set Alignment to center, middle
We can also remove the “New Text” text, since we want nothing there by default.
Now we need to add a Raw Image object to the canvas (call it CameraProjection). This is going to be what we apply our WebCamTexture onto (the texture that renders what our device camera sees). Make sure that it’s on-top of the text in the Hierarchy (this makes the text render in-front).
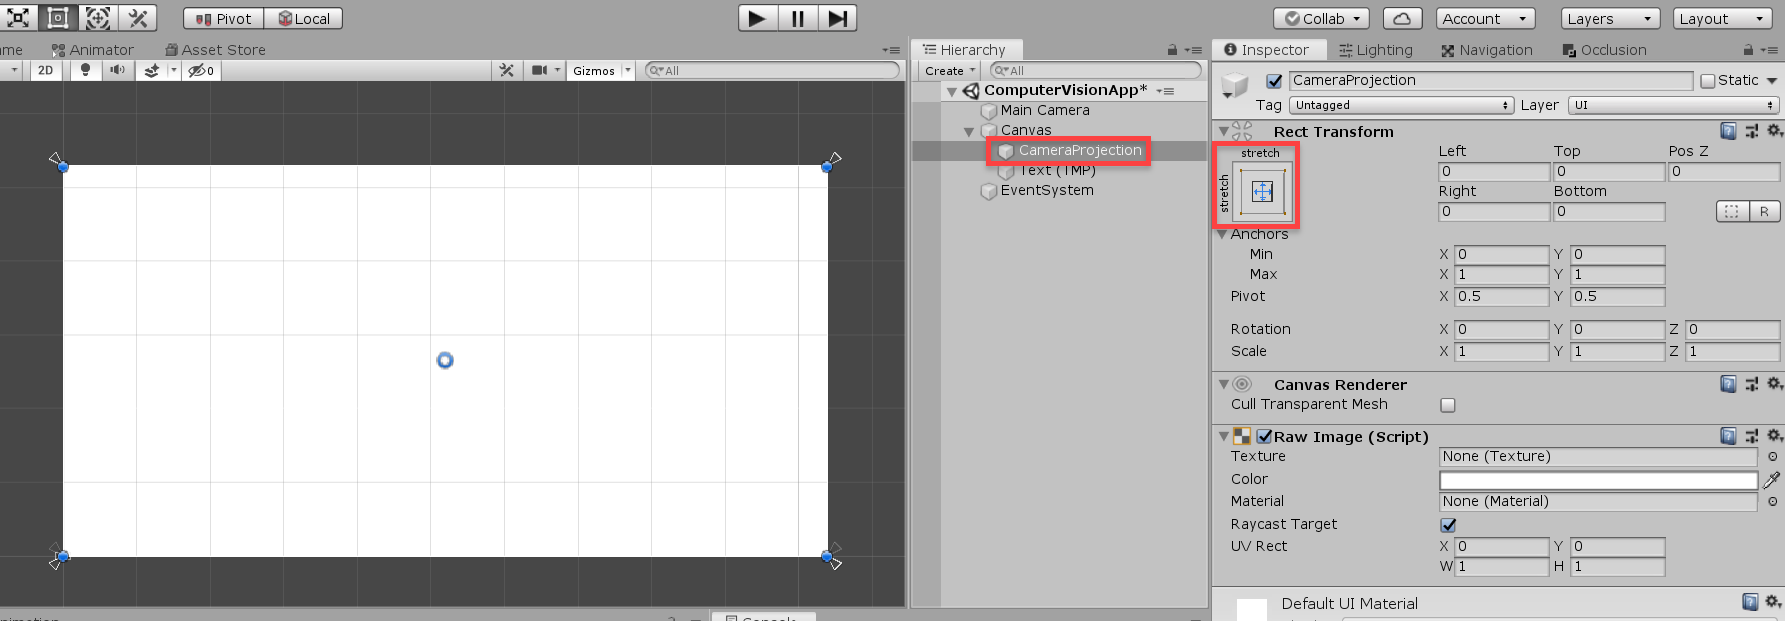
That’s all for our UI! Let’s move onto the scripting now.
CameraController Script
Before we make a script, let’s create a new GameObject (right click Hierarchy > Create Empty) and call it _AppManager. This will hold all our scripts.

Create a new C# script (right click Project > Create > C# Script) called CameraController and drag it onto the _AppManager object. This script will render what the device camera sees to a WebCamTexture, then onto the UI.
We need to add Unity’s UI library to our using namespaces.
using UnityEngine.UI;
Next, let’s add our variables.
// UI RawImage we're applying the web cam texture to
public RawImage cameraProjection;

// texture which displays what our camera is seeing
private WebCamTexture camText;
In the Start function, we’ll create a new WebCamTexture, assign it to the UI and start playing.
void Start ()
{
    // create the camera texture
    camTex = new WebCamTexture(Screen.width, Screen.height);
    cameraProjection.texture = camTex;
    camTex.Play();
}
The main function is going to be TakePicture. This will be a co-routine, because we need to wait a frame at the beginning. The function converts the pixels of the camTex to a byte array – which we’ll be sending to the Computer Vision API.
// takes a picture and converts the data to a byte array
IEnumerator TakePicture ()
{
    yield return new WaitForEndOfFrame();

    // create a new texture the size of the web cam texture
    Texture2D screenTex = new Texture2D(camTex.width, camTex.height);

    // read the pixels on the web cam texture and apply them
    screenTex.SetPixels(camTex.GetPixels());
    screenTex.Apply();

    // convert the texture to PNG, then get the data as a byte array
    byte[] byteData = screenTex.EncodeToPNG();

    // send the image data off to the Computer Vision API
    // ... we'll call this function in another script soon
}
Then in the Update function, we can trigger this co-routine by either a mouse press (for testing in the editor), or a touch on the screen.
void Update ()
{
    // click / touch input to take a picture
    if(Input.GetMouseButtonDown(0))
        StartCoroutine(TakePicture());
    else if(Input.touchCount > 0 && Input.touches[0].phase == TouchPhase.Began)
        StartCoroutine(TakePicture());
}
We can now go back to the Editor, and drag in the CameraProjection object to the script.
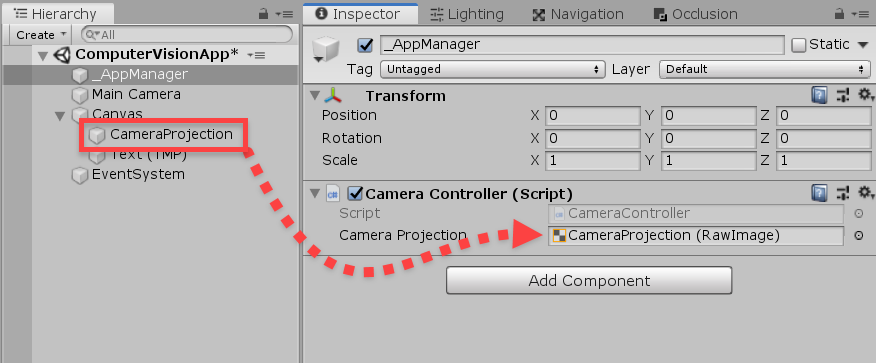
AppManager Script
Create a new C# script called AppManager and attach it to the object too. This script sends the image data to the Computer Vision API and receives a JSON file which we then extract the text from.
We’ll begin by adding in our using namespaces.
using UnityEngine.Networking;
using SimpleJSON;
using TMPro;
Our first variables are what we need to connect to the API.
// Computer Vision subscription key
public string subKey;

// Computer Vision API url
public string url;
Then we need the UI text element we made before.
// on-screen text which shows the text we've analyzed
public TextMeshProUGUI uiText;
Since this script will need to be accessed by the text-to-speech one (we’ll make that next), we’re going to create an instance of it.
// instance
public static AppManager instance;

void Awake ()
{
    // set the instance
    instance = this;
}
The main function is a co-routine which will do what I mentioned above.
// sends the image to the Computer Vision API and returns a JSON file
public IEnumerator GetImageData (byte[] imageData)
{

}
First, let’s make the text show that we’re calculating.
uiText.text = "<i>[Calculating...]</i>";
Then we need to create a web request (using Unity’s system). Setting the method to POST, means that we’re going to be sending data to the server.
// create a web request and set the method to POST
UnityWebRequest webReq = new UnityWebRequest(url);
webReq.method = UnityWebRequest.khttpVerbPOST;
A download handler is how we’re going to access the JSON file once, the image has been analyzed and we get a result.
// create a download handler to receive the JSON file
webReq.downloadHandler = new DownloadHandlerBuffer();
Let’s then setup the upload handler.
// upload the image data
webReq.uploadHandler = new UploadHandlerRaw(imageData);
webReq.uploadHandler.contentType = "application/octet-stream";
We also need to add our subscription key to the headers.
// set the header
webReq.SetRequestHeader("Ocp-Apim-Subscription-Key", subKey);
With that all done, let’s send the web request and wait for a result.
// send the content to the API and wait for a response
yield return webReq.SendWebRequest();
Now that we have our data, let’s convert it to a JSON object using SimpleJSON.
// convert the content string to a JSON file
JSONNode jsonData = JSON.Parse(webReq.downloadHandler.text);
With this, we want to extract just the readable text (a function we’ll make next), then display the text on screen.
// get just the text from the JSON file and display on-screen
string imageText = GetTextFromJSON(jsonData);
uiText.text = imageText;

// send the text to the text to speech API
// ... called in another script we'll make soon
The GetTextFromJSON function, takes in a JSON object and extracts just the text that’s been analyzed in the image and returns it as a string.
// returns the text from the JSON data
string GetTextFromJSON (JSONNode jsonData)
{
    string text = "";
    JSONNode lines = jsonData["regions"][0]["lines"];

    // loop through each line
    foreach(JSONNode line in lines.Children)
    {
        // loop through each word in the line
        foreach(JSONNode word in line["words"].Children)
        {
            // add the text
            text += word["text"] + " ";
        }
    }

    return text;
}
Let’s now go back to the CameraController script and down to the bottom of the TakePicture function. Here, we’re going to send the image data over to the AppManager script to be analyzed.
    ...
    // send the image data off to the Computer Vision API
    AppManager.instance.StartCoroutine("GetImageData", byteData);
}
Back in the Editor, add your Computer Vision subscription key and endpoint url with /v2.0/ocr at the end. Mine is: https://australiaeast.api.cognitive.microsoft.com/vision/v2.0/ocr
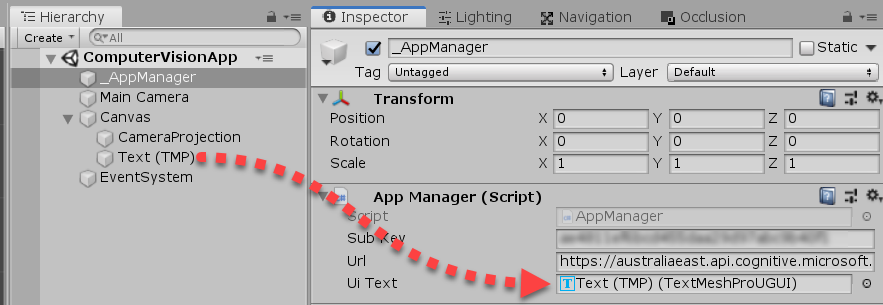
TextToSpeech Script
Create a new C# script called TextToSpeech and attach this to the _AppManager object. This script will take in text, send it to the Speech API and play the TTS voice.
We’ll only be needing the networking namespace for this script.
using UnityEngine.Networking;
Since we’re playing an audio clip through this script, we’ll need to make sure there’s an AudioSource attached.
[RequireComponent(typeof(AudioSource))]
public class TextToSpeech : MonoBehaviour
{
For our first variables, we’re going to keep track of the info we need to connect to the API.
// TTS subscription key
public string subKey;

// TTS service region
public string region;

// TTS resource name
public string resourceName;
Then we need to keep track of our access token and audio source.
// token needed to access the TTS API
private string accessToken;

// audio source to play the TTS voice
private AudioSource ttsSource;
Finally, let’s create an instance and set it in the Awake function.
// instance
public static TextToSpeech instance;

void Awake ()
{
    // set the instance
    instance = this;

    // get the audio source
    ttsSource = GetComponent<AudioSource>();
}
The first thing we’ll need to do is create a function to get an access token. This token is needed in order to use the API.
// we need an access token before making any calls to the Speech API
IEnumerator GetAccessToken ()
{

}
Step 1, is to create a new web request and set the url to be the endpoint with our region included.
// create a web request and set the method to POST
UnityWebRequest webReq = new UnityWebRequest(string.Format("https://{0}.api.cognitive.microsoft.com/sts/v1.0/issuetoken", region));
webReq.method = UnityWebRequest.khttpVerbPOST;

// create a download handler to receive the access token
webReq.downloadHandler = new DownloadHandlerBuffer();
Then we can set the request header to contain our sub key and send it off.
// set the header
webReq.SetRequestHeader("Ocp-Apim-Subscription-Key", subKey);

// send the request and wait for a response
yield return webReq.SendWebRequest();
When we get a result, check for an error and log it if so. Otherwise, set our access token.
// if we got an error - log it and return
if(webReq.isHttpError)
{
    Debug.Log(webReq.error);
    yield break;
}

// otherwise set the access token
accessToken = webReq.downloadHandler.text;
With this done, we can call the co-routine in the Start function.
void Start ()
{
    // before we can do anything, we need an access token
    StartCoroutine(GetAccessToken());
}
Let’s now work on the GetSpeech function (co-routine), which will send the text to the API and return a voice clip.
// sends the text to the Speech API and returns audio data
public IEnumerator GetSpeech (string text)
{

}
The first thing we need to do, is create the body. This is where we’ll store the info for the API to read.
// create the body - specifying the text, voice, language, etc
string body = @"<speak version='1.0' xmlns='https://www.w3.org/2001/10/synthesis' xml:lang='en-US'>
    <voice name='Microsoft Server Speech Text to Speech Voice (en-US, ZiraRUS)'>" + text + "</voice></speak>";
Then like before, we can create a new web request.
// create a web request and set the method to POST
UnityWebRequest webReq = new UnityWebRequest(string.Format("https://{0}.tts.speech.microsoft.com/cognitiveservices/v1", region));
webReq.method = UnityWebRequest.kHttpVerbPOST;

// create a download handler to receive the audio data
webReq.downloadHandler = new DownloadHandlerBuffer();
Next, we want to upload the body to the request.
// set the body to be uploaded
webReq.uploadHandler = new UploadHandlerRaw(System.Text.Encoding.UTF8.GetBytes(body));
webReq.uploadHandler.contentType = "application/ssml+xml";
Then we’ll set the headers, which will identify us and also include some info for the returning audio.
// set the headers
webReq.SetRequestHeader("Authorization", "Bearer " + accessToken);
webReq.SetRequestHeader("User-Agent", resourceName);
webReq.SetRequestHeader("X-Microsoft-OutputFormat", "rif-24khz-16bit-mono-pcm");
Now we can send the request and wait for a result. If we get an error, return.
// send the request and wait for a response
yield return webReq.SendWebRequest();

// if there's a problem - return
if(webReq.isHttpError)
    yield break;

// play the audio
StartCoroutine(PlayTTS(webReq.downloadHandler.data));
The PlayTTS function (co-routine) takes in the audio data as a byte array and saves it temporarily as a .wav file. Then we load that in, convert it to an audio clip and play it through the audio source.
// converts the audio data and plays the clip
IEnumerator PlayTTS (byte[] audioData)
{
    // save the audio data temporarily as a .wav file
    string tempPath = Application.persistentDataPath + "/tts.wav";
    System.IO.Fil.WriteAllBytes(tempPath, audioData);

    // load that file in
    UnityWebRequest loader = UnityWebRequestMultimedia.GetAudioClip(tempPath, AudioType.WAV);
    yield return loader.SendWebRequest();

    // convert it to an audio clip
    AudioClip ttsClip = DownloadHandlerAudioClip.GetContent(loader);

    // play it
    ttsSource.PlayOneShot(ttsClip);
}
Back in the Editor, we can fill in the component’s properties.
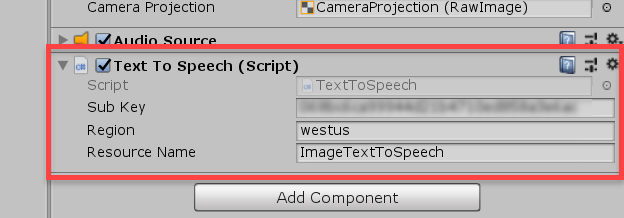
That’s it for the scripting! If you have a webcam, you can try it out right now in the Editor. Otherwise, you can build the app to your device and try it on there.
Conclusion
Congratulations on finishing the tutorial! If you followed along, you now have a complete app with text to speech capabilities. If you wish to make additions, or just have the project ready to use, you can download the project files here.


