You can access the full course here: Intro to Augmented Reality
Part 1
Welcome to the Course
In this course, we’ll be learning about augmented reality and AR Foundation in Unity. Augmented reality (AR), is the augmentation of the real world with the addition of virtual objects. But what is AR Foundation? Well right now, there are two main AR SDKs. ARCore for Android and ARKit for iOS. What AR Foundation does is provide you with an API to develop for both platforms seamlessly.
How Does it Work?
Using the camera and depth sensor, the app creates feature points, which track specific features in the world. With this, the app can then create horizontal and vertical planes that map to real-world surfaces. The app also tracks the device’s position and orientation in world space.
Device Requirements
For Android, the supported devices are:
- Min Android version of 7.0
- Galaxy S7 or more recent
- All Pixel phones
- All supported devices can be found here
For iOS, the supported devices are:
- iPhone SE
- iPhone 6s or more recent
- All supported devices can be found here
What Can it Do?
AR Foundation is a new and ever-evolving technology, so there are new features constantly being released.
- Track surfaces (detect raycast hits, place objects)
- Lighting estimation
- Environment probes
- Face tracking
- 2D image tracking
Learn more about AR Foundation and its features here.
Now let’s get started with the course.
Part 2
Adding our Build Platform
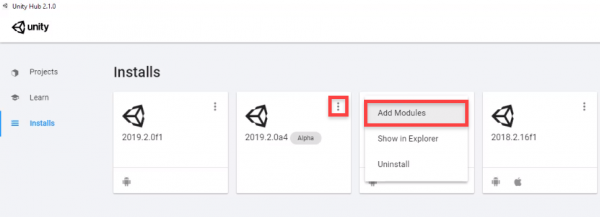
Open up the Unity Hub to begin the lesson. Let’s go over to the Installs tab and add either the Android or iOS build platform to Unity. Find the version of Unity you want to use, click on the three dots and select Add Modules.
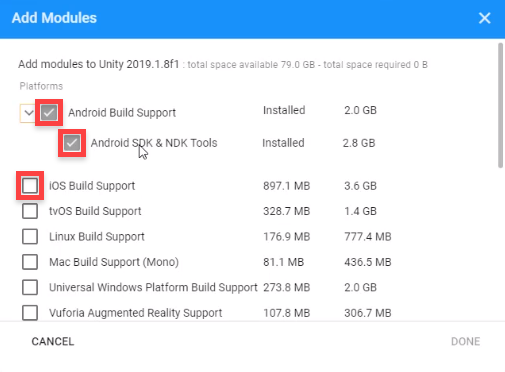
If you want to build for Android, select the two (or three with newer versions) and click Done. Otherwise, if you want to build for iOS, select iOS Build Support and click Done. Do note, that if you’re on a Windows PC you cannot build for iOS. There are some work arounds, yet we won’t be going over that in the course.
New Unity Project
Hopefully it’ll not take too long to install. When it’s done, create a new project (make sure to be using the correct version). First, let’s open up the Build Settings window (File > Build Settings…).
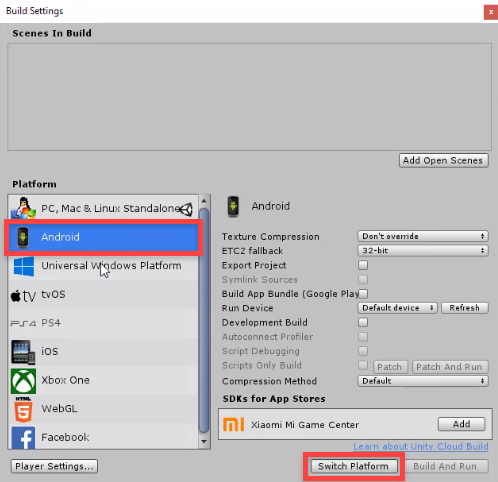
- Select either the Android or iOS platform and select Switch Platform
- Also select Add Open Scenes to add the current scene to the build
Installing AR Foundation
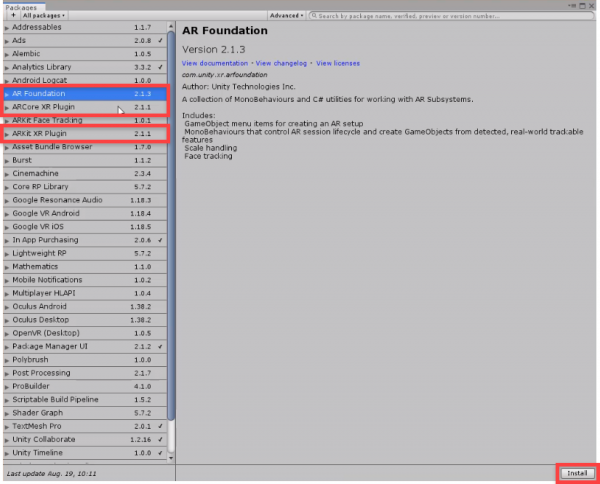
Now we can install the required packages for AR Foundation. This is done in the Package Manager screen (Window > Package Manager).
- Install AR Foundation
- Install ARCore XR Plugin if you’re building for Android
- Install ARKit XR Plugin if you’re building for iOS
Note: In some cases, you may need to use the Advanced tab and select View Previews to be able to see some of the options.
Now let’s edit the player settings. Open the Project Settings (Edit > Project Settings) and click on the Player tab. At the top, we can change the Product Name. This is what the app will be called on your device.

Scroll down to the Other Tabs tab.
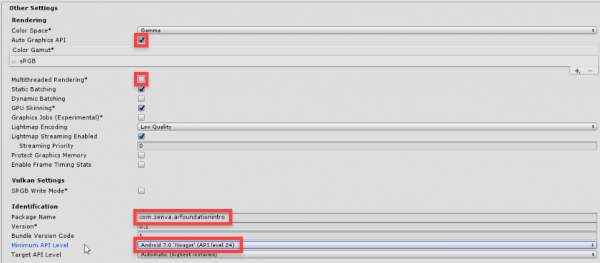
- Enable Auto Graphics API
- Disable Multithread Rendering
- Set the Package Name to a unique identifier in the format of: com.companyName.productName
- Set the Minimum API Level to Android 7.0 “Nougat” (API level 24)
If you’re building to Android, click on the XR tab and Create a settings asset for ARCore.

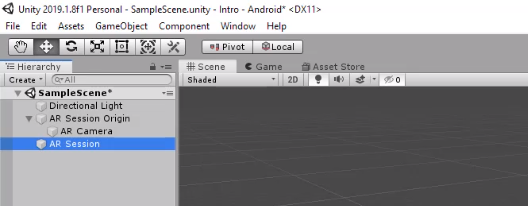
You can now close the Project Settings window. In the Hierarchy, right click and create two new objects:
- XR > AR Session Origin
- XR > AR Session
In the next lesson, we’ll go over visualising the AR planes.
Part 2
Enabling USB Debugging
In order to install files on your Android device from your PC, we need to enable USB debugging. On your Android device, go to your Settings app.
- Go to About Phone
- Click on Software Information
- Click on Build Number, 7 times
- Go back to the main page and go to Developer Options
- Enable USB Debugging
Back in Unity
Back in Unity, go to the Build Settings window and click Build And Run.
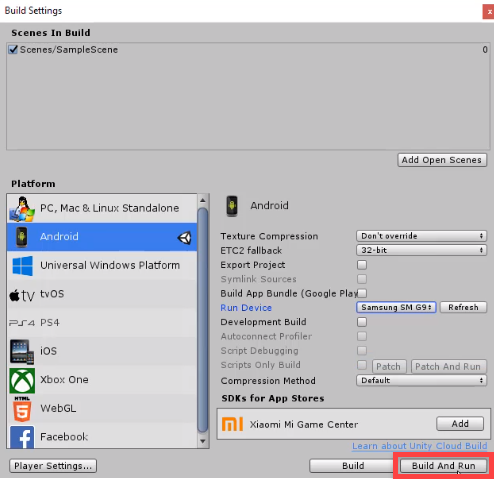
Save the .apk anywhere on your PC. Unity should now begin to build your project, install it onto your device, then launch it.
Transcript 1
Hey everyone and welcome to the course. My name is Daniel Buckley, and I’ll be instructor. So in this course, we are going to look at augmented reality and more specifically AR Foundation inside of Unity and how to set that up so we can actually build our very own AR app to our device.
So first of all, what we need to talk about is what exactly is augmented reality. Well, augmented reality is basically adding virtual objects into the real world. This can be stuff such as 3D models and maybe even measurements. This is not to be confused with virtual reality. Virtual reality is creating an entirely virtual environment around you, whereas augmented reality is just augmenting your existing one.
Now AR technology is very versatile as it can pretty much be used in any sort of field. It can be used in games, education, industry, as even now there are a wide range of AR apps that cover wide range of different uses. And something else you should also note is that augmented reality technology is fairly recent and especially AR Foundation, which we’re gonna be working with. This sort of technology is new and it is going to continue to grow as phone technology improves.
So now what is AR foundation? Well, before we go into that, I reckon we should first talk about what the two main sort of AR SDKs that are out right now. The first one is ARCore and this is augmented reality for Android devices. This allows developers to create AR apps for Android devices and then over on the iOS side, Apple has their ARKit, which has the same sort of principles with augmented reality but with iOS devices.
So what AR Foundation does is it gives the Unity developer an API so that they can actually develop for both platforms seamlessly, they don’t have to have separate projects for Android, one for iOS, they don’t have to be switching between the different APIs and SDKs. It’s all in one package where you can just develop for AR and then build to either iOS or Android or both.
So how does AR Foundation actually work inside Unity? Well, first of all, what it does is it uses your camera and depth sensor, and with that, the app creates things known as feature points. These are basically points that, points of interest in the world that it can track. It can track it’s position, it’s orientation relative to other points as well, and this sort of maps out a rough 3D sort of mesh of your world so they understand how far away things are and the position between different feature points, and with this, the app can then create horizontal and vertical planes that map out real-world surfaces.
As you can see in the image, it can track the floor, it can track walls, and with this, we can do many things. The app can also track the devices position in orientation world space so you can actually then walk around your environment and, in fact, it memorizes and catalogs the environment in feature points. So what you could do is you can go into an entirely different room, look around the walls there, set that up, and then go back into the other room, and all those features points and objects that you placed down before will still actually be there.
Okay, so that’s how it works, but what can we actually do with AR foundation, why should we use it? Well, with AR foundation, we can, first of all, of course, track surfaces, and with these surfaces, we can detect raycast hits and place objects. As you can see in the image to the left, there’s objects that have been placed down on the surfaces, and they’ll actually stick there so you can walk around them and they will stay in the exact same position.
AR Foundation also has lighting estimation, which means that your AR models can actually adapt to the lighting around you, so if you’re in a dark room, then your models will become darker, and if you’re out in the sun, your models will be bright. And this is really good in creating immersive experiences as you don’t want the lighting to be off, and of course, this technology will only get better as time goes on.
There’s also environment probes and this allows you to accurately map the lighting conditions and reflections inside of your environment. So if you have a shiny object or something metallic, you can actually see your surrounding environment sort of reflect off of that object. AR Foundation also has face tracking so you can track people’s faces and apply masks, really whatever you want to their face, and then there is 2D image tracking.
This is useful for maybe if you are maybe making a promotional app, you could have a movie poster or a game poster and you could have your AR app look at it and then out from that poster could pop a 3D model in animation or something like that. Sort of this collection of various different features. You can really make any sort of AR app you can think of at the moment, and of course, as time goes on, this technology is only gonna get better and there is definitely going to be many, many more features that are gonna be added to AR Foundation and ARCore and ARKit in the future for you to use.
Now on the screen here is a link that will actually take you to the AR Foundation, sort of menu page on the internet. This just goes over the features and sort of explains more about AR Foundation and how it works. Now there is one sort of downside to AR Foundation and that is not all devices are supported. Since this has fairly advanced AR in using our depth sensors and actually being able to capture, map out the world around you, it does require a certain level of device.
So, first of all, for Android, you need a minimum Android version of 7.0 and all phones including the Galaxy S7 and above can work with AR Foundation, and of course, all Pixel phones work as well. On the iOS side, the support phones are the iPhone SE and the iPhone 6S and more recently. So pretty much all devices from the past few years should be working fine with AR Foundation, but if you want to make sure, you can go to these phone links which will be downloading summaries to make sure that your specific device does actually work with AR Foundation.
Zenva is an online learning academy with over 500,000 students. We feature a wide range of courses for people who are just starting out or for people who just want to learn something new. The courses are also very versatile allowing you to learn in really whatever way you want. You can choose to follow the online video tutorials or you can choose to read the included lesson summaries. There’s even the included project files so you follow along with the instructor. So now that we know a little bit more about AR and AR Foundation inside of Unity, let’s now go and create our first AR app inside of Unity using AR Foundation.
Transcript 2
Welcome, everyone. In this lesson, we are going to be setting up a Unity project so that in the future, we can easily just jump straight in and get working with AR Foundation.
So, here I am inside the Unity Hub. The first thing we want to do is make sure that we have either the Android or iOS build platforms installed. So, I’m gonna go to the Installs tab here, find my Unity version I’ll be using, and then click on the little three dots here and go Add Modules. You need to make sure that you either have Android here with Android SDK & NDK Tools enabled and installed, or iOS Build Support enabled and installed. You can just enable this and click Done, and that will begin installing.
I’m using Android for my example, because I am working on a Windows PC, so building to iOS is not possible. But if you are working on a Mac computer, you can build to iOS. So, make sure that you have those, either the Android or the iOS modules installed.
And then we can go to Projects and then we can click on the New button right here and create our new Unity project. All right, so here we are inside of Unity. To begin, let’s go up to File, Build Settings. Inside of this Build Settings window, what we want to do is first of all switch over to our desired platform that we wanna build to. This can be either Android or iOS. In my case, I’m building to Android, so I’m gonna select the Android platform right here. Now, you do need to make sure that you do have either the Android or iOS platform installed as a module onto your Unity version.
And do know also that if you are working on a Windows computer, you cannot actually build to an iOS device. So, only on a Mac computer can you build to iOS. So in our case, we’re gonna be building to Android. So, select your build platform right here and then just click on Switch Platform. It shouldn’t take too long since we do have an empty project, so this should pretty much go ahead pretty fast, just like that. And now, as you can see, ooh, it’s just doing a bit more here.
And now, as you can see, at the top here, it says Android instead of PC, Mac, & Linux Standalone. Now, the last thing we wanna do here in Build Settings is click on the Add Open Scenes button right here to just add our current scene to the Build Settings as this is the scene that we want to launch when we actually play the game.
So, we can close out of that now. And what we want to do is actually import the packages that we’re gonna be using for this app. Now, we need to, first of all, install the AR Foundation package. And then also, either the ARCore or ARKit plugin, depending on what you’re going for. Remember that ARCore is the Android AR system and ARKit is the iOS AR system.
So, let’s go up to Window, Package Manager. Inside of the Package Manager here, what we want to do is just wait for all the packages to load here and we want to install, first of all, the AR Foundation package. So, we’ll just click on Install here. This just has all the basic features of AR Foundation, connecting the two SDKs to Unity and being that actual in-between between your app and the two SDKs just so it’s fairly easy and straightforward to actually develop for both – where you don’t have to have separate projects if you’re working for iOS and a separate project for Android. You can all work in the exact same project using AR Foundation.
Now, like I mentioned, if you’re working on Android, you need to install the ARCore XR Plugin right here, or if you’re working on ARKit, so iOS, you install the ARKit XR Plugin here. We’re working for Android, so I’m gonna install the ARCore XR Plugin here. Just click install. And also, if you do wanna publish for both maybe, you could install both of these plugins as well. Okay, now that we have that installed, we can get out of the Package Manager here.
And let’s just set up some of the actual player settings for this app because when we build it, we need to set up a few things. So, let’s do that now. Go to Edit, Project Settings. Inside of the Project Settings window here, we first of all wanna go to our Player settings.
And in here, what we can do is set up a few things. First of all, for the Company Name, this isn’t really necessary, so you can have this as your company or just have it as the default one here. For the Product Name, this is what’s actually gonna be showing on the actual app. The icon, this is gonna be the name of the app, so I’m just gonna call this our AR Foundation Intro. And down here then in the Android settings, or iOS if you have that enabled, we can skip over Resolution and Presentation since we don’t really need to mess up anything in there.
In other settings though, what we need to do is enable Auto Graphics API. We also then need to come down here to our Package Name and fill this in. This is basically our unique identifier for our app. So, the way this normally works is you have com, then dot, your company name, then dot, your product name. So, I’m gonna replace Company here with Zenva and ProductName here with, we’re just gonna call this arfoundationintro. Now, you can call this whatever you want. It doesn’t have to be tied to a specific company or product. This is just a way to uniquely identify your app on your device.
Something else we also need to set is a Minimum API Level for the app as we don’t want this running on devices that can’t actually support it, and it is a requirement. So, we need to set our Minimum API Level here for Android. We need to set this to 24. So down here, Android 7.0, we’ll click on that, and there we go. The rest of the other settings here should be fine.
Down in XR Settings, you may see that it says ARCore Supported. Now, we don’t need to enable this as we are using AR Foundation, technically, but if you are creating an app that is just using the ARCore SDK and not AR Foundation, then you would have to enable it. But since we are going for AR Foundation, we don’t need to tick this.
Now, something else we also need to do is go down here to where it says XR. And it says, you must create a specialized instance of the settings data in order to modify the settings of this UI. So, we’ll just click on Create here. It will ask us to save this somewhere, so we’ll just save it right here, and there we go. And we just wanna change this from Required to Optional. Now, with that all set up, our app is pretty much ready to go. If we were to plug our phone in and build this to there, we would see that the app works, but nothing really would happen because we actually haven’t even set up anything for AR at the moment.
So, the way we can do that is by right-clicking here in the hierarchy. And we need two things for this. So, let’s go XR, and we want to add in an AR Session Origin. This basically defines the center of the world, this defines the origin. And if we click on this, you could see that it has the AR Session Origin script right here. And as a child, it also has a camera. Now, this is the AR camera that is what you’ll see. It will be rendering what your camera sees behind it. And any sort of AR features inside of Unity will be on top of that. There’s a few scripts here that manage all that. So, what we can actually do is delete the existing main camera right here, and let’s change this AR Camera’s tag to Main Camera as this is now the main camera.
Now, along with this object, we also need to have a XR AR Session right here. This is what mask out our AR world. And with that, we are pretty much done. In the next lesson, what we’re gonna do is set it up so that we can actually see the planes that are being detected and actually learn how to build this to our device. So, I’ll see you all then in the next lesson.
Transcript 3
Welcome back, everyone. In this lesson, we are gonna be going over how to set up our AR app inside of Unity to work with Android, and then after that, we’re gonna go over how to actually build this to an Android device.
So first of all, what we want to do is change our build platform to Android ’cause right now, as you can see here at the top, it is PC, Mac & Linux Standalone. We wanna switch this platform over to Android. So let’s go File, Build Settings, and make sure that you do have the Android build platform installed. We went over this over in the previous lesson of how to actually set this up, how to install it into your version of Unity. So select that. Then just click on the Switch Platform button right here. It shouldn’t take too long.
And after that is done, let’s also add our current scene into the scenes in Build List right here as this is going to be all the scenes that we are gonna be able to run inside of our app. So we’ll click on Add Open Scenes, and there we go. We’ve got our scene added to the build right here.
Okay, we can then click on Player Settings, and this will open up the Player Settings window right here with a bunch of things that we can change. First of all, we can change our product name, and this is what the name of the app is gonna be. The little icon, this is what the app is gonna be called. So we can just call this one our AR Foundation Test. It’s really up to you. You can call this whatever you want. The Company Name, that’s not really too important. If you do have a company name you wish to put there, then you can, but I’m gonna keep it like that for now.
Then down here, what we’re gonna do is change a few things, as well. Let’s open up Other Settings. And what we want to enable is Auto Graphics API here. We then wanna go down to where it says Package Name, and in here, what we want to do is basically change this to our unique identifier. Now, a package name for Android is basically a way for the device to uniquely identify your app. And the format for this is normally com dot your company name dot your product name. Now, this doesn’t have to be strict. It’s not gonna check to see if your company name is really that or anything. This can really be whatever you want. So here, I’m gonna go com.zemba.introtowarfoundation. Okay, there we go.
Version we can keep the same, but something we do have to change is actually a requirement with AR Foundation is to change the minimum API level right here. We’ve gotta change it from the default 4.1 Jelly Bean, and we gotta change it to API level 24, which is Android 7.0. So we’ll change it to that there. And apart from that, we really don’t need to change anything else.
You might see that down here in XR Settings, there is this thing called AR Core Supported. We don’t actually have to enable this as this is really only needed if you are building a app that is just using AR Core. Since we’re using AR Foundation, we don’t have to do this. But what we do have to do is click on XR right here and click Create and just save it really anywhere. We can just save it here in the Assets folder and change Requirement to Optional. This is just something we have to set up for AR Core. And apart from that, we are pretty much done. We’ve set up everything we need here.
If you do want to, you can go to Resolution and Presentation and change if we are allowed to go Portrait mode, Landscape, Portrait Upside Down or Landscape Right. You can change those if you wish if you only want it to be played in Landscape mode. Splash Image, this is just what appears on the screen when we startup, as well as the Unity logo. So you can add your own logos here if you wish. And Publishing Settings, this is really just for if your publishing it to the Play Store, so we don’t really need to look at that for now. And yeah, that really all we need to do.
So let’s click on the X right here, but we can’t click build and run just yet, and the reason why is because we need to set up our device first of all to actually work inside of, to actually set up our device so we can actually use with Unity, so we can actually build projects and transfer the files over to our device because by default, that is not allowed.
So let’s go over to our Android right device now, and I’ll show you how to enable developer options. Okay, so what you wanna do is you first of all wanna go to your Settings on your mobile device. Then you wanna scroll right down to the bottom to About phone, and then in here, we wanna click on Software information. In here, what we wanna do then is just tap on our Build number here seven times. So one, two, three, four, five, six, seven, and what this does is we then have to enter in our current PIN, and then Developer mode has been enabled.
So we can go back, back to our settings, and if we scroll right down to the bottom, you’ll see that we now have Developer options enabled. We can open that up, and in here, what we want to do is scroll down to USB debugging here. We wanna enable that. And what this will allow us to do is connect our device up to our computer, and it’ll allow us to build Unity games directly to our mobile and add that as an app. That’s pretty much all we have to do on our phone.
Now all we need to do is connect our device to our computer. Okay, so after you’ve done that, we should go back to Unity here, and you just wanna find where it says Run Device. You wanna click Refresh, and if you open this up now, you should see that you have your Android device right here. So we can select that, and then we can hit Build And Run. You can choose the location and save this APK. I’m just gonna save it here in our IntroToAR folder. Now, the name of this doesn’t really matter as this is just the name of the file, not the name of the actual app. So I’m just gonna call this one our App right here. Hit Save, and then it is gonna start to build to our device. Make sure your device is plugged into your computer.
And once that is finished, it should then automatically pop up on the screen, and you should be able to test it out.
In the next lesson, we’re gonna be going over the exact same sort of thing, but with iOS devices and how to set it up for that. So if you don’t have an iOS device, you can just skip over that lesson, but if you do, it’s recommended that you do watch that lesson as there are many steps that do differ from building to Android, so we do need to explain them when we’re over there. Apart from that, though, I’ll see you all then in the next lesson.
Interested in continuing? Check out the full Intro to Augmented Reality course, which is part of our Augmented Reality Mini-Degree.
