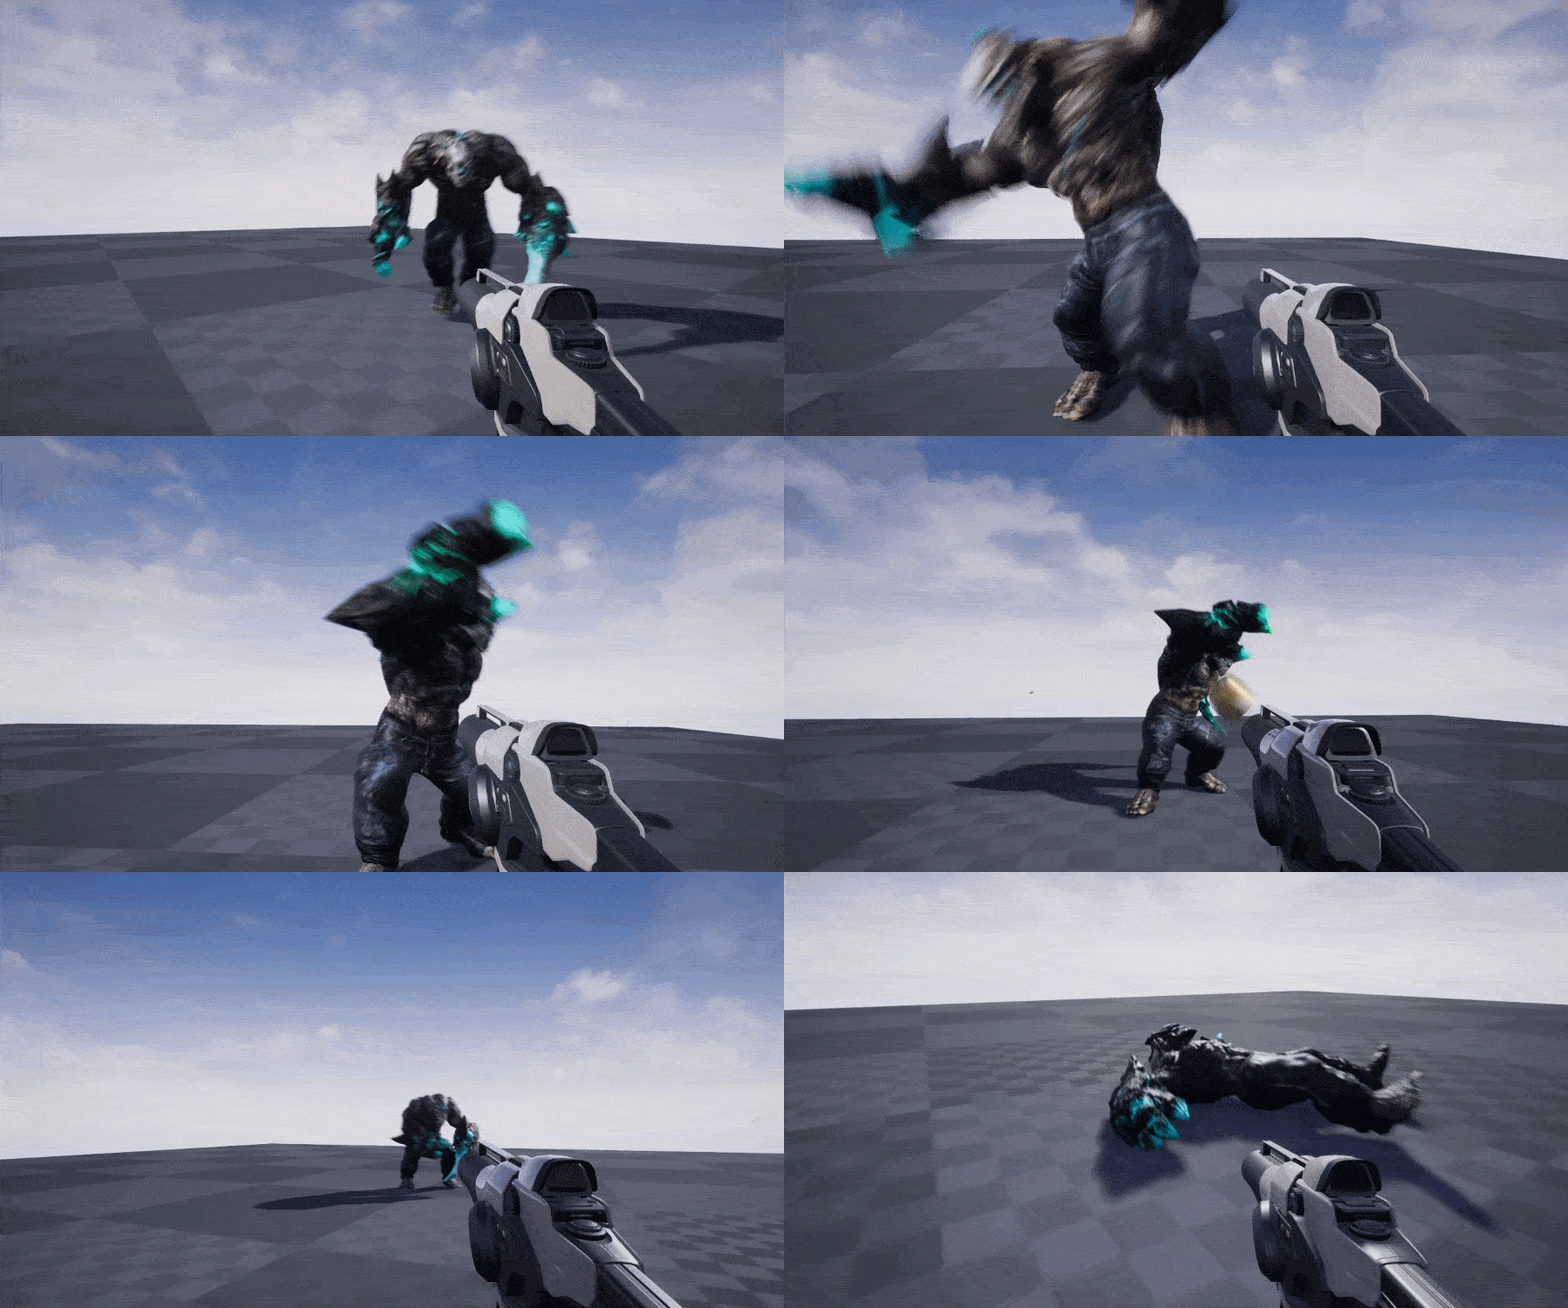
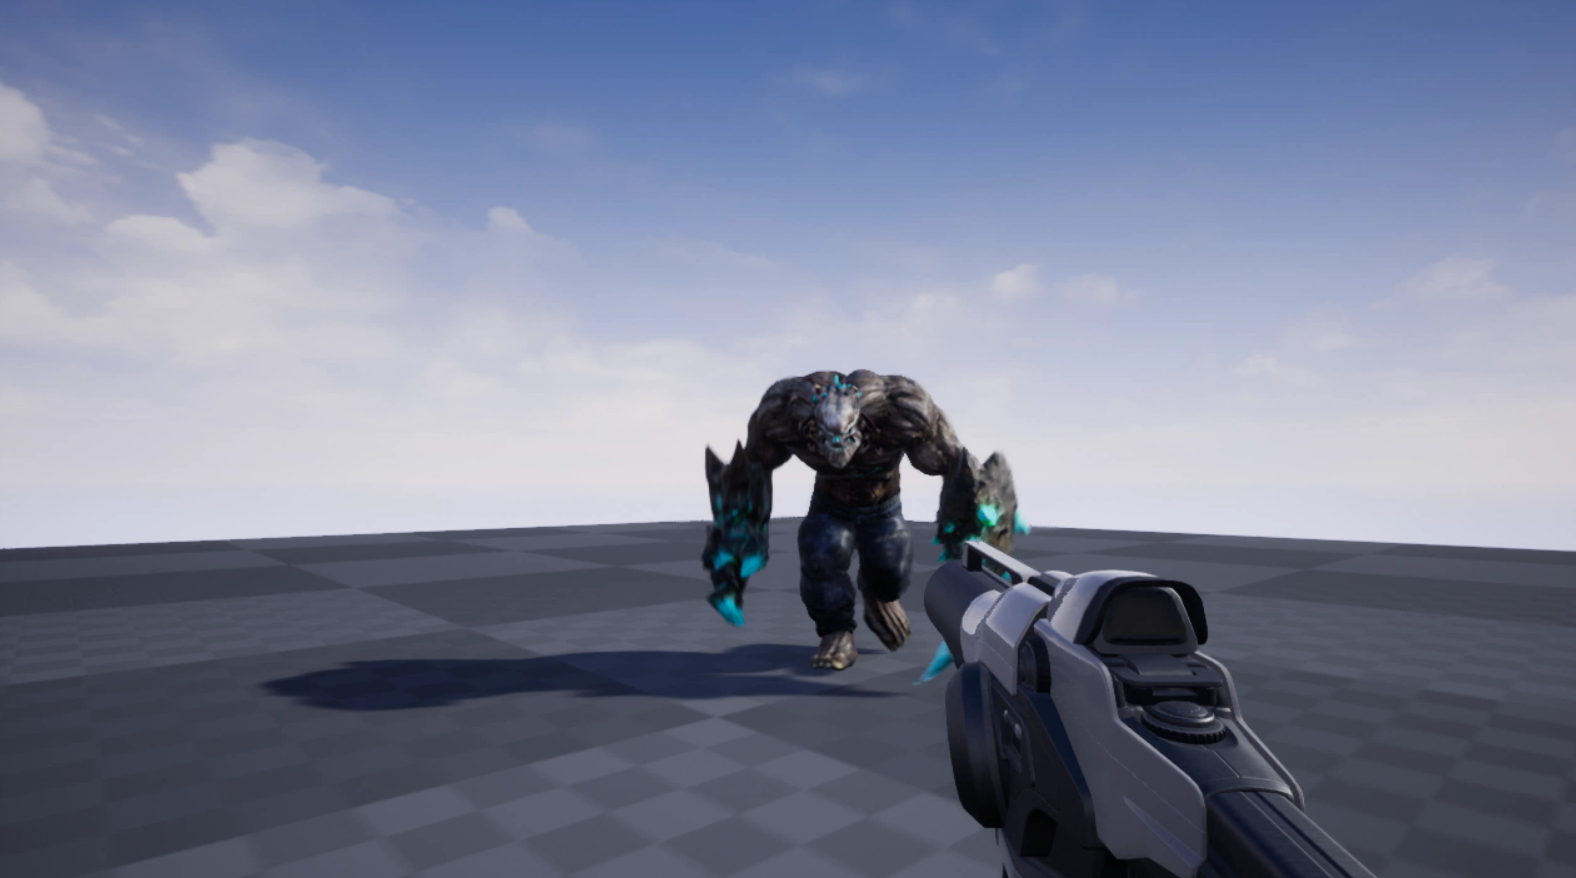
Whether you’re a fan or not, there’s no denying that first-person shooters are a popular game genre. Thus, it can be beneficial to know how to make one, whether it’s just to round out your own skills or to create that FPS game idea you’ve had haunting your dreams. It can be even more beneficial to learn how to do this with Unreal Engine, the popular and graphically stunning engine behind a ton of popular games.
In this tutorial, we’re going to show you how to create a first-person shooter game inside of the Unreal Engine. The game will feature a first-person player controller, enemy AI with animations, and various shooting mechanics. We will also cover the Unreal Engine blueprinting system for the logic, so no other coding knowledge is needed.
So, without further ado, let’s start learning how to build an FPS with Unreal Engine!

Project Files
There are a few assets we’ll be needing for this project such as models and animations. You can also download the complete Unreal project via the same link!
Project Setup
Before we start though, it’s important to know that this tutorial won’t be going over the basics of Unreal Engine. If this is your first time working with the engine, we recommend you follow our intro tutorial here.
To begin, create a new project making sure to include the Starter Content. This should then open up the Unreal Engine editor. Down in the Content Browser, create four new folders.
- Animations
- Blueprints
- Levels
- Models
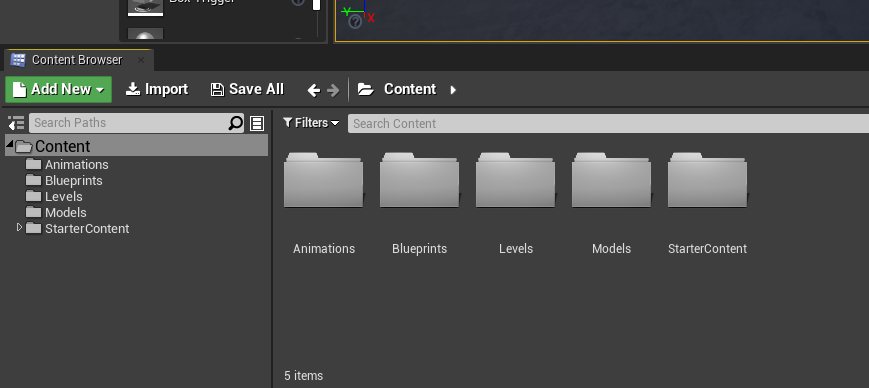
Next, download the required assets (link at the start of tutorial). Inside the .ZIP file are three folders. Begin by opening the Models Folder Contents folder and drag all the folders inside of that into the Models folder in the Content Browser. Import all of that.
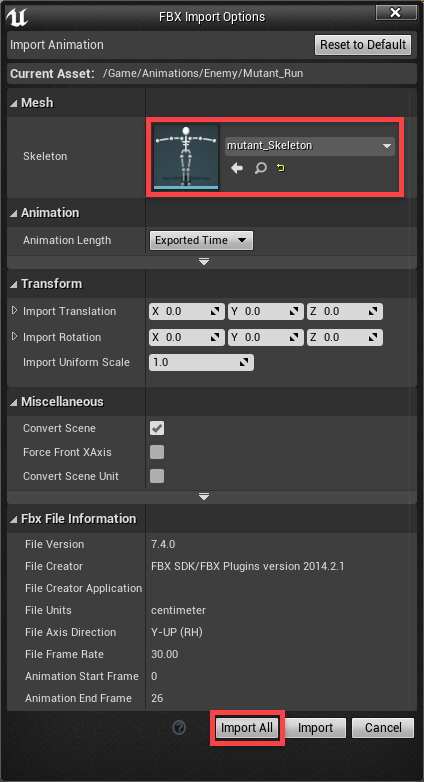
Then do the same for the Animations Folder Contents. When those prompt you to import, set the Skeleton to mutant_Skeleton. The mutant model and animations are free from Mixamo.
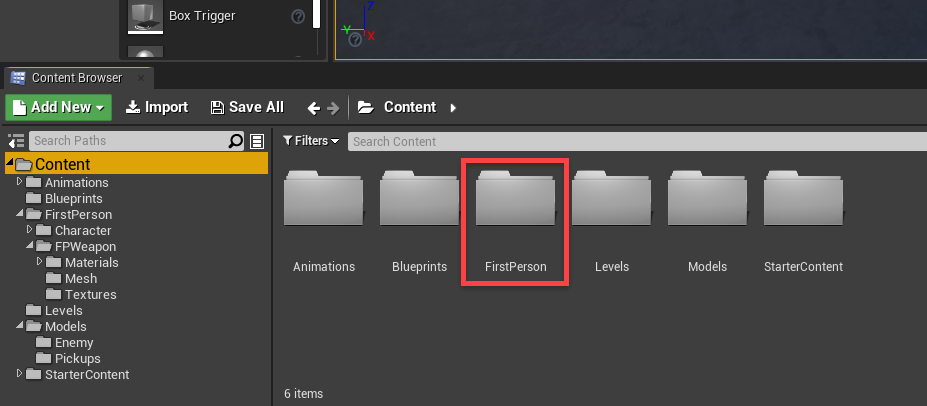
Finally, drag the FirstPerson folder into the editor’s Content folder. This a is a gun asset that comes from one of the Unreal template projects.
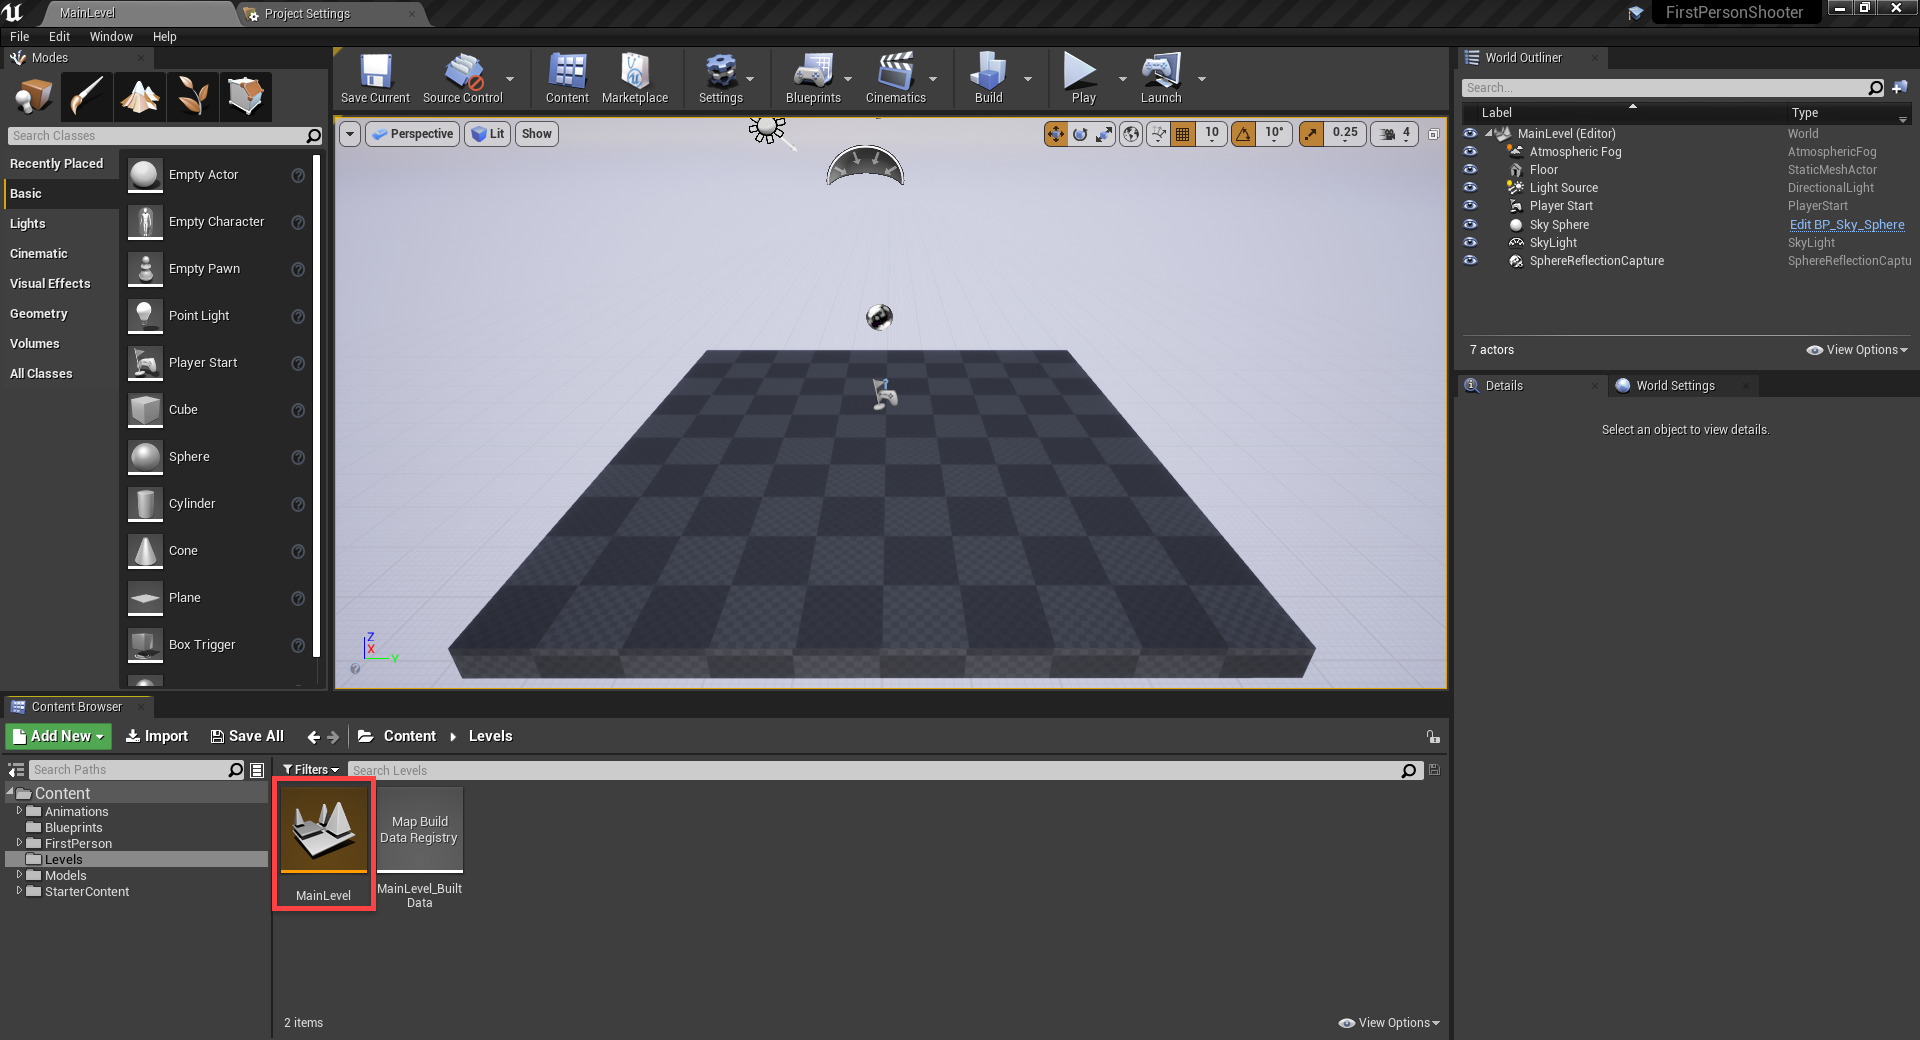
Now we can create a new level (File > New Level) and select the Default level template. When the new level opens, save it to the Levels folder as MainLevel.
Setting Up the Player
Let’s now create the first-person player controller. In the Blueprints folder, create a new blueprint with the parent class of Character. Call it Player. The character parent includes many useful things for a first-person controller.
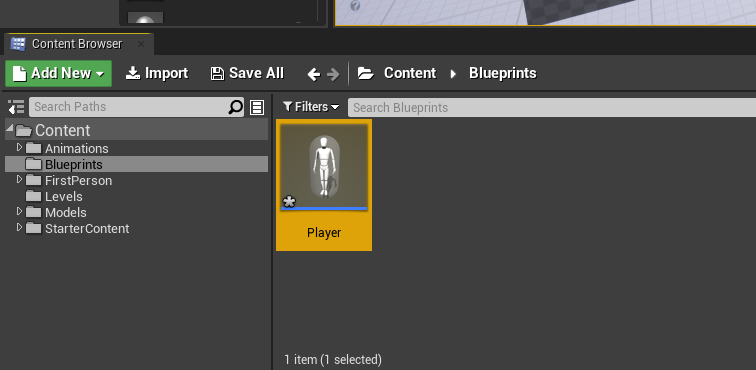
Double click it to open the player up in the blueprint editor. You’ll see we have a few components already there.
- CapsuleComponent = our collider
- ArrowComponent = forward direction
- Mesh = skeletal character mesh
- CharacterMovement = movement, jumping, etc.
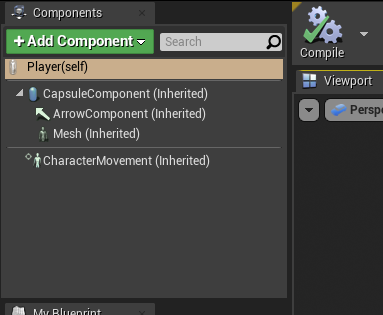
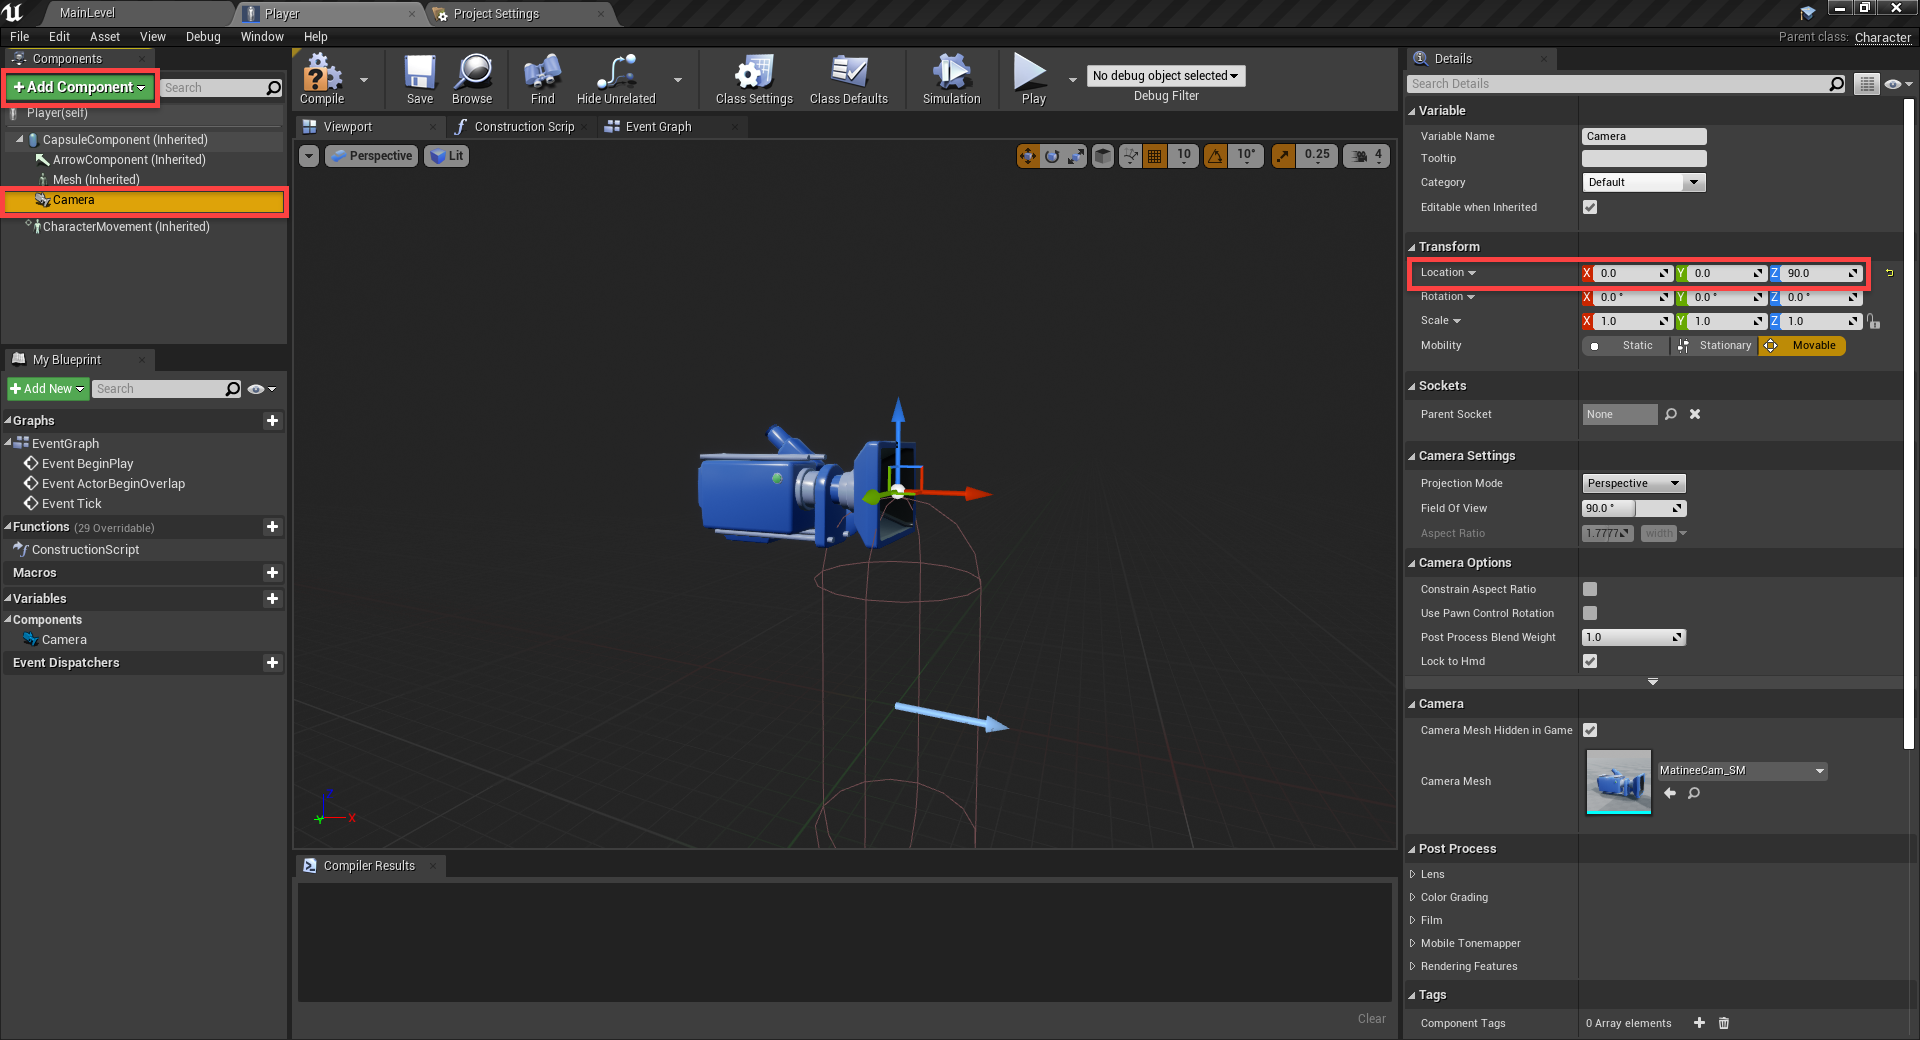
We can start by creating a new Camera component. This allows us to see through our player’s eyes into the world.
- Set the Location to 0, 0, 90 so that the camera is at the top of the collider.
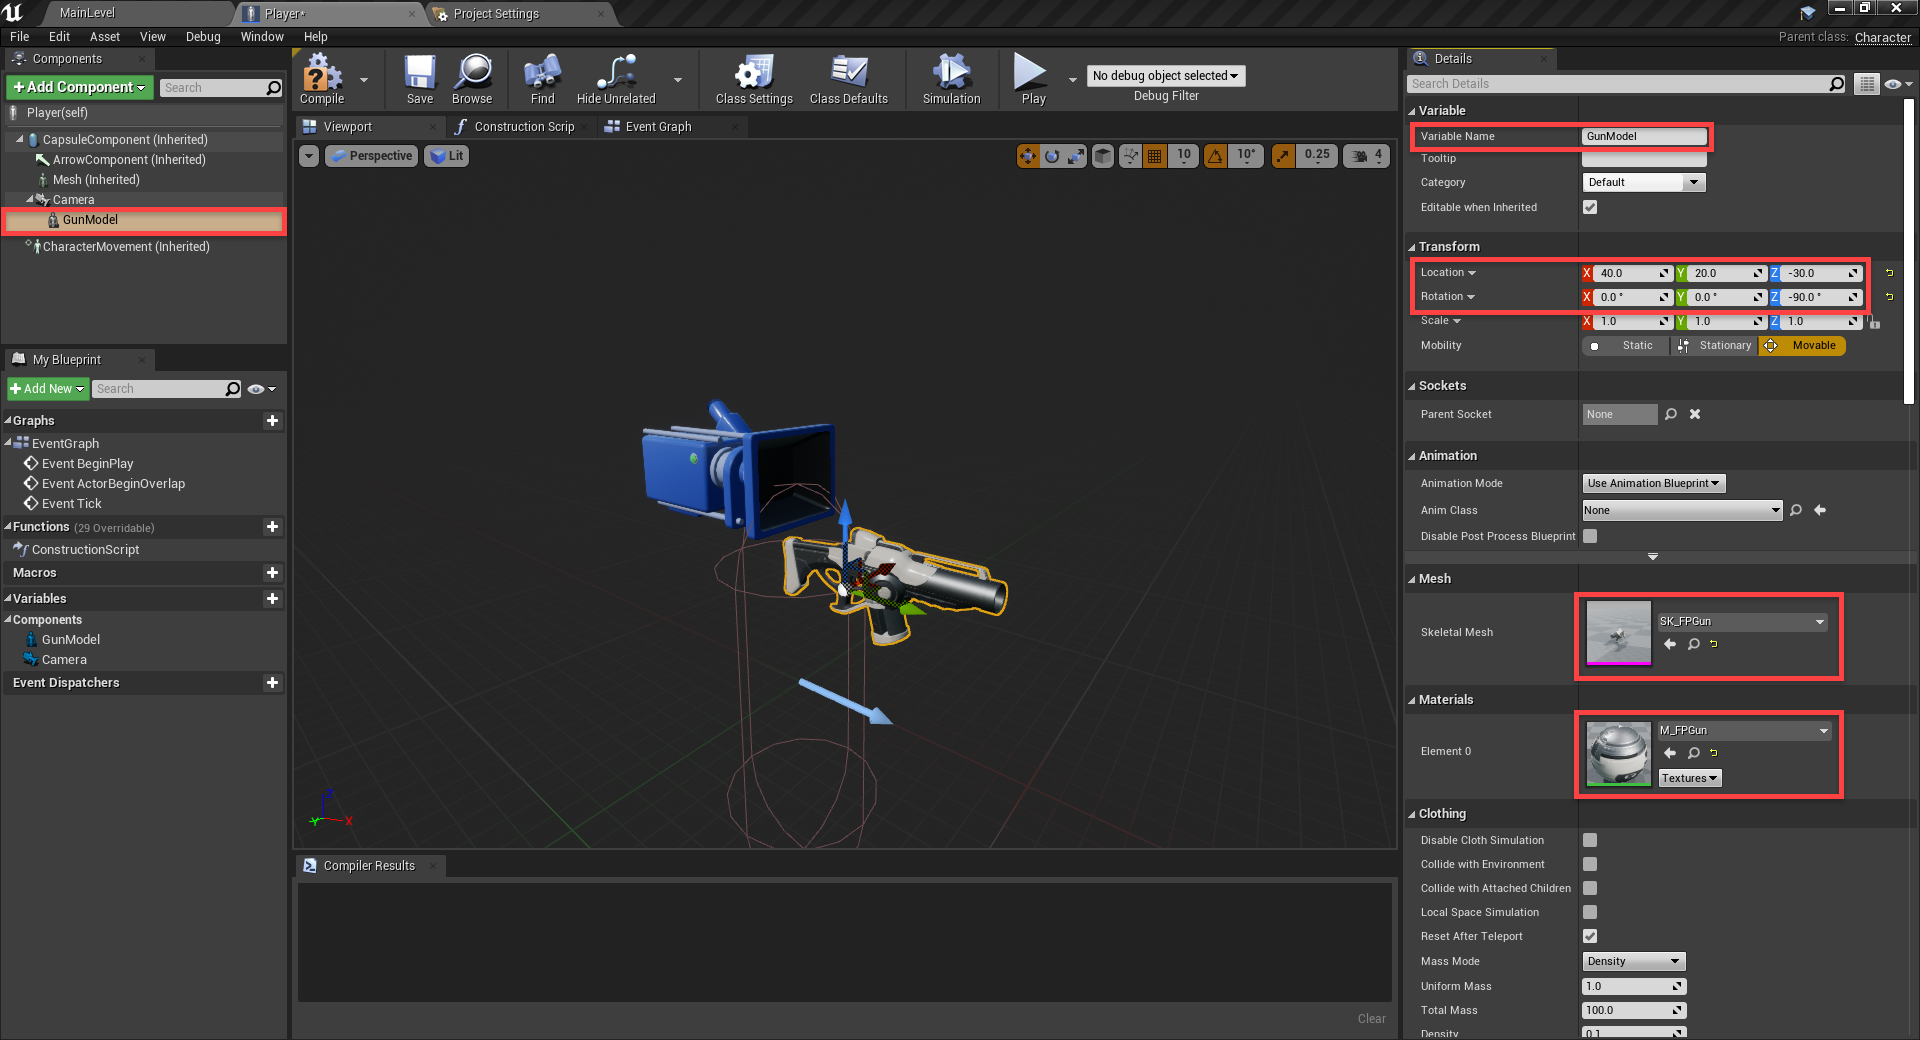
For the gun, create a Skeletal Mesh component and drag it in as a child of the camera.
- Set the Variable Name to GunModel
- Set the Location to 40, 0, -90
- Set the Rotation to 0, 0, -90
- Set the Skeletal Mesh to SK_FPGun
- Set the Material to M_FPGun
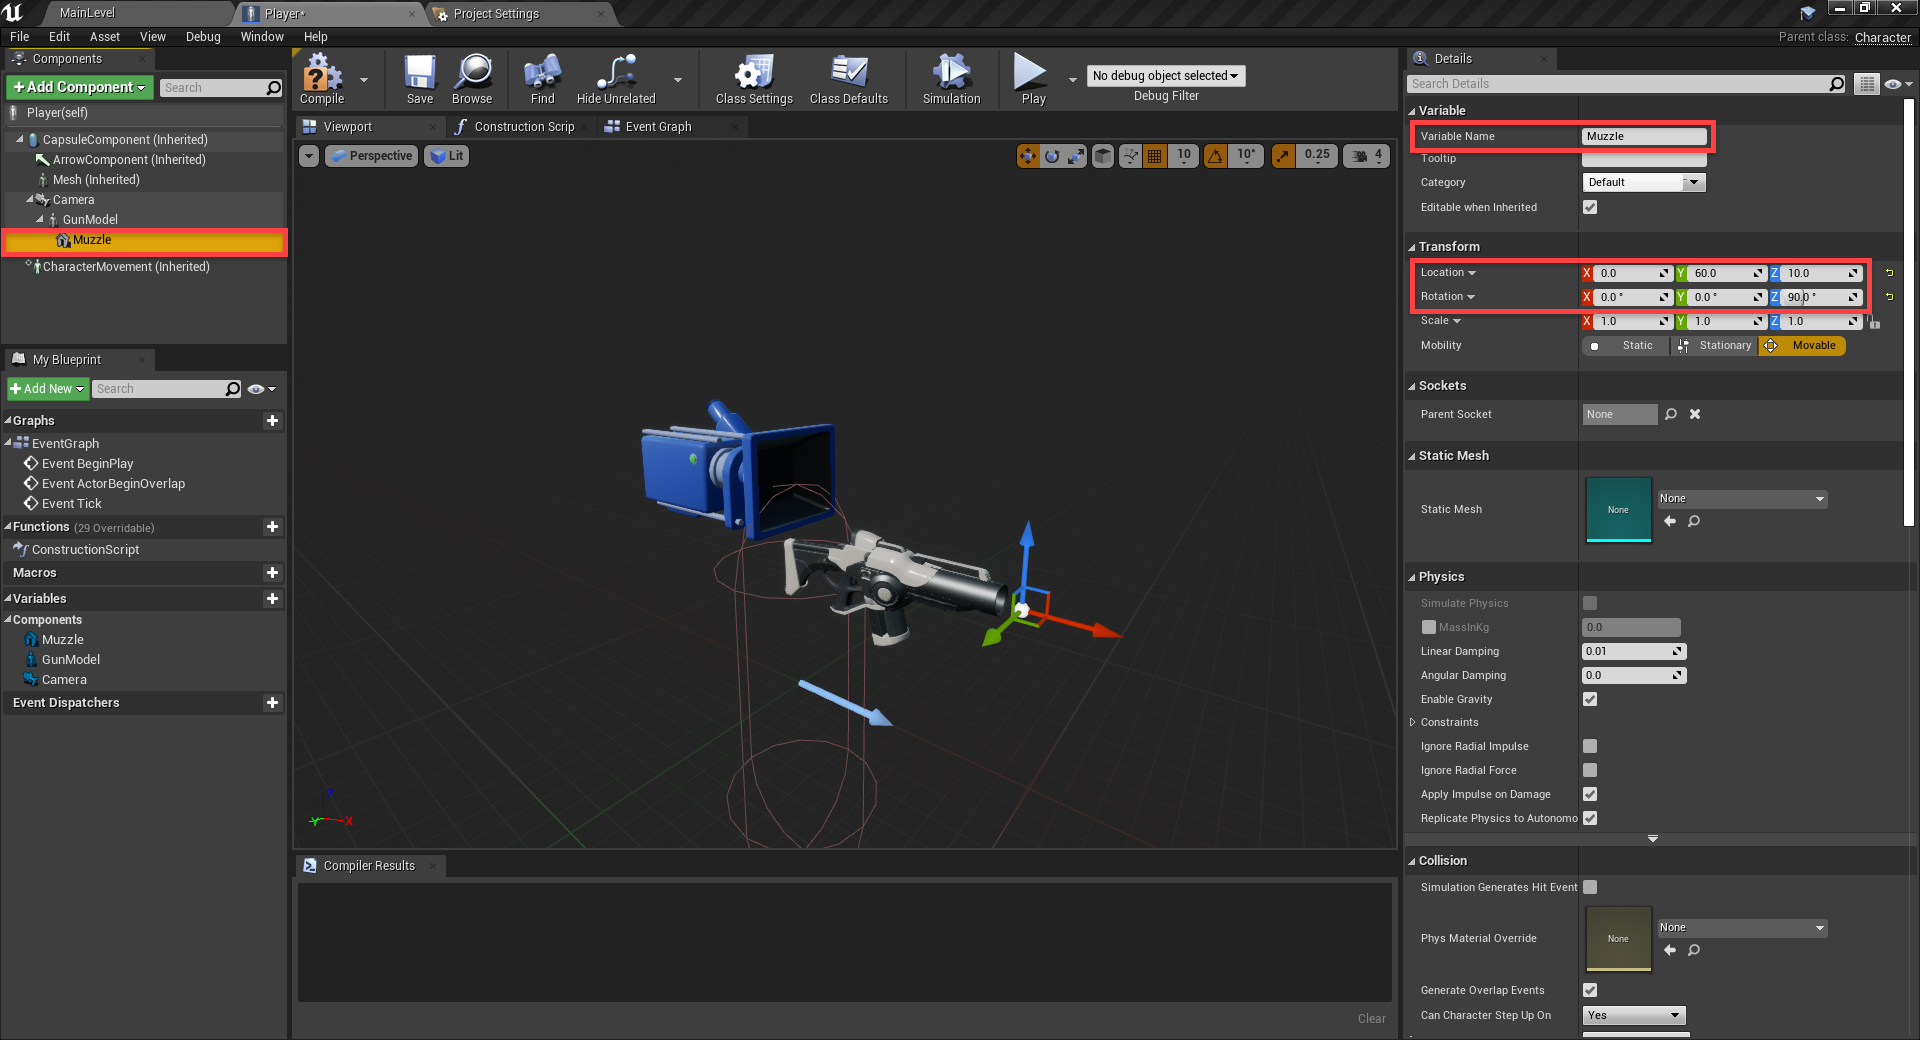
Finally, we can create the muzzle. This is a Static Mesh component which is the child of the gun model.
- Set the Variable Name to Muzzle
- Set the Location to 0, 60, 10
- Set the Rotation to 0, 0, 90
We’re using this as an empty point in space, so no model is needed.
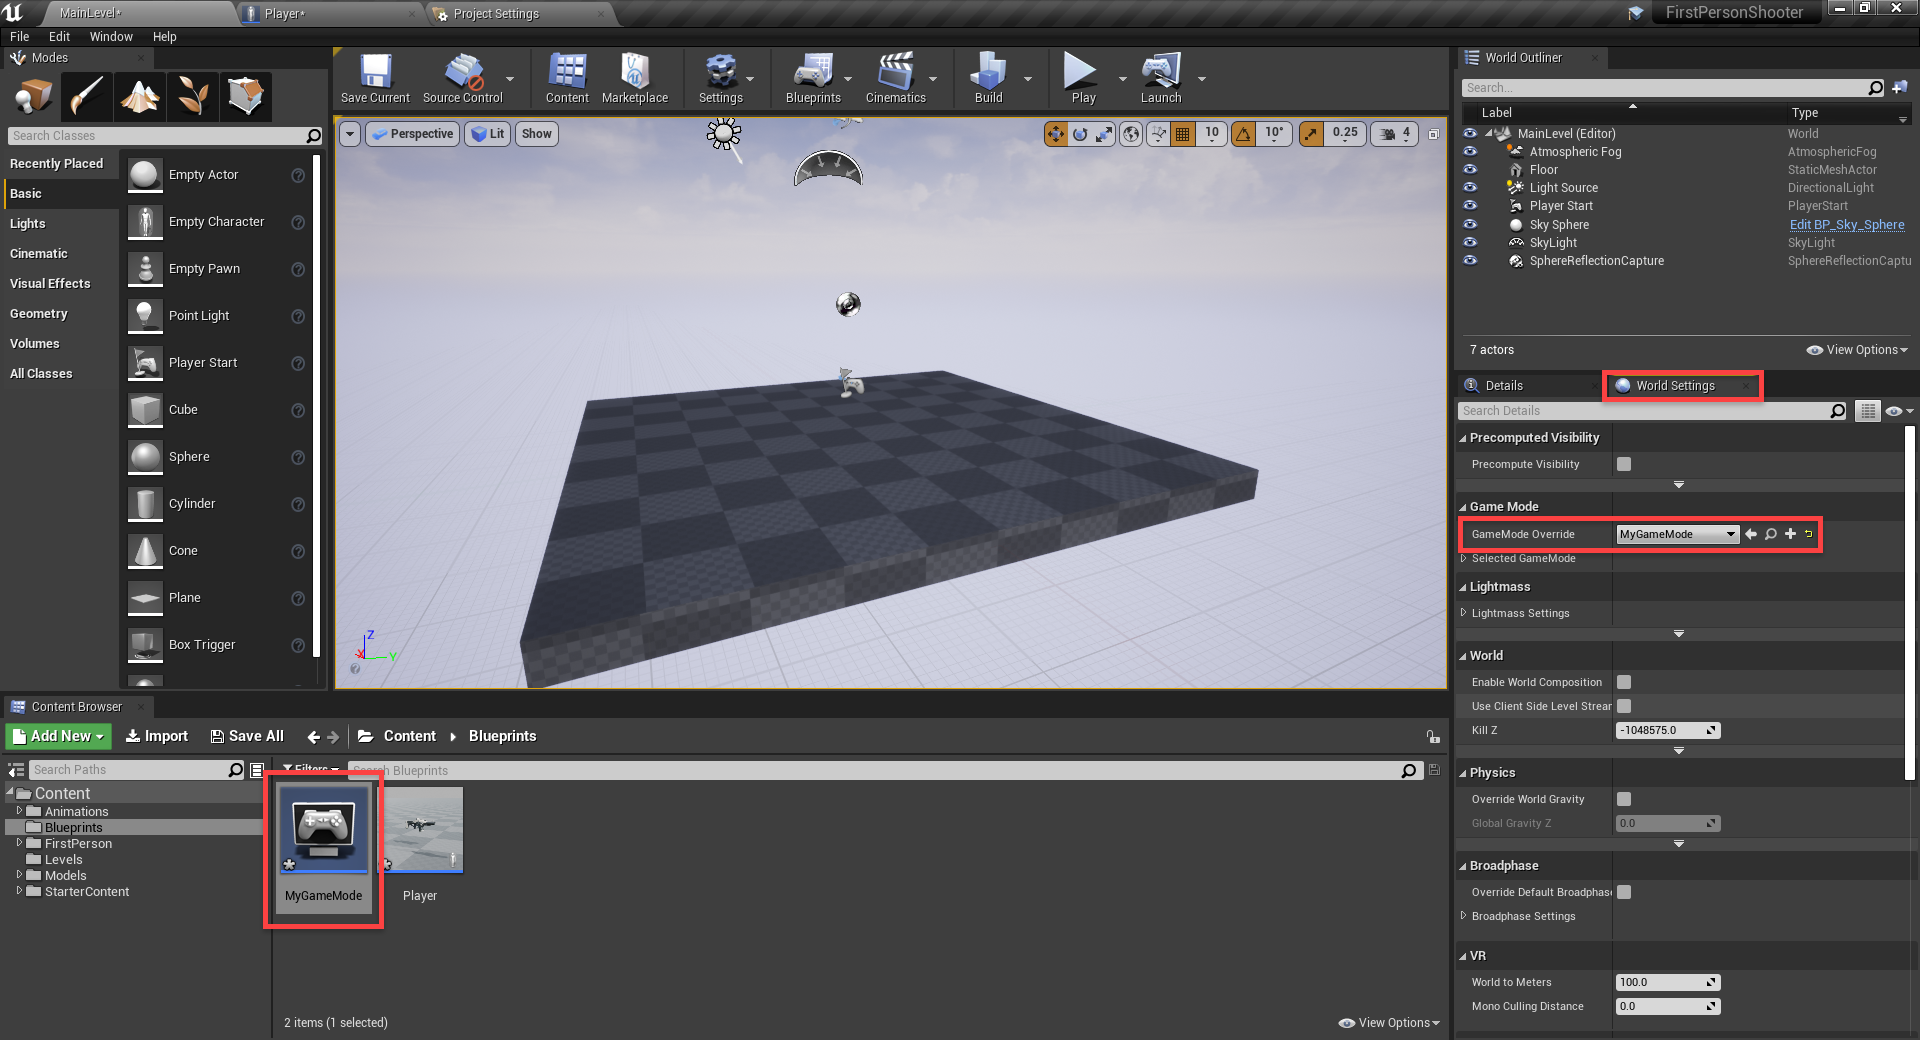
That’s it for the player’s components! In order to test this out in-game, let’s go back to the level editor and create a new blueprint. With a parent class of Game Mode Base, call it MyGameMode. This blueprint will tell the game what we want the player to be, etc.
In the Details panel, click on the World Settings tab and set the GameMode Override to be our new game mode blueprint.
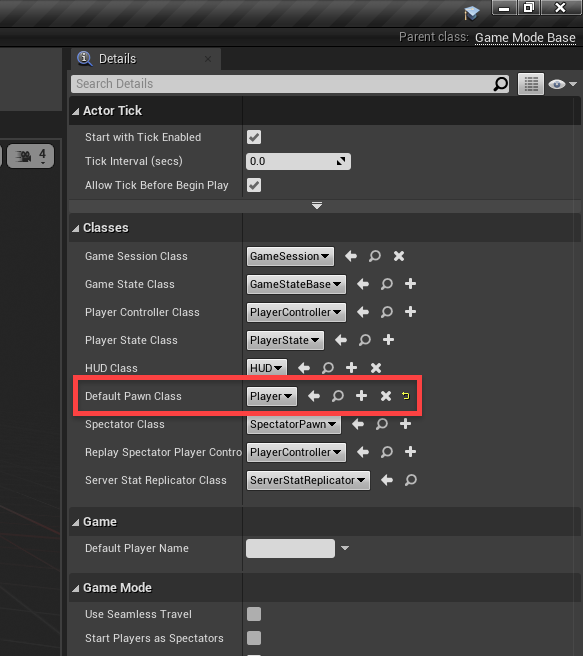
Next, double-click on the blueprint to open it up. All we want to do here is set the Default Pawn Class to be our player blueprint. Once that’s done: save, compile, then go back to the level editor.
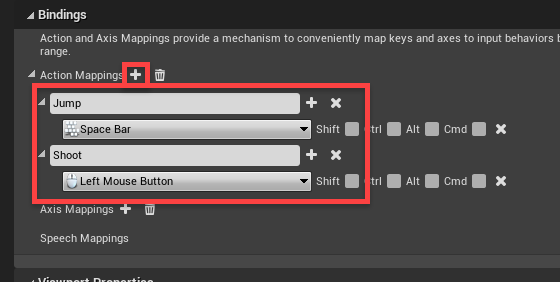
One last thing before we start creating logic for the player, and that is the key bindings. Navigate to the Project Settings window (Edit > Project Settings…) and click on the Input tab.
Create two new Action Mappings.
- Jump = space bar
- Shoot = left mouse button
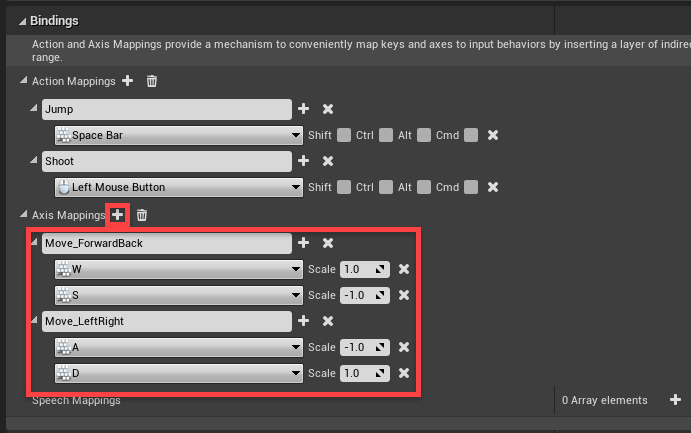
Then we want to create two Axis Mappings.
- Move_ForwardBack
- W with a scale of 1.0
- S with a scale of -1.0
- Move_LeftRight
- A with a scale of -1.0
- D with a scale of 1.0
Player Movement
Back in our Player blueprint, we can implement the movement, mouse look and jumping. Navigate to the Event Graph tab to begin.
First we have the movement. The two axis input event nodes will plug into an Add Movement Input node, which will move our player.
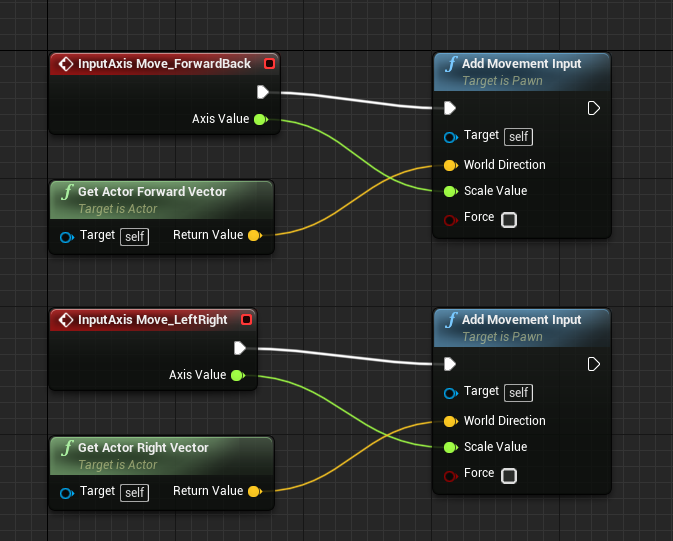
We can then press Play to test it out.
Next up, is the mouse look. We’ve got our camera and we want the ability to rotate it based on our mouse movement. We want this to be triggered every frame so start out with an Event Tick node.
This then plugs into an AddControllerYawInput and an AddControllerPitchInput. These nodes will rotate the camera along the Z and Y axis’. The amount will be based on the mouse movement multiplied by 1 and -1. -1 because the mouse Y value inverts the camera movement.

If you press play, you’ll see that you can look left to right, but not up and down. To fix this, we need to tell the blueprint that we want to the camera to use the pawn’s control rotation. Select the Camera and enable Use Pawn Control Rotation.
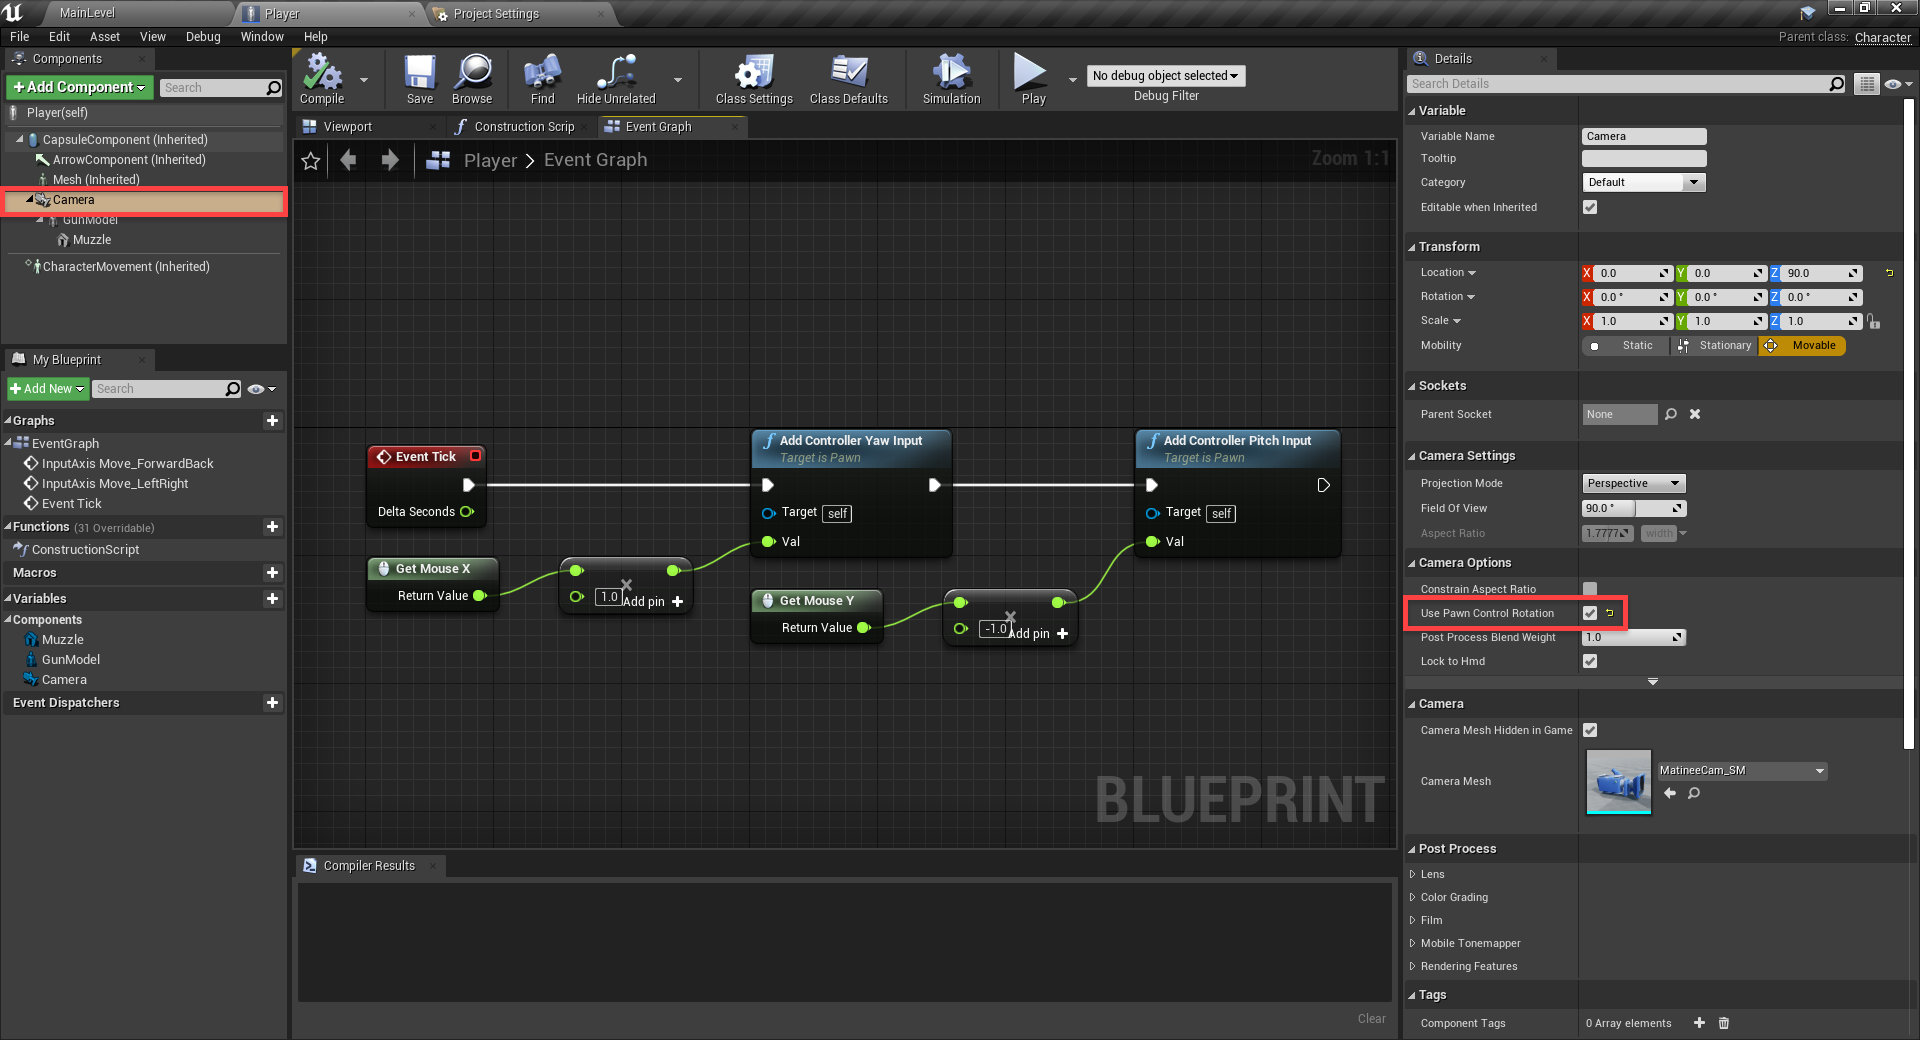
Now when you press play, you should be able to move and look around!
Jumping is relatively easy since we don’t need to manually calculate whether or not we’re standing on the ground. The CharacterMovement component has many build in nodes for us to do this easily.
Create the InputAction Jump node which is an event that gets triggered when we press the jump button. We’re then checking if we’re moving on ground (basically, are we standing on the ground). If so, jump!

We can change some of the jump properties. Select the CharacterMovement component.
- Set the Jump Z Velocity to 600
- Set the Air Control to 1.0
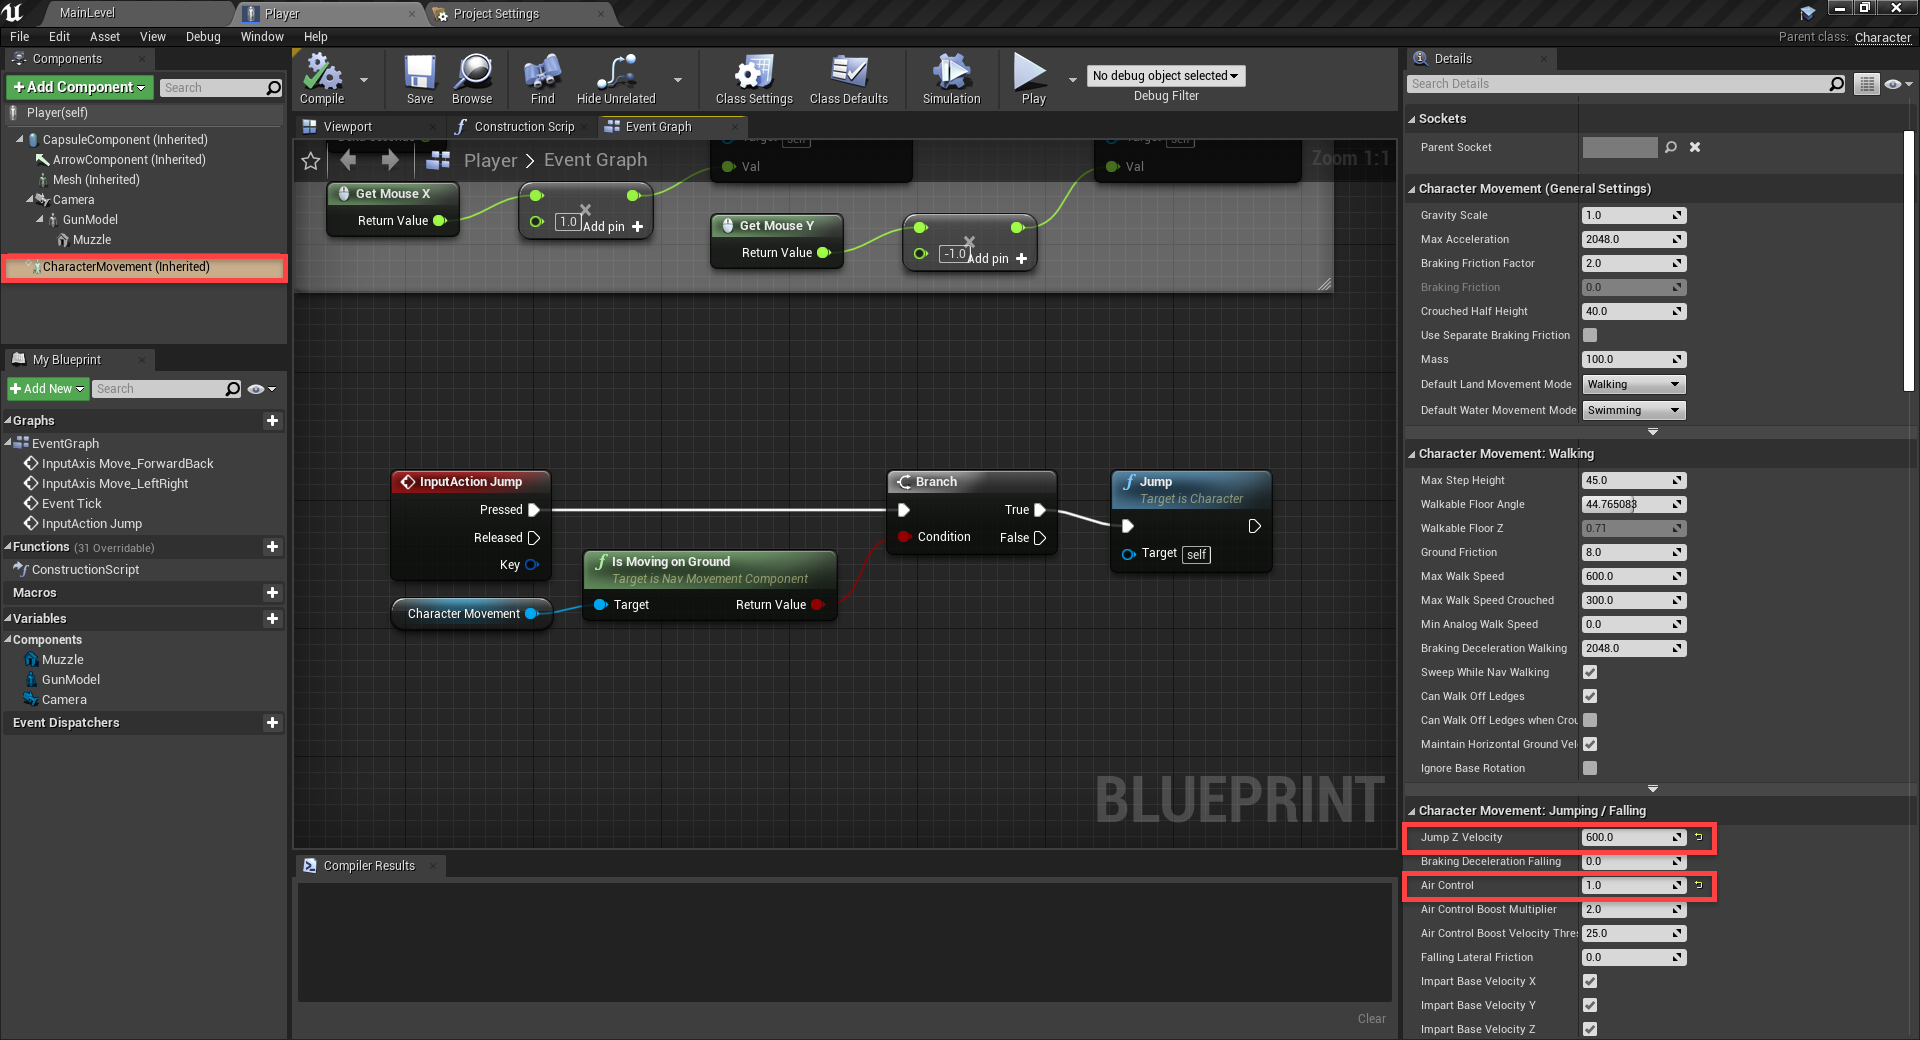
You can tweak the many settings on the component to fine tune your player controller.
Creating a Bullet Blueprint
Now it’s time to start on our shooting system. Let’s create a new blueprint with a parent type of Actor. Call it Bullet.
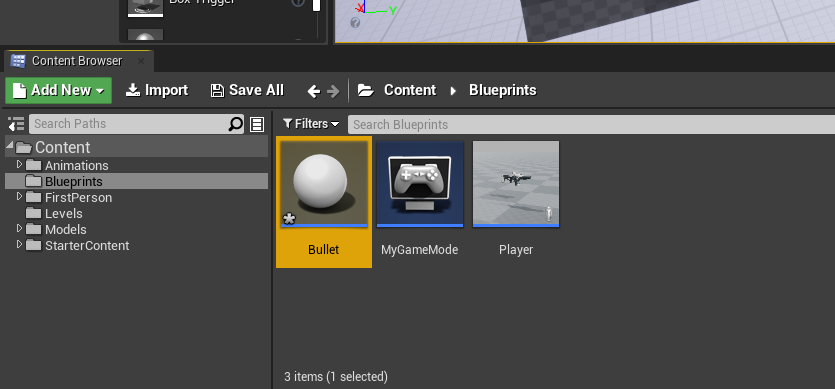
Open it up in the blueprint editor. First, let’s create a new Sphere Collision component and drag it over the root node to make it the parent.
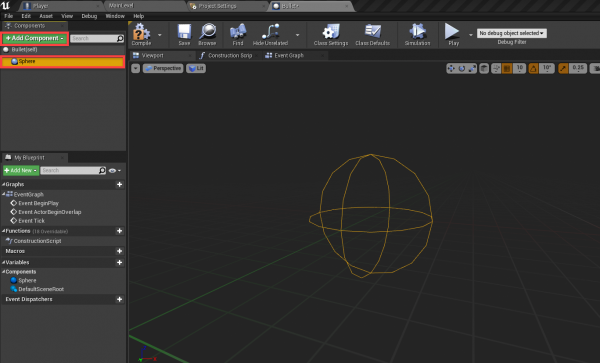
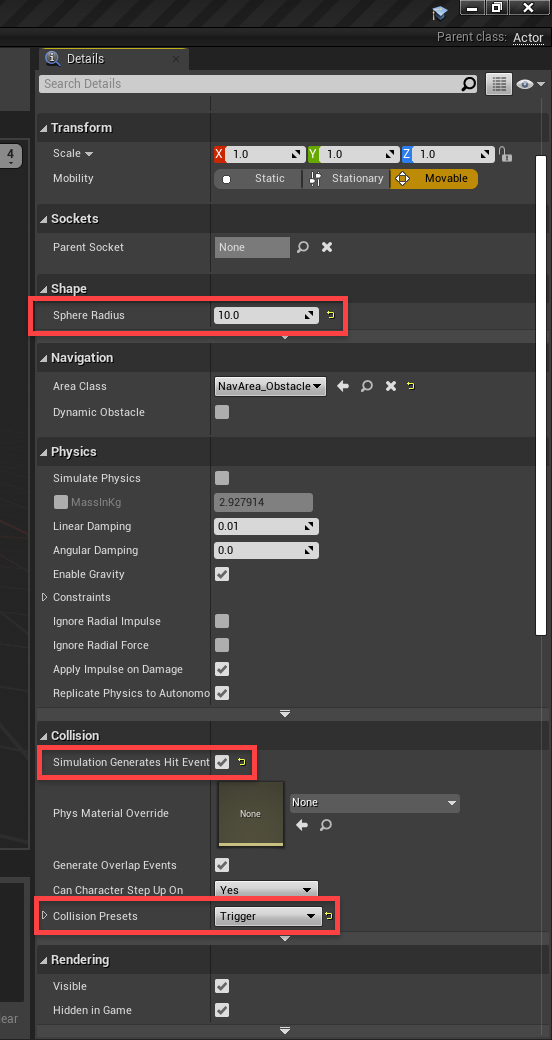
In the Details panel…
- Set the Sphere Radius to 10
- Enable Simulation Generates Hit Events
- Set the Collision Presets to Trigger
Now we have the ability to detect collisions when the collider enters another object.
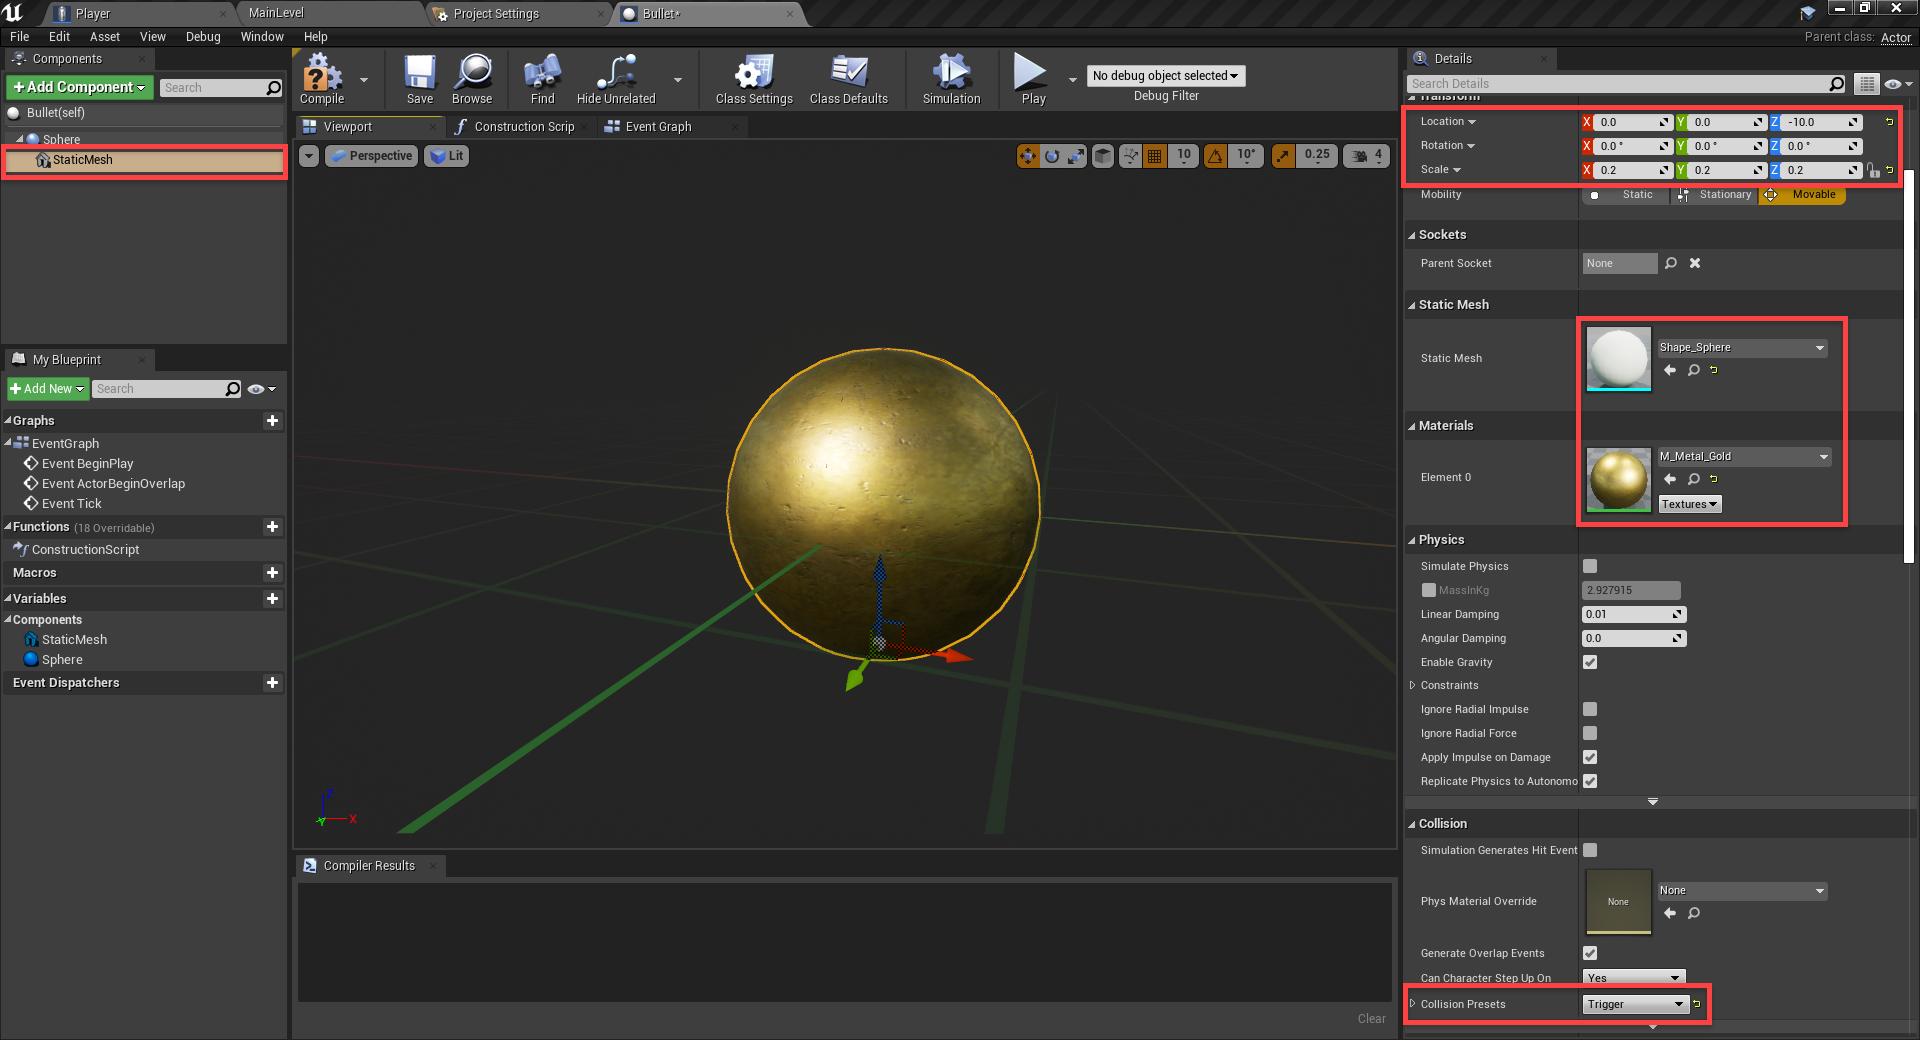
Next, create a new component of type Static Mesh.
- Set the Location to 0, 0, -10
- Set the Scale to 0.2, 0.2, 0.2
- Set the Static Mesh to Shape_Sphere
- Set the Material to M_Metal_Gold
- Set the Collision Presets to Trigger
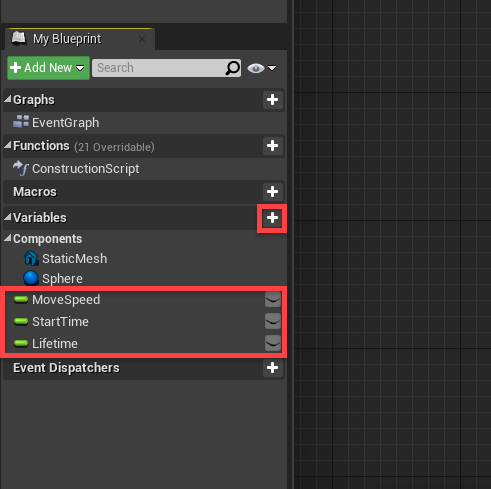
Go over to the Event Graph tab and we can begin with out variables.
- MoveSpeed (Float)
- StartTime (Float)
- Lifetime (Float)
Then click the Compile button. This will allow us to now set some default values.
- MoveSpeed = 5000.0
- Lifetime = 2.0
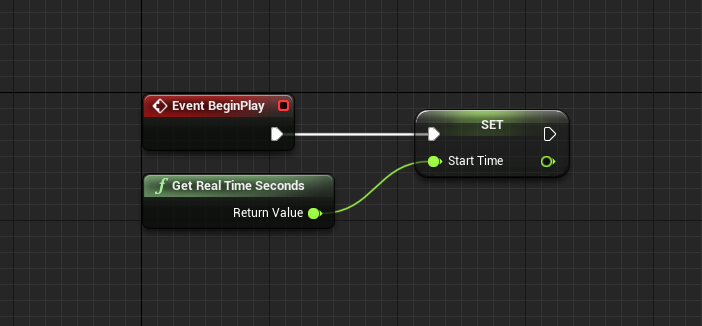
We want our bullet to destroy itself after a set amount of time so that if we shoot the sky, it won’t go on forever. So our first set of nodes is going to set the start time variable at the start of the game.
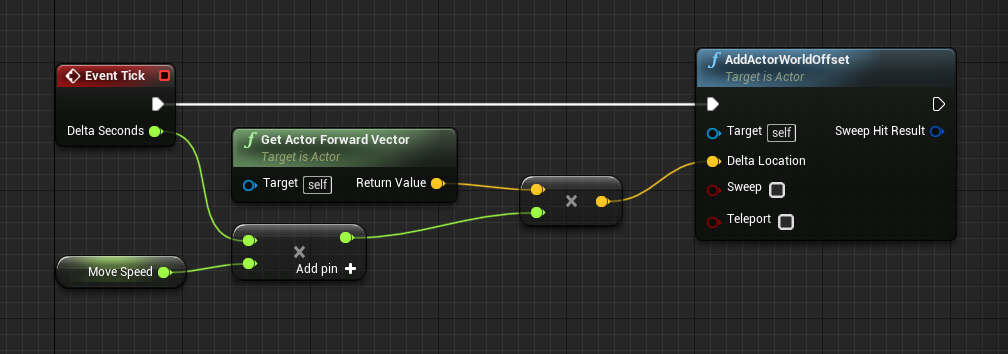
Over time, we want to move the bullet forward. So we’ll have the event tick node plug into an AddActorWorldOffset node. This adds a vector to our current location, moving us. The delta location is going to be our forward direction, multiplied by our move speed. You’ll see that we’re also multiplying by the event tick’s Delta Seconds. This makes it so the bullet will move at the same speed, no matter the frame rate.
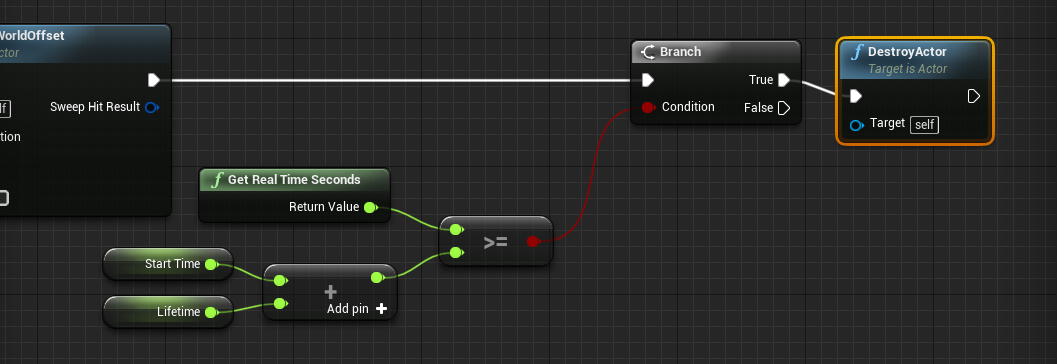
Connect the flow to a Branch node. We’ll be checking each frame if the bullet has exceeded its lifetime. If so, we’ll destroy it.
All the bullet needs now, is the ability to hit enemies. But we’ll work on that once enemies are implemented.
Shooting Bullets
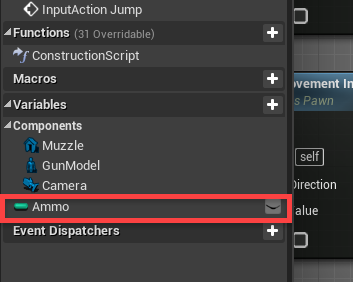
Back in our Player blueprint, let’s implement shooting. First, we need to create an integer variable called Ammo. Compile, and set the default value to 20.
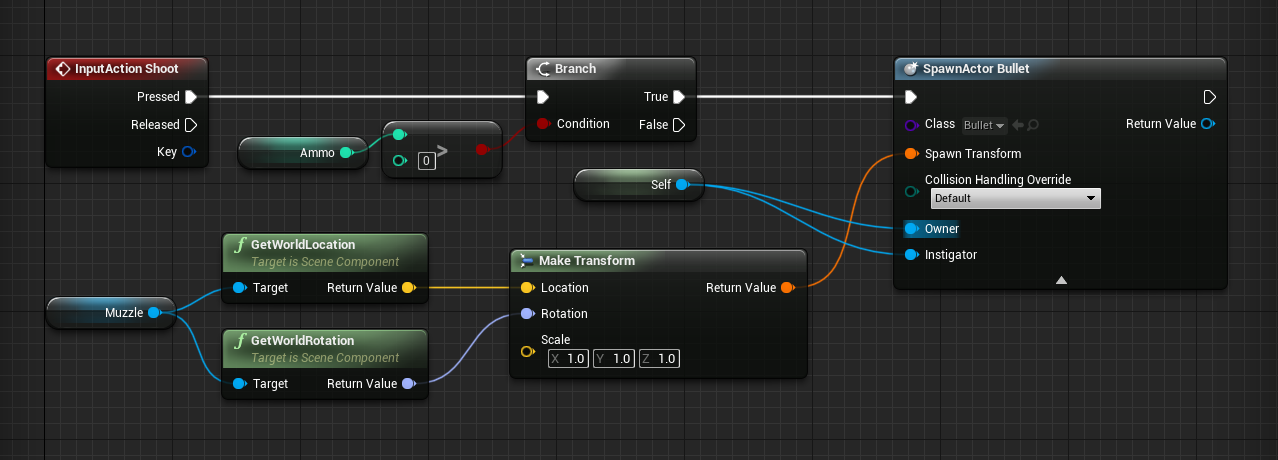
To begin, let’s add in the InputAction Shoot node. This gets triggered when we press the left mouse button. Then we’re going to check if we’ve got any ammo. If so, the SpawnActor node will create a new object. Set the Class to Bullet.

Next, we need to give the SpawnActor blueprint a spawn transform, owner and instigator. For the transform, we’ll make a new one. The location is going to be the muzzle and the rotation is going to be the muzzle’s rotation. For the owner and instigator, create a Get a Reference to Self node.
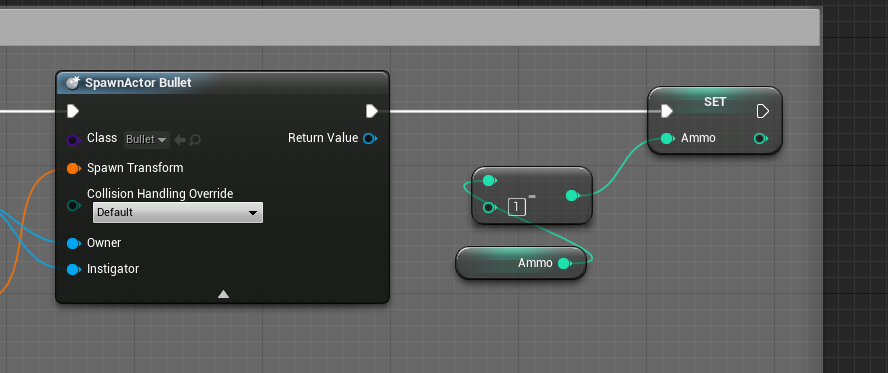
Finally, we can subtract 1 from our ammo count.
We can now press play and see that the gun can shoot!
Creating the Enemy
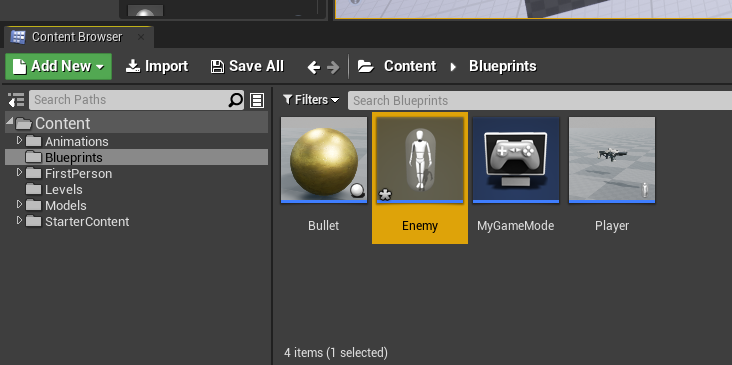
Now it’s time to create the enemy and its AI. Create a new blueprint with the parent class of Character. Call it Enemy.
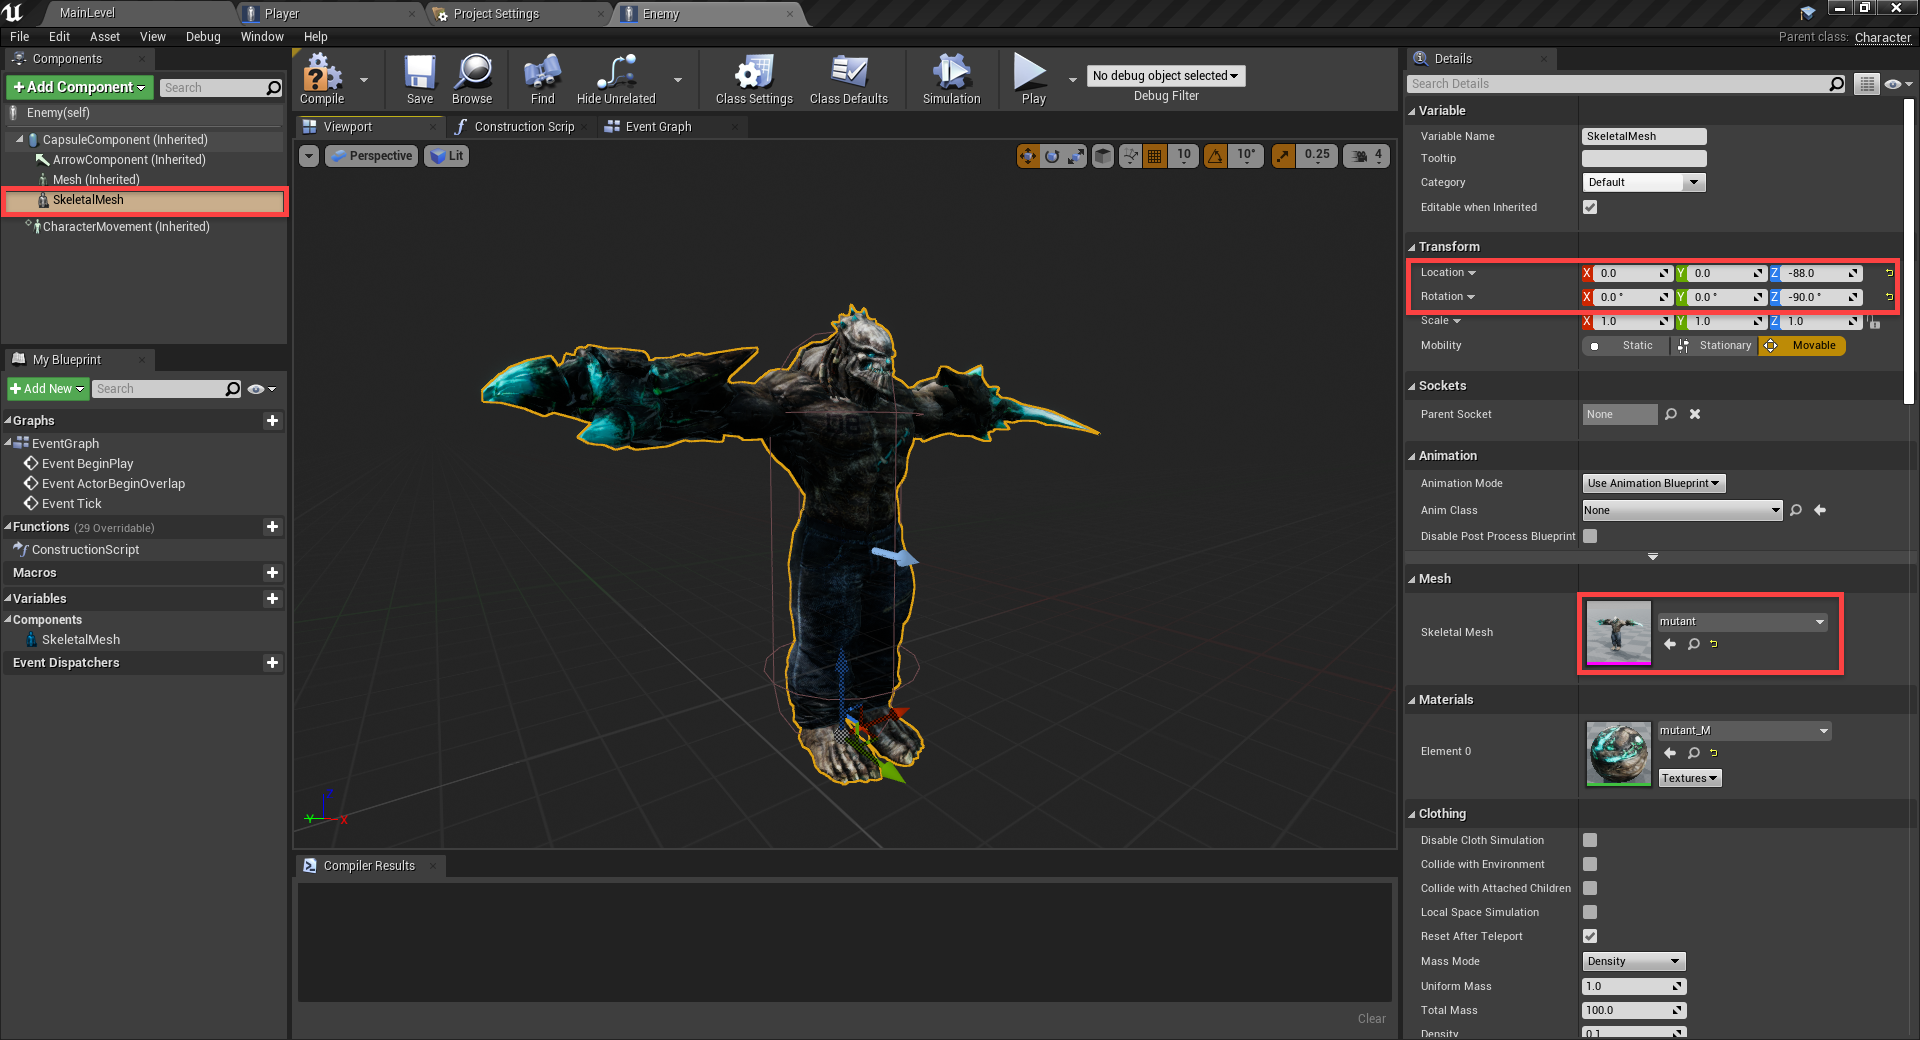
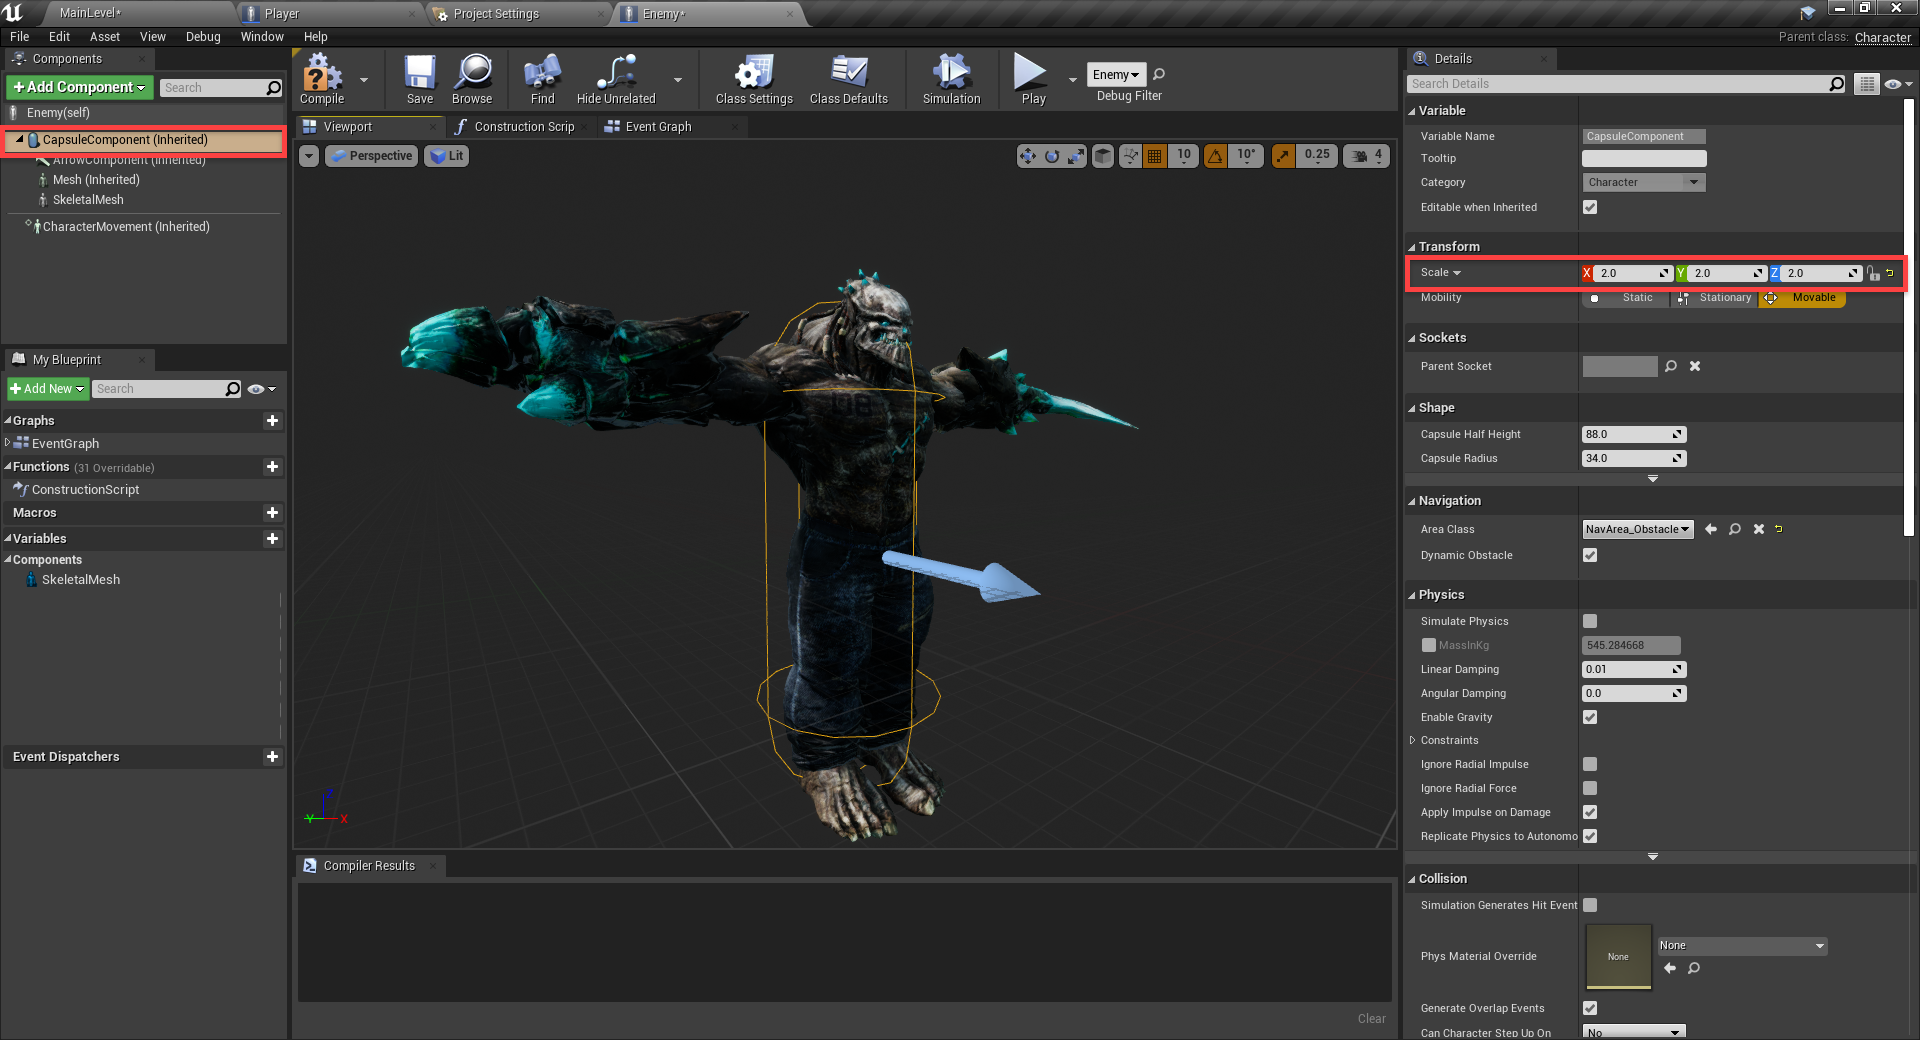
Inside of the blueprint, create a new Skeletal Mesh component.
- Set the Location to 0, 0, -88
- Set the Rotation to 0, 0, -90
- Set the Skeletal Mesh to mutant
Select the CapsuleComponent and set the Scale to 2. This will make the enemy bigger than the player.
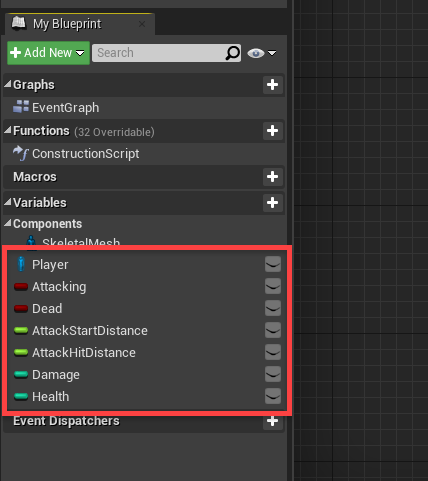
Next, let’s go over to the Event Graph and create our variables.
- Player (Player)
- Attacking (Boolean)
- Dead (Boolean)
- AttackStartDistance (Float)
- AttackHitDistance (Float)
- Damage (Integer)
- Health (Integer)
Hit the Compile button, then we can set some default values.
- AttackStartDistance = 300.0
- AttackHitDistance = 500.0
- Health = 10
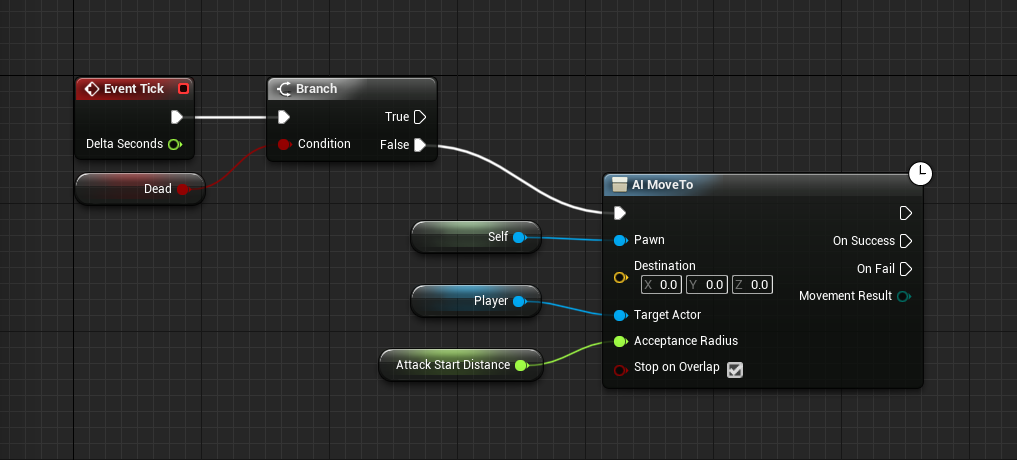
Let’s get started. First, we want to be using the Event Tick node which triggers every frame. If we’re not dead, then we can move towards the player. Fill in the properties as seen below.
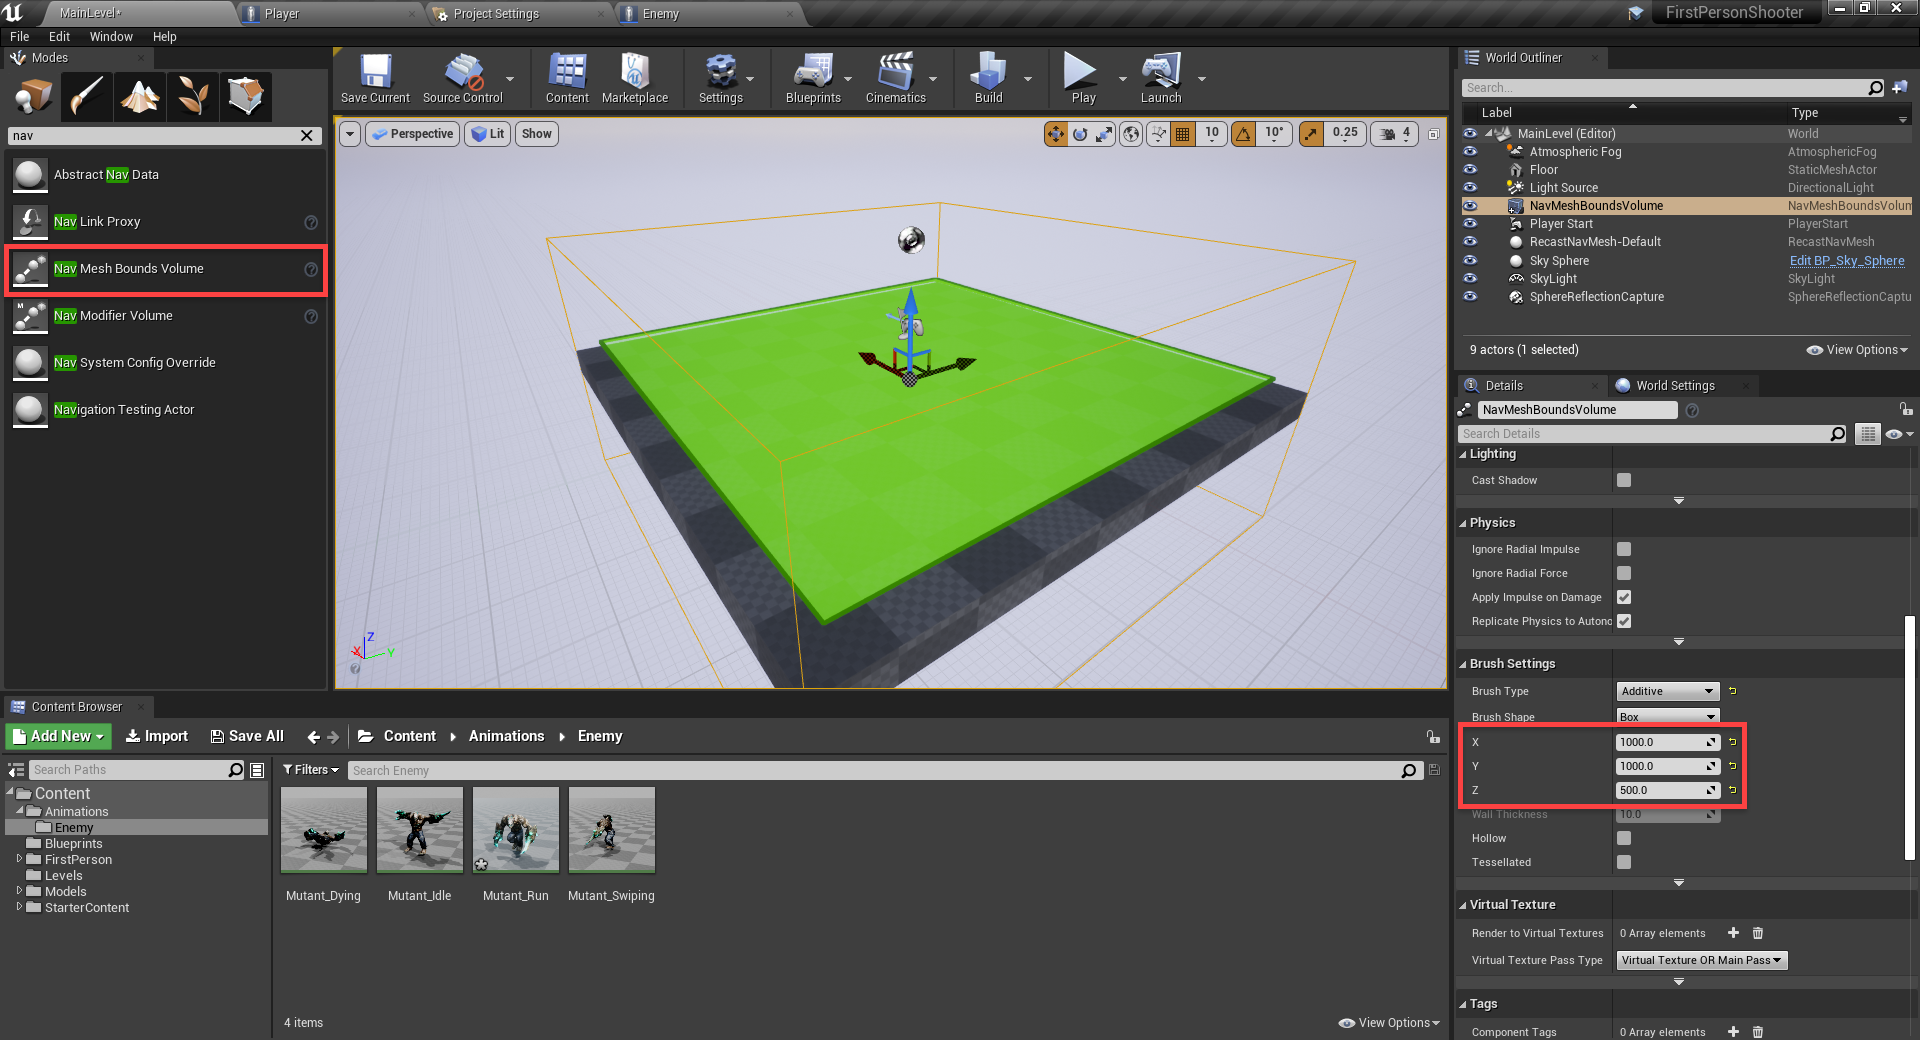
Back in the level editor, we need to generate a nav-mesh for the enemy to move along.
- In the Modes panel, search for the Nav Mesh Bounds Volume and drag it into the scene
- Set the X and Y size to 1000
- Set the Z size to 500
You can press P to toggle the nav-mesh visualizer on or off.
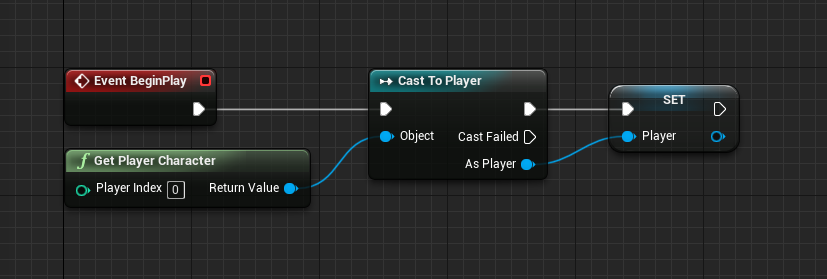
You can also increase the size of the platform and nav mesh bound. Back in the enemy blueprint, let’s make it so when the game starts, we set our player variable.
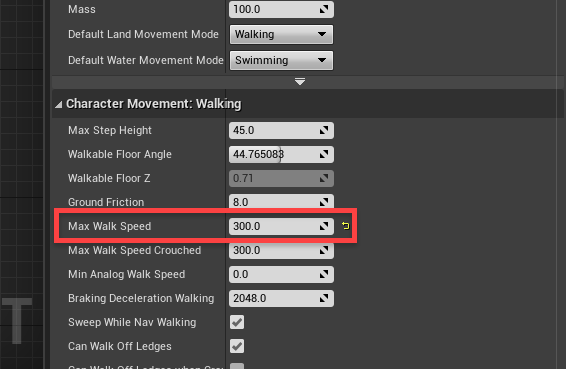
Finally, let’s select the CharacterMovement component and change the Max Walk Speed to 300.
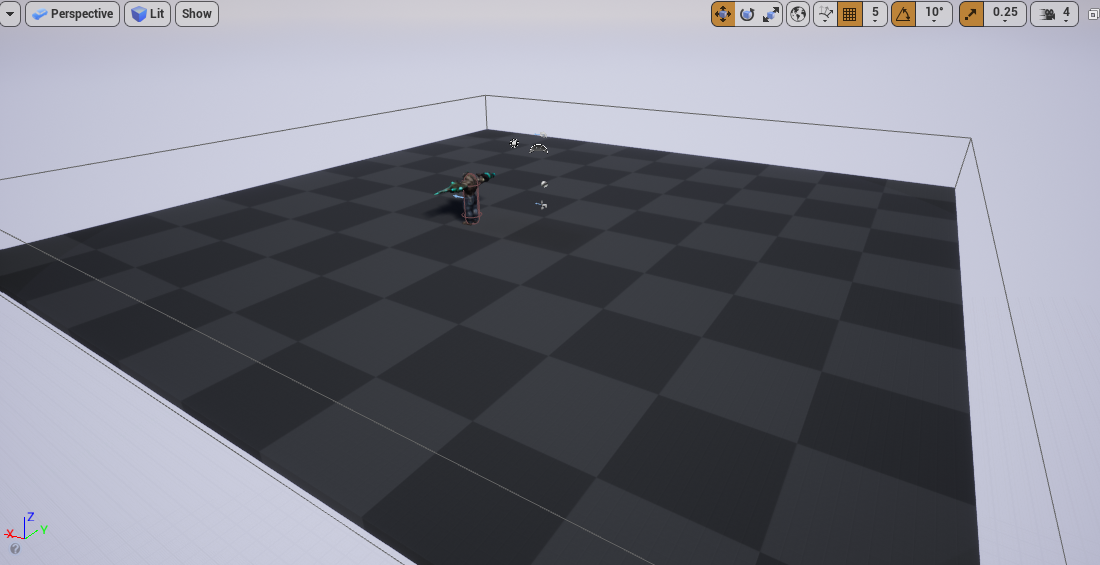
Back in the level editor, let’s increase the size of the ground and nav mesh bounds.
Let’s set some default values for the variables.
- AttackStartDistance = 300.0
- AttackHitDistance = 500.0
- Damage = 1
- Health = 10
Enemy Animations
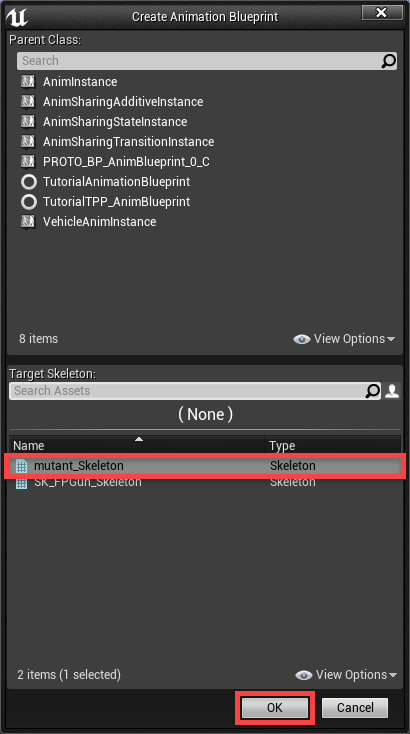
Next, is to create the enemy animations and have those working. In the Blueprints folder, right click, select Animation > Animation Blueprint. Select the mutant for our skeleton, then click Ok. Call this blueprint: EnemyAnimator.
Double-clicking on it will open up the animation editor. On the top-left, we have a preview of our skeleton. At the bottom-left, we have a list of our 4 animations. You can open them up to see a preview in action.
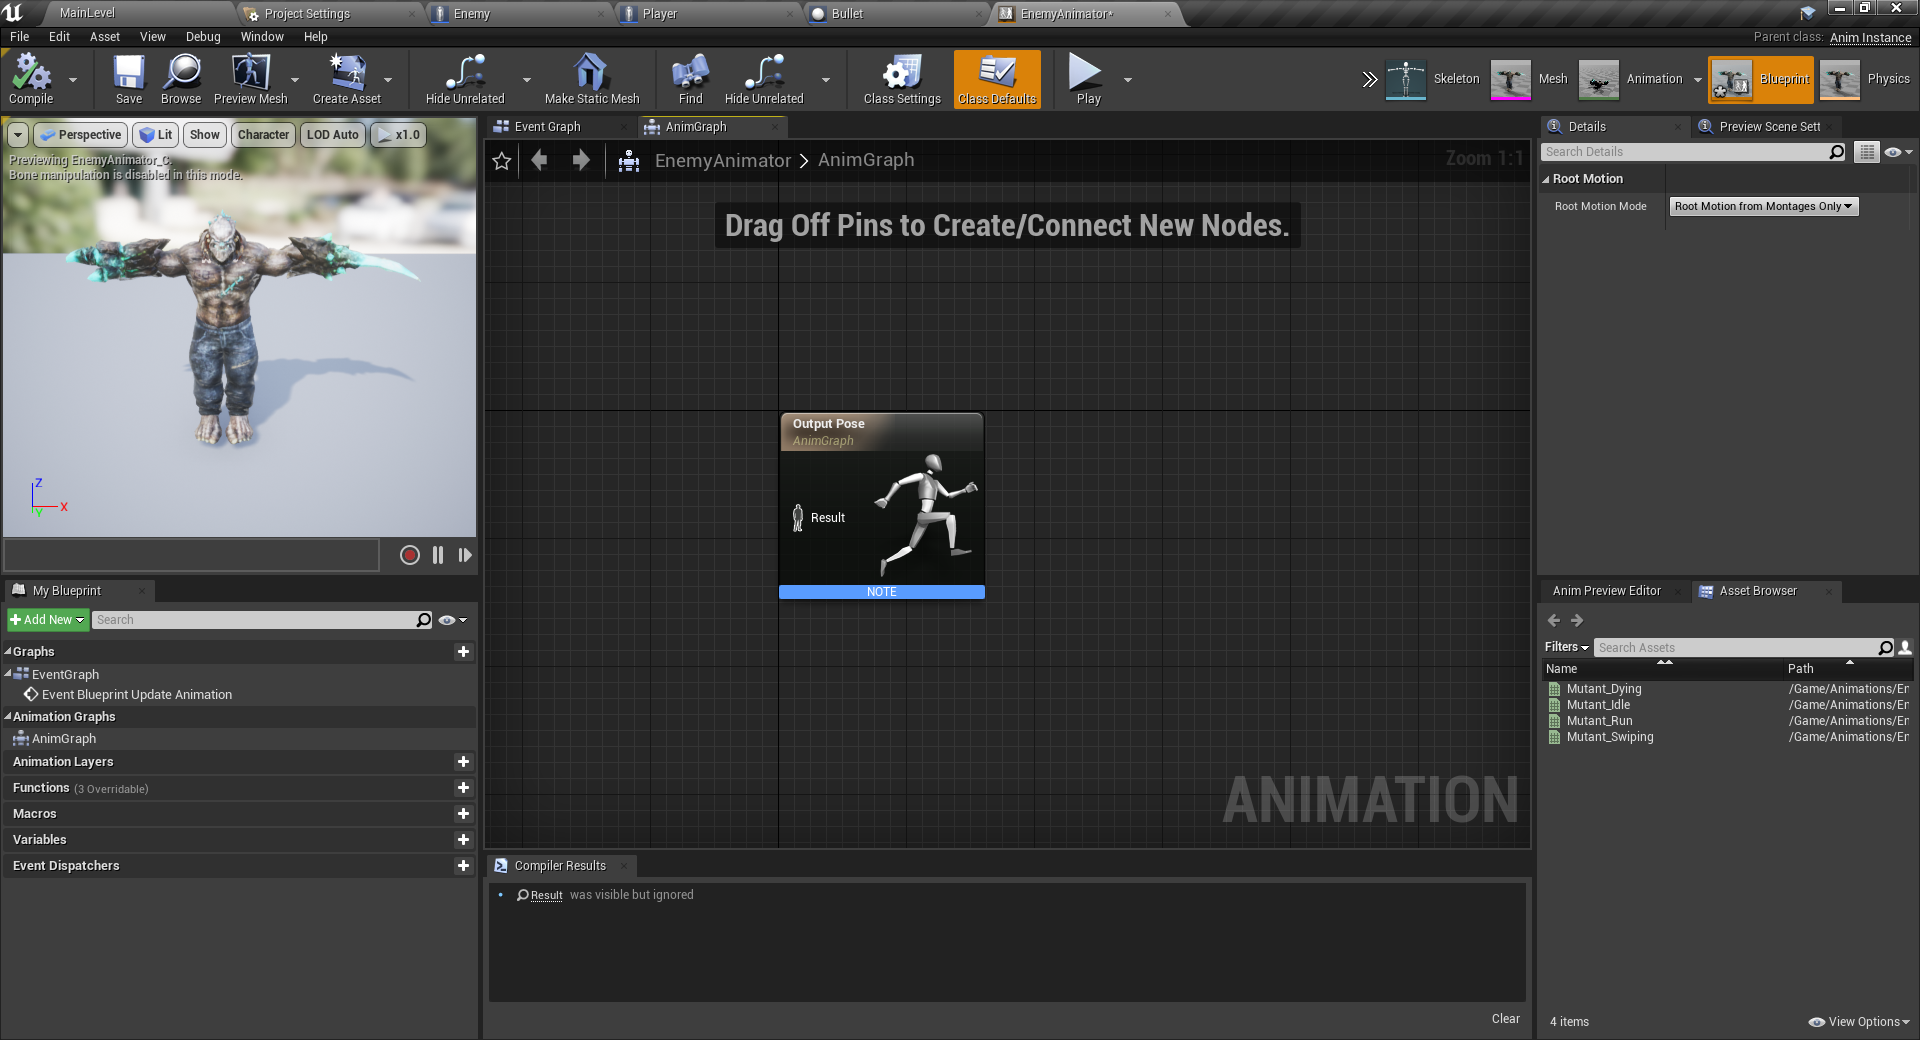
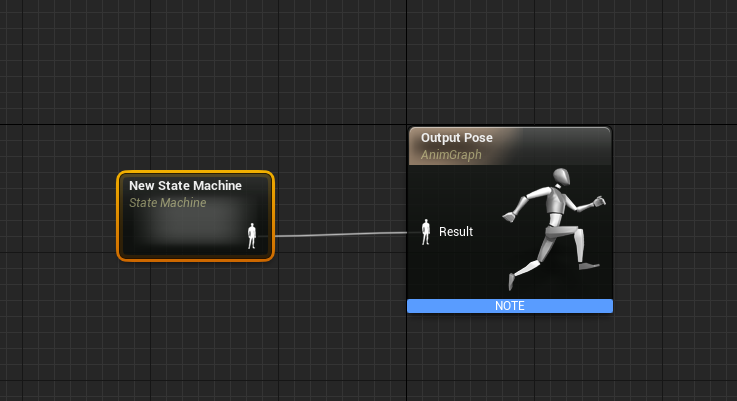
What we want to do now, is in the center graph, right click and create a new state machine. A state machine is basically a collection of logic to determine what animation we currently need to play.
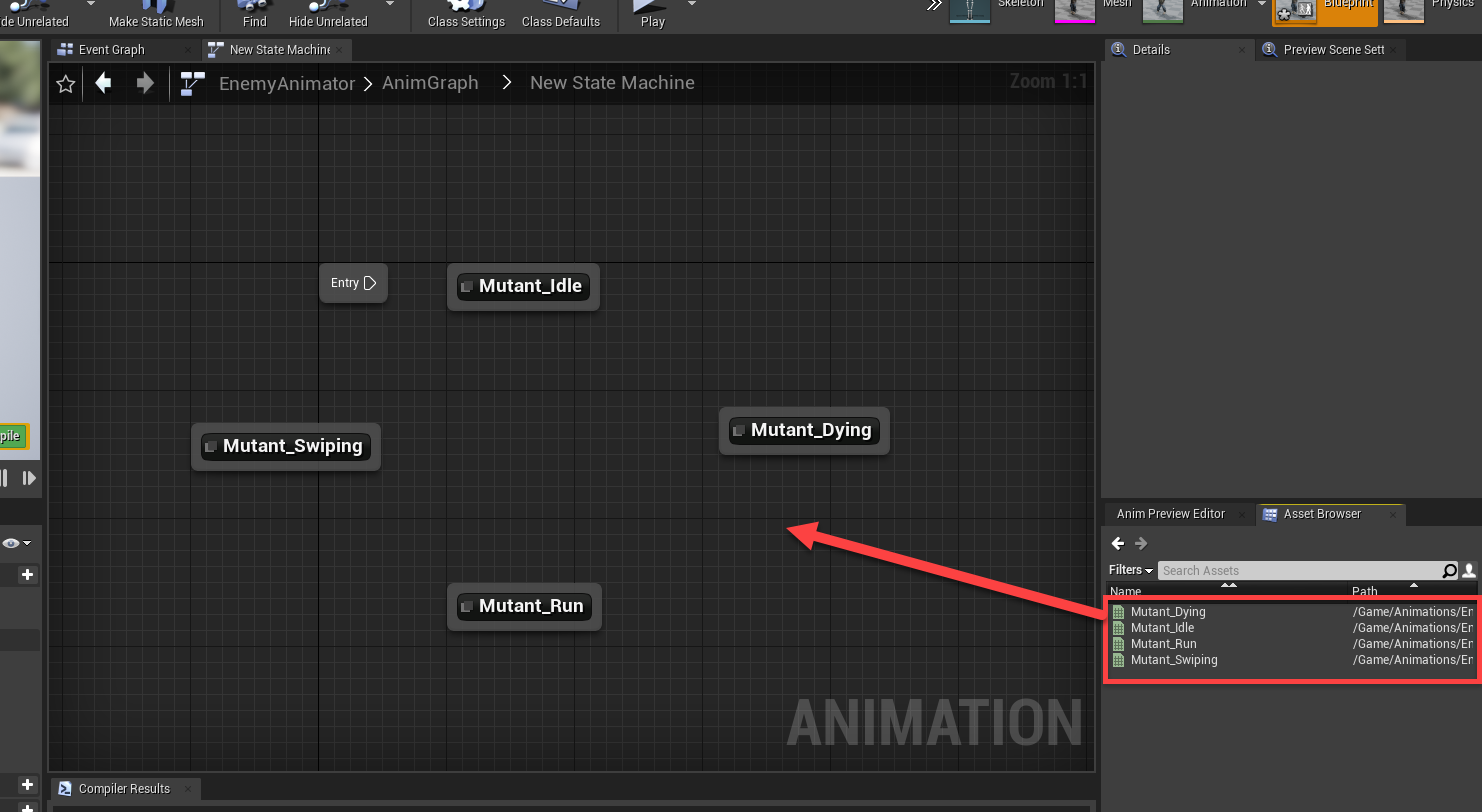
You can then double-click on the state machine to go inside of it. This is where we’re going to connect our animations so that the animator can move between them in-game. Begin by dragging in each of the 4 animations.
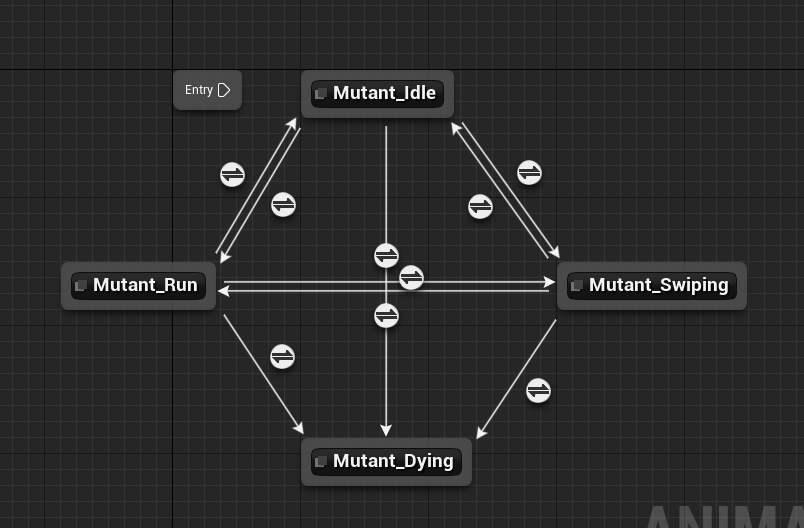
Then we need to think… If we’re idle, what animations can we transition to? All of them, so on the idle state, click and drag on the border to each of the three others.
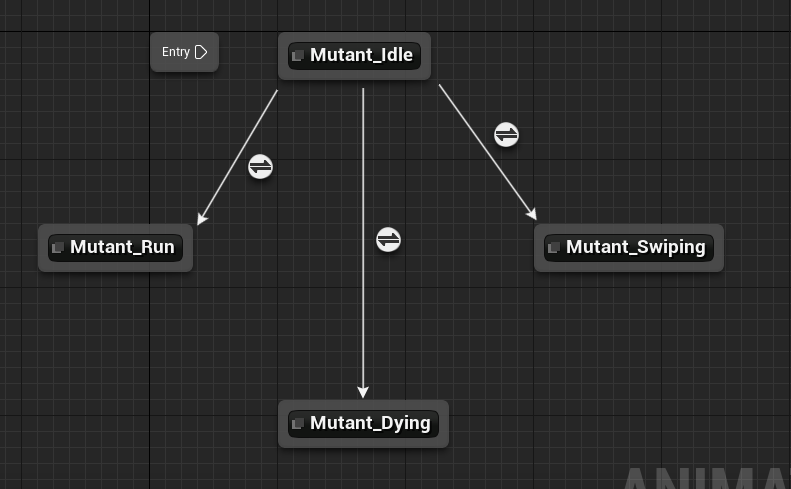
We then need to do the same with the other states. Make the connections look like this:
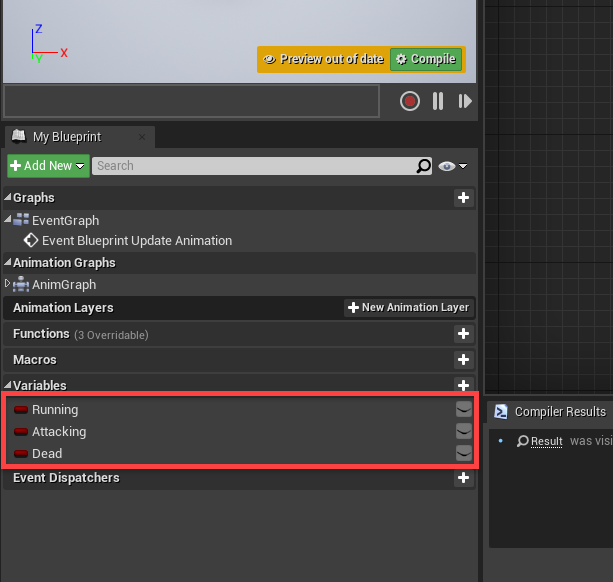
In order to apply logic, we need to create three new Boolean variables. Running, Attacking and Dead.
You’ll see that next to the state transition lines is a circle button. Double-click on the one for idle -> run. This will open up a new screen where we can define the logic of moving along this transition. Drag in the Running variable and plug that into the Can Enter Transform node. So basically if running is true, then the transition will happen.
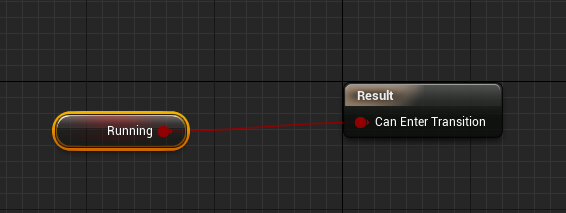
Back in the state machine open the run -> idle transition. Here, we want to do the opposite.

Go through and fill in the respective booleans for all of the transitions.
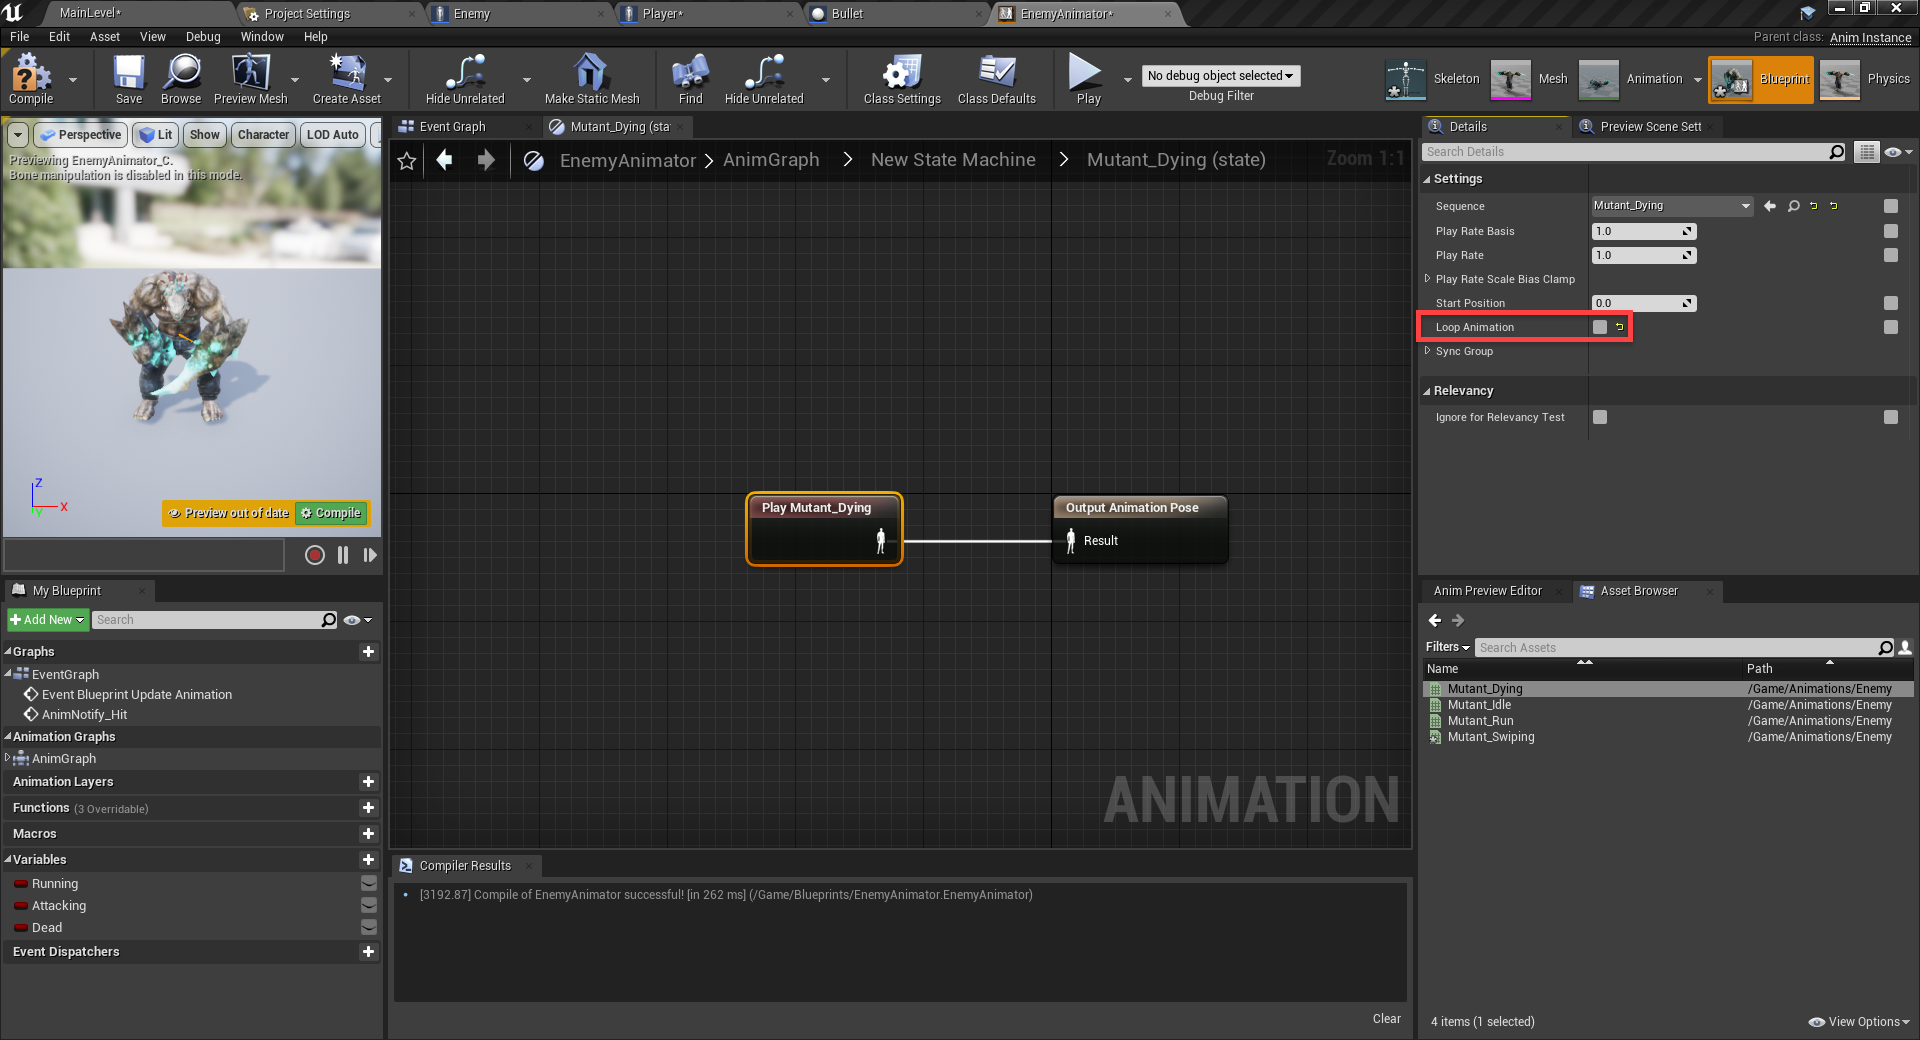
While we’re at it, let’s double click on the Mutant_Dying state, select the state and disable Loop Animation so it only plays once.
At the top of the state screen is an Event Graph tab. Click that to go to the graph where we can hook our three variables up to the enemy blueprint. First, we need to cast the owner to an enemy, then connect that to a Sequence node.

To set the running variable, we’re going to be checking the enemy’s velocity.

For attacking, we just want to get the enemy’s attacking variable.

The same for dead.

Back in the Enemy blueprint, select the SkeletalMesh component and set the Anim Class to be our new EnemyAnimator.
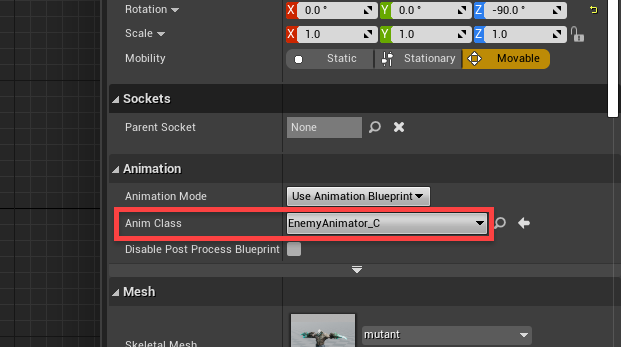
Press play and see the results!
Attacking the Player
In the Enemy blueprint, let’s continue the flow from the AIMoveTo component’s On Success output. We basically want to check if we’re not current attacking. If so, then set attacking to true, wait 2.6 seconds (attack animation duration), then set attacking to false.

If you press play, you should see that the enemy runs after you, then attacks. For it to do damage though, we’ll first need to go over to the Player blueprint and create two new variables. Compile and set both default values to 10.
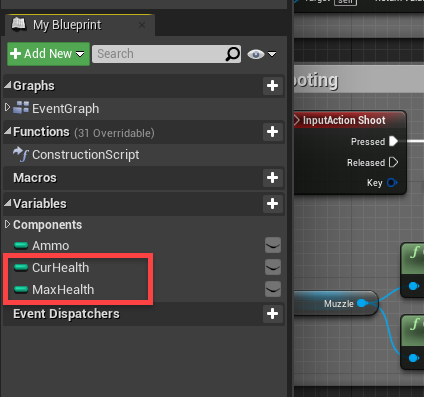
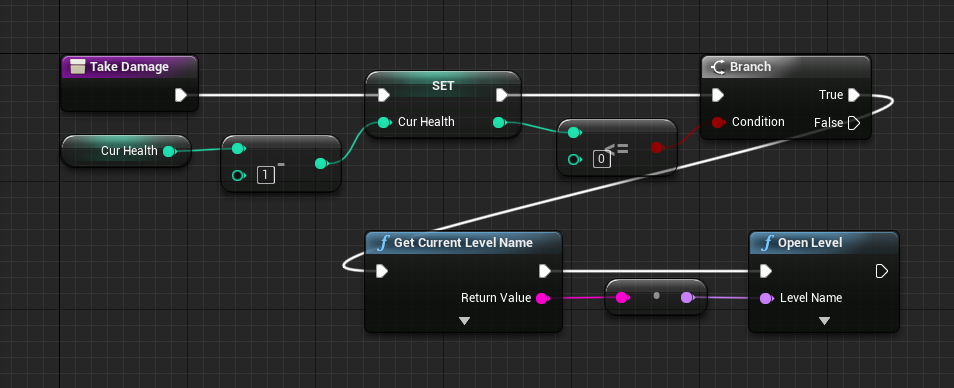
Next, create a new function called TakeDamage.
Back in the Enemy blueprint, create a new function called AttackPlayer.
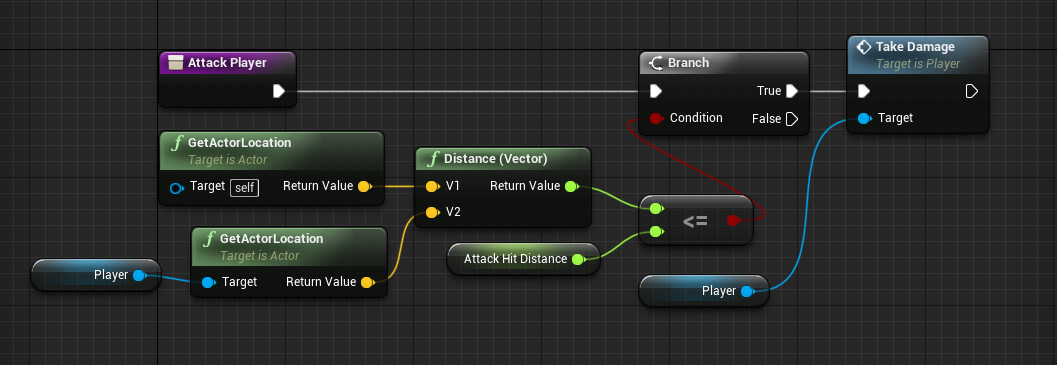
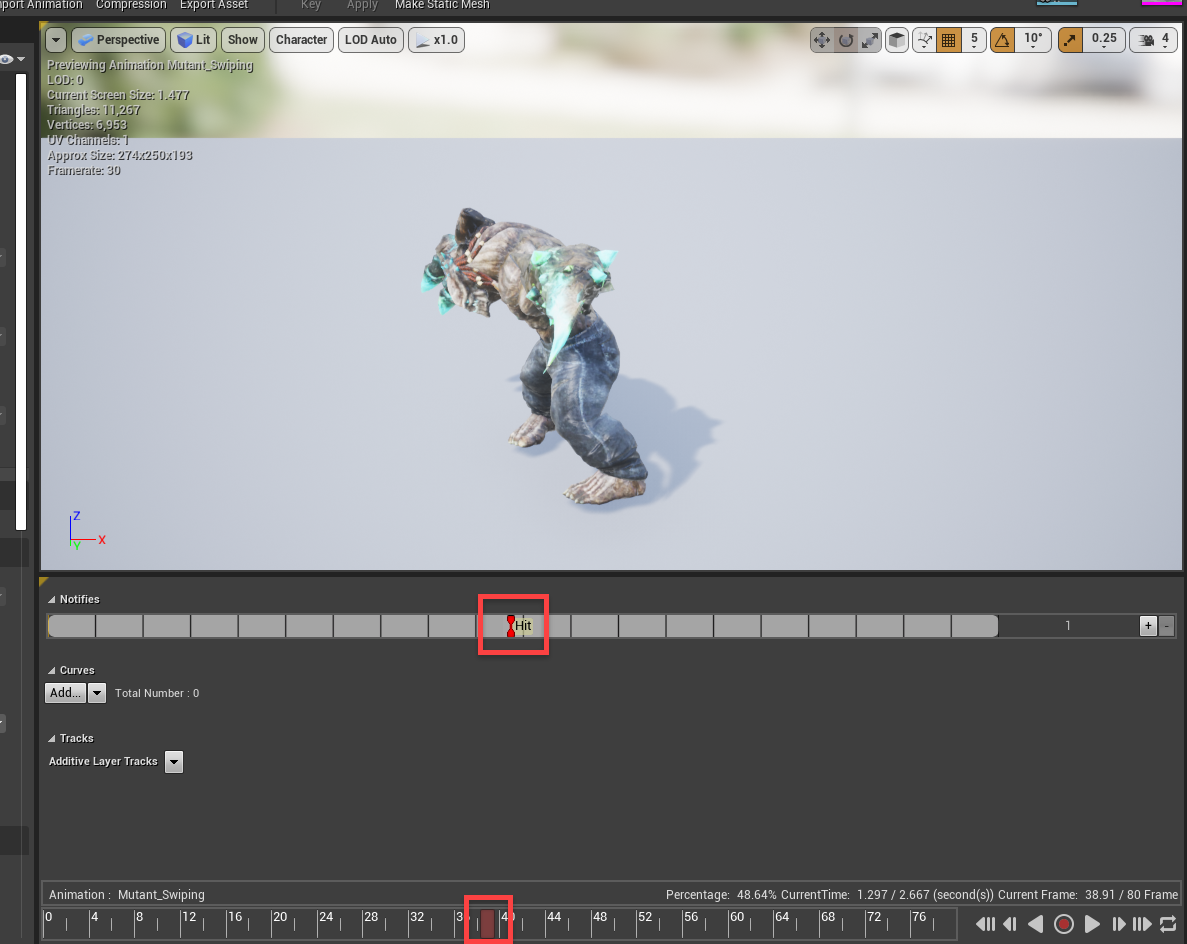
To trigger this function, we need to go to the enemy animation editor and double-click on the swiping animation in the bottom-left. Here, we want to drag the playhead (bottom of the screen) to the frame where we want to attack the player. Right click and select Add Notify… > New Notify…
Call it Hit.
Then back in the animator event graph, we can create the AnimNotify_Hit event. This gets triggered by that notify.
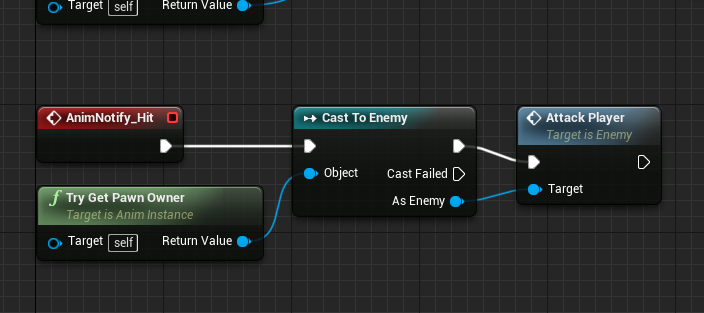
Now you can press play and see that after 10 hits, the level will reset.
Shooting the Enemy
Finally, we can implement the ability for the player to kill the enemy. In the Enemy blueprint, create a new function called TakeDamage. Give it an input of DamageToTake as an integer.
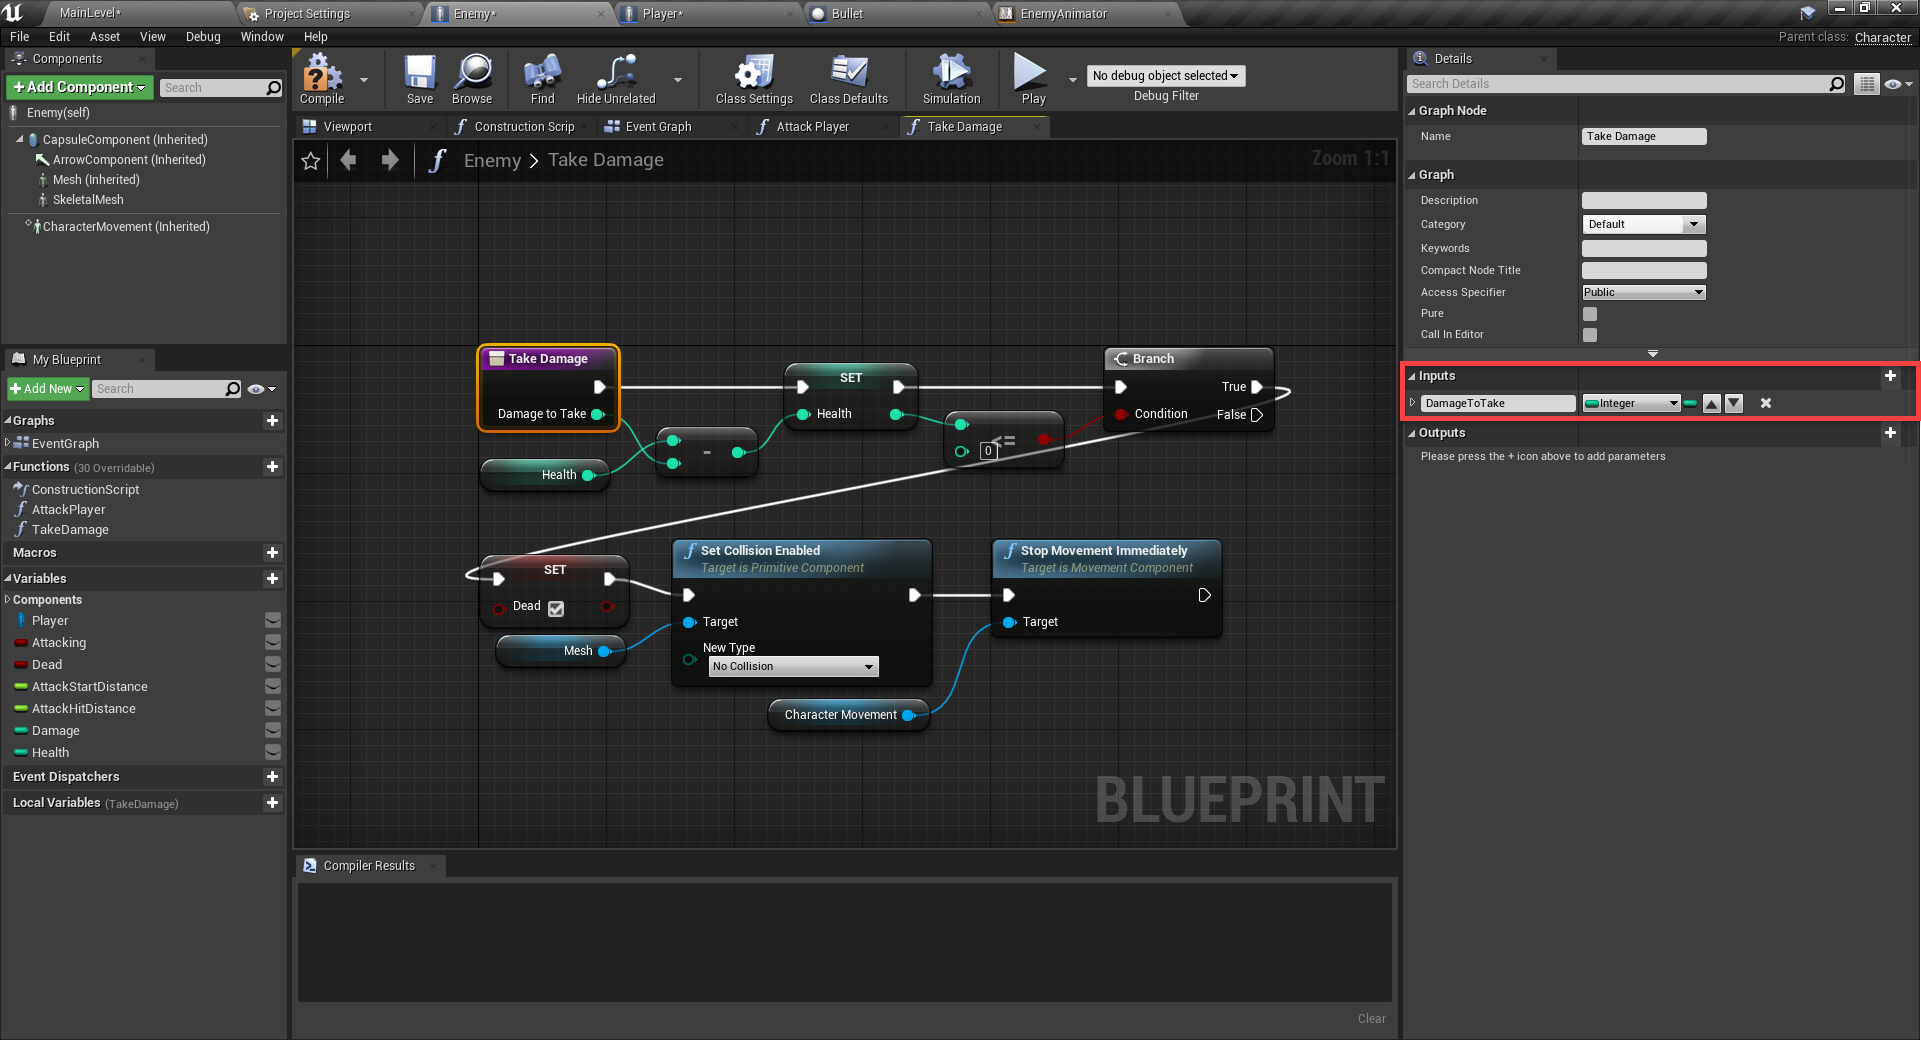
Then in the Bullet blueprint, we can check for a collider overlap and deal damage to the enemy.

If you press play, you should be able to shoot the enemy and after a few bullets, they should die.
Conclusion
And there we are!
Thank you for following along with the tutorial! You should now have a functional first-person shooter with a player controller and enemy AI – complete with animations and dynamic state machine! Not only will your players be able to dash about the stage jumping and shooting at their leisure, but the health mechanics create a challenge to stay alive. You’ve accomplished this and more with just Unreal Engine’s blueprinting system as well, learning how to control nodes to provide a variety of functionality.
From here, you can expand the game or create an entirely new one. Perhaps you want to add more enemies, or create an exciting 3D level where enemies might be just around that shadow-y corner! The sky is the limit, but with these foundations you have all you need to get started with robust FPS creation in Unreal Engine.
We wish you luck with your future games!
