While Unity is a fantastic tool, there are a lot of aspects to it. From learning C# coding principles to simply knowing how to use the features Unity offers, it can seem like a daunting task to go from complete beginner to making your first project. What if there was a middle ground, though?
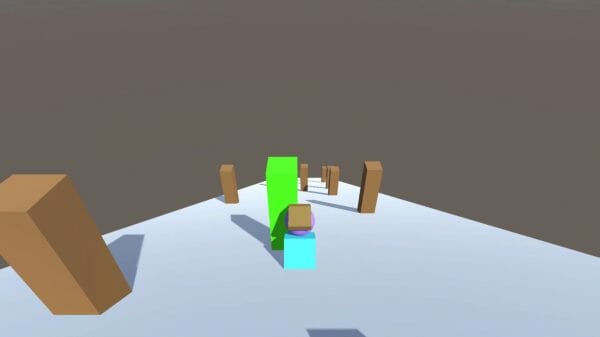
In this tutorial, we’re going to do just that: explore the middle ground. We’ll be creating a ski mini-game project in Unity that uses collisions as its core mechanic – one of the primary tools you’ll need to be able to make many kinds of games. While some basic Unity experience is advised, the explanations here are perfect for those still setting out on their Unity journey and looking for an easy game to start with!
Let’s dive into it!
Project Files
You can find the source code files for the project done in this tutorial available for download here.
Getting Started
First off, with Unity open, let’s create a new Scene called “Collisions” and set up a new Plane for the ground:

To create a slope, we’ll rotate the plane by 35 degrees on the x-axis as follows:

Let’s then create our Player using the primary Sphere and Cube. These model meshes should be contained in an empty parent GameObject.


We can also create a Tree by adding a Cube and scaling it up along the y-axis:

Now we can position our Main Camera to be looking down at our Player from the top of the hill.

Moving The Player
In order for the Player GameObject to be affected by gravity, we need to add a Collider and a Rigidbody component to it.

Note that the Freeze Rotation settings are enabled for all three axes (x,y,z) inside the Rigidbody component. This prevents our Player from tipping over and rolling instead of sliding down the hill.
One last thing we need to do is to reduce the Friction between the colliders so that it looks like we’re sliding down on a slippery surface.
To do this, create a new Physic Material (right-click in Project window > Create > Physic Material):

And set the Static Friction to be zero:

And apply it to our Player (Collider) and the Ground and the Tree by dragging it straight into the Scene view.


Setting up the Player Controller
In order to move the player left and right, we need to set up the Player Controller (that is, the C# script attached to the Player GameObject):

Let’s open up the script and declare the following variables:
using System.Collections;
using System.Collections.Generic;
using UnityEngine;

public class PlayerController : MonoBehaviour
{
    public float moveForce;     // Force applied when we move left or right.
    public Rigidbody rig;       // A referene to our Rigidbody component.
}
Update vs FixedUpdate
The Update function is a built-in function that comes with MonoBehaviour class. Since it gets called every frame, it is useful to implement any game script that needs to be constantly updated.
However, doing physics calculations in the Update function is not recommended, as you will get inconsistent results across different devices. This is because each device comes with different frame rates.
Hence when dealing with Rigidbody, we recommend using FixedUpdate instead of Update. By simulating physics in every fixed frame (e.g. 60 fps), we can yield consistent results across varying devices:
using System.Collections;
using System.Collections.Generic;
using UnityEngine;

public class PlayerController : MonoBehaviour
{
    public float moveForce;     // Force applied when we move left or right.
    public Rigidbody rig;       // A referene to our Rigidbody component.

    // Called 60 times a second.
    // Similar to the Update function, but used for physics calculations.
    void FixedUpdate ()
    {
    }
}
Player Input
Inside the FixedUpdate function, we’re going to register our player’s input on whether to move left or right.
We can use Input.GetAxis (built-in function) to get the value of the horizontal axis, which is by default mapped to the left and right arrow keys. The value will be in the range of -1 (left) to 1 (right):
using System.Collections;
using System.Collections.Generic;
using UnityEngine;

public class PlayerController : MonoBehaviour
{
    public float moveForce;     // Force applied when we move left or right.
    public Rigidbody rig;       // A referene to our Rigidbody component.

    // Called 60 times a second.
    // Similar to the Update function, but used for physics calculations.
    void FixedUpdate ()
    {
        // Get the horizontal input.
        // 0 = nothing
        // 1 = right
        // -1 = left
        float xInput = Input.GetAxis("Horizontal");
    }
}
We’re then going to add force to our Player GameObject based on our input:
using System.Collections;
using System.Collections.Generic;
using UnityEngine;

public class PlayerController : MonoBehaviour
{
    public float moveForce;     // Force applied when we move left or right.
    public Rigidbody rig;       // A referene to our Rigidbody component.

    // Called 60 times a second.
    // Similar to the Update function, but used for physics calculations.
    void FixedUpdate ()
    {
        // Get the horizontal input.
        // 0 = nothing
        // 1 = right
        // -1 = left
        float xInput = Input.GetAxis("Horizontal");

        // Add force based on our input.
        rig.AddForce(Vector3.right * xInput * moveForce);
    }
}
Coding the Tree Script
Let’s begin work on our Tree’s behavior by attaching a new script to the Tree GameObject:

We’re going to add the OnCollisionEnter function inside the script, which is called when the collider has begun touching another rigidbody or collider:
using System.Collections;
using System.Collections.Generic;
using UnityEngine;

public class Tree : MonoBehaviour
{
    // Called when another object collides with us.
    void OnCollisionEnter (Collision collision)
    {
    }
}
When we hit the tree, we can change the color of the tree by accessing the MeshRenderer component’s material.color property:
using System.Collections;
using System.Collections.Generic;
using UnityEngine;

public class Tree : MonoBehaviour
{
    public Color hitColor;      // The color we want to set when we get hit.
    public MeshRenderer mr;     // A reference to the MeshRenderer component.

    // Called when another object collides with us.
    void OnCollisionEnter (Collision collision)
    {
        // Set our color to be "hitColor".
        mr.material.color = hitColor;
    }
}
Ensure the HitColor property is set in the Inspector after saving the script:

Now you can test it out in Play mode and duplicate the tree to complete the level:


Conclusion
And that covers the basics of this beginner’s ski game with Unity! Well done on making it to the end!
While a very small project, being able to work with colliders and physics will have huge implications for your future game projects. Of course, you can also expand your skills by expanding this project. Try adding collectibles for the player to get along their path down the slope. Then try adding some sort of scoring so you can render win and game over conditions. If you’re up for a real challenge, you can even explore ways to make the level loop! The sky is the limit here.
Regardless, we hope that you can apply the physics of sliding objects down surfaces and avoiding obstacles learned here to your future projects – and mostly that you had fun while following this tutorial!
Want to learn more about farming sims? Try our complete Unity Mini-Projects – C# Fundamentals course.


