Since the release of Unity 2017.1 in the summer of 2017, Unity Technologies has made making 2D games incredibly easy and fast.
In this tutorial, we will create a fully-featured 2D platformer. This project will incorporate a number of key topics including how to make cutscenes, how to quickly build and prototype a 2D level, and how to precisely choreograph game objects using the Timeline Editor.
This tutorial can also be thought of as the culmination of several tutorials – posted on Game Dev Academy – about these topics. You can check them out here:
- Storytelling in Unity – Part 1: Virtual Cameras
- Storytelling in Unity – Part 2: Animation Tracks
- Cinemachine and Timeline Editor for Unity 2D Game Development
- Mastering Unity’s New Tilemap Editor: Building 2D Levels
Project Details
Let’s think about what we will be making. As said in the introduction, it will be a 2D platformer. We will use the 2D character from the Unity Standard Assets pack. Then we will create an environment using tilemaps and Unity’s new Tilemap Editor. Then we will create an enemy that has an Idle/Attack animation (you’ll see). Then we will create a cutscene where the camera views the entire level then zooms on the character: here we will use the Timeline Editorand Cinemachine for 2D.
You can download the complete Unity project here.
Before jumping in, while not entirely required, it is good to have familiarity with Unity and Cinemachine. Besides the tutorials above, you may also wish to check out some of our other Unity tutorials. Additionally, you can consider trying some premium online courses that have a more guided learning path and cover many of the same elements featured here.
For teachers, you might also want to consider Zenva Schools instead. Zenva Schools was designed specifically for teaching in the classroom and comes not only with online courses for Unity, but tons of tools like reporting, pre-made course plans, and more to make teaching with them super easy.

BUILD YOUR OWN GAMES
Get 250+ coding courses for
$1
AVAILABLE FOR A LIMITED TIME ONLY
Tilemap Editor, Timeline, and Cinemachine
When Unity Technologies released the Unity 2017 version cycle, they introduced three pivotal tools designed to make Unity more accessible to artists. These tools were the Tilemap Editor, Timeline, and Cinemachine.
The Tilemap Editor, released later in the 2017 cycle, allowed users to “…literally paint directly in Unity” according to Rus Scammell, the project manager of Unity for 2D. The Tilemap Editor gives you the ability to create vast and complicated Tilemaps without having to use a third-party program.
The Timeline Editor and Cinemachine were released at the same time, though improvements to Cinemachine were released later. Cinemachine is a suite of cameras that allows you to create cutscenes, specify how the camera tracks a game object, and, in the end, allows you to tell a better story. Combine this with the Timeline Editor, a tool that allows you to choreograph game objects like a movie editor.
With these two tools, you can create stunning compositions with having to write any code.
Well, that’s a summary of the tools that we will be using! This tutorial is by no means exhaustive, for more information about these tools check out the tutorials linked above.
Setting up our project
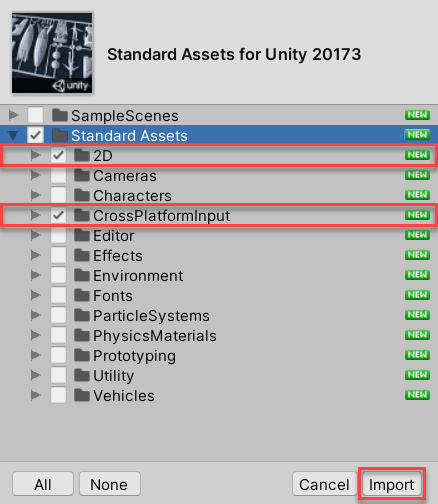
The assets for this project you can get here. Then create a new Unity project. Let’s import the 2D Standard Assets package by going to the Asset Store panel. Here, search for “Standard Assets” and download it.

Then click on the Import button to import the asset. When the import window pops up, select the Standard Assets > 2D and StandardAssets > CrossPlatformInput folders only. Then import those.
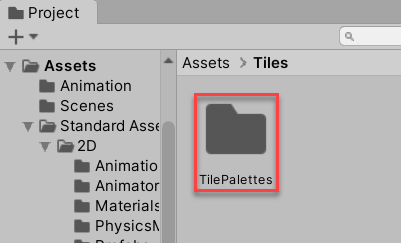
Next, we need to create two new folders. One called “Animations” and the other called “Tiles”.
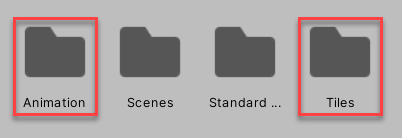
In the Tiles folder, create another folder called “Tile Palettes”.
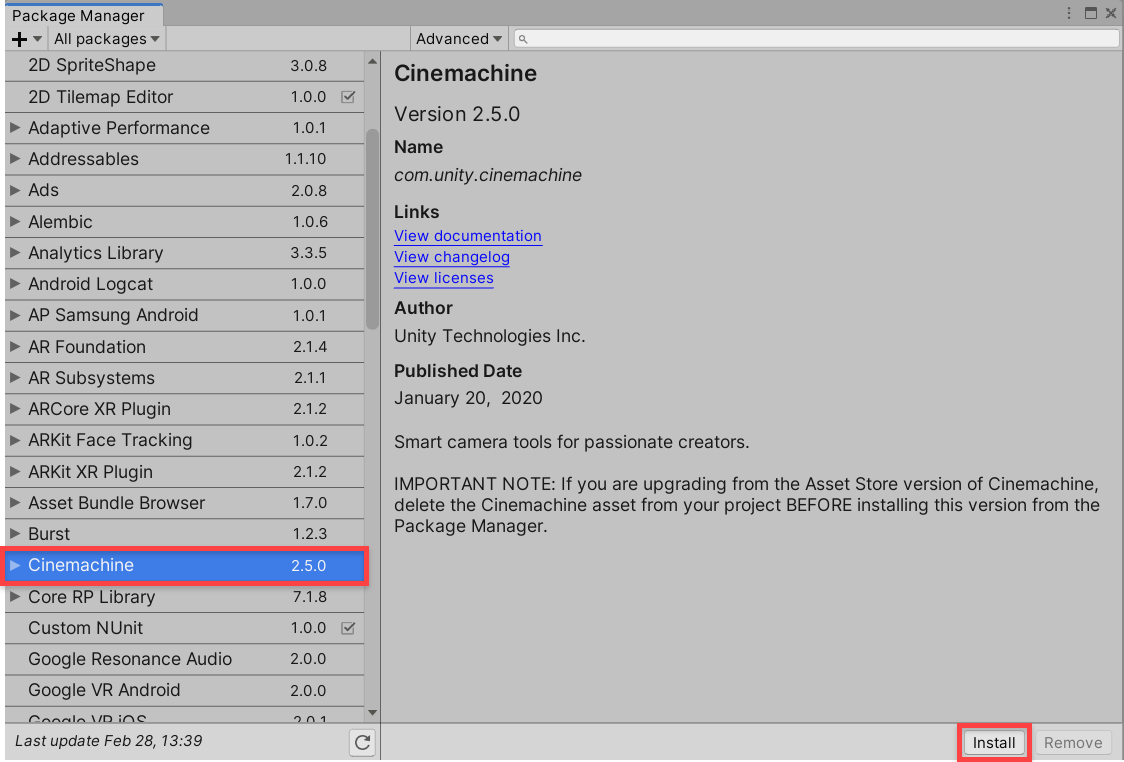
The use of this folder will become apparent later on. Now let’s import Cinemachine by going to Package Manager (Window > Package Manager) and installing “Cinemachine”.
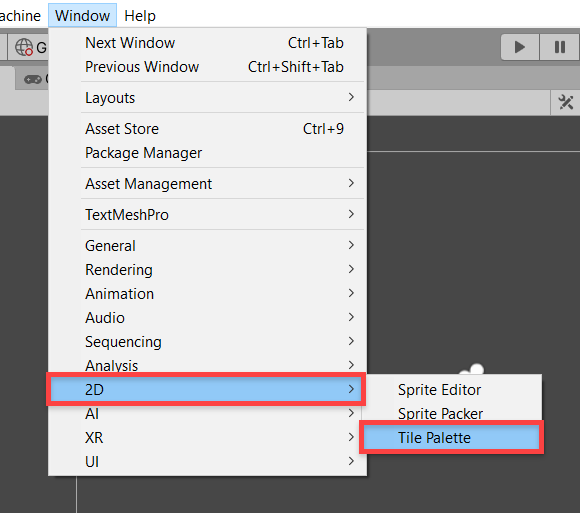
Now that we have everything imported we can start getting our tools in order. We will start with the Tilemap Editor. Go to Window > 2D > Tile Palette.
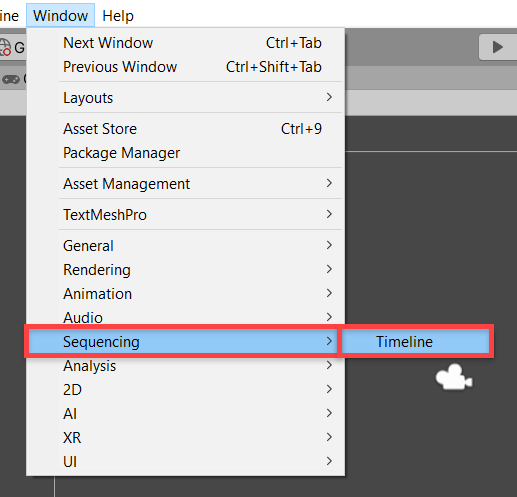
Place it in a sensible place on your workspace. I chose to put it in the space between the inspector and the scene view. Next, we need the Timeline Editor. Go to Window > Sequencing > Timeline.
The position of this tab is not set in stone so be prepared to move it around. We now have our workspace in order! Time to start creating!
Creating our environment
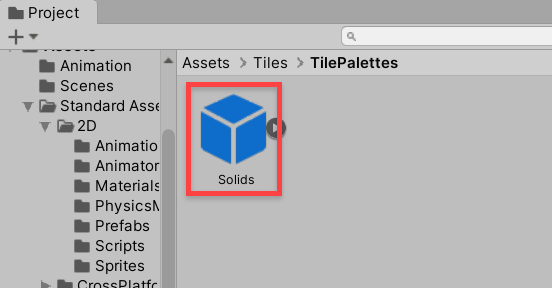
Go to your Tile Palette tab and create a new palette. Call it “Solids” since these are the tiles that the character will not be able to pass through.
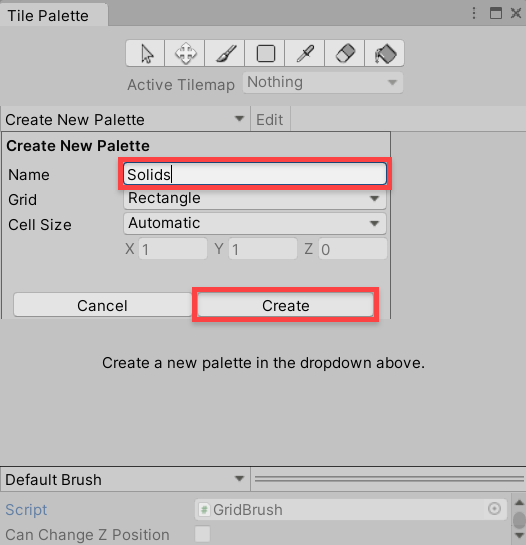
A palette works just like you would expect it to based on the name, it is a set of images that we use to “paint” with. Leave all of the settings set to default and save it in the Tile Palettes folder which we created in the Tiles folder.
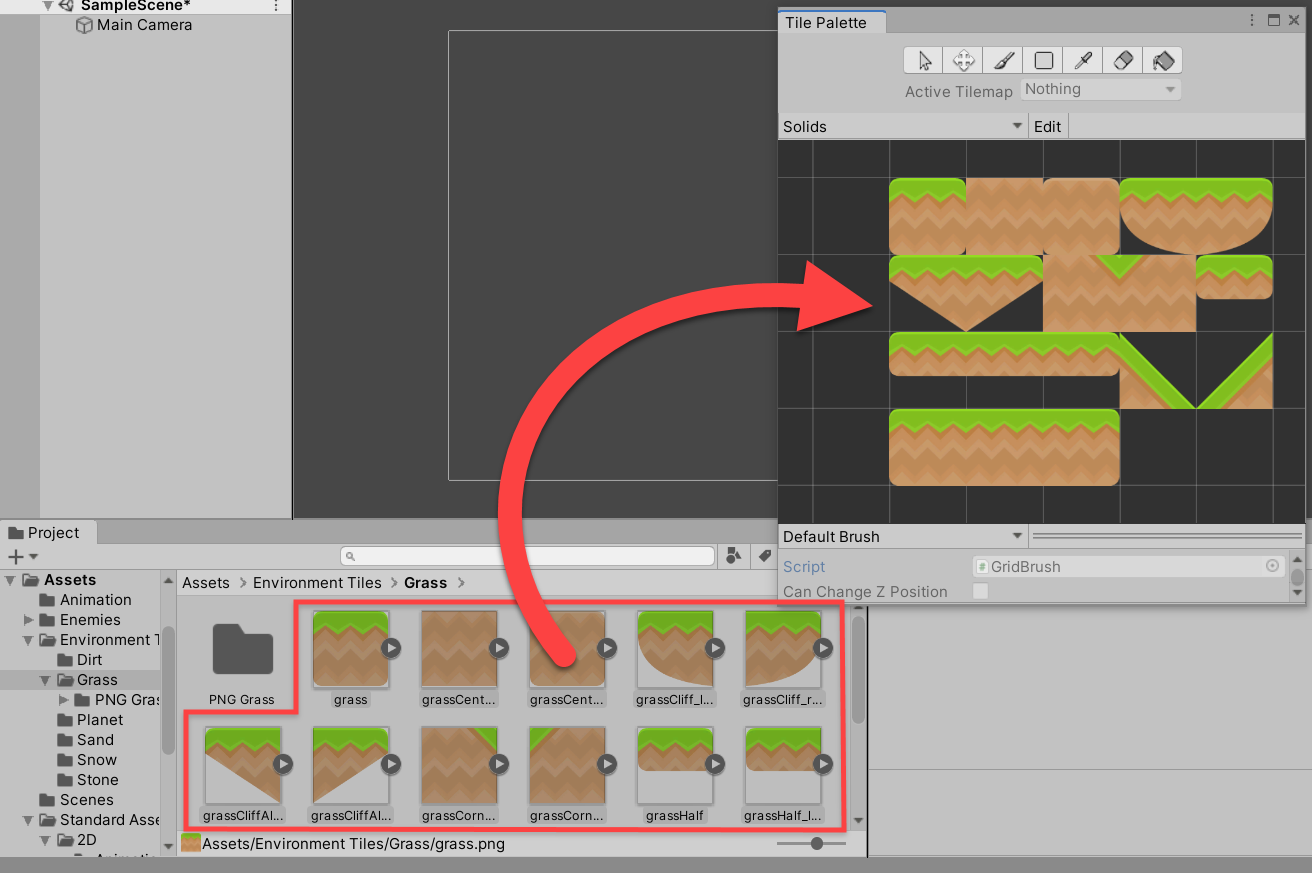
To setup our tiles, go to the Environment Tiles > Grass folder and drag those sprites into the Tile Palette window (do the same for any other tiles you want). Save the .asset files to the Tiles folder.
Now that all of our tiles are in order, let’s create a “canvas” to paint on. In your hierarchy, right-click and got to 2D Object > Tilemap.
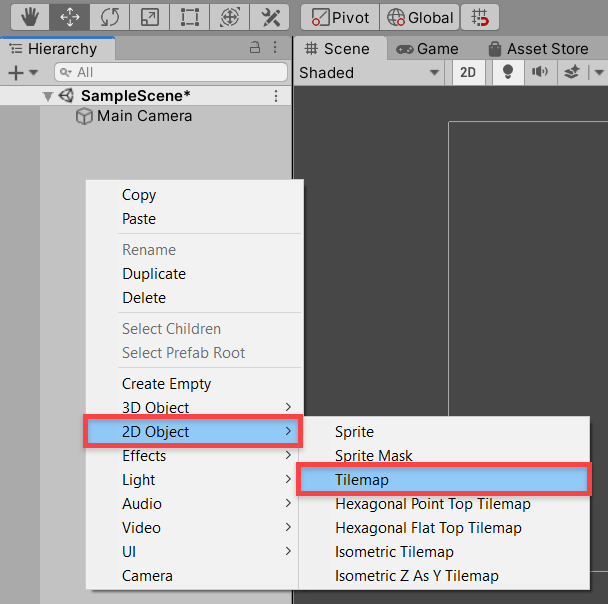
What it has done is created a grid, and inside that grid is our “canvas”, also known as a tilemap. In order to start painting you need to familiarize your self with the toolbar in the Tile Palette tab. With your rule tile selected, start experimenting with the various types of brushes. Once you feel pretty confident with the tools, start creating your level!

Adding the character
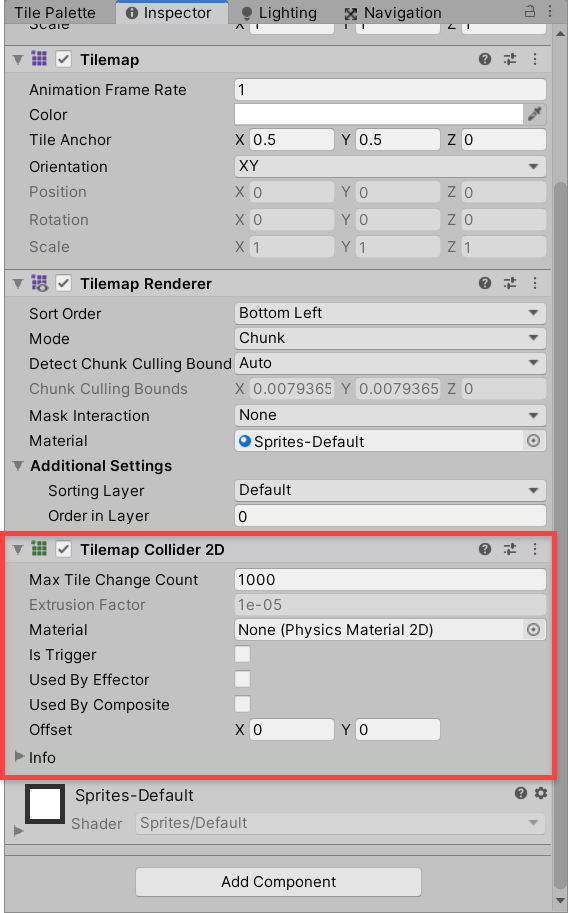
The last thing we have to do to our tilemap is to make it have physics interactions. Right now anything we put on it would just fall through the world. To fix this, Unity Technologies released a new collider component called the Tilemap Collider. This behaves just like you would expect it to based on the title, it creates a collider around each tile. Go to your Tilemap and click Add Component.
Search “CharacterRobotBody” and drag the character into the scene.
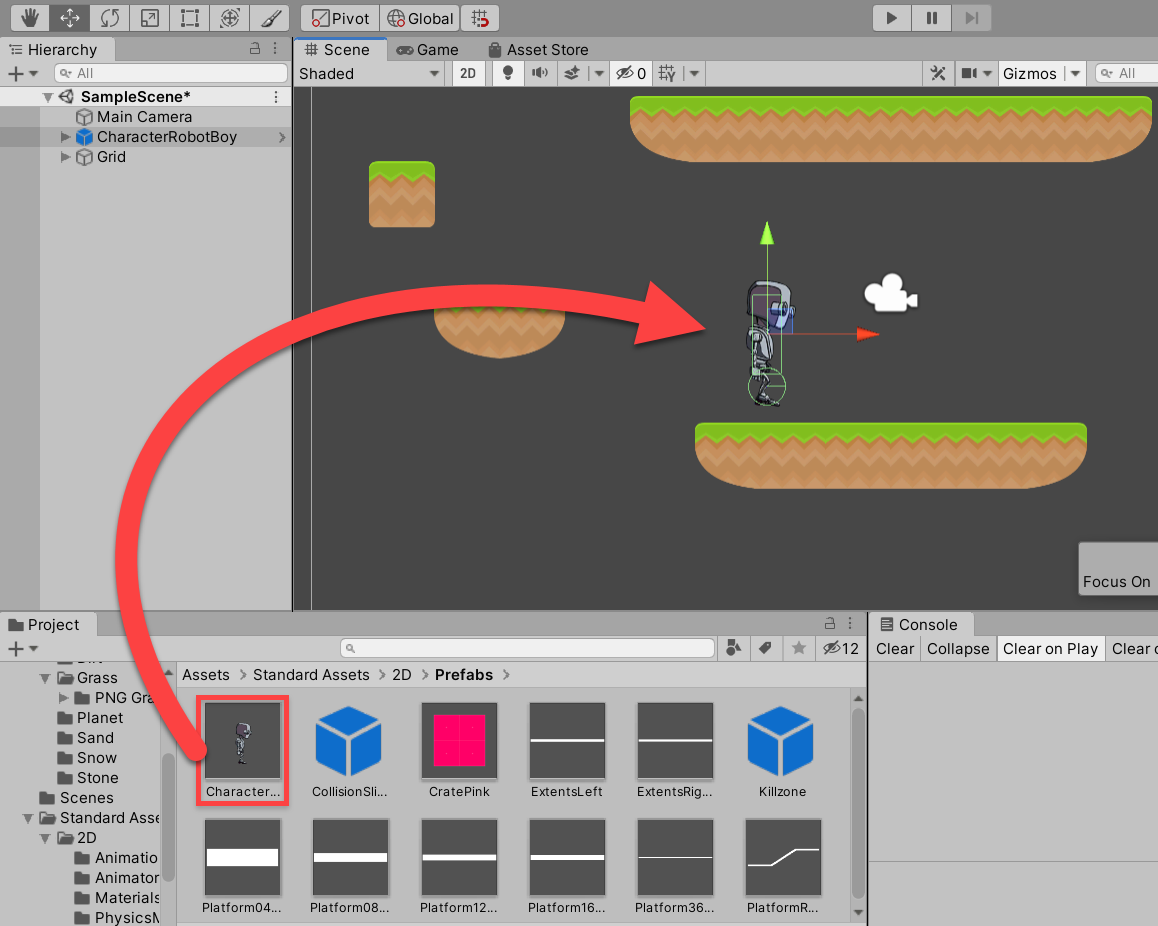
We will be using the default character that came with the 2D standard asset pack. You can find the character by either going to Standard Assets -> 2D -> Prefabs and then dragging in the “CharacterRobotBoy”, or, you can just search “CharacterRobotBoy” and access it from there. Once the character is in the scene, you can hit play and move the character through the arrow keys. You may have to reposition the camera in order to see the robot. Great! On to the next paragraph!
Creating the enemy
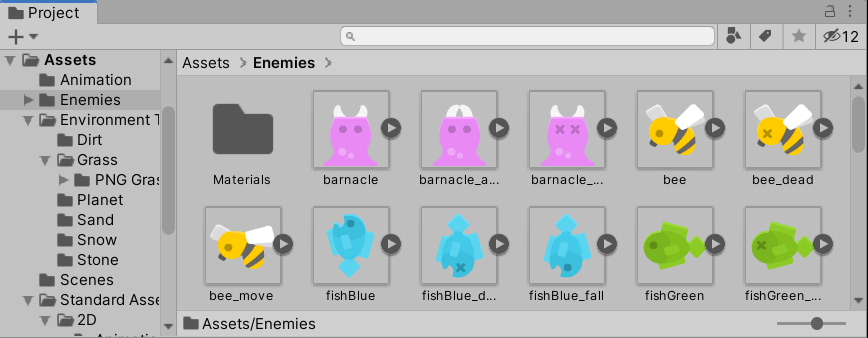
In the “Enemies” folder from the asset pack, pick a certain enemy that you think would go well with your scene.
Drag it into your scene and place it in a sensible spot.
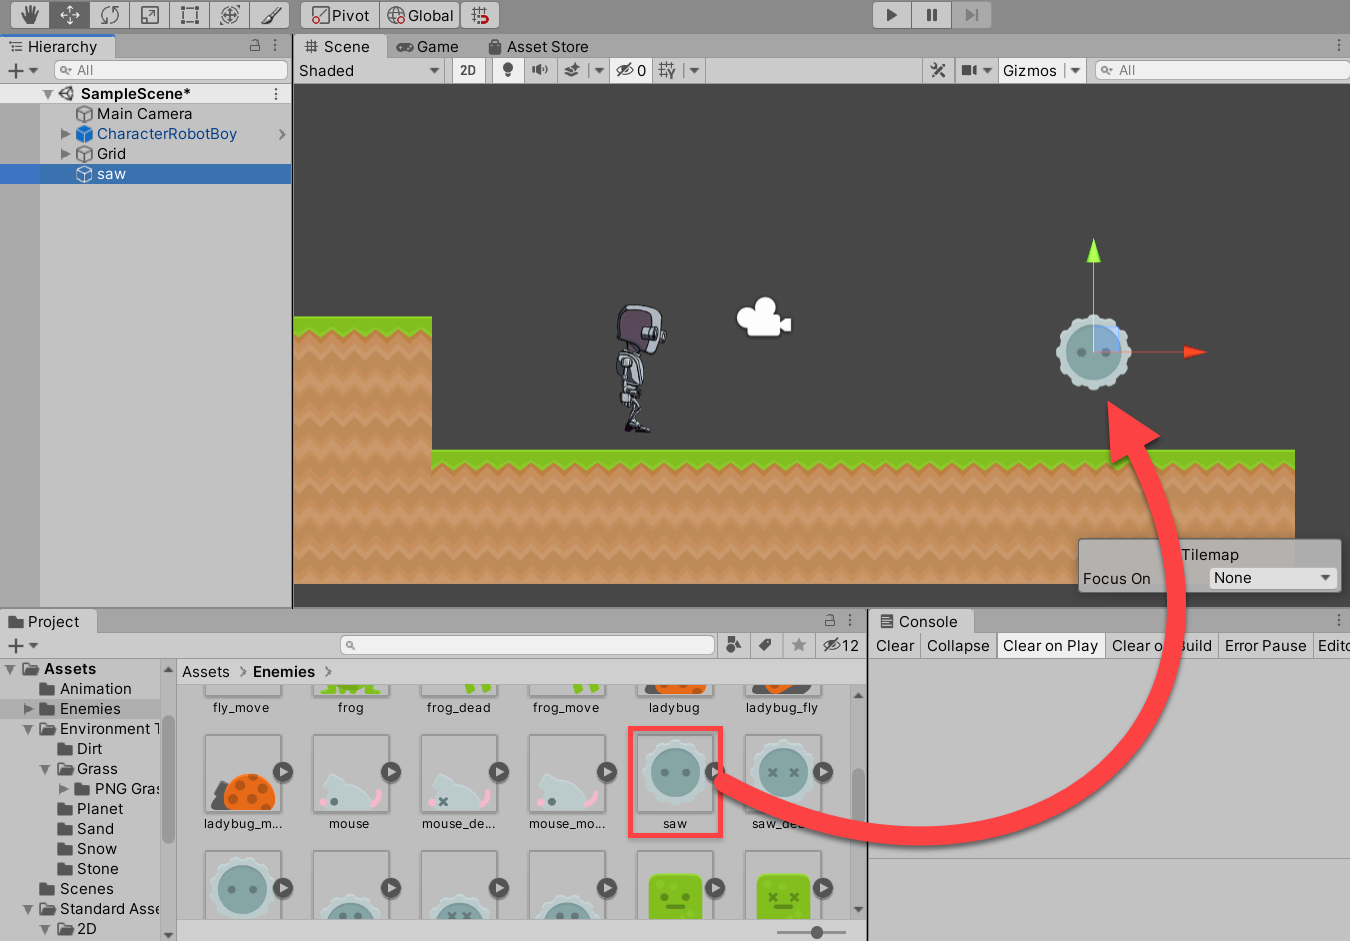
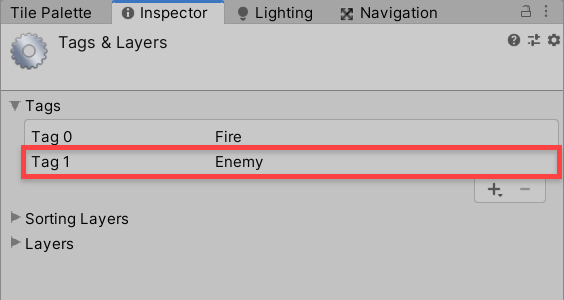
Then create a new tag called “Enemy” and assign it to your enemy.

Now we are going to animate this enemy. You should already have the Animation tab open in the lower window of your workspace. If not, go to Window > Animation > Animation.

With your enemy selected, click “Create” in the Animation tab.

Name it “Enemy1Controller”.
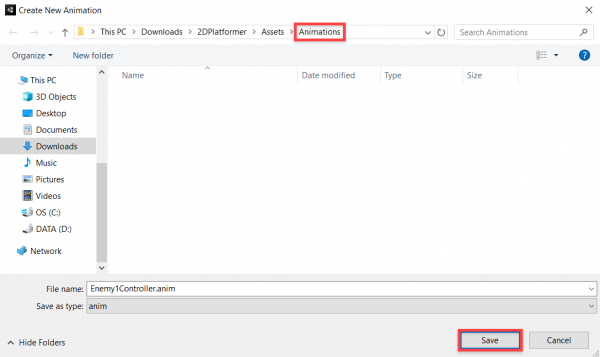
Save the animator controller in the Animations folder we created earlier.
Hit the record button and change the Sprite field to the other image that was provided (in my case it was called Saw_move, it may be similar if you chose a different enemy).
Then move about four frames ahead and change the image back to what it was before.
Then move a couple frames forward and change it back to the first image.
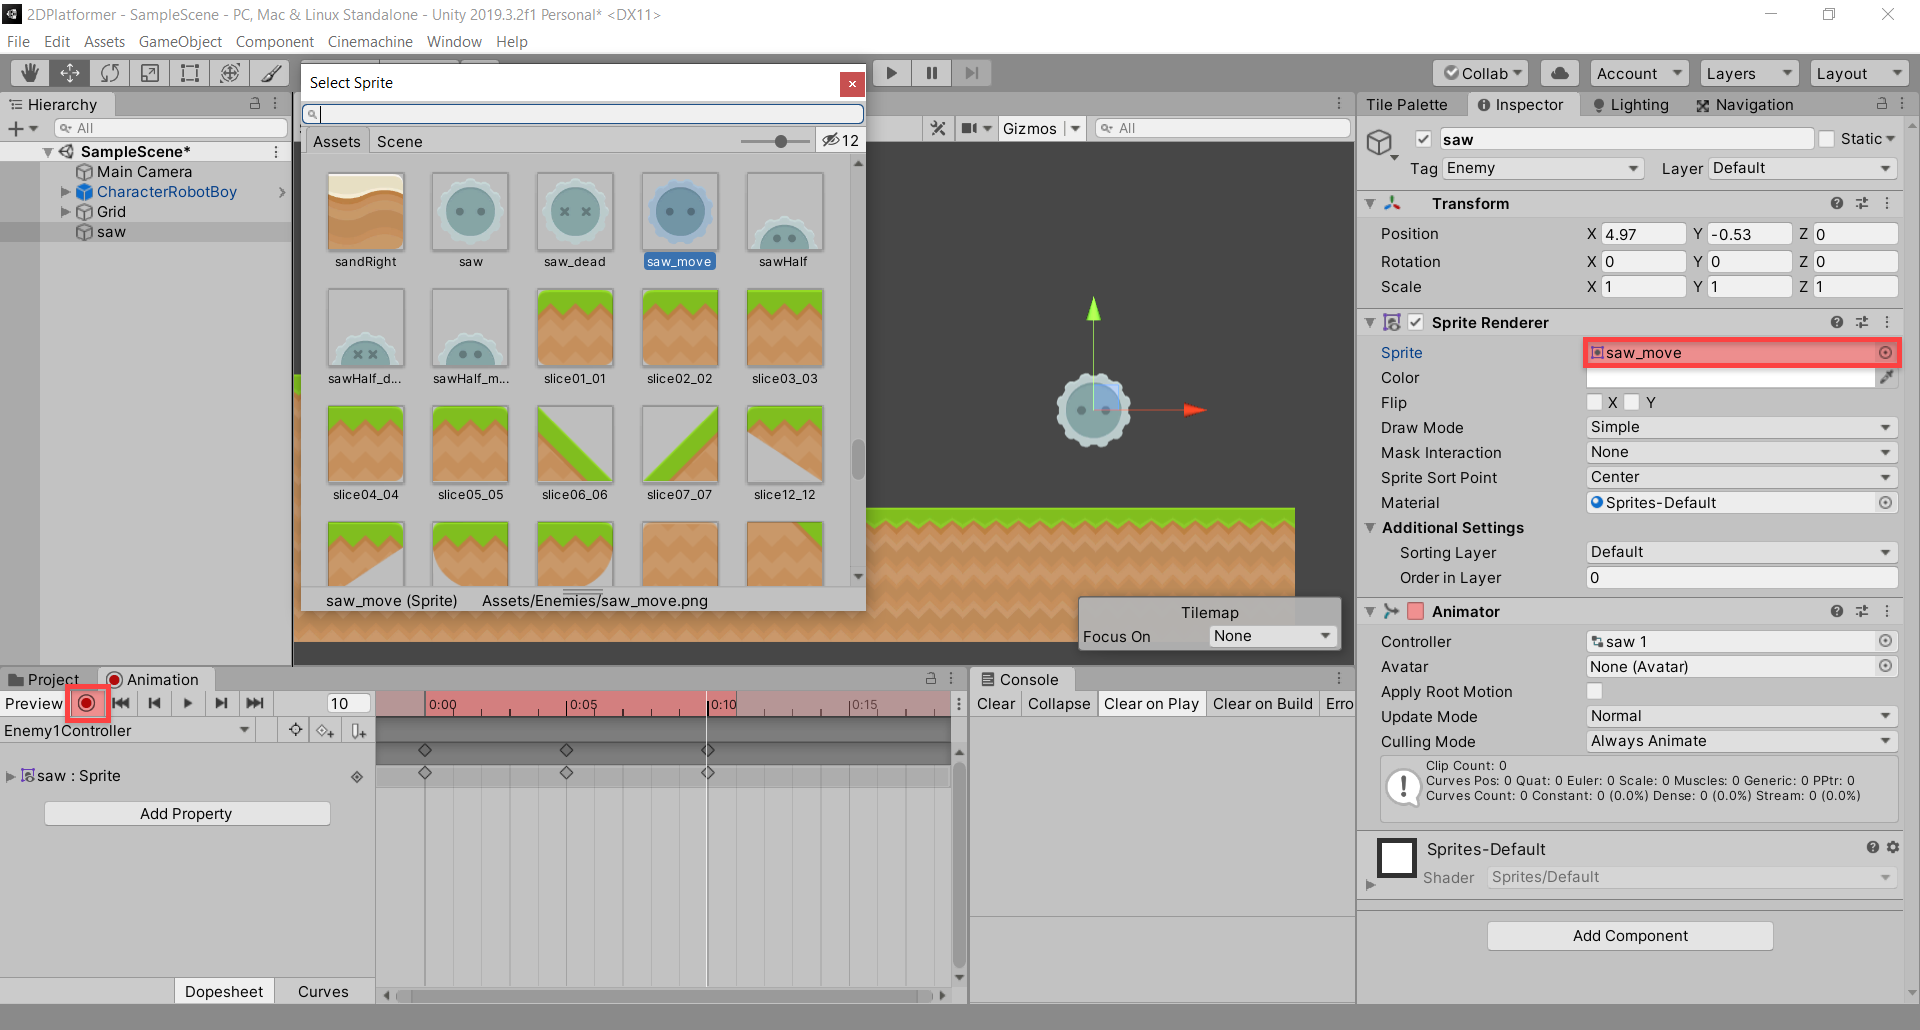
Now if you hit play you will see that our enemy is animating! Cool!
Scripting our enemy
Let’s make it so that whenever the character touches the enemy the level restarts. The best way to do this is to actually create a new script and box collider on our robot character.
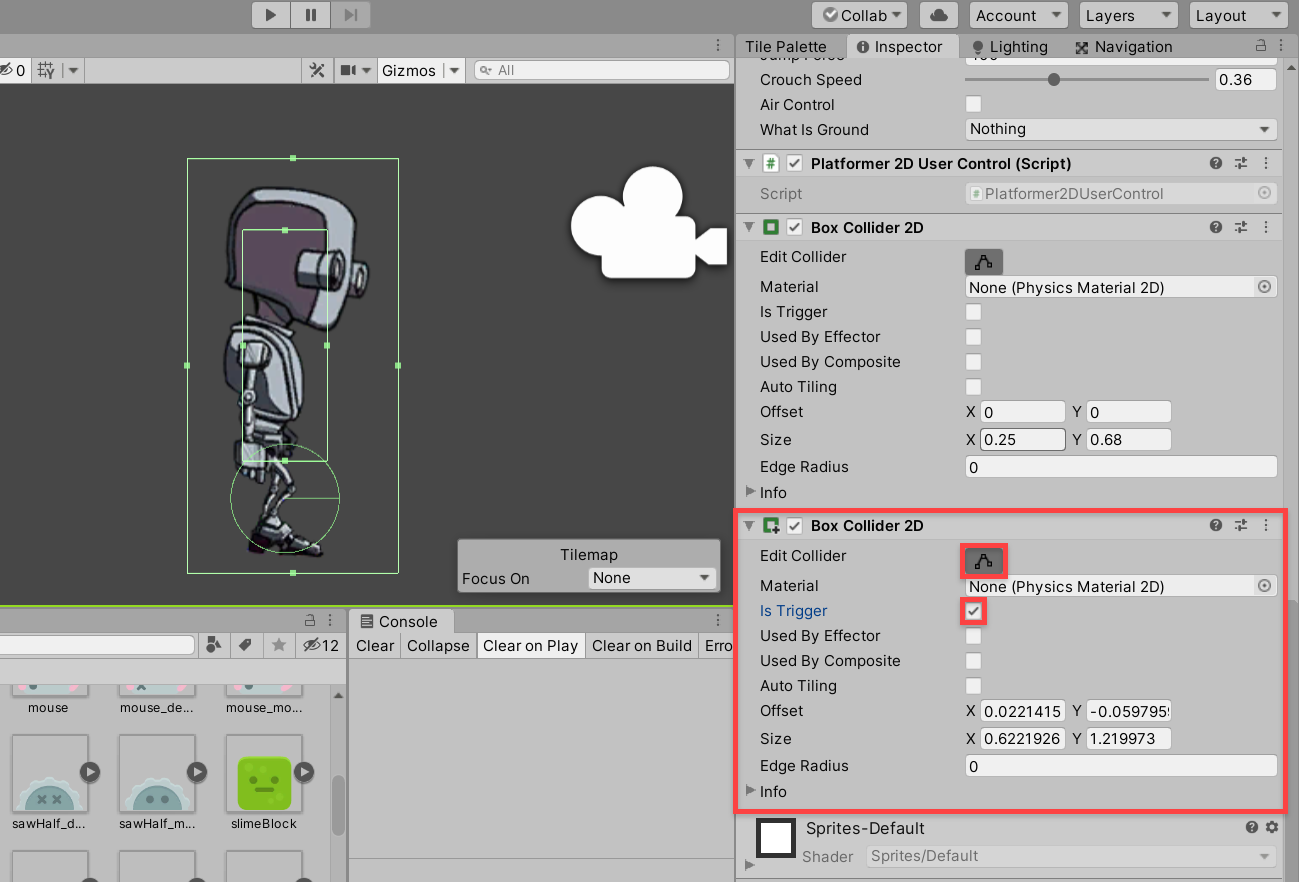
Set the box collider to Trigger and make sure it liberally covers the character. Name the new script “EnemyReaction”.
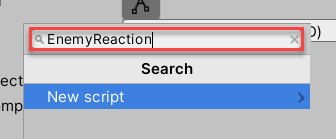
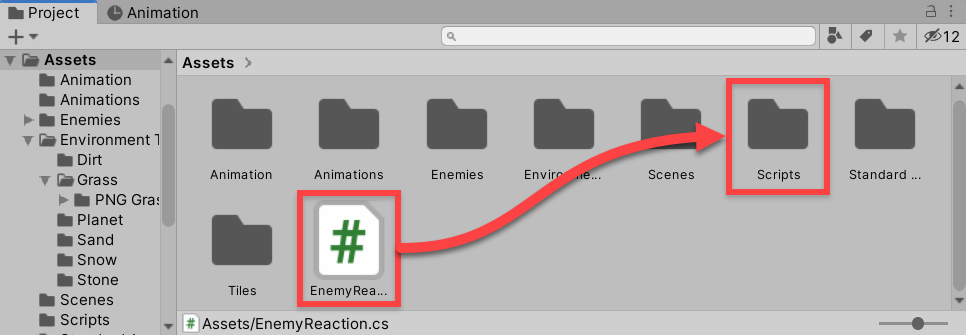
Let’s create a new folder called “Scripts” to house this component.
Here is the content of the EnemyReaction script.
using System.Collections;
using System.Collections.Generic;
using UnityEngine;
using UnityEngine.SceneManagement; // This is very important if we want to restart the level

public class EnemyReaction : MonoBehaviour {

	// Use this for initialization
	void Start () {

	}

	// Update is called once per frame
	void Update () {

	}
	// This function is called every time another collider overlaps the trigger collider
	void OnTriggerEnter2D (Collider2D other){
		// Checking if the overlapped collider is an enemy
		if (other.CompareTag ("Enemy")) {
			// This scene HAS TO BE IN THE BUILD SETTINGS!!!
			SceneManager.LoadScene ("scene1");
		}
	}
}
In order for this script to work, we need to do a couple of things. First, we need to have a collider on our enemy.

A simple box collider works best for covering all needs. Then, we need to save this scene as “scene1”.
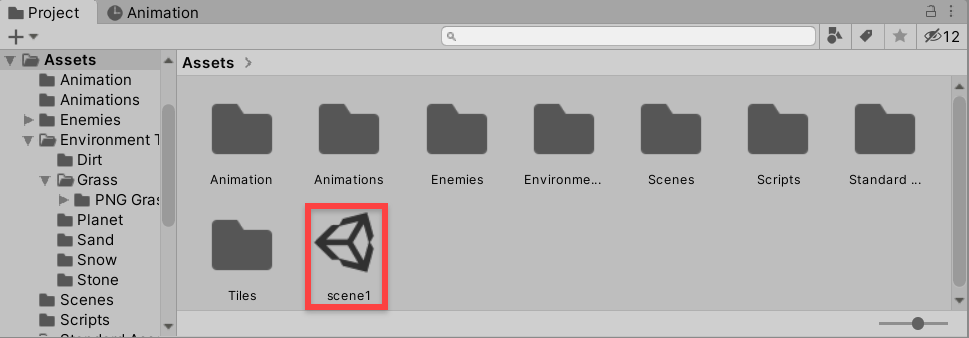
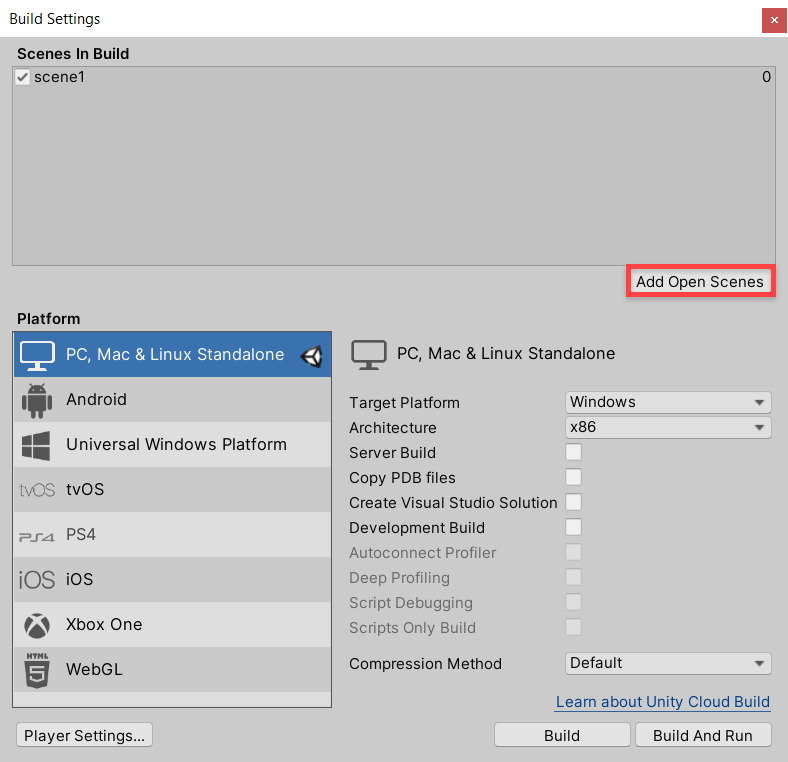
Just save it in the root folder since we only have one, but if you are planning on having multiple scenes then you should create a new folder. Finally, that scene has to be put in the build settings. To do this, just go to File -> Build Settings
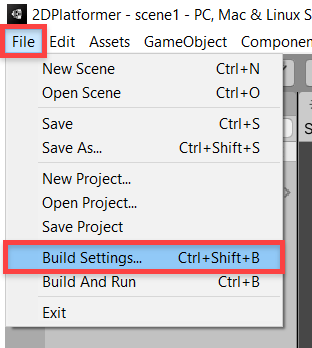
and then click “Add Open Scenes”.
Now everything should work! Hit play and run into the enemy, the level restarts!
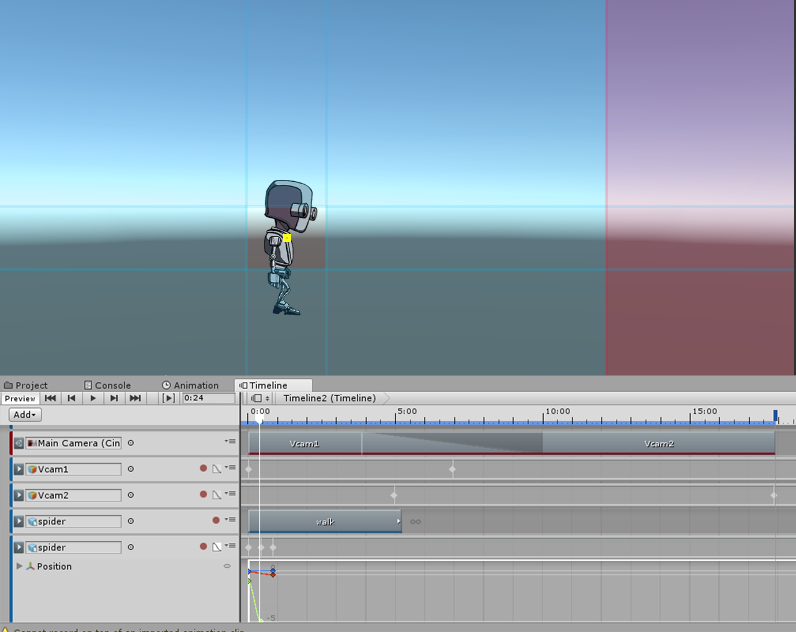
Cinemachine and Timeline
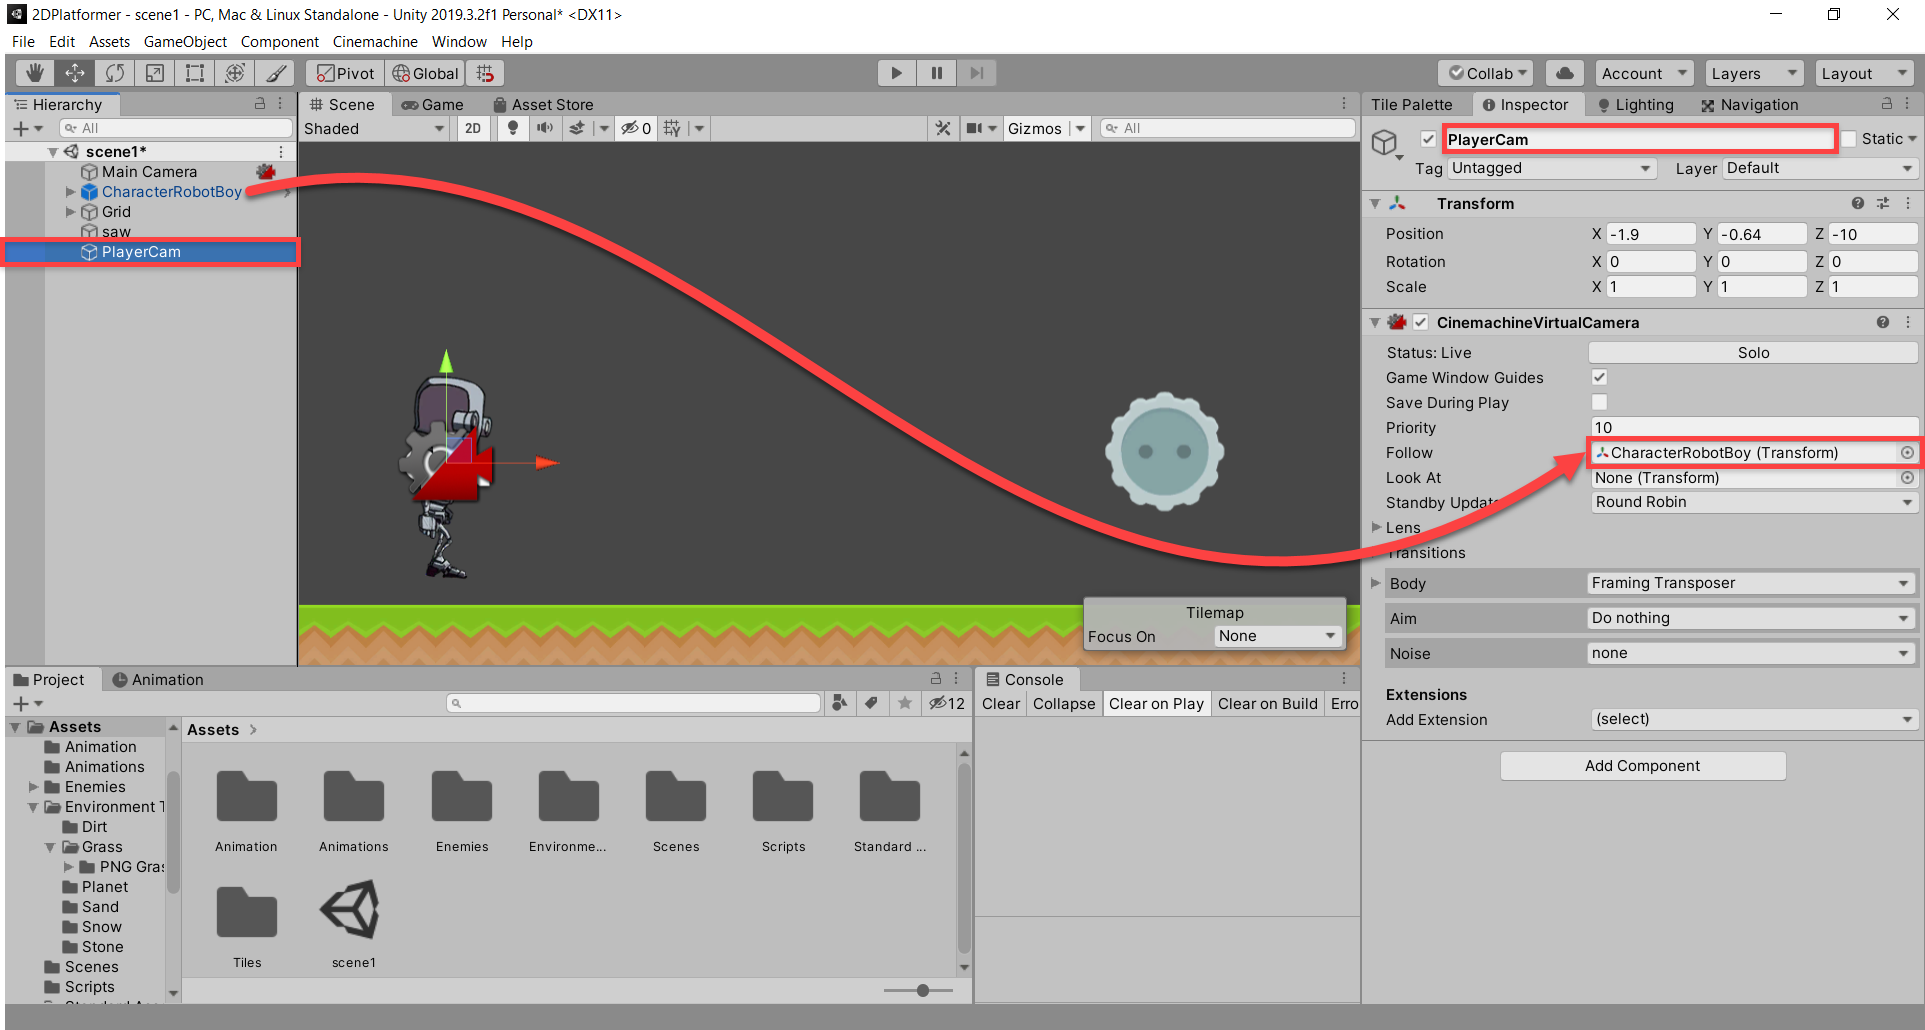
We now come to the last part of this tutorial. In this part, we will be using Cinemachine and the Timeline editor. Let’s start with Cinemachine. You’ll notice that our camera isn’t following the character when he moves around. We can fix this by creating what is known as a Virtual Camera. Navigate to your toolbar and go to Cinemachine -> Create 2D Camera.

Then assign the “follow” field on this camera to be the CharacterRobotBoy. Rename this to “PlayerCam”. Set the Aim to “Do Nothing” and set the Body to “Framing Transposer”.
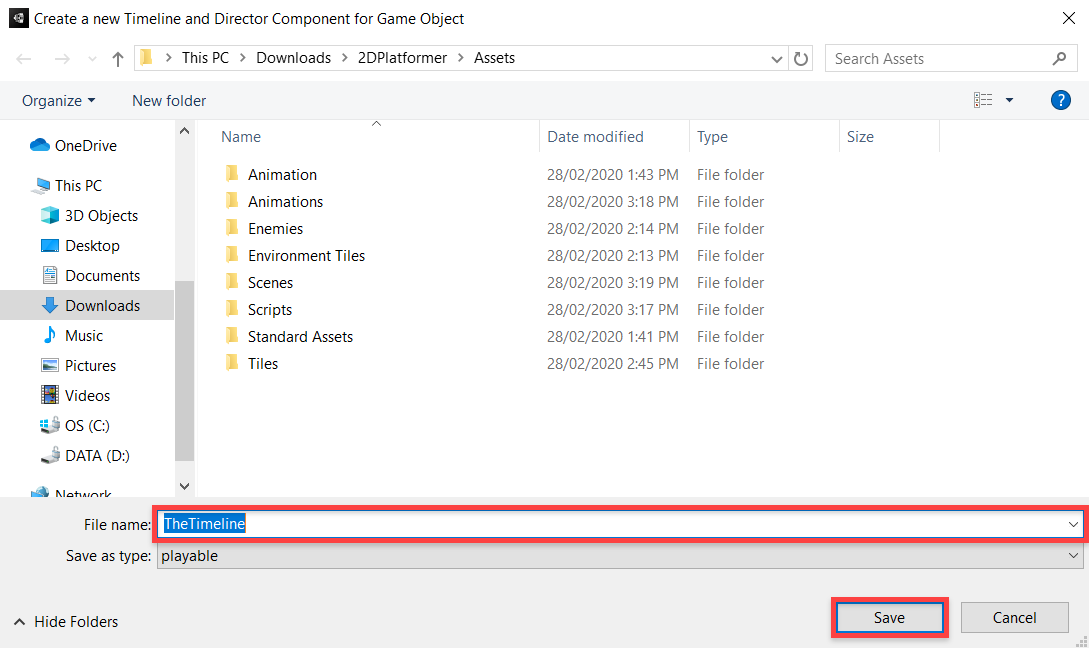
Next, let’s have a look at the Timeline Editor. Create a new, empty game object, named “Timeline”…

…and then click Create in the Timeline Editor. Call it “TheTimeline” and save it in the root folder.
You can have multiple timeline editors in a scene, which just adds to the complexity so we just have one. With this Timeline, we will create a cutscene where the camera views the entire level and then zooms in on the player. This will occur as soon as the scene starts. In order to do this, we need to combine Cinemachine and the Timeline Editor. We can do this through Cinemachine shot clips. In the Timeline, click “Add” and then go to Cinemachine.Timeline -> Cinemachine Track.

Drag the Main Camera into the field.
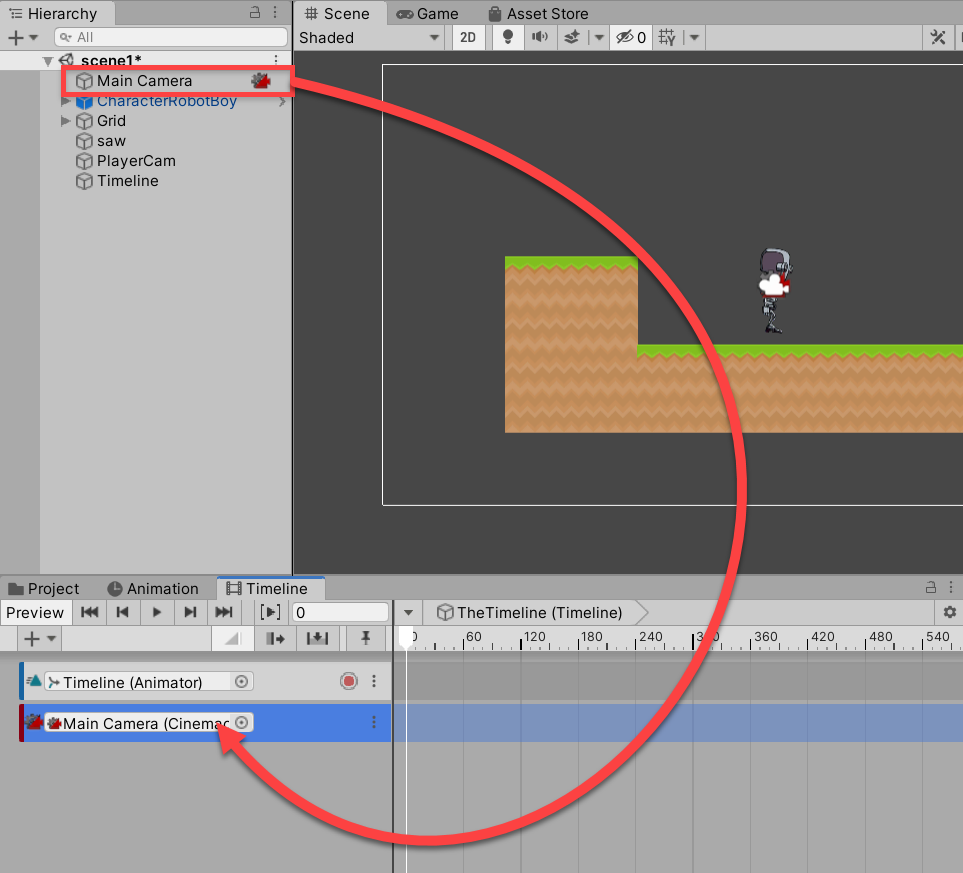
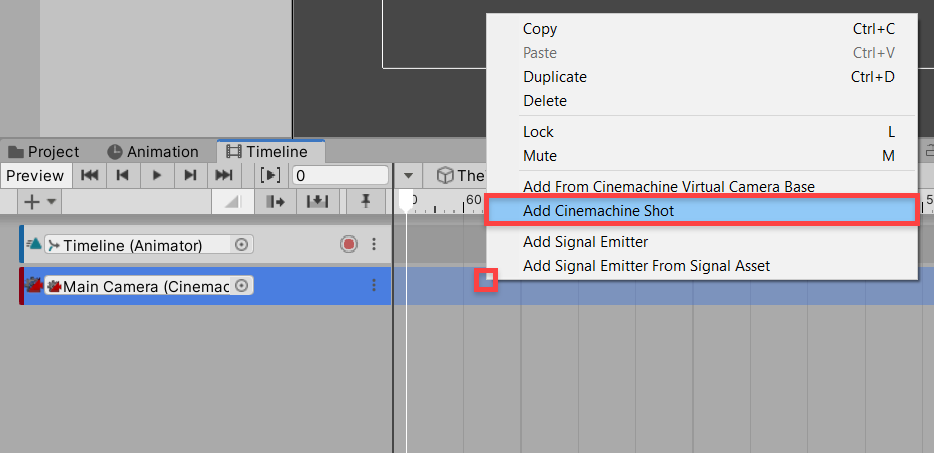
Then right-click and go to “Add Cinemachine Shot Clip”.
With this track, we can specify how long we want a certain camera to be active. Let’s create a new 2D camera and position it so that we can see the entire level. Name this one “FullLevel”.
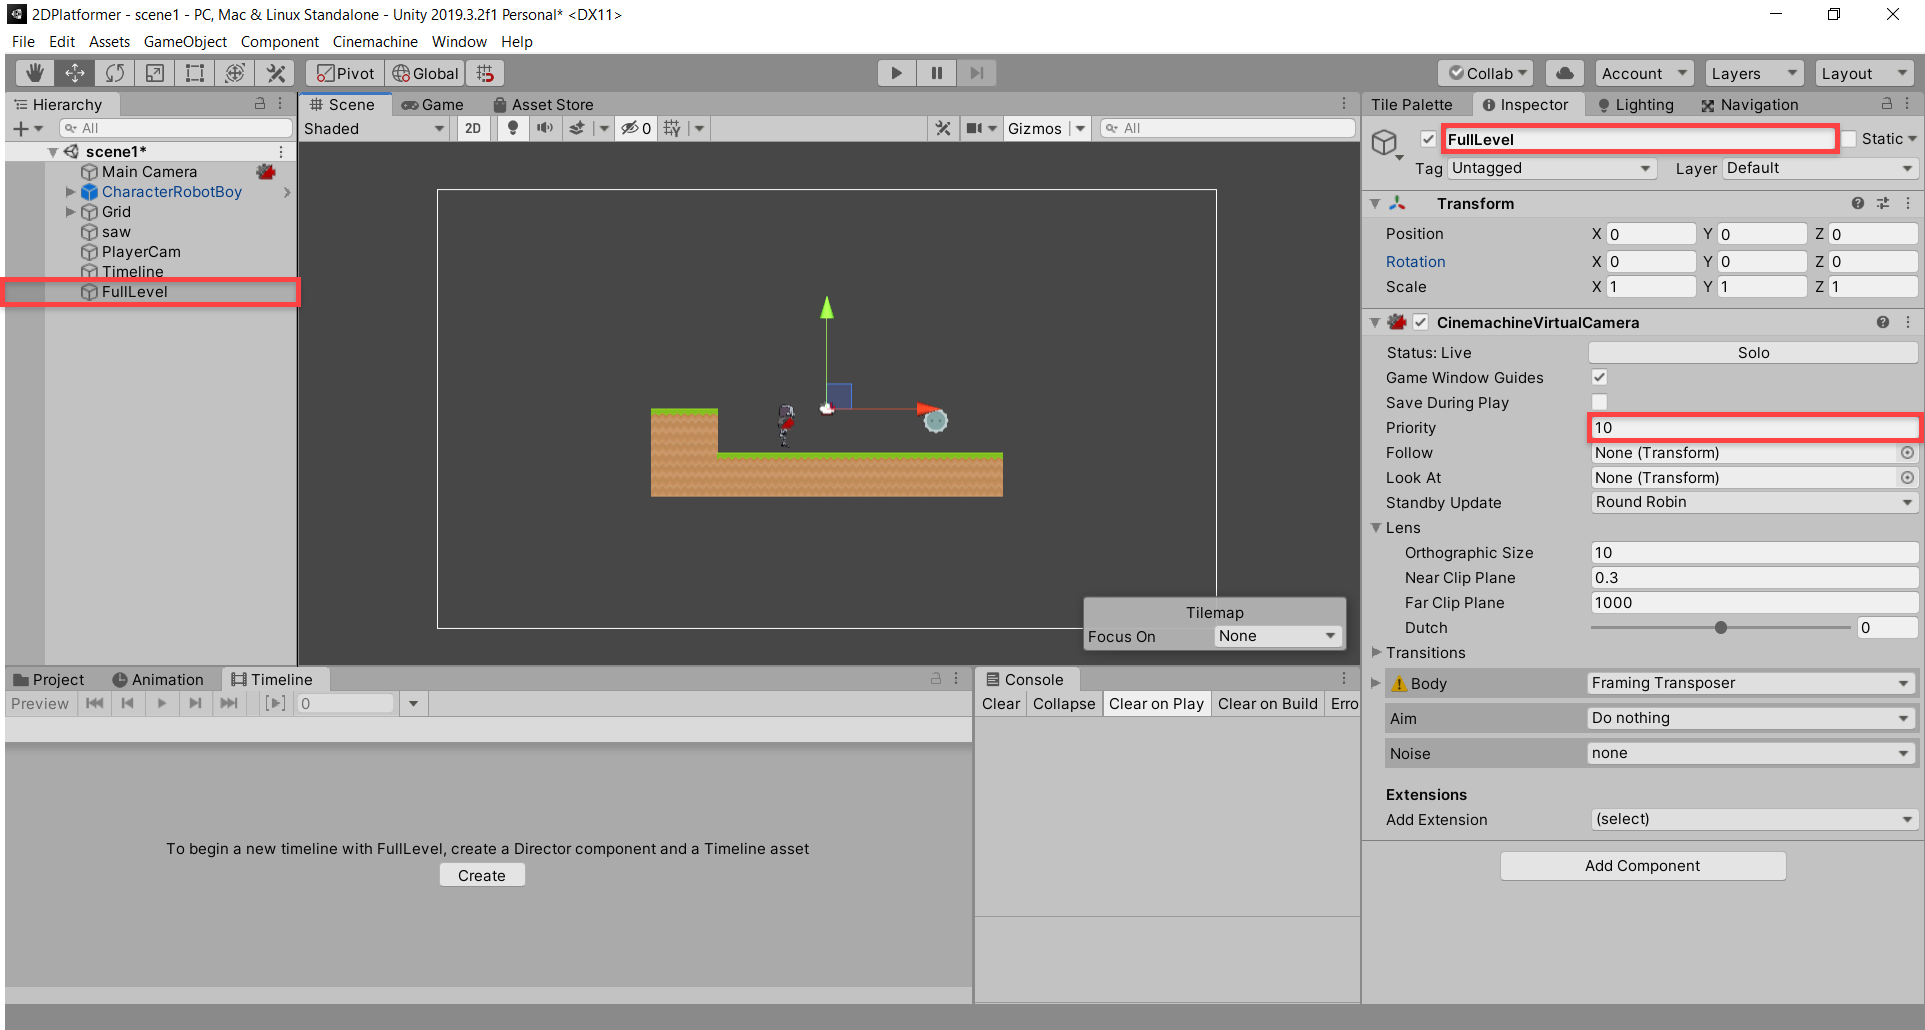
This will be our first camera so select the Cinemachine shot clip and drag this camera into the “Virtual Camera” field.
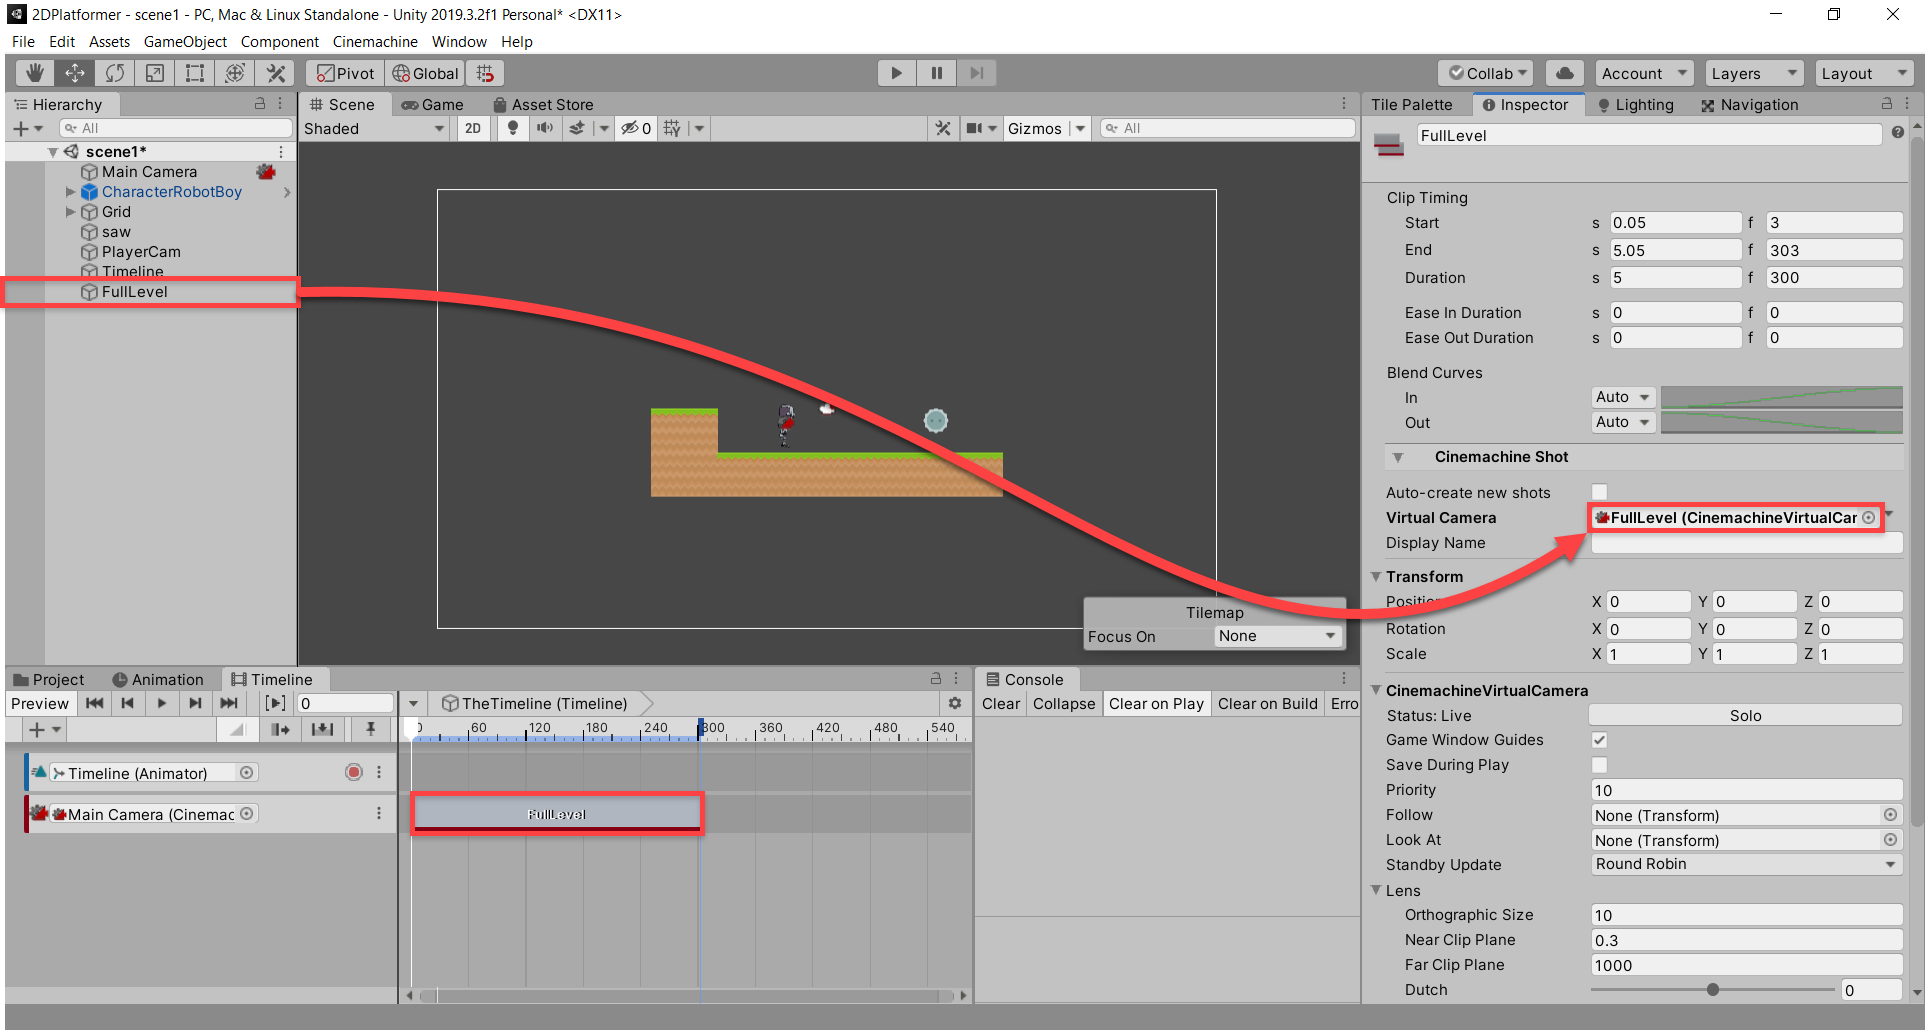
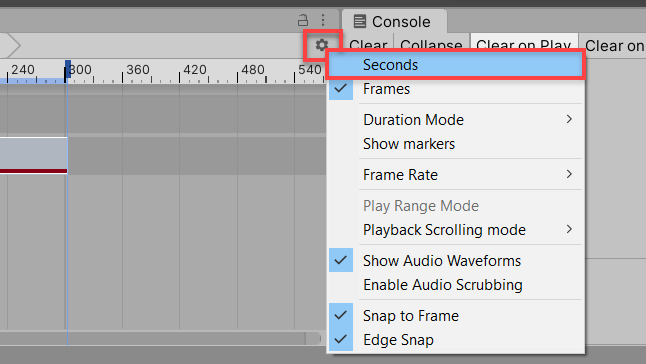
Set how long you want this camera to last. One thing that helps is to set the timescale to be in second and not frames.
Next, we need to create another clip for the player camera.
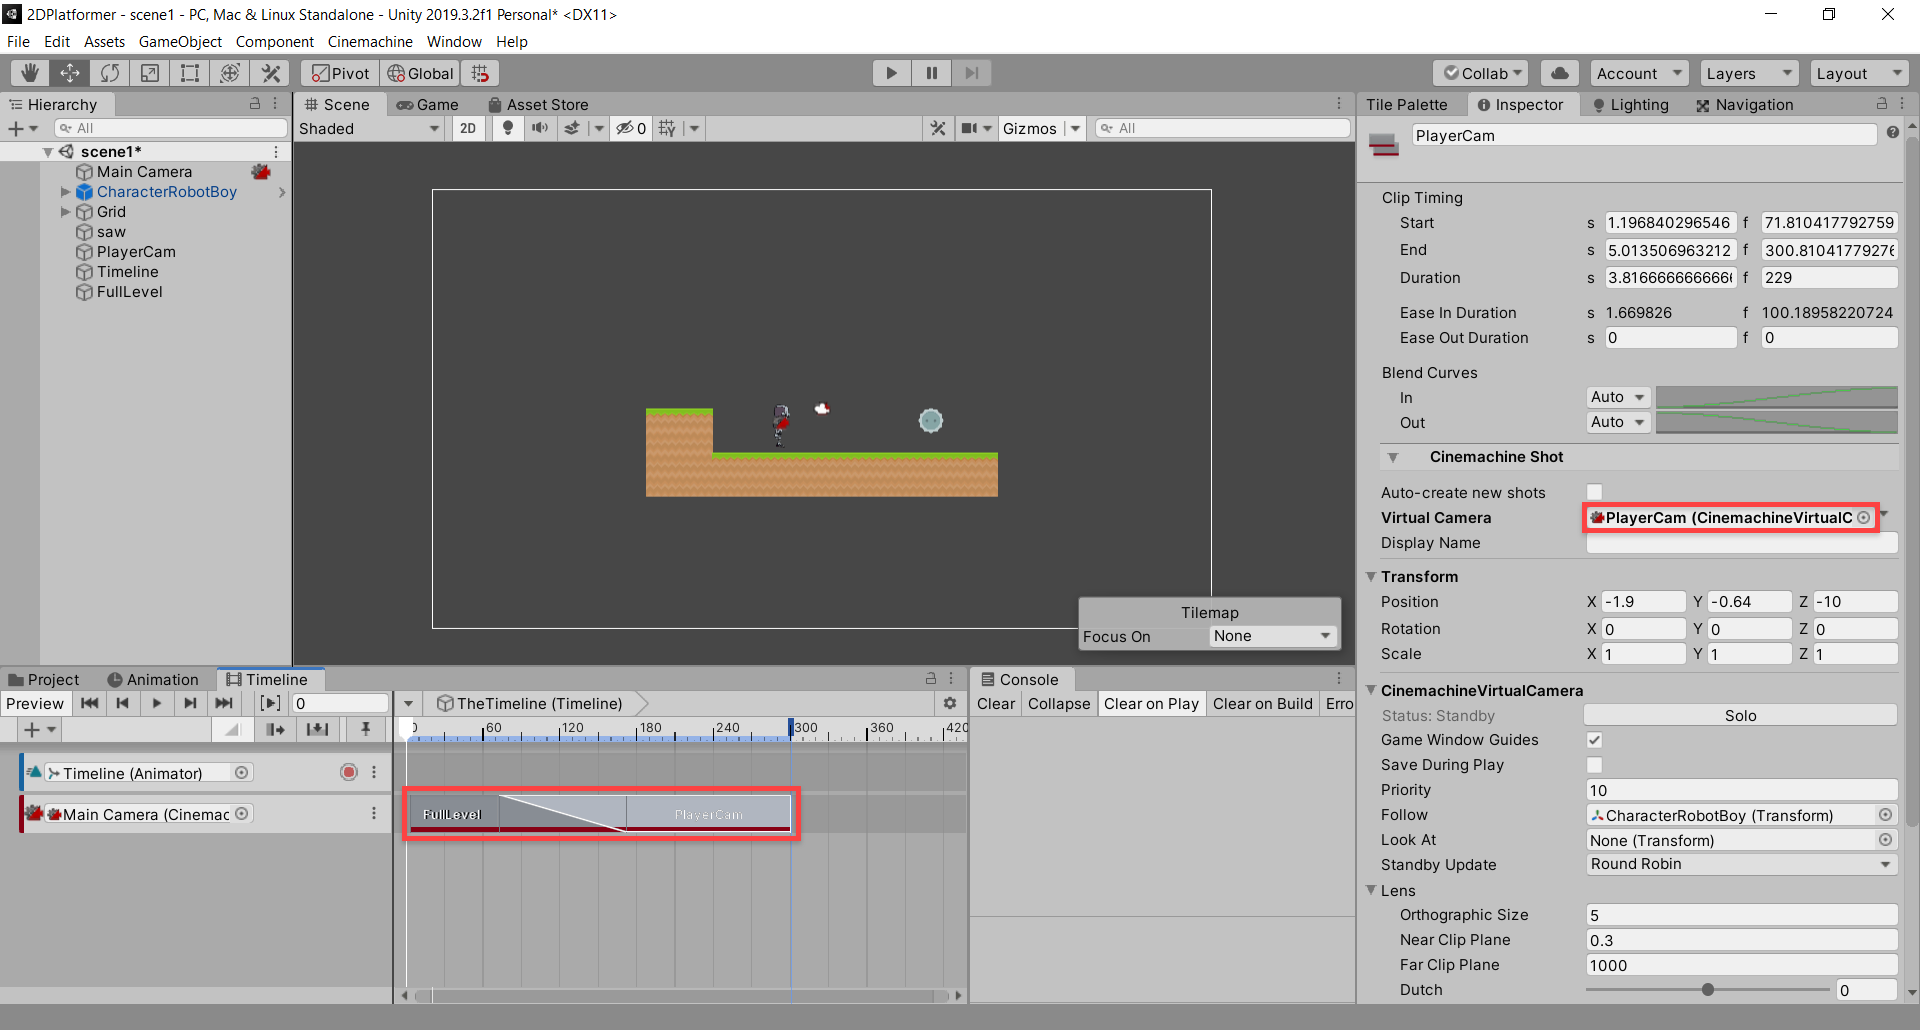
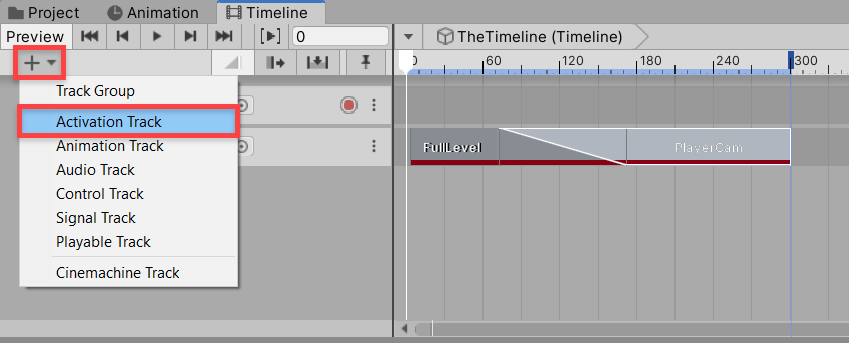
Place this at the end of the other clip. Drag either one of the clips on top of each other in order to smoothly transition. Now if you hit play, we have a pretty neat cutscene! But notice when the last track ends it goes back to the first camera instead of staying on the player. The easiest way to fix this is by deactivating the first camera after we have transitioned into the second. We can do this by using an Activation Track. As its title implies, the specified game object will stay active as long as the track persists. Create an Activation track…
…and drag the first camera into its field.
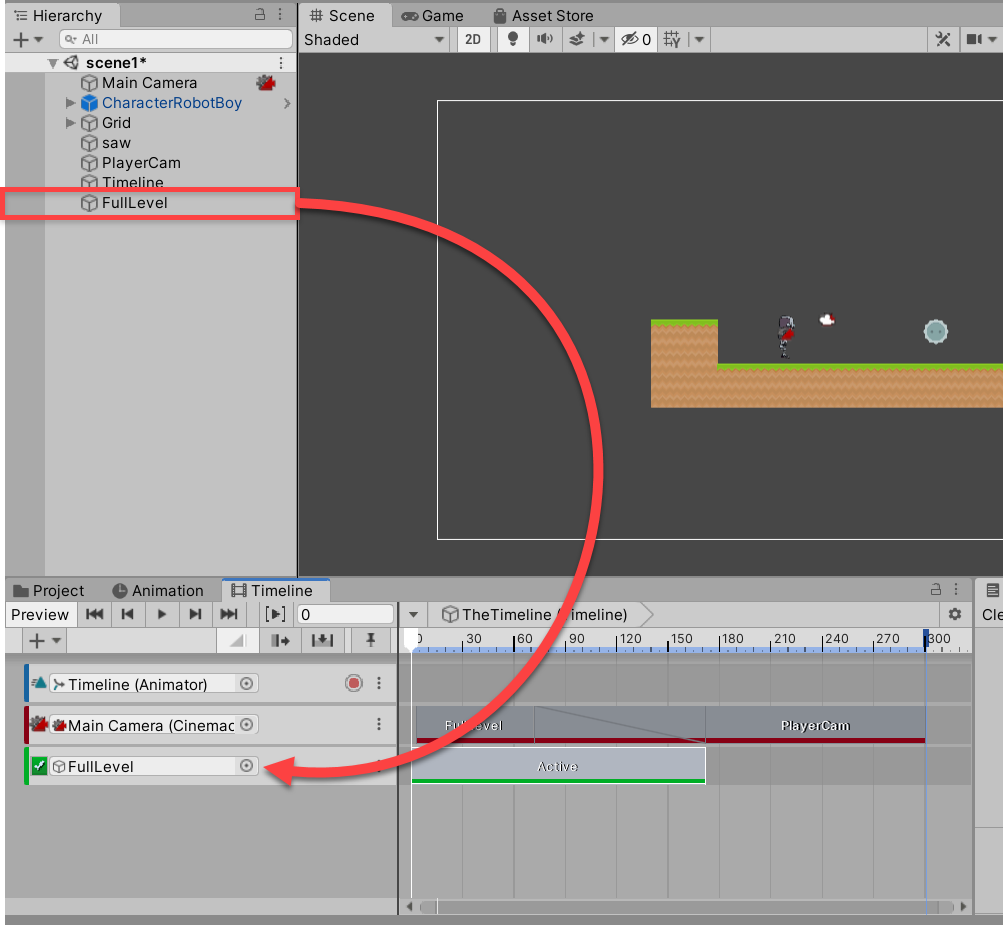
Then set the length to be a little after the transition. Now if you hit play, it all looks good and the player camera persists!
Outro
Congratulations on getting to the end of this tutorial. We now have a 2D platformer in our hands, a perfect addition for any portfolio!
However, as I said before, this is not meant to be exhaustive. In order to find out more about these tools, you can either read the tutorials linked above, or you can explore them on your own! We also recommend you check out our web class on camera following and our mini-course on 2D platformers as well, as they’re sure to help you cement the knowledge you’ve learned here!
However, expanding your knowledge is also important. So be sure to explore other useful Unity skills via other tutorials or courses. Don’t forget there are also solutions for classrooms wanting to teach Unity as well that can come in handy for any teachers out there!
In either case:
Keep making great games!
BUILD GAMES

FINAL DAYS: Unlock 250+ coding courses, guided learning paths, help from expert mentors, and more.